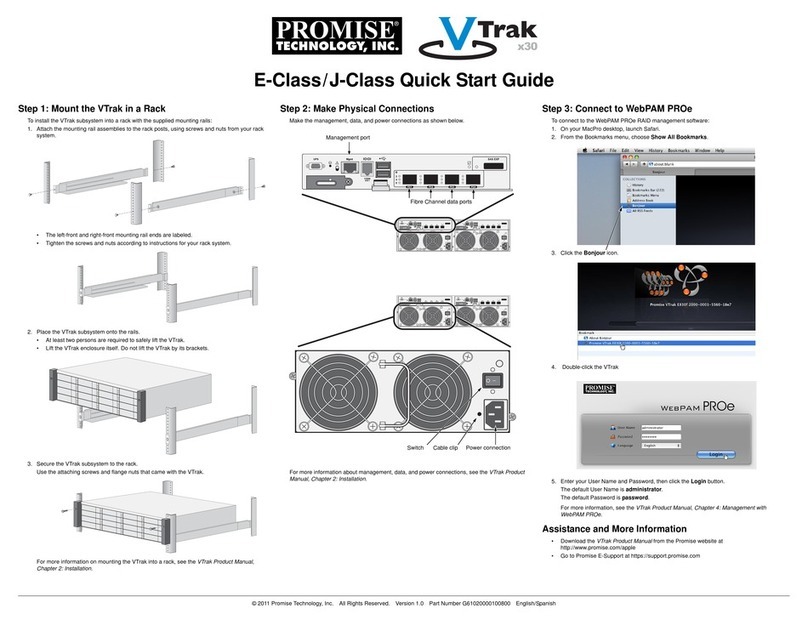
Promise VTrak J5000 Series User manual

VTrak J5000 Series
12G SAS JBOD enclosure
Product Manual
Version 1.3
© 2018 PROMISE Technology, Inc. All Rights Reserved.

ii
Warning
This is a Class A product. In a domestic environment this
product may cause radio interference in which case the user
may be required to take adequate measures.
Warning
The electronic components within the enclosure are sensitive
to damage from Electro-Static Discharge (ESD). Observe
appropriate precautions at all times when handling the
enclosure or its subassemblies.
Warning
Turn off the power and disconnect the power cord before
servicing this device.
Promise TechnologyVTrak J5000 Series

iii
Also included are four levels of notices:
Warning
A Warning noties you of probable equipment damage or loss of data,
or the possibility of physical injury, and how to avoid them.
Caution
A Caution informs you of possible equipment damage or loss of
data and how to avoid them.
Important
An Important message calls attention to an essential step or point
required to complete a task, including things often missed.
Note
A Note provides helpful information such as hints or alternative ways
of doing a task.
12G SAS JBOD User Guide

iv
About this MAnuAl
This Product Manual describes how to setup, use, and maintain the VTrak J5000 Series JBOD storage
enclosure. The manual is organized into chapters as follows:
• “Introduction” on page 1
• “Hardware Installation” on page 10
• “Managing the J5000 Series” on page 41
• “Maintenance” on page 60
• “ZoneConguration”onpage71
• “Contact PROMISE” on page 90
Promise TechnologyVTrak J5000 Series

About this MAnuAl �������������������������������������������������������������������������������������������������������������������iv
IntroductIon ............................................................................................................................ 1
Features ............................................................................................................................................................ 2
Vtrak J5000 serIes Models.............................................................................................................................. 2
specificAtions �������������������������������������������������������������������������������������������������������������������������� 3
front pAnel hArdwAre ����������������������������������������������������������������������������������������������������������� 5
reAr pAnel hArdwAre �������������������������������������������������������������������������������������������������������������� 7
sAs port identificAtion ������������������������������������������������������������������������������������������������������������������������� 7
Hardware InstallatIon ........................................................................................................... 10
unpAcking ������������������������������������������������������������������������������������������������������������������������������ 11
pAcking list �����������������������������������������������������������������������������������������������������������������������������������������11
Mounting the vtrAk enclosure in ArAck�������������������������������������������������������������������������������� 12
MountIng tHe Vtrak J5600/Vtrak J5800........................................................................................................ 13
MountIng tHe Vtrak e5300F/e5320F............................................................................................................... 16
instAlling physicAl drives ������������������������������������������������������������������������������������������������������ 19
drIVe slot nuMberIng ..................................................................................................................................... 20
InstallIng Your drIVes ..................................................................................................................................... 22
3�5-inch hArd disk drives������������������������������������������������������������������������������������������������������������������� 22
2�5-inch hArd disk drives������������������������������������������������������������������������������������������������������������������� 24
MAnAgeMent And dAtA connections ���������������������������������������������������������������������������������������� 26
seriAl cAble connections������������������������������������������������������������������������������������������������������������������� 27
seriAl connection settings ���������������������������������������������������������������������������������������������������������������� 27
PInout reFerences ............................................................................................................................................ 28
rJ-11 seriAl port pinout�������������������������������������������������������������������������������������������������������������������� 28
MAnAgeMent port rJ-45 pinout ����������������������������������������������������������������������������������������������������������� 28
db-9 pinout for rJ-11 to db-9 seriAl cAble�������������������������������������������������������������������������������������� 29
das connectIon ............................................................................................................................................. 30
bAsic dAs connection������������������������������������������������������������������������������������������������������������������������ 30
cascadIng das connectIon ............................................................................................................................. 31
redundant cascadIng das connectIon ........................................................................................................... 32

connect the power ��������������������������������������������������������������������������������������������������������������� 33
power on systeM�������������������������������������������������������������������������������������������������������������������� 34
Power on Vtrak J5300 ................................................................................................................................... 34
Front led beHaVIor aFter bootIng uP .............................................................................................................. 36
drive stAtus led behAvior After boot up����������������������������������������������������������������������������������������� 38
controller led beHaVIor ................................................................................................................................ 40
ManagIng tHe J5000 serIes ................................................................................................... 41
MakIng aserIal connectIon ............................................................................................................................. 42
loggIng Into tHe clI........................................................................................................................................ 42
Jbod utility cli������������������������������������������������������������������������������������������������������������������� 43
ManageMent VIa ssH connectIon ..................................................................................................................... 44
clI conVentIons .............................................................................................................................................. 44
cli coMMAnds������������������������������������������������������������������������������������������������������������������������������������� 45
enclosure ������������������������������������������������������������������������������������������������������������������������������������������� 47
event��������������������������������������������������������������������������������������������������������������������������������������������������� 51
link ���������������������������������������������������������������������������������������������������������������������������������������������������� 52
cAble �������������������������������������������������������������������������������������������������������������������������������������������������� 53
net ����������������������������������������������������������������������������������������������������������������������������������������������������� 54
route �������������������������������������������������������������������������������������������������������������������������������������������������� 55
fActorydefAults ��������������������������������������������������������������������������������������������������������������������������������� 56
uptiMe ������������������������������������������������������������������������������������������������������������������������������������������������ 56
ptiflAsh ���������������������������������������������������������������������������������������������������������������������������������������������� 57
ssh_Account �������������������������������������������������������������������������������������������������������������������������������������� 58
vpdr ��������������������������������������������������������������������������������������������������������������������������������������������������� 59
version ����������������������������������������������������������������������������������������������������������������������������������������������� 60
help/? ������������������������������������������������������������������������������������������������������������������������������������������������ 60

MaIntenance .......................................................................................................................... 61
replAcing Apower supply������������������������������������������������������������������������������������������������������� 62
Vtrak J5300 and Vtrak J5320 Psu .............................................................................................................. 62
reMoving the power supply ����������������������������������������������������������������������������������������������������������������� 62
instAlling the new power supply ���������������������������������������������������������������������������������������������������������� 63
Vtrak J5600 and Vtrak J5800 Psu .............................................................................................................. 64
reMoving the old power supply ����������������������������������������������������������������������������������������������������������� 64
instAlling the new power supply ���������������������������������������������������������������������������������������������������������� 64
replAcing Acontroller Module ��������������������������������������������������������������������������������������������� 65
reMoving the old i/o Module��������������������������������������������������������������������������������������������������������������� 65
instAlling Anew controller ���������������������������������������������������������������������������������������������������������������� 65
reMove controller ����������������������������������������������������������������������������������������������������������������������������� 66
systeM firMwAre updAte�������������������������������������������������������������������������������������������������������� 67
updAting firMwAre through seriAl port (rs232)������������������������������������������������������������������������������� 67
updAting firMwAre over ip network (tftp) �������������������������������������������������������������������������������������� 70
Zone conFIguratIon ............................................................................................................... 72
Zone conFIguratIon oPtIons............................................................................................................................. 73
Zoning configurAtion 0: noZoning����������������������������������������������������������������������������������������������������� 75
Zoning configurAtion 1����������������������������������������������������������������������������������������������������������������������� 78
Zoning configurAtion 2����������������������������������������������������������������������������������������������������������������������� 82
Zoning configurAtion 3����������������������������������������������������������������������������������������������������������������������� 86
contact ProMIse ............................................................................................................... 91

IntroductIon
VTrak J5000 Series 12G SAS JBOD enclosures are designed for high performance computing application of
mass capacity storage. Each dual-controller VTrak J5000 enclosure is equipped with eight 12G SAS (four per
controller) connections. The VTrak J5000 controller enables high-speed data rates via mini-SAS SFF-8644 cable
connections for direct attached servers or for mass storage expansion.
The main sections in this chapter include the following:
• “Features” on page 2
• “VTrak J5000 Series Models” on page 2
• “Specications”onpage3
• “Front Panel Hardware” on page 5
• “Rear Panel Hardware” on page 7
1
12G SAS JBOD User Guide

Features
• High performance SAS
• 12,16,or24hot-swappabledrivebaysina2U,3Uor4Uchassis
• Supports Serial Attached SCSI (SAS) and SATA drives simultaneously
• Dual active/active SAS JBOD I/O modules provide redundant data paths to ensure data availability
• Up to four wide SAS (x4) ports, two x8 wide ports or one x16 wide port per I/O module
• Redundant hot-swappable Field Replaceable Units (FRUs), including controller and Power Supply Units
(PSU)
• SES-2 compliant enclosure management
• Compatible with leading SAS & SATA drives, HBAs and RAID controllers
Vtrak J5000 series Models
Model Controller
Units Interface Number
of Drives
Power
Supplies
J5800 2SFF-8644 SAS 24 2
J5600 2SFF-8644 SAS 16 2
J5300 2SFF-8644 SAS 12 2
J5320 2SFF-8644 SAS 24 2
2
VTrak J5000 Series Promise Technology

SpecIfIcatIonS
VTrak J5000 2U/12 Bay 2U/24 Bay 3U/16 Bay 4U/24 Bay
Model J5300 J5320 J5600 J5800
Drive Support Upto123.5”
drives
Up to 24 2.5”
drives
Upto163.5”
drives Upto243.5”drives
12G,6G,3G,SAS,6G,3GSATAHDDandSSD*
External I/O Ports Each controller module has 4 SAS (SFF--8644) I/O ports for cascading JBODs and Direct
Attached Storage.
SAS Features ANSI T10 SAS 3.0 Compliant
Expander
Management
Features
Self--conguringexpandersupportsfullSASdomaintopologymanagement
SMP – SAS Management Protocol
In--band access to Expander and PHY information
Statistic counters
SES EM – SES Enclosure Management (ANSI T10 SES 2 Compliant)
SCSI SES command set over virtual SSP device
System Management
Management
Interfaces
LED status indicator support for drives, FRU and enclosure environmentals
In--band SES enclosure management alerts user to out of spec operation: thermal condition,
voltage condition or
component failures, protecting data and hardware
FullsubsystemmanagementCLIthroughout--of--bandRS232serialport
Enclosure
Management
Protocols
SES over in--band SAS
*
A mix of SAS and SATA drives simultaneously in the same enclosure might be supported, depending
on the model of HBA used, and the model and rmware of drives used. Please consult PROMISE before
mixing drive types in a single enclosure.
3
12G SAS JBOD User Guide

Model J5300 J5320 J5600 J5800
Mechanical Specications
Drive Support Upto123.5”
drives
Up to 24 2.5”
drives
Upto163.5”
drives Upto243.5”drives
Dimensions
(H x W x D)
88 mm (3.5 in),
447 mm (17.6 in),
507 mm (19.9 in)
88 mm (3.5 in)
447 mm (17.6 in)
427 mm (16.8 in)
131 mm (5.2 in)
447 mm (17.6 in)
507 mm (19.9 in)
174 mm (3.5 in)
447 mm (17.6 in)
507 mm (19.9 in)
Weight
20 (44 lbs) w/o drives
29 (64 lbs) w/drives
23(51lbs)w/odrives
28 (62 lbs) w/drives
29 (64 lbs) w/o drives
40 (88 lbs) w/drives
30(66lbs)w/odrives
47(104 lbs) w/drives
Voltage 100--240 Vac Auto--Ranging
Current
(Maximum) 15 A @ 110 VAC; 6 A @ 240 VAC
Power Conversion
Efciency >80% @ 110V (>20% load), >80% @ 240V (>20% load)
Temperature
Range Operational:5°to35°C,Non--Operational:--40°to70°C
Humidity Operational: 20% to 80% (Non--Condensing)
Non--Operational: 5% to 95% (Non--Condensing)
Acoustic Noise
Levels Less than 60 dB when ambient temperatures is below 25° C with HDD installed
Shock
Operating:Halfsinewave,5gn,11ms,X,Y,Zaxes,6surfaces,3times/eachsurface
Halfsinewave,30gn,11ms.X,Y,Zaxes,6surfaces,3times/eachsurface(withHDD
installed)
Vibration
Operating
Condition1:Sinewave0.5oct/min,5to500Hz,0.2G,30minforX,Y,Zaxis
Condition2:Random,3-10-200-500Hz,0.41grams,30minforX,Y,Zaxes
Non-Operating
Condition1:Sinewave0.5oct/min,5to500Hz,1G,30minforX,Y,Zaxes
Condition2:Random,5-80-350-500Hz,2.256grams,30minforX,Y,Zaxes
Regulatory
Certicate
EMC Class A: CE, FCC, VCCI, BSMI, RCM and KC
Safety: IEEE CB, UL/cUL and TUV
Environmental
Standards RoHS, GreenPC, WEEE
Power Supply Efcient80PLUSGOLDcertiedredundantPSU
4
VTrak J5000 Series Promise Technology

front panel Hardware
The front panel of VTrak J5000 enclosures provide access to storage disk drive carriers, a view of drive status
LED indicators located on the front of each drive carrier, the LED indicators for system monitoring.
See the illustrations of the front view of each model below.
VTrak J5320 front view
SSD drive carriers Drive carrier LEDs Enclosure Power
and Status LEDs
VTrak J5300 front view
Drive carrier LEDs Enclosure Power
and Status LEDs
HDD drive carriers
5
12G SAS JBOD User Guide

VTrak J5800 front view
Drive carrier LEDs Enclosure Power
and Status LEDs
HDD drive carriers
VTrak J5600 front view
Drive carrier LEDs Enclosure Power
and Status LEDs
HDD drive carriers
6
VTrak J5000 Series Promise Technology

rear panel Hardware
The rear panel of the VTrak J5000 features dual controllers for SFF-8644 SAS uplink connection (4 I/O ports
per controller), 1G network ports used for system monitoring, serial port management connection, two hot-
swappable power supplies, system cooling units, and power supply ON/OFF switches. For details about ports,
LEDs, connection types and other hardware setup information, please see “Hardware Installation” on page 10.
SAS port identificAtion
PleasetakeamomenttonotehowtheeightSASportsareidentiedintheconnectioninstructionsthatfollow.
SAS ports are numbered 1 to 4, left to right, for each controller module, the controller modules are also numbered
left to right.
The SAS port furthest left is identied as Controller 1: Port 1.
The SAS port furthest right is identied as Controller 2: Port 4.
See “Ports for in-band and out-of-band management connection on VTrak J5000 controller” on page 26 for
a closer look at the controller front panel.
VTrak J5800 front view
VTrak J5600 front view
VTrak J5800 rear view
PSU2
power insert
PSU1
power insert
PSU 2
ON/Off switch
PSU 1
ON/Off switch
Controller 1 Controller 2
7
12G SAS JBOD User Guide

VTrak J5600 rear view
Power insert
Power insert PSU 2
ON/Off switch
PSU 1
ON/Off switch
Controller 1 Controller 2
VTrak J5300 and VTrak J5320 rear view
PSU
ON/Off switch
PSU 1
ON/Off switch
PSU 2
power insert
PSU1
power insert
Controller 1 Controller 2
8
VTrak J5000 Series Promise Technology

WArrAnty And Support
WArrAnty
• Three year complete system limited warranty
• Optional 2-year extended warranty
• Optional onsite parts replacement program
PromiseTechnology,Inc.(“Promise”)warrantsthatforthree(3)yearsfromthetimeofthedeliveryofthe
product to the original end user
a)theproductwillconformtoPromise’sspecications;
b) the product will be free from defects in material and workmanship under normal use and service.
This warranty:
a) applies only to products which are new and in cartons on the date of purchase;
b) is not transferable;
c) is valid only when accompanied by a copy of the original purchase invoice;
d) is not valid on spare parts.
This warranty shall not apply to defects resulting from:
a)improperorinadequatemaintenance,orunauthorizedmodication(s),performedbytheend
user;
b)operationoutsidetheenvironmentalspecicationsfortheproduct;
c) accident, misuse, negligence, misapplication, abuse, natural or personal disaster, or maintenance
by anyone other than a Promise or a Promise authorized service center.
9
12G SAS JBOD User Guide

Hardware InStallatIon
This chapter presents the basics on unpacking the VTrak J5000 Series enclosure and mounting it in an
equipment rack, making the connections for data and management paths and connecting the power. It also
describes how to power on the system and what to look for while it is powering up.
The main sections in Hardware Setup include the following:
• “Unpacking” on page 11
• “Mounting the VTrak enclosure in a rack” on page 12
• “Installing Physical Drives” on page 19
• “Management and Data Connections” on page 26
• “Connect the Power” on page 33
• “Power on system” on page 34
Depending on the details of your order, the VTrak J5000 enclosure might be shipped with hard drives installed,
or it might require that you install hard drives. The section “Installing Physical Drives” on page 19 provides
instruction for installing hard disks.
10
VTrak J5000 Series Promise Technology

unpackIng
pAcking LiSt
The VTrak J5000 Series box contains the following items:
• One VTrak J5000 Series Unit
VTrak J5800, VTrak J5600,
VTrak J5300, or VTrak J5320
• One printed Quick Start Guide
• Two 1.5m (4.9 ft) Power cords
• Adjustable rack mounting rail assembly
• Two SFF-8644 SAS cables
• Two RJ11 to DB9 adapter cables
Warning
The electronic components within the VTrak enclosure
are sensitive to damage from Electro-Static Discharge
(ESD). Observe appropriate precautions at all times
when handling the VTrak or its subassemblies.
11
12G SAS JBOD User Guide

Cautions
• Donotpopulateanyunitwithharddrivesuntilithasbeensecurely
installedintherack.
• Atleasttwopersonsarerequiredtosafelylift,place,andattachthe
unitintoaracksystem.
• Donotliftormovetheunitbythehandles,powersuppliesorthe
controllerunits.Holdthesystemitself.
• Donotinstalltheunitintoarackwithoutrailstosupportthe
system.
• Onlyaqualiedtechnicianwhoisfamiliarwiththeinstallation
procedureshouldmountandinstalltheunit.
• Mounttherailstotherackusingtheappropriatescrewsandange
nuts,fullytightened,ateachendoftherail.
• Donotloadtherailsunlesstheyareinstalledwithscrewsas
instructed.
• TherailsavailableforthePROMISEVTrakunitaredesignedtosafely
supportthatPROMISEVTrakunitwhenproperlyinstalled.Additional
loadingontherailsisatthecustomer’srisk.
• PROMISETechnology,Inc.cannotguaranteethatthemountingrails
willsupportyourPROMISEVTrakunitunlessyouinstallthemas
instructed.
Caution
Tolightentheenclosure,removethepowersupplies,andremoveall
harddrivecarriers.Replacethepowersuppliesanddrivecarriers
aftertheunitismountedinyourrack.
MountIng tHe Vtrak encloSure In arack
This section provides instructions for installing the VTrak J5000 enclosure into a rack
12
VTrak J5000 Series Promise Technology

Support ange on the front
end of each rail
Front right label
Front left label
Guide pins on rails align with holes in the rack post
Installing the rails onto the rack
Caution
Tolightentheenclosure,removethepowersupplies,andremoveall
harddrivecarriers.Replacethepowersuppliesanddrivecarriers
aftertheunitismountedinyourrack.
To install the 3U/4U VTrak enclosure into a rack with the supplied mounting rails:
1. Checkthetofthemountingrailsinyourracksystem.
2. Adjust the length of the mounting rails as needed.
• The rear rail slides inside the front rail. The rails are composed of two sliding sections and do not require
adjusting screws.
• The front-left and front-right mounting rail ends are labeled.
• Be sure the front rail support is on the bottom facing inward.
Mounting the Vtrak J5600/Vtrak J5800
• All rail ends, front and rear, attach at the outside of the rack posts.
• The guide pins at the rail ends align with the holes in the rack posts.
• Usetheattachingscrewsandangenutsfromyourracksystem.Tightenthescrewsandnutsaccording
to instructions for your rack system.
13
12G SAS JBOD User Guide
This manual suits for next models
4
Table of contents
Other Promise Enclosure manuals
