Protect Xtratus User manual

Version 2.1
Installation
Manual
Installation Manual
Manuel d’installation
Manuale installatore
Manual de la instalación
Installationsmanual
F
I
E
GB
DK
PROTECTGLOBAL.COM

PROTECT Xtratus®
2
Table of contents
1. Begin here – very important if you are installing a PROTECT Fog Cannon for the rst time
Please read the installation manual . . . . . . . . . . . . . . . . . . . . . . . . . . . . . . . 4
Removal of cover ........................................... 4
Mounting the Fog Cannon ...................................... 5
Positioning ............................................... 6
Safety instructions .......................................... 7
Inserting/replacingtheuidcan ................................. 7
2. Connections, setting and test
Printed circuit board ......................................... 9
Typical installations .........................................10
Dipswitch ................................................11
Inputs / Outputs............................................12
Fog volume ...............................................13
Connecting the battery .......................................14
Test ....................................................15
3. Hand over
Information and registration ...................................16
Service and maintenance agreement ..............................17
4. In case of faults
Faultnding ..............................................19
Fuses ...................................................19
5. Warnings . ..................................................25
Tables des matières
1. Important – si vous installez pour la première fois un générateur de
fumée
Lisez s’il vous plait le manuel d’installation.......................... 4
Démontage du capot ......................................... 4
Montage du canon à brouillard .................................. 5
Emplacement ............................................. 6
Instructions de sécurité . . . . . . . . . . . . . . . . . . . . . . . . . . . . . . . . . . . . . . . 7
Mise en place/remplacement de la recharge ......................... 7
2. Connections, réglages et tests
Carte à circuit imprimé ....................................... 9
Installation type ............................................10
Dipswitch ................................................11
Entrées / Sorties ...........................................12
Volume de fumée ...........................................13
Branchement de la batterie (Le cas échéant).........................14
Essai ...................................................15
3. Remise
Information et enregistrement ..................................16
Recommandations de Service et de Maintenance ......................17
4. En cas de défauts
Rechercher les défauts .......................................19
Fusibles .................................................19
5. Avertissements ...............................................25
Indice
1. Importante – per chi installa un generatore di nebbia per la prima volta
Consultazione del manuale..................................... 4
Apertura del contenitore ...................................... 4
Installazione del sistema nebbiogeno .............................. 5
Posizionamento ............................................ 6
Sicurezza ................................................ 7
Collegamento/sostituzione di PROTECT Fog Spray ..................... 7
2. Collegamenti, impostazioni e test
Circuito stampato ........................................... 9
Tipica installazione ..........................................10
Dipswitch ................................................11
Ingressi / Uscite ............................................12
Volume della nebbia .........................................13
Collegamento della batteria ....................................14
Test ....................................................15
3. Consegna dell’impianto
Informazione e registrazione ...................................16
Contratto di manutenzione ....................................17
4. In caso di funzionamento anomalo
Identicazioneerrore ........................................19
Fusibili ..................................................19
5. Avvertenze . ................................................25
F
I
GB

PROTECT Xtratus®3
Contenido
1. Empezar por aquí – importante si es su primera instalación de un generador de niebla
Por favor lea detenidamente el manual de instalación................... 4
Retire las cubiertas ......................................... 4
Montaje de los anclajes ....................................... 5
Colocación ............................................... 6
Instrucciones de seguridad .................................... 7
Inserte/reemplaceelcontenedordeuido.......................... 7
2. Conexiones, conguración y prueba
Placa de circuito impreso (PCB).................................. 9
Instalación típica ...........................................10
Dipswitch ................................................11
Entradas / Salidas...........................................12
Volumen de niebla ..........................................13
Conexión de la batería........................................14
Prueba ..................................................15
3. Entrega
Información y registro .......................................16
Acuerdo de servicio y mantenimiento ..............................17
4. En caso de averías
Comprobación de la avería .....................................19
Fusibles .................................................19
5. Advertencias . ...............................................25
Indholdsfortegnelse
1. Start her – Særlig vigtigt, når du monterer første gang
Start med at læse manualen.................................... 4
Afmontering af kabinet ....................................... 4
Montering og mål ........................................... 5
Placering ................................................ 6
Sikkerhedsinstrukser ......................................... 7
Isætning/udskiftning af væskebeholder ............................ 7
2. Tilslutning, indstillinger og test
Printkort ................................................. 9
Typisk installation...........................................10
Dipswitche/tågetider ........................................11
Indgange / Udgange .........................................12
Tågevolumen ..............................................13
Tilslutning af batteri .........................................14
Test ....................................................15
3. Aevering
Information og registrering ....................................16
Serviceaftale ..............................................17
4. I tilfælde af fejl
Fejlnding................................................19
Sikringer .................................................19
5. Advarsler...................................................25
DK
E

PROTECT Xtratus®
4
As an installer you must participate in a
PROTECT training session.
Avant l’installation, les installateurs doivent suivre
les cours techniques de PROTECT.
Suggeriamo la partecipazione ad un corso di
formazione organizzato da PROTECT ITALIA
Como instalador, debe participar en un curso de
capacitación de PROTECT.
Som installatør skal du have deltaget i et
PROTECT træningskursus.
1.
Begin here - very important if you are installing a PROTECT Fog Cannon for the rst time
F: Commencez ici – Particulièrement important quand vous installez un canon à fumée pour la première fois
I: Importante: per chi installa un generatore di nebbia per la prima volta
E: Empezar por aquí – importante si es su primera instalación de un generador de niebla
DK: Start her – Særlig vigtigt, når du monterer første gang
DK
I
GB
F
E
1
I
F
E
When unpacking the fog cannon please read the
installation manual carefully.
Quand vous déballez l’appareil, lisez s’il vous plait le
manuel d’installation avec attention.
Leggere attentamente il manuale installatore prima di iniziare
l’installazione.
Antes de desembalar el equipo, por favor lea
detenidamente el manual de instalación.
Før du pakker tågekanonen ud, bedes du læse installations-
manualen omhyggeligt.
DK
GB 2
1
3 4
2
I
F
E
DK
GB
Cross-point/phillips screwdriver
Removal of cover. Remove the two screws and remove the
metal plate in the bottom of the fog cannon. Now also
remove the next two screws appearing. Now push the cover
upwards and lift.
Démontage du capot. Enlevez les deux vis et la plaque métal-
lique au fond du canon à brouillard. Retirez également les
deux autres vis qui apparaissent à présent. Poussez le cou-
vercle vers le haut et soulevez-le.
Rimozione del coperchio. Rimuovere le due viti e il piatto di
metallo nella parte inferiore del generatore nebbiogeno.
A questo punto, rimuovere anche le due viti sottostanti.
Spingere il coperchio verso l'alto e sollevare.
Extracción de la cubierta. Extraiga los dos tornillos y retire
la placa metálica situada en la parte inferior del generador
de niebla. Extraiga los dos tornillos que aparecerán a
continuación. Empuje hacia arriba la cubierta y levántela.
Afmontering af kabinet. Skruerne i bunden af maskinen skrues
ud – fjern derefter bundpladen. De næste to skruer i bunden
skrues også ud. Skub nu kabinettet opad og løft.
3

PROTECT Xtratus®5
Fix the fog cannon temporarily against the wall/ceiling and
mark the drilling holes. Mount the fog cannon and the cabinet.
Plaquez le Cannon à brouillard au mur/plafond et tracez les
emplacements des trous à percer. Fixez le Cannon à Brouillard
et son capot.
Poggiareilnebbiogenoallapareteoalsofttoesegnareifori
perilmontaggio.Altermineprocedereconilssaggio.
Fije el cañón de niebla temporalmente contra la pared / techo
ymarquelosoriciosdeperforación.Monteelcañóndela
niebla y la carcasa.
Hold tågekanonen op mod væg/loft og marker til skruer.
Når tågekanonen er skruet op, kan kabinettet monteres.
Measurements for installation of the fog cannon.
Dimensions du générateur de fumée lors du montage.
Dimensioni del generatore nebbiogeno.
Medidas del generador de niebla.
Tågekanonens ophængsmål.
DK
I
I
I
GB
F
F
F
E
E
E
4
DK
GB
PROTECT Xtratus®
650 mm
140 mm
148 mm
9,5
X
Y
Z
KG
To ensure the best possible coverage the fog needs free
passage.
Pour assurer une couverture optimale, la fumée doit être
expulsée sans encombre.
Il generatore di nebbia deve essere posizionato in modo da
coprire istantaneamente i beni da proteggere.
Para asegurar una cobertura óptima, es importante
que la niebla circule libremente al dispararse.
For at sikre bedst mulig dækning skal tågen affyres, så den
har et frit forløb.
DK
GB 6
5

PROTECT Xtratus®
6
Prevent sabotage by installing the fog cannon
correctly out of reach and avoid blocking exit routes.
Eviter les risques de sabotage en installant le générateur cor-
rectement hors de portée, ne pas couvrir les voies de fuite.
Evitate la possibilità di sabotaggio installando il generatore di nebbia
fuori portata. La nebbia non deve ostruire le vie di fuga
Evite la posibilidad de sabotaje mediante una
instalación correcta y fuera de alcance, y evite cubrir
las posibles vías de escape.
Undgå sabotagemulighed ved korrekt montage uden for
rækkeviddesamtundgåatdækkeugtveje.
DK
GB 8
30°
The fog cannon must be placed to ensure
immediate coverage of possible access points
Placer le générateur de fumée de façon à couvrir
immédiatement toute voie d’accès.
Per assicurare una buona copertura, la nebbia non deve incontrare
ostacoli e bloccare subito l'accesso ai beni.
EI generador de niebla debe colocarse de manera que las
posibles vías de acceso se cubran inmediatamente.
Tågekanonen placeres, så mulige adgangsveje
dækkes øjeblikkeligt.
DK
I
I
I
GB
F
F
F
E
E
E
7
Min. installation distance from objects.
Ecart minimal entre le générateur et d’autres objets.
Distanza minima dai beni consigliata.
Distancia de instalación mín. respecto a otros objetos.
Min. installationsafstand til genstande.
DK
GB 9

PROTECT Xtratus®7
Min.35 cm.
For horizontal mounting, place the fog cannon as shown in
the picture.
Montage horizontal: installer le générateur de fumée
comme illustré.
Posizionamento corretto e distanze minime da pareti e sof-
tti.
En caso de montaje horizontal, el generador de niebla
debe colocarse tal como aquí se indica.
Ved horisontal montage placeres tågekanonen som vist
her.
DK
I
I
GB
F
E
10
Min. safety distance – risk of scalding.
Distance de sécurité minimum
– danger d’échaudage.
Distanza minima di sicurezza
- ATTENZIONE: pericolo ustione.
Distancia de seguridad mínima
- peligro de quemaduras.
Min. sikkerhedsafstand - fare for skoldning.
DK
GB
F
E
11
E
I
F
DK
GB 12 1
2
3
Min. 10 cm
Min. 50 cm
Inserting/replacingtheuidcan.Firstdisconnectthe
power. Remove the two screws and remove the metal plate
inthebottomofthefogcannon.Removeemptyuidcan
if any.
Insertion/remplacement de la recharge. Débranchez
l'alimentation. Enlevez les deux vis et la plaque métallique
au fond du canon à brouillard. Retirez la recharge vide, le cas
échéant.
Inserimento/sostituzione di PROTECT Fog Spray. Disalimentare
il nebbiogeno. Svitare le due viti dalla piastra di metallo alla
base del nebbiogeno e rimuoverla. Inserire ora il serbatoio
eventualmente estraendo prima quello da sostituire.
Inserción/sustitucióndelcontenedordeuido.Enprimerlugar,
desconecte la alimentación. Extraiga los dos tornillos y retire
la placa metálica situada en la parte inferior del generador de
niebla.Retireelcontenedordeuidovacío,silohay.
Isætning/udskiftning af væskebeholder. Kobl først strømmen
fra. Skruerne i bunden af maskinen skrues ud – fjern
derefter bundpladen. Fjern evt. tom væskebeholder.

PROTECT Xtratus®
8
I
Scan the code with a smartphone to watch how to
replacetheuidcan.
Scannez ce code avec votre Smartphone et regardez comment
remplacer la recharge.
Scannerizza il QR Code con il tuo Smartphone per ricevere
istruzioni su come sostituire PROTECT Fog Spray.
Escanee el código con un Smartphone para visualizar cómo
sustituirelcontenedordeuido.
Scan koden med en smartphone for at se, hvordan man skifter
væskebeholder.
DK
GB
F
E
13

PROTECT Xtratus®9
2. Connections, setting and test
F: Connections, réglages et tests
I: Collegamenti, impostazioni e test
E: Conexiones,conguraciónyprueba
DK: Tilslutning, indstillinger og test
GB: Printed circuit board F: Carte à circuit imprimé (PCB) I: Circuito stampato
E: Placa de circuito impreso (PCB) DK: Printkort
GB: Voltage F: Tension I: Alimentazione E: Tensión DK: Spænding
PROTECT Xtratus®
230 V ac (115/130 V ac)
GB: Effect F: Puissance I: Assorbimento E: Consumo DK: Effekt
PROTECT Xtratus®
1000 W
Output 1
Output 2
Arm
Trig 1
Trig 2
-
+
9V Out
F3F4
123
45
ON
Reset
Connect
Buzzer DipSw
Heat N L G
PCB
Xtratus
Temp
Motor-batt-sw
Diode
PROTECT Xtratus®
10
Output 1
Output 2
Arm
Trig 1
Trig 2 12V Out
-
+
9V
-
+
PIR
Movement Detector
Alarm panel
Fog Cannon
Xtratus
Alarm trig
Normally Open
when alarm system
is ARMED (Night)
Closed when alarm
system is disARMED
(day)
-
+
9V Out
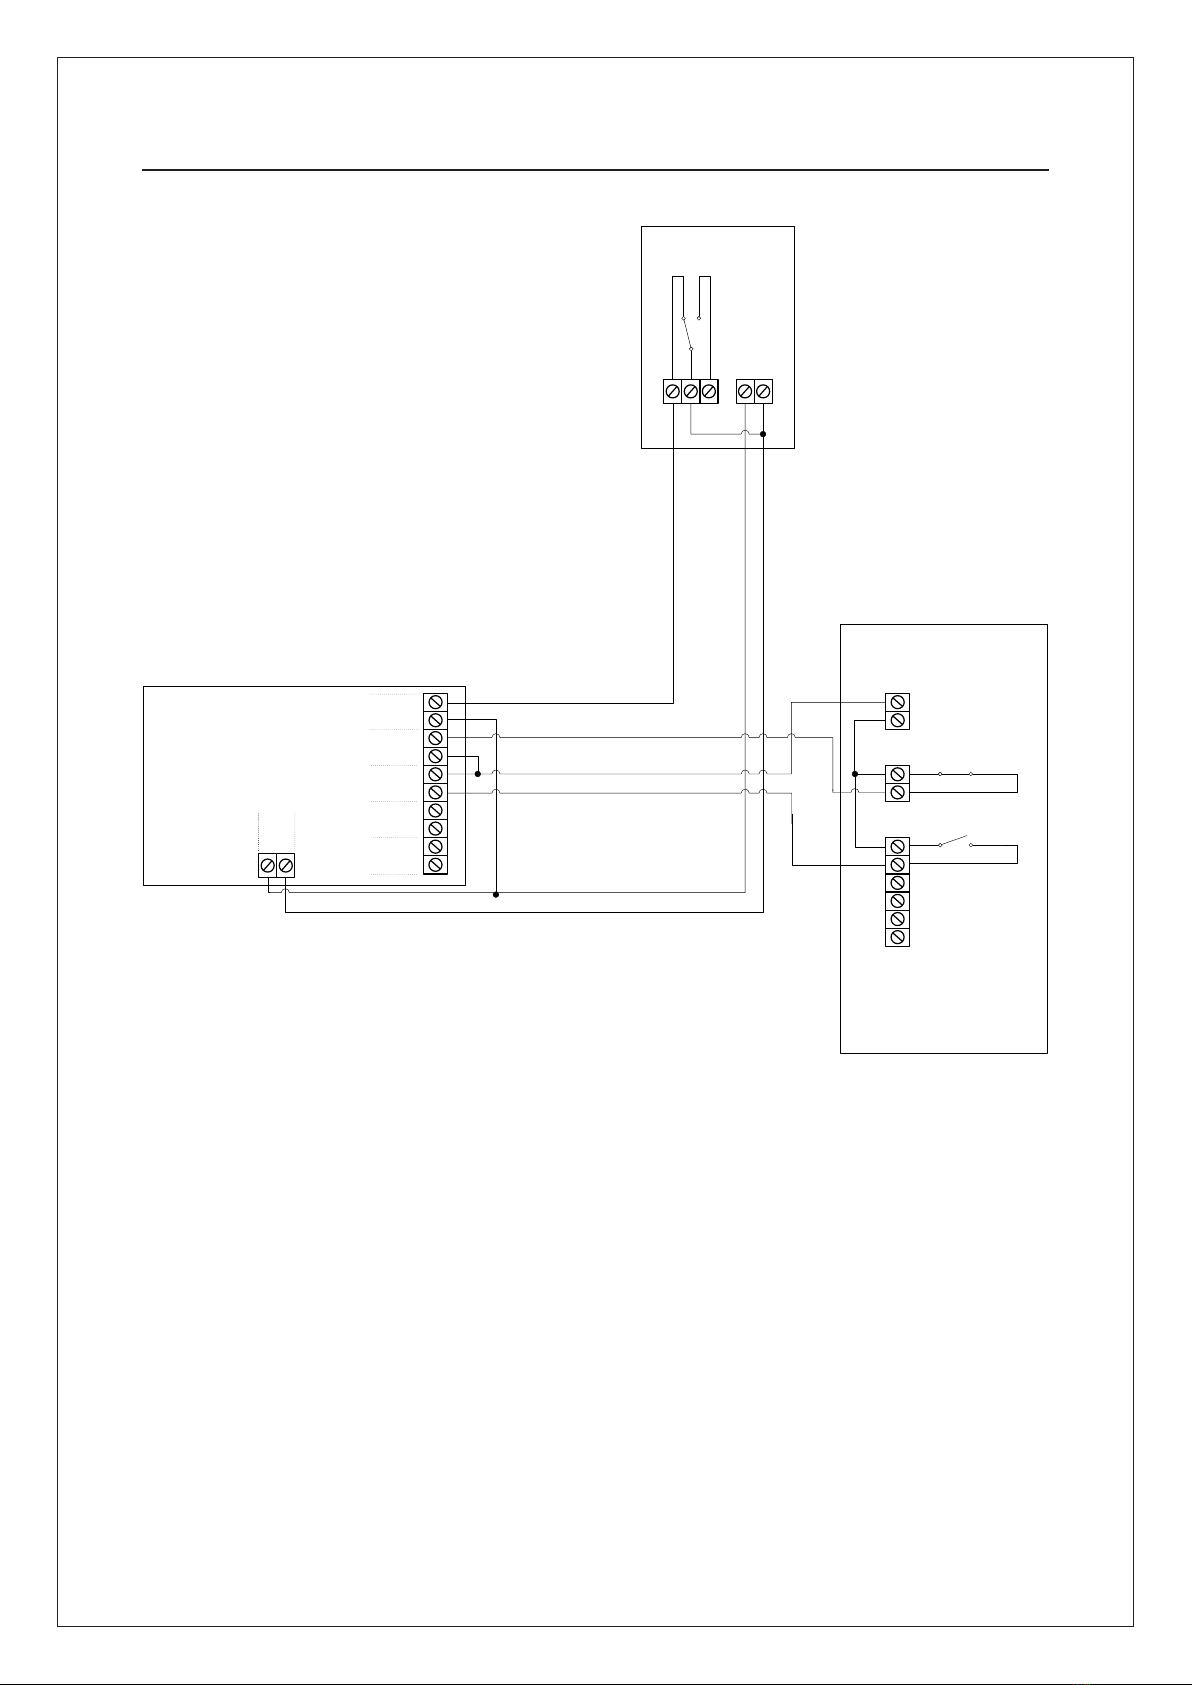
GB: Typical Installation
F: Installation type
I: Installazione tipica
E: Instalación típica
DK: Typisk Installation
GB: Connection to alarm panel
(typical installation)
F: Connexion au tableau d’alarme
(installation type).
I: Collegamento alla centrale
d'allarme (installazione tipica).
E: Conexión al panel de alarma
(instalación típica).
DK: Tilslutning til alarmpanel (typisk
installation).

PROTECT Xtratus®11
1. GB: Dipswitch F: Dipswitch I: Dipswitch E: Dipswitch DK: Dipswitch
DIP GB: Function F: Fonction I: Funzione E: Función DK: Funktion
1
Heat disable
On = The heating element dis-
connects if disarm is activated
OFF = Constantly heating
Chauffage désactivé
On = l’élément chauffant s’éteint
si “disarm” est activé
OFF = Chauffe Permanente
ON = l’elemento termico è
disattivato quando è attivo il
comando “disarm”
OFF = Riscaldamento
sempre attivo.
Desactivar calentamiento
ON = el elemento térmico
se desconecta
OFF = calentar constantemente.
Heat disable
ON = varme afbrydes,
når disarm aktiveres
OFF = Konstant varme
2Trig 1* Trig 1* Trig 1* Trig 1* Trig 1*
3Trig 2* Trig 2* Trig 2* Trig 2* Trig 2*
4Reserved. Leave in OFF position Réservé.
Doit rester sur la position OFF
Riservato.
Lasciare in posizione OFF
Reservado. Mantener en posición
OFF
Reserveret.
Sættes i OFF position
5
Error indicator/buzzer
ON = Beeper/buzzer
connected
Détection d’erreur/buzzer
ON = bipeur/buzzer activé
Segnalatore di errore/buzzer
ON = buzzer inserito
Indicador de error/zumbador
ON = localizador/zumbador
conectado
Fejlmelder/buzzer
ON = lydgiver/buzzer tilkoblet
* ON = normal open / normal ouvert / normalmente assente / normal abierta / aktiv slutte.
OFF = normal closed / normalement fermé / normalmente presente / normal cerrada / aktiv bryde.

PROTECT Xtratus®
12
GB: Inputs F: Entrées I: Ingressi E: Entradas DK: Indgange
GB F I E DK
Tamper
Potential-free switches activate
(open) when the covers are
removed. They can be
used in the alarm system’s
tamper circuit.
Des contacts libres sont installés
et sont activés (ouverts) lorsque
les couvercles sont enlevés.
Ils peuvent être utilisés dans
le circuit tamper du système
d’alarme.
I contatti puliti si attivano
(aprono) alla rimozione del
coperchio. Si possono collegare
al circuito antisabotaggio del
sistema di allarme.
Las conexiones libres de
potencial se activan (se abren)
al desmontarse las tapas y
pueden emplearse en el circuito
tamper de la instalación de
alarma.
Der er monteret potentialefri
kontakter, som aktiveres (åb-
ner), når dækslerne afmonteres.
Disse kan benyttes i alarman-
læggets tamper kreds.
Trig 1
Trig 1 trigger signal is normally
taken from the alarm system
and activated from it in case of
a break-in.
Le signal de déclenchement
primaire (Trig 1) se fait à partir
du système d’alarme qui
L’active en cas d’effraction.
Trig 1: Il segnale principale di
attivazione del nebbiogeno
è generato dalla centrale d’
allarme quando rileva
un’intrusione.
Trig 1 la señal de disparo
procede normalmente desde el
sistema de alarma y se activa
desde ella en caso de robo.
Trig 1 udløsesignal tages som en
hovedregel fra alarmsystemet
og aktiveres herfra ved indbrud.
Trig 2
Trig 2 trigger signal is normally
taken from a verifying sensor
such as a room sensor or
a door switch.
Le signal de déclenchement
secondaire (Trig 2) se fait à par-
tird’uncapteurdevérication
Tel qu’un détecteur de mouve-
ment ou d’un contact de porte.
Trig 2: Il segnale di allarme
confermato solitamente è gen-
erato da un sensore volumetrico
collegato direttamente a questo
ingresso.
Trig 2 la señal de disparo
procede normalmente de un
sensorvericador,p.ejun
sensor de sala o un contacto
de puerta.
Trig 2 udløsesignal tages
normaltfraenvericerende
sensor såsom rumføler eller en
dørkontakt.
ARM.
ARM goes with the arming and
disarming of the alarm.
Alarm is connected = 0V on the
ARM-input (= fog cannon armed).
Alarm is disconnected = 12V on
the ARM-input (= fog cannon
dis-armed).
ARM suit la mise en service
et mise hors service de la
centrale d’alarme.
Alarme en Service (marche) =
0V sur l’entrée ARM
(= Le générateur de brouillard
est débloqué).
Alarme Hors service (arrêt) =
12V sur l’entrée ARM
(=Le générateur de
brouillard est bloqué).
ARM:ON/OFF impianto
d’allarme.
Allarme inserito =
0 Volt su ingresso ARM.
Allarme non inserito =
12 Volt su ingresso ARM.
ARM va con el armado y el
desarmado de la alarma.
Alarma está conectada =
0 V en la entrada – ARM
(= cañón de niebla armado).
Alarma está desconectada =
12 V en la entrada – ARM
(= cañón de niebla desarmado).
ARM følger alarmens
til- og frakobling.
Alarm tilkoblet = 0V på ARM-
indgang (= tågekanon armeret).
Alarm frakoblet = 12V på
ARM-indgang (= tågekanon
dearmeret).
GB: Outputs F: Sorties I: Uscite E: Salidas DK: Udgange
GB F I E DK
Output
1
When the Fog Cannon produces
fog, this output will activate.
Lorsque le générateur produit
de la fumée, cette sortie est
activée.
L'uscita si attiva durante
l'erogazione.
Cuando el generador produce
niebla, esta salida se activa.
Når tågekanonen producerer
tåge, vil denne udgang blive
aktiv.
Output
2
Output activated in case of
system error. Error type can be
read from the LED signals
(see page 21).
La sortie est activée lors d’une
erreur de l’appareil. Le type
d’erreur est indiqué au des
signaux Led (voir page 21).
L'uscita si attiva in caso di
anomalia. Il tipo di errore è
indicato dallo stato dei led
(vedi pagina 21).
La salida se activa en caso de un
fallo en el aparato. El tipo de
fallo se lee en las señales Led
(consulte página 21).
Udgang bliver aktiv ved en
fejl i apparatet. Fejltypen kan
aæsesviaLED(seside21).
9V
Built-in 9V supply system that
delivers 0.1A – mainly to supply
the secondary circuit,
e.g. a PIR sensor.
Alimentation 9V intégrée qui
peut fournir 0,1A principale-
ment pour alimenter le circuit
secondaire, tel qu’un capteur
PIR.
Alimentazione 9V 0,1 A per
alimentare il circuito
secondario, ad esempio un
sensore IR come sensore di
verica,odautilizzarenelcaso
manchi il comando 12 Volt dal
sistema d’allarme e sia solo
disponibile un comando relè.
Alimentación de 9V para
suministro de 0.1A al circuito
secundario, p. ej. un sensor PIR.
Indbygget 9V forsyning, som kan
levere 0.1A til hovedsageligt at
forsyne sekunddærkredsen,
eks. en PIR-sensor.

PROTECT Xtratus®13
GB
In the tables below the fog volume mentioned is based on the world-
wide IEC standard of security fog. It’s important to perform a test
ringoftheinstallation-andnotonlyrelyonthecalculationofcubic
metres. A change in visibility is gained through more Fog Cannons and/
or different placing of the unit(s).
F
Dans les tableaux ci-dessous les volumes de brouillard exprimés sont
basés sur les standards mondial de l’industrie de la Protection par le
brouillard (IEC). Il est important de réaliser un tir réel et complet pour
validation l’installation - et ne pas s’appuyer seulement sur le calcul
du volume. Un changement dans la visibilité est acquise grâce à plus
de canons à brouillard.
I
Nella tabella riportata in basso il volume di nebbia prodotta è quan-
ticatosuglistandardIEC(InternationalElectrotechnicalCommission)
denitiper la nebbiadisicurezza. È fondamentaleeseguireun test
nalesulluogodell’installazione,enonbasarsiesclusivamentesudi
un calcolo teorico dei metri cubi da saturare. Una variazione della visi-
bilità è ottenibile tramite un numero maggiore di sistemi nebbiogeni
e/o una differente disposizione degli stessi.
E
En las tablas que hay a continuación, el volumen de niebla indicado se
basa en los estándares mundiales IEC de niebla de seguridad.
Es importante realizar un disparo en la instalación – y no conar
únicamente en el cálculo de los metros cúbicos. Un cambio en la
visibilidad se consigue mediante más Generadores de Niebla y/o
diferente ubicación de la/s unidad/es.
DK
Tallene i skemaerne nedenfor angiver tågevolumen ud fra den
verdensomspændende IEC-norm for tågesikring.
Enændringisigtbarhedenopnåsvederetågekanonerog/ellerænd-
ret placering. Det er altid vigtigt at teste installationen i praksis og
ikke kun gå ud fra kubikmeterudregning.
GB: Fog Volume F: Volume de fumée I: Volume di nebbia E: Volumen de niebla
DK: Tågevolumen
Xtratus®230V & 115/130V
GB F I E DK
250 m3at 1 meter visibility. 250 m3pour une visibilité à 1 m. 250 m3con visibilità 1 metro. 250 m3por metro de visibilidad. 250 m3ved 1 meters sigt.
PROTECT Xtratus®
14
Check the control signals before testing.
Contrôler les signaux de commande avant de tester.
Controllare i segnali di attivazione prima di iniziare Il test.
Controle las
sen˜ales
de mando antes de realizar el ensayo.
Kontroller styresignaler før afprøvning.
GB
F
F
I
I
E
E
14
DK
GB
DK
15
Installation of backup battery. Connect the wires with the
clip as illustrated.
Installationdelapiledesecours.Connectezleslsavecle
connecteur comme illustré.
Installazione della batteria di backup. Utilizzare il connettore
apposito come illustrato.
Instalación de batería de respaldo. Conecte los cables con un
conector como el de la imagen.
Montering af backup-batteri. Forbind ledningerne med clipsen
som vist på tegning.

PROTECT Xtratus®15
Installtheuidcan(seepage4and7)
and close the fog cannon.
Installez la recharge (voir pages 4 et 7) et refermez le canon à
brouillard.
Installareilcontenitoredeluido(vedipagine4e7)
e richiudere il nebbiogeno.
Instaleelcontenedordeuido(véanselaspáginas4y7)y
cierre el generador de niebla.
Installer væskebeholderen (se side 4 og 7) og luk tågekanonen.
Remember to heat the system before testing.
Ne pas oublier le temps de chauffe avant de tester.
Permettere al sistema di riscaldarsi prima di eseguire il test.
Recuerde el tiempo de calentamiento antes de realizar el
ensayo.
Husk opvarmningstid før test.
Full-scale test: Remember that the test must include the
entire alarm installation.
Test en situation réelle: Ne pas oublier d’inclure l’ensemble
de l’installation d’alarme dans l’essai.
Test completo: il test deve includere tutto l’impianto d’allarme.
Ensayo completo: Recuerde que el ensayo debe incluir toda
la instalación de alarma.
Fuld skala test: Husk: testen skal omfatte hele
alarminstallationen.
GB
GB
GB
F
F
F
I
I
I
E
E
E
16
17
18
DK
DK
DK
PROTECT Xtratus®
App. 8 min.
Min.

PROTECT Xtratus®
16
Remember to put warning labels on the windows.
Ne pas oublier de bien placer les autocollants d’avertissement
sur les fenêtres.
Apporreleetichettediavvisosullesupercivetrate
(punti di accesso).
No olvide colocar las etiquetas de advertencia en las
ventanas.
Husk påsætning af advarselsmærkater på vinduerne.
GB
F
E
I
20
Before leaving the installation all users must be
instructed in how the fog cannon works.
L’installationnie,l’installateurdoitinstruiretoututilisateur
dans le fonctionnement du générateur de fumée.
Al termine tutto il personale del locale deve essere
informato sul funzionamento del generatore nebbiogeno.
Antes de abandonar la instalación, asegúurese de que
todos los usuarios han sido instruidos en el manejo del
generador de niebla.
Før du forlader installationen, skal alle brugere
instrueres i, hvorledes tågekanonen virker.
GB
F
I
E
21
DK
DK
3. Hand over
F: Remise I: Consegna dell’impianto E: Entrega DK:Aevering
Alwaysinsertanewuidcanaftertestingandhandoverthe
fogcannonwithafulluidcan.
Toujours installer une nouvelle recharge après un test et livrer
le canon à brouillard avec une recharge pleine.
Consegnare sempre il nebbiogeno con un serbatoio nuovo
installato.
Siempreinserteunnuevocontenedordeuidodespuésde
la comprobación y entregar el cañón de niebla con un
contenedor lleno.
Sætaltidennydåseieftertestogaeveraltid
tågekanonen med fuld væskebeholder.
GB
F
I
E
19
DK

PROTECT Xtratus®17
The users must be informed that further information
can be found on www.protectglobal.com
Les utilisateurs doivent être informés de la possibilité
d’obtenir plus de renseignements sur le site
www.protectglobal.fr
Informare il cliente che ulteriori informazioni
Sono disponibili sul sito www.protectglobal.it
Informe a los usuarios que pueden consultar
www.protectglobal.es para mayor información.
Brugerneskaloplyses,atereinformationerkanndespå
www.protect.dk
DK
GB
F
I
E
22
PROTECTGLOBAL.COM
F
I
E
DK
Finally, a service contract must be made, which
should contain an agreement for min. one test a year.
Finalement, dresser un contrat d’entretien qui doit
comprendre au minimum un essai par an.
Sisuggerisceinnedistipulareconilcliente
un contratto di manutenzione.
Porúltimo,debermarseuncontratodeservicioque
incluya un acuerdo de 1 prueba anual como mínimo.
Afslutningsvis indgås serviceaftale, som bør
indeholde en aftale om min. 1 årlig test.
GB 23

PROTECT Xtratus®
18
E: Acuerdo de servicio y mantenimiento
Un acuerdo de mantenimiento con el cliente incluye lo
siguiente:•Piensequeelnuevocontenedordeuidopuede
durar: 5 años desde la fecha de producción • Compruebe la
capacidad de carga y edad de la batería. Si la batería tiene
más de 2 años, debe ser reemplazadas • Compruebe si hay
algún aviso de avería en el generador de niebla • Comprue-
be que la boquilla no está obstruida por objetos extraños
• Compruebe si hay alguna señal de sabotaje y compruebe
los interruptores de sabotaje • Compruebe que el sensor de
vericaciónfuncionacorrectamente•Hagaunapruebacom-
pleta de funcionamiento, donde se compruebe la interacción
de todos los sistemas (incluso el ABA si existe).
DK:
Serviceaftale
En serviceaftale med kunden bør min. indeholde: • Måske
ny væskebeholder. Holdbarhed: 5 år fra produktionsdato •
Undersøg batteriets belastbarhed og alder. Er batterierne 2
år eller mere, bør de under alle omstændigheder skiftes • Er
der eventuelt fejlmeldinger på maskinen? • Er udblæsnings-
dysen fri for fremmedlegemer? • Er der tegn på sabotage?
Kontrollersabotageswitse•Virkerdenvericerendesensor,
som den skal? • Foretag en fuld-skala-test, hvor samspillet
mellem alle systemer afprøves (også ABA hvis til stede).
GB: Service and maintenance agreement
A service contract with the customer includes the following:
•Thinkaboutanewuidcan(Durabililty:5yearsfrompro-
duction date) • Check the loading Durability and the age of
the battery. If the battery is more than 2 years old it must
be replaced • Check if there is any fault indicated on the
Fog Cannon • Check that the nozzle is clean of foreign bod-
ies • Check if there are any signs of sabotage and check the
sabotage switches • Check that the verifying sensor is work-
ing correctly • Make a full-scale-test, where the interaction
betweenallsystemsistested(alsotherealarmsystemif
there is one).
F: Recommandations de Service et de Maintenance
Contratdemaintenanceavecleclientnal,celui-cirespec-
tant les points suivants: • Remplacement de la recharge:
Durée de vie 5 ans à partir de sa date de fabrication • Véri-
erleniveaudechargeetl’âgedelapileSilapileaplusde
deuxans,elledoitêtreremplacée•Vériersiiln’yapas
dedéfaut(messaged’erreursurl’afcheur)surl’appareil•
Vérierquelabusenesoitpasobstruéepardes“corpsétran-
gers” • Vérier qu’il n’y ait pas de signe de malveillance
surl’appareiletsurlesswitch•Vérierlebonfonctionne-
mentdu detecteurdeconrmation •Testerl’ensemble de
l’installationd’alarmeandeverierlesinterferencesdes
différents appareils entre eux (y compris le SSI si present).
I: Manutenzione
Un tipico contratto di assistenza con il cliente contempla: •
Ispezione visiva del nebbiogeno • Eventuale sostituzione del
serbatoio (durata cinque anni dalla data di produzione con
confezione integra) • Controllo dello stato della batteria: se
hapiùdiunannosostituirla•Vericadieventualimessag-
gidierrore•Controllodellapuliziadell’ugello•Vericare
se sono presenti segni di sabotaggio e controllo del contatto
antisabotaggio • Controllo del funzionamento corretto dell’
eventualesensoredivericacollegatoalgeneratoredineb-
bia • Controllo del corretto funzionamento dell’intero siste-
ma d’ allarme.

PROTECT Xtratus®19
GB F I E DK
1Identify the error Identierl’erreur Identicailtipodierrore Identiqueelfallo Identicérfejlen
2Find the cause of the error Trouver la cause de l’erreur Individua la causa dell’errore Determine la causa del fallo Find årsagen til fejlen
3Correct the cause of the error Corriger la cause de l’erreur Elimina la causa dell’ errore Corrija la causa del fallo Ret fejlen
GB:FaultndingF: Défauts possible I: Uscite di allarme E: Salidas de avería DK:
Fejlnding
GB F I E DK
Out-
put 1/
Fog
When the Fog Cannon produces
fog, this output will activate.
Lorsque le générateur produit de
la fumée, cette sortie est activée.
L'uscita si attiva durante
l'erogazione.
Cuando el generador produce
niebla, esta salida se activa.
Når tågekanonen producerer
tåge, vil denne udgang
blive aktiv.
Out-
put 2/
Fault
Output activated in case of system
error. Error type can be read from
the LED signals.
La sortie est activée lors d’une
erreur de l’appareil. Le type
d’erreur est indiqué au des
signaux Led.
L'uscita si attiva in caso di
anomalia. Il tipo di errore è
indicato dallo stato dei led.
La salida se activa en caso de un
fallo en el aparato. El tipo de fallo
se lee en las señales Led.
Udgang bliver aktiv ved en fejl i
apparatet.Fejltypenkanaæses
via LED.
GB:
Fuses
F:
Fusibles
I:
Fusibili
E:
Fusibles
DK:
Sikringer
230V AC Fuses / Fusibles / Fusibili / Fusibles / Fuses PROTECT Xtratus®
F1 (Incoming Power/High Voltage / Alimentation / Ingresso alimentazione / Alimentación de entrada / Alto voltaje / Højvolt) 10 AT
F3 6.3 AT
F4 63 mA
115/130 V AC Fuses / Fusibles / Fusibili / Fusibles / Fuses PROTECT Xtratus®
F1 (Incoming Power/High Voltage / Alimentation / Ingresso alimentazione / Alimentación de entrada / Alto voltaje / Højvolt) 10 AT
F3 10 AT
F4 63 mA
4. In case of faults
F: En cas de défauts I: In caso di funzionamento anomalo E: En caso de averías DK: I tilfælde af fejl
GB: AnidentiederrorcanberesetbypressingtheResetbuttonforapprox.4seconds.Thebuttonislocatedinthecentreofthecircuitboard.
F: Une faute enregistrée est remise à zéro en appuyant pendant environ 4 secondes sur la touche “Reset” qui est située au milieu de la carte électronique.
I: Un errore segnalato può essere cancellato premendo il pulsante reset per circa 4 secondi. Il pulsante si trova vicino ai Dip switch.
E: Para reiniciar un fallo registrado, mantenga pulsado el botón “Reset”, que está situado en el centro de la placa electrónica, aprox. 4 segundos.
DK: En registreret fejl nulstilles ved at trykke på “Reset” knappen, placeret midt på elektronikkortet i ca. 4 sekunder.

PROTECT Xtratus®
20
GB: External LED status indicator – a service function in arm and
disarm status.
F: LED exterieure d’ indicateurs d’état –
fonction mise en- ou hors- service du système (+/- 9V sur DIS).
I: Indicatore esterno di stato a LED,
diagnostiche di guasto.
E: Indicador LED externo de estado -
encendido tanto en estado de armado como desarmado.
DK: Dioder til ekstern statusmelding - en servicefunktion i frakoblet
og tilkoblet tilstand.
GB
Error identication
Xtratus has a LED and a buzzer, and two relays, which can signal the
machine's operating status on to the control center.
The LED has three levels:
Green: Flashesduringheating,1ash/sec.
Constant light when Xtratus is Ready.
Turns off at error.
Yellow: FlashesatE2error(nouid),beepersoundsandfaultrelay
active(1ash/sec.).
Flashesfor 24 hoursafter successfulfog release,1ash/
sec. (no beeper active).
(Can be erased by pushing Reset button).
Red: Constant light at critical errors: E5, E6, E7, E8.
Flashesatlesscriticalerrors:E1,E3,E4(1ash/sec.).
Xtratus can signal 8 different errors:
E1: Mains supply error
E2:Nouiderror
E3: Battery voltage low
E4: PCB board temperature high/low error
E5: Thermal sensor error
E6: Heat rod error
E7: Over temperature on heater error
E8: Motor error
At yellow and red light also the buzzer is activated. Buzzer beeps with
0,3Hz for 2 minutes. After that the buzzer gives a single beep every
half minute.
The buzzer can be deactivated by setting DIP switch 5 in the OFF
position.
Which error is announced?
TondoutwhicherrorisannouncedontheXtratus,yousimplypress
and release the Reset button shortly. Immediately after, the Xtratus
will tell you which error is present - simply by counting the present
error.Thisisdonebyuseoftheredlightandthebuzzerthatwillash
and beep the error number.
One example: E5 error is present on the Xtratus. You press and release
the Reset button and the constant red light will turn off. Then the red
lightslowlywillash5timesandthebuzzerwillsoundaccordingly.
Right after the red constant light comes back.
Soyousimplycountthenumberof ashes and beeps, andthiswill
correspond to the present error number.
This procedure can be repeated until you reset the error.
Identifying and rectify critical and less critical errors
Fog uid:
Xtratusdoesnotmeasurethefoguidlevelinthecan.Xtratusisde-
signedtoreonefullshotwhenitisactivated.Afterthatitisrecom-
mendedtoreplacetheuidcan.
Theuidcanhasenoughuidfor1fullshotsplusuidforabackup
fogshot,almostaspowerfulastherstshot.
As an user of Xtratus you are therefore aware that the unit has a
backup fog shot.
Example:XtratusisactivatedonaFridaynightwhereitisdifcultand
expensivetogetatechniciantoreplacetheuidcan.Butyouknow
that the premises are secured over the weekend, because there is
enoughfoguidforonemorefogactivation.
The general recommendation is to change the uid container each
time Xtratus has been activated.
The PCB detects the liquid running through the heat exchanger in the
fogcannon.ActivatingtheXtratuswitheithertoolittleornofoguid,
thePCBwilldetecterrorE2:"Nouiderror".Thiserrorisshownwith
the yellow LED and buzzer. And the relay "Output 2" is activated.
ErrorE2,"Nouiderror",istoberesetbypressingtheresetbutton
Green light / Voyant Vert /
Led verde / Luz Verde / Grønt lys
Yellow light / Voyant Jaune /
Led giallo / Luz amarilla / Gult lys
Red light / Voyant Rouge /
Led rosso / Luz roja / Rødt lys
GB
Flasheswhenheating(1ash/sec.).
Lights constantly when Xtratus is Ready.
Turns off if error occurs.
FlashesatE2error(nouid),beepersoundsand
faultrelayactive(1ash/sec.).
Flashes for 24 hours after successful fog release.
1ash/sec.(nobeeperactive).
(Can be erased by pushing Reset button).
Lights constantly at critical errors: E5, E6, E7, E8.
1ash/sec.atlesscriticalerrors:E1,E3,E4.
F
Clignoteenchauffe(1ashparsec.).
Allumé Fixe quand Xtratus est Prêt.
Eteint quand une Erreur apparait.
Clignoteàl’erreurE2(plusdeuide),Le«Buzzer
bippeetlerelaisfaultestactif(1ash/sec.).
Clignotement pendant 24 heures Après
untirdebrouillardréussit.1ash/sec.
(pas de signal sonore).
(peut être réinitialisé en appuyant
sur le bouton reset).
Allumé Fixe en cas d’erreur critique:
E5, E6, E7, E8.
Clignote1ashpersec.encasd’erreurmineure:
E1, E3, E4.
I
Lampeggiaduranteilriscaldamento(1ash/sec).
AccesossoquandoXtratusèpronta(ready).
Spento in presenza di anomalia.
LampeggiaconerroreE2Nouido(1ash/sec).
Il buzzer e l’uscita Output 2 si attivano.
Lampeggiaper24ore(1ash/sec)dopolaprima
erogazione per poi tornare verde. I buzzer e
l’uscita Output 2 NON si attivano.
Azzerabili con la pressione per 5 sec.
del tasto Reset.
Accesossoinpresenzadierroricritici
E5, E6, E7, E8.
Lampeggia(1ash/sec)inpresenzadierrorinon
critici E1, E3, E4.
NOTA: Dopo una veloce pressione del tasto Reset
il led rosso emetterà un serie di lampeggi ed il
Buzzer di suoni ad indicare il tipo di errore.
E
Parpadeacuandocalienta(unashporseg.).
Luce constantemente cuando
la Xtratus está preparada.
Se apaga si se produce un error.
ParpadeaconunE2(sinuido),elzumbador
suenayelrelédefalloseactiva(1ash/sec.)
Parpadea durante 24 horas después del disparo
deniebla.1ash/seg.(elzumbadorno
está activado). (Puede ser borrado pulsando
el botón reset).
Luce constantemente con errores críticos:
E5, E6, E7, E8.
1 parpadero por seg. para errores leves:
E1, E3, E4.
DK
Blinker under opvarmning, 1gg/sek.
Lyser fast når Xtratus er Ready.
Slukker ved fejl.
Blinker ved E2 fejl (væskemangel), beeper lyder
og fejlrelæ aktiv (1gg/sek.).
Blinker i 24 timer efter vellykket tågeaffyring,
1gg/sek. (Kan slettes med Reset).
Lyser fast ved kritiske fejl: E5, E6, E7, E8.
Blinker 1gg/sek. ved mindre kritiske fejl:
E1, E3, E4.
1/5
Other manuals for Xtratus
1
Other Protect Fog Machine manuals


