PSA LIFESAVER LIFPE10LP User manual
Low Prole
Photoelectric
Smoke Alarm
Model LIFPE10LP
Lithium (non-replaceable
sealed in) Battery-Operated
Photoelectric Smoke Alarm.
Designed with style in mind,
this smoke alarm has a slim
line profile while providing
maximum protection.

Thank you for purchasing this
PSA LIFESAVER smoke alarm!
Please read these instructions carefully and store them
in a safe place where you can access them easily.
Product description
This alarm detects particles of combustion using
photoelectric technology. This smoke alarm has an
expected service life of ten years under normal conditions.
We recommend that you should replace after 10 years
from installation date to ensure normal operation.
LED
indicator
Sound
output
Test &
Hush
button

Product Specications
Detection method Photo-electric Technology
Power supply Sealed battery (3V DC)
Battery spec CR123A
Battery lifetime 10 years
Alarm volume ≥85 dB (A) at 3 meters
Operating temperature 0 °C - 40 °C
Operating humidity < 93 %
Date of replacement See product label
Individual alarm indicator Yes
Alarm silence facility Yes | Hush me: 5-15 minutes
Low battery warning Yes
Low battery silence facility Yes | Hush me : 10 hours
Installation in
accommodation vehicles Yes
Mounting location Ceiling or wall
Interconnectable No
Comply with AS3786:2014
Sound Pattern
ISO8201(BI 0.5s -pause 0.5s -BI
0.5s -pause 0.5s -BI 0.5s -pause
1.5s, with the RED LED flashing,
repeat this alarm pattern)

Warnings
• To prevent injury, this smoke alarm must be securely
attached to the ceiling/wall in accordance with the
installation instructions.
• Batteries should not be exposed to excessive heat such as
sunshine, fire or the like.
• Do not paint or cover the smoke alarm.
Where to install a smoke alarm
• Check specific State legislation in your area to ensure
smoke alarms are correctly located according to local laws.
Each State or Territory may dier in building codes and
regulations. PSA Products can only recommend the locations.
• Locate an alarm for each separate sleeping area in the
immediate vicinity of the bedrooms. Try to monitor the exit
path as the bedrooms are usually farthest from an exit. If
more than one sleeping area exist, then install additional
alarms in the immediate vicinity of each sleeping area.
• Locate additional alarms to monitor any stairwells because
stairwells act like chimneys for smoke and heat.
• Locate at least one alarm on every floor level.

• Locate an alarm in every room where a smoker sleeps.
• Locate an alarm in every room where electrical appliances
are operated (i.e. portable heaters or humidifiers).
• Locate an alarm in every room where someone sleeps with
the door closed. The closed door may prevent an alarm not
located in that room from waking the sleeper.
• Smoke, heat and other combustion products rise to the
ceiling and spread horizontally. Mounting the alarm on
the ceiling in the center of the room places it closest to all
points in the room. Ceiling mounting is preferred in ordinary
residential construction.
• When mounting alarms on the ceiling locate it at least
300mm away from the side wall and 300mm away from any
corner. (see diagram).
• When mounting alarms on a wall, use the inside wall. The
recommended position is between 300mm and 500mm o
the ceiling. (see diagram).
NOTE: The performance of smoke alarms mounted on walls is
unpredictable and this mounting position is not recommended
when ceiling mounting can be implemented.

Location of smoke alarm
Apex Of Sloping Ceiling Ceiling / Wall Junction
Single Floor Typical Multiple Floor
Installation

Where not to install a smoke alarm
• Do not locate your smoke alarm in the garage - products
of combustion are present when you start your automobile.
Use Lifesaver Heat Alarm in this location.
• Do not locate your smoke alarm in front of forced air supply
ducts used for heating and air conditioning and other high
air flow areas.
• Do not locate your alarm in areas where temperatures may
fall below 0°C or rise above 40°C, or in humidity higher than
93% as these conditions may reduce battery life.
• Avoid dusty areas, dust particles may cause smoke alarm to
false alarm or fail to alarm. Use Lifesaver Heat Alarm in this
location to avoid false alarms.
• Avoid very humid areas or near a bathroom, moisture can
cause false alarm.
• Avoid insect-infested areas.
• Do not locate alarm within 0.9m of the following: the door
to a kitchen, the door to a bathroom containing a tub or
shower, ceiling or whole house ventilating fans, or other high
flow areas.
• Avoid locating near fluorescent lights or other electrical
equipment. Install smoke alarms at least 300mm away from
lights and other electrical devices.

Activation
Before commissioning the smoke alarm, it is important
to activate it and test it for correct operation.
• Install the smoke alarm onto the mounting bracket.
The smoke alarm will give a short beep when the alarm
is fully connected to the bracket.
• Firmly press the test button for at least 3 seconds.
The alarm will sound 3 short beeps – 1.5 seconds pause,
then repeat it until the button is released. The initial test
volume is low, then followed by full volume sound. The alarm
may sound for up to a few seconds after releasing the test
button, indicating that the product can be used normally.
Mounting
• Place the mounting bracket on the desired installation
location and mark where the holes should be drilled.
• Drill two holes with a diameter of 5 millimeters.
• Push the plastic plugs into the holes.
• Insert the screws into the mounting bracket and
tighten them firmly into the plugs.
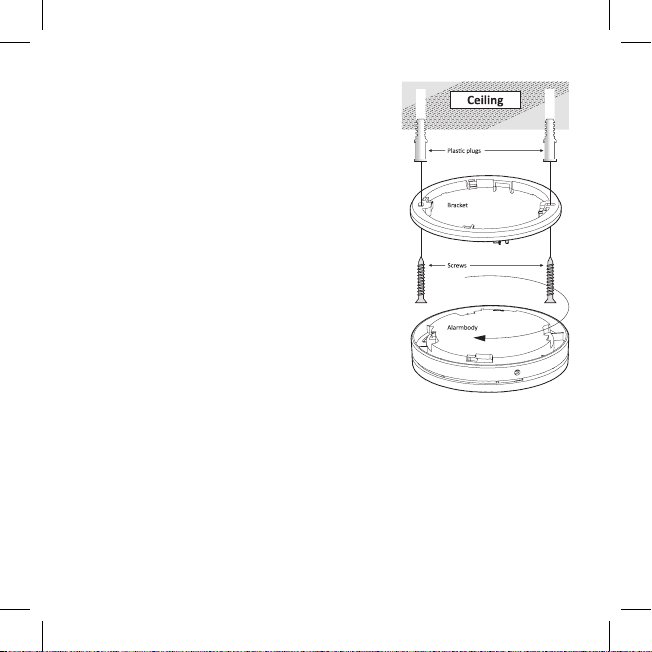
• Place the smoke alarm
on the mounting
bracket and secure
it by turning it
clockwise. Test the
correct operation of
your smoke alarm
by pressing the test
button.
• If no sound is
generated, the smoke
alarm is not functioning
properly and should not
be used!
Alarm silence facility
When the smoke alarm activates, the alarm can be silenced or
hushed for 5 to 15 minutes by pressing the test/hush button.
After that, the smoke alarm automatically resets and returns to
normal opera on mode. If there are small particles of combustion
in the air, the smoke alarm will activate again. WARNING: Before
using the alarm silence facility, always identify the cause of the
alarm and make sure that the circumstances are safe.

Low battery mode
When the battery is running low, the smoke alarm will indicate
this with a repetitive beep and flash for approximately 30 days.
WARNING: This smoke alarm is equipped with a non-
replaceable battery. When this warning occurs, replace the
device as soon as possible! The low battery warning beep
can be hushed for 10 hours by pressing the test/hush button.
This feature allows you time to change the smoke alarm. The
smoke alarm will continue to function as normal in this mode.
Fault warning mode
When the smoke sensor is not functioning properly, it will turn
into the fault warning mode. Try cleaning the smoke alarm (see
paragraph maintenance) or replace the smoke alarm. If the
buzzer is not working correctly, the device will turn into the
buzzer fault warning mode. Please immediately replace the
smoke alarm when this occurs.
Night mode
This smoke alarm has an automatic night mode. In dark rooms,
the LED signal will be turned o to prevent disturbance of the
night’s sleep.
Alarm Tamper-Resist
Feature
A tamper resist feature has been
provided. To activate this feature,
you must break out the tamper-
resist blocks on the mounting plate.
Using this feature will deter
children and others from removing
the alarm from the mounting plate.
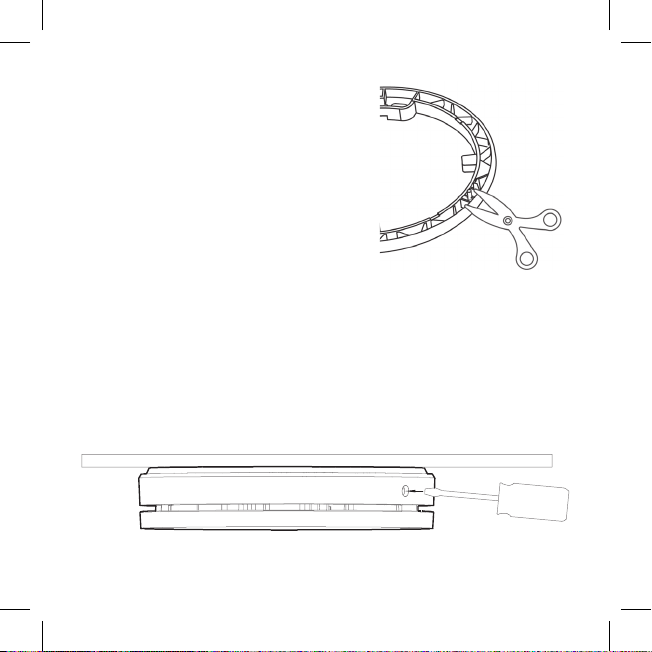
Disassembling
To disassemble the smoke alarm, take a screw driver and
push it into the mounting hole. Then, turn the smoke alarm
counterclockwise to remove it from the mounting bracket.

Maintenance
• This smoke alarm is equipped with a self-testing mechanism.
We recommend to test the smoke detector manually at
least once every three months by using the test facility. If the
smoke alarm functions correctly, it will generate a loud beep.
Due to the loudness of the alarm, make sure that you always
stand at arm’s length distance from the unit when you are
testing. If the smoke alarm does not generate an acoustic
signal, the smoke alarm must be replaced immediately!
• Clean the smoke alarm at least once per month to remove
dirt, dust or debris. Use a vacuum cleaner with a soft brush
and vacuum all sides and covers of the smoke alarm. Do not
remove the top cover of the smoke alarm to clean it inside.
• Do not attempt to repair this smoke alarm. If the smoke
alarm shows damage related to its functionality, it must be
replaced!
• Troubleshooting: False alarm is often caused by dust
or steam.
This smoke alarm has an expected service life of 10 years under normal
conditions. We recommend that you should replace the smoke alarm after 10
years from installation date to ensure normal operation.

Product warranty registration
Thank you for purchasing and installing the most trusted
brand in fire, security and intercoms. To ensure you receive
excellent after-sale product service we encourage you to
register your products.
There are a few important reasons to register your product:
1. It will ensure your investment is protected in case it is
damaged or broken and we can eectively carry out any
warranty claims.
2. Registration will also allow us to contact you in an unlikely
event of product safety notification required under
Consumer Product Safety Act.
3. Registration will also help us improve our product design
to meet your needs.
Register at: https://www.psaproducts.com.au/register-product/
Register this product for warranty to ensure fast and effective
service.

Overview visual & acoustic signals
Operating
mode
Visual signal
(ash)
Acoustic signal
(beep)
Description
mode
Normal 1 x per
40 second None Device is
functioning
properly
Te s t 1 x per second
(3 x) / pause
of 1.5 seconds
1 x per seconds
(3 x) / pause
of 1.5 seconds Device is tested
Alarm 1 x per second
(3 x) / pause
of 1.5 seconds
1 x per seconds
(3 x) / pause
of 1.5 seconds
Device is
detecting smoke
Alarm silence 1 x per
8 seconds None Smoke alarm
signal is muted
Low battery
warning 1 x per
40 seconds 1 x per
40 seconds Battery is
running low
Low battery
warning
silence None None Low battery
warning is muted
Sensor fault
warning 1 x per
40 seconds 1 x per
40 seconds
Sensor is not
functioning
properly
Buzzer fault
warning 2 x per
40 seconds None Buzzer is not
functioning
properly

Warranty and Liability
1. PSA Products Pty Ltd (ABN: 99 076 468 703) of 17
Millicent Street, Burwood 3125 Victoria, Australia warrants
the model LIFPE10LP for a period of five (5) years from
the date of purchase, as reflected on the Authorised
Reseller’s or Distributor’ invoice / receipt provided to you.
PSA Products Pty Ltd will repair or replace the product
(at the option of PSA Products) due to any manufacturing
defect, at the cost of PSA Products Pty Ltd (excluding
any labour costs relating to removal or re-installation of
product, and transport costs).
2. This warranty shall not apply to the product if it has been
damaged, modified, insect infested, contaminated, abused
or altered after the date of purchase, or if it fails to operate
due to improper maintenance.
3. To the extent permitted by law, the liability of PSA
Products Pty Ltd arising from the sale or under the terms
of this limited warranty shall not in any case exceed the
cost of replacement and subject to this clause. In no case
shall PSA Products Pty Ltd be liable for consequential
loss or damages resulting from the failure of the product
or breach of this, or: Any other warranty, express or
implied, loss or damage caused by failure to abide by the
instructions supplied in the leaflets.

4. To the extent permitted by law, PSA Products Pty Ltd.,
makes no warranty, expressed or implied, written or
oral, including that of merchantability or fitness for
any particular purpose, with respect to the consumer
replaceable battery if any. A product with non-serviceable
built-in battery is covered under warranty of the product.
5. This warranty is provided in addition to other rights and
remedies you have under law: Our goods come with
guarantees that cannot be excluded under the Australian
Consumer Law. You are entitled to a replacement or
refund for a major failure and compensation for any other
reasonably foreseeable loss or damage. You are also
entitled to have the goods repaired or replaced if the
goods. fail to be of acceptable quality and the failure does
not amount to a major failure. What constitutes a major
failure is set out in the Australian Consumer Law.
6. To make a claim under warranty, take the product (with a
proof of purchase) to the store where you purchased the
product or contact PSA Products Pty Ltd. Phone (03)
details, proof of purchase or expense claim in writing.
LIFPE10LP-V1
Table of contents
Other PSA Smoke Alarm manuals

PSA
PSA Homeguard HG2000 User manual

PSA
PSA LIFESAVER LIF10YPEW User manual

PSA
PSA LIF5800/2 User manual

PSA
PSA LIFESAVER LIFHA240 User manual

PSA
PSA LIFESAVER LIF5800ACF User manual

PSA
PSA LIFESAVER 6000DCW User manual

PSA
PSA Lifesaver 6800RL User manual

PSA
PSA Lifesaver LIF5000 User manual

PSA
PSA LIFESAVER LIFPE9/1 User manual

PSA
PSA LIFESAVER LIFWMB2 User manual


Popular Smoke Alarm manuals by other brands


UltraFire
UltraFire UBH1RF user manual

System Sensor
System Sensor ECO1003ABLINK Installation and maintenance instructions

Siemens
Siemens DELTA reflex 5TC1 290 Operating and mounting instructions

Zeta
Zeta ZD-SI-601/ZD-SO-601 user manual

ITI
ITI ESL 562 installation instructions

Chubb
Chubb 24/7 FIRE PROTECTION FP301 manual