Pure Distilling Reflux Kit User manual

The Reflux Kit Instructions
WARNING
In Australia it is illegal to use this system to produce alcohol
for consumption without a licence from the Customs and
Excise Department
An instructional video and additional helpful resources are available at:
www.puredistilling.com.au

Congratulations on purchasing the best & easiest to use spirit making system!
Pure Distilling are always developing new products to make your new hobby easier and a
whole lot more fun. Continue to check in on our website and social platforms below to see
what’s new.
Email: info@puredistilling.com
Facebook: www.facebook.com/PureDistilling
Youtube: www.youtube.com/channel/UCcrnxLS14ulycAy5BWMqp9w
Instagram: www.Instagram.com/pure.distilling
The Beer Me Heated Fermenter has a 2 year warranty.
The Pure Distilling copper reflux condenser has a 5 year warranty.

Your Reflux Kit contains the
following items:
•A Pure Distilling copper reflux condenser (Made in Australia)
•Digital distilling thermometer with alarm
•3 x 12mm plastic hose connections
•4m of 12.5mm clear vinyl hose
•One Smart Filter System with stainless steel spindle and very clever stainless-
steel plug stick
•Pure Distilling filter cartridge, more than twice the size of the competition
•One 30l stainless steel heated fermenter
•Hydrometer with easy read scale
•Alcometer with easy read scale
•Premium Spirit Yeast
•Crystal Clear
•Spirit Enhancer Liquid Carbon
•Stirring paddle
•Distilling Conditioner
•6 x mixed Pure Distilling essences
•4l barrel chunk soaker bucket
•2 x 100g sample packs of Pure Distilling Barrel Chunks

Warning:
To reduce the risk of fire, electrical shock or injury to persons or property:
•This device is to be operated by competent personnel only, children under the
age of 18 must be supervised at all times
•Do not touch the metal parts of the boiler without gloves during or after
operation –it will be VERY HOT and could cause burns.
•Do NOT open the lid while liquid is boiling.
•Use in a well-ventilated area away from naked flames, the appliance is not
intended for outdoor use. Operate in ambient temperature range of 0-70 C.
•Do not overfill boiler above the MAX mark. IF THE BOILER IS OVERFILLED THERE
IS A RISK THAT BOILING LIQUID MAY BE EJECTED.
•Do not operate any product with a damaged cord or plug, or after the product
malfunctions or is damaged in any way. Return the complete product to the
place of purchase for inspection, repair or replacement.
•Do not leave appliance unattended when switched on.
•Do not use appliance for other than its intended use.
•Always keep appliance on a level surface before, during and after use.
•Do not move the appliance when it is switched on.
•Do not switch on unless there is liquid covering the element in the boiler.
•Suitable for Beer mash brewing, water boiler, crab/lobster boiler.
•This product is intended for normal household / domestic use only.
Please read and save these instructions along with the separate Boiler instructions. PDF
versions can be found on our website:
www.puredistilling.com.au

Preparing the Wash
The wash is the mixture of yeast and sugar which will be fermented to produce an alcoholic
liquid which will be purified by the distillation process. Careful attention to producing a clean
and high-quality wash will reward you with a higher quality finished spirit, these instructions
are to make the best quality wash possible.
We recommend fermenting in a plastic fermenter available at any home brew store.
We also suggest using dextrose over sugar, it is more expensive, but produces a cleaner wash,
with less impurities than a sugar wash.
All the directions for use are on the individual packets.
1. Clean and sterilize the fermenting vessel and stirring paddle.
2. Add 21 litres of water @ 30 degrees.
3. Dissolve the dextrose or sugar into the warm water, stir until all the sugars are
dissolved. The table below show approximate wash alcohol by volume percentages and
eventual yields if distilled.
Dextrose kg
Sugar kg
Approx. Wash ABV
Spirit @ 90%
7kg
6kg
14%
~ 3.0 l
8kg
7kg
18%
~ 3.5 l
9kg
8kg
20%
4.0 - 4.5 l
4. Add the Pure Distilling Premium Yeast and the Pure Distilling Spirit Enhancer, the wash
will go completely black, relax, it’s meant to, this carbon absorbs a lot of the impurities
created in the fermentation process. Stir in well.
5. Fit the grommet and airlock (add some water to the airlock) and do up the lid and leave
in a well-ventilated area.
If you live in an apartment or need to carry out the fermentation
inside, consider using a Pure Distilling Smell Eliminator Kit, a
carbon block which hooks up to your airlock, eliminates all
odours!

Fermenting
Fermentation times will vary with how much sugar is used, the ambient temperature you are
fermenting in and if you are using a heater or not.
•6kg of dextrose at 25 degrees will ferment in 48 hours
•9kg of dextrose at 20 degrees will take 10 to 14 days
A fermenting temperature of 20-24 degrees will produce the cleanest wash.
Some points to note:
•When the yeast is first added to the wash in a warm environment, the fermentation is
very active and may blow the water out of the airlock. To prevent a mess, fit the airlock
after 2 days when the fermentation has slowed.
•If the temperature is too low (less than 20 degrees), the fermentation may stop, get the
wash to a warmer position or fit a heater belt or pad, stir well and fermentation should
restart.
•If the temperature is too hot (above 30 degrees), the yeast will become stressed and
produce “off” flavours, if the temperature gets above 35 degrees the yeast will die and
fermentation will stop.
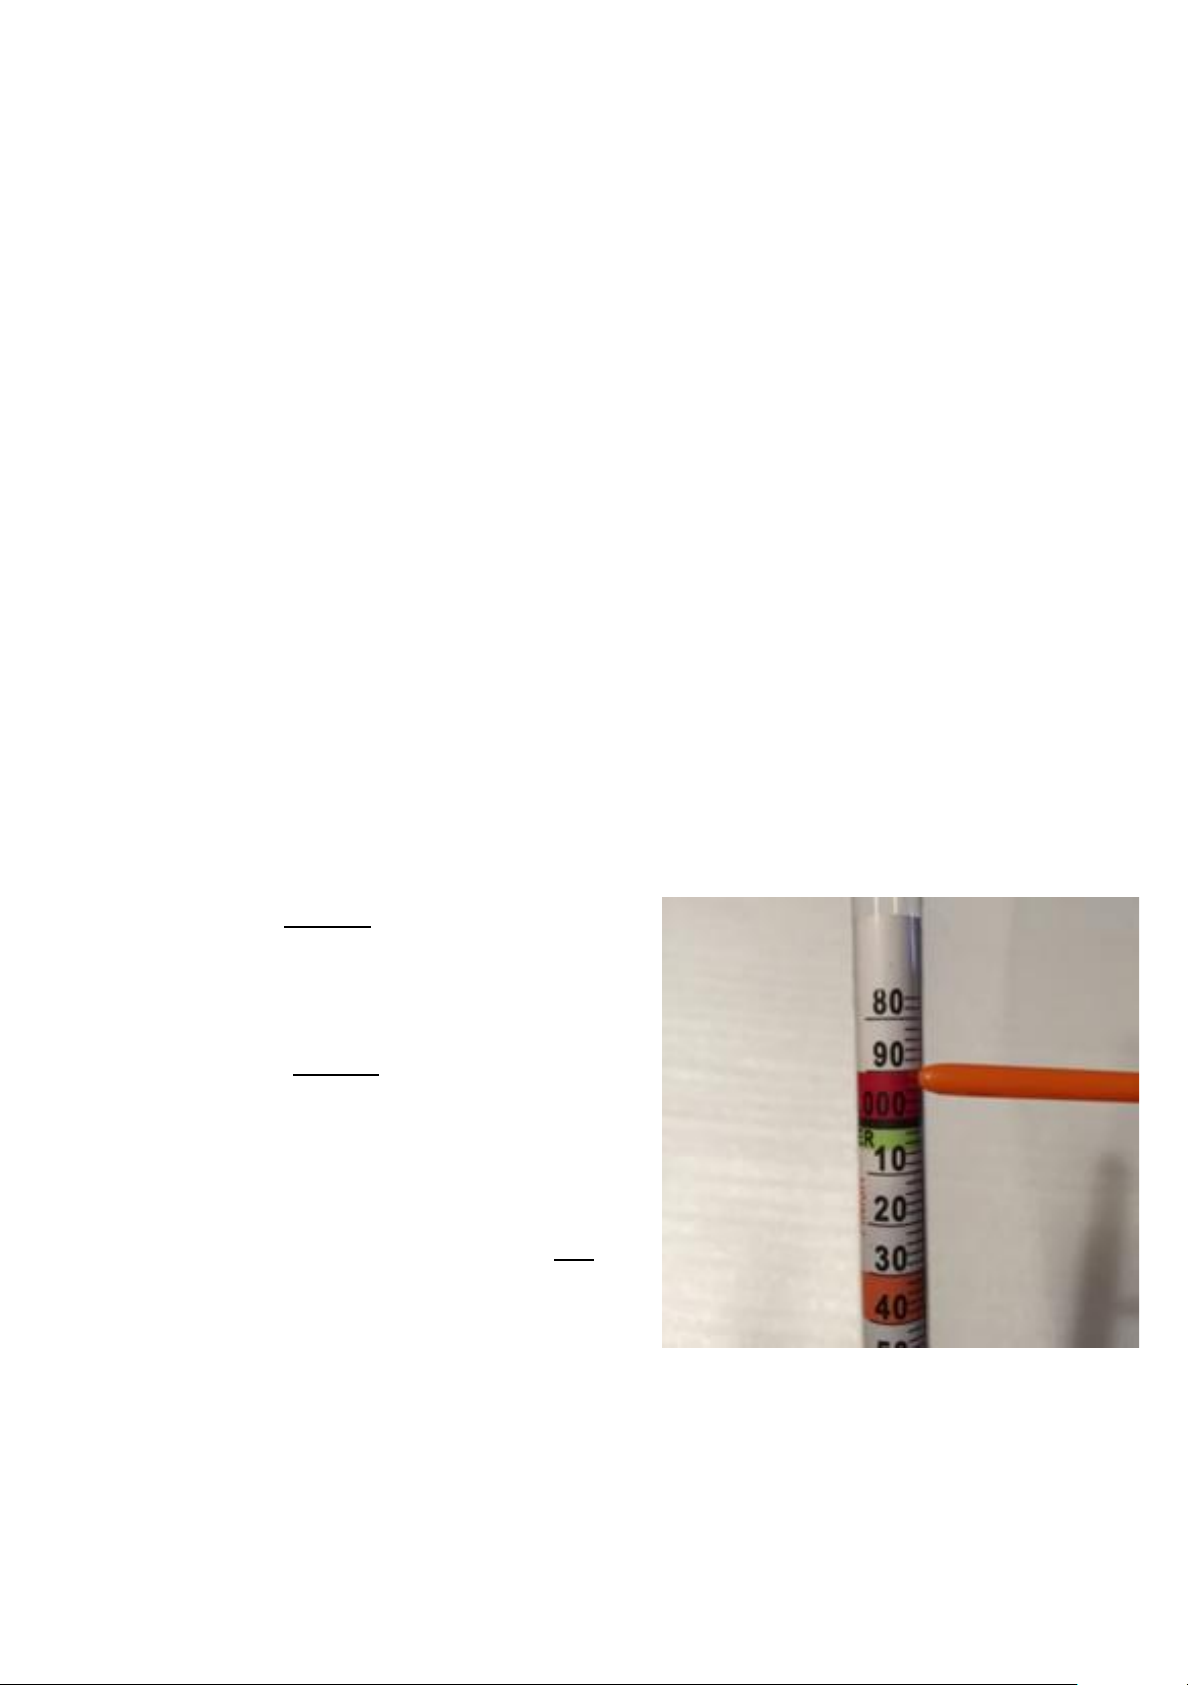
•If fermentation gets “stuck” e.g. fermentation has stopped and will not restart, take a
hydrometer reading:
oIf the reading is below or near 0.990
(as shown on the photo) preferably at
the 80, the wash has finished
fermenting.
oIf the reading is significantly higher
than the photo, e.g. above the 1.006
green section, the fermentation is
“stuck”, and remedial action needs to
be taken.
•To restart a stuck fermentation, do not add
another packet of turbo yeast, there is a
measured amount of nutrient in each pack
and adding more increases the pH of the
wash, and unless the pH is lowered the wash can produce a spirit with a blue tinge.
•Use a champagne yeast from your local home brew store, it will take a lot longer to
finish fermenting, up to an additional 10 days.

Preparing the Wash for Distillation
Preparing the wash is the most important step of the distillation process, 99% of distilling
issues we hear of are related to the wash not being fully fermented or too much of the “trub”
(all the spent yeast at the bottom of the fermenter) being transferred into the boiler.
If you have ever boiled or heated milk you will be familiar with the surge of foam that happens
when the milk reaches around 70 degrees, the same can happen in the boiler if there is
undissolved sugars or yeast cells still in the wash.
Following the previous fermenting instructions will result in a well-prepared wash, and once
fermentation has finished add the two-part Pure Distilling Crystal Clear at least 24 hours
before you plan to carry out the distillation. The wash can then stand for an extending period
of time before distillation if required.
Transfer the wash to the boiler (if using for the first time clean the boiler including running
warm water through the boiler tap), you can syphon the clear liquid to the boiler making sure
no yeast sediment is transferred. The fermenter tap can also be used to transfer the wash,
just make sure to discard the first 50ml as there will be some yeast sediment trapped in the
tap, another tip:
•Put a wedge under the fermenter at the tap, so the majority of the
yeast sediment is at the back of the fermenter, away for the tap.
Fill the boiler up to the level mark MAX imprinted on the boiler side.
Add 10 shakes of the Distilling Conditioner, this helps prevent any foaming
from any residual sugars or yeast cells.

Setting Up the System
The condenser and condenser product arm need to be rinsed with warm water to remove any
residues from the manufacture process, run water through the condenser body from the
base. Ensure you can blow through the condenser product arm, with the tap in the open and
closed positions, the holes can sometimes be blocked by particles from manufacturing, if
blocked use a very small needle and poke through the ball in the tap.
Setting up
1. Undo the nut and silicon seal from the base of the condenser and fit the boiler lid to
the condenser, refit the silicon seal (always under the lid) and tighten the nut.
2. Ensure the boiler is placed on a stable and secure workspace near a water connection
and drainage point and secure the lid to the top of the boiler with the clips.
3. Fit the condenser product arm to the condenser, it only needs to be finger tight, do not
use a spanner. Ensure the tap and vent hole are facing up and there is a slight slope
away from the condenser as per below.
Vent Hole

4. Fit the thermometer probe into the thermowell as shown below, the thermometer is
fitted with a magnet and a long probe lead so position the thermometer in a spot where
it is easy to read the display and access the controls.
5. Measure and cut a suitable length of the supplied vinyl hose to connect the condenser
to a water source, fit the supplied hose connectors to both ends of the hose. One end
connects to the tap (this may require a trip to the hardware store to source a suitable
fitting), the other end connects to one of the condenser water fittings as per the photo
below, it doesn’t matter which one. Fit the remaining hose connector to the other
length of vinyl tubing, connect to the free condenser water fitting and put the other
end in a suitable drainage point e.g. in a sink or drain.

6. Turn the water on carefully and test the connections for leaks, tighten or fit correctly
any leaking connections.
7. The required water flow is 1.5 litres a minute, this can be set by measuring how much
water is collected in 30 seconds, you need around 0.75 litres, adjust the water flow as
required.
8. We recommend collecting the spirit output in a glass 5 litre demijohn (bottle with a
handle) or a scientific supply measuring jug e.g. Pourmaxx brand, both available at your
nearest home brew store.

Distillation
Now for the fun part, we have the well-prepared wash, we have added the distilling
conditioner to the wash in the boiler, the system is setup, we are ready to turn on the boiler!
1. Turn on the boiler, never turn the boiler on if it is empty, it will activate the boil dry
switch and cut out. If this happens, turn the boiler off, wait 10 minutes and turn the
boiler on again.
2. Set the thermometer alarm to 10 degrees above the ambient air temperature, this will
allow enough time to turn the water on prior to spirit being collected. The thermometer
probe is not waterproof, take care not to immerse the probe in water.
3. Turn the tap to the off position, as per below, this is slow mode.
4. Place a small collection vessel to collect the “heads” (the hydrometer container is ideal),
there is a small amount of methanol present in any fermentation, more in fruit or wine
ferments heavy with stalks etc. Methanol has a boiling point of 65 degrees, and the
small amount in the wash is collected at the start.
5. When the alarm sounds, turn on the cooling water at the water tap, the temperature
will continue to rise, it may even rise above 80 degrees for a short period, but will settle
on a steady temperature of around 78 degrees.
6. Liquid will start coming out of the condenser product tube, this is the heads we
discussed in Point 4, this should be within one hour of turning the boiler on.
7. Collect 50ml - 100ml or nearly the volume in the hydrometer container, this is discarded
(this liquid is great for cleaning windows or floors), it is not suitable for consumption.
8. Replace the heads collecting container with the container to be used for collecting the
alcohol (neutral spirit or ethanol).
Slow Mode

9. Turn the tap to the open position, as per below.
10.Set the thermometer alarm for 2 degrees higher than the steady temperature shown
on the display.
11.Once a rolling boil has been achieved, we can turn off the 500w element on the boiler,
we need the larger element going at all times to maintain a good head of steam for the
reflux action in the condenser to work properly. If the 1700w element is turned off the
temperature on the condenser thermometer will rise very early and you will not get
your full yield of spirit.
12.Sit back, relax, the hard bit is done!
13.Between 2 and 3 hours after starting spirit collection the temperature will start to rise,
and the thermometer alarm will sound, turn the tap back to the off position, this will
return the reflux action to slow mode. The temperature may take a few minutes to
return to the steady temperature of around 78 degrees.
14.We recommend you change collection vessels at this point, you have completed
collecting the purest and cleanest neutral spirit. There is nothing wrong with the
remaining neutral spirit that is being collected now, it will contain a slightly higher
percentage of tails or feints and these will be removed in the filtering process. We
suggest you use this product to make liqueurs. Remember to filter separately, after the
initial collection has been watered down and filtered.
15.Reset the thermometer alarm again for 2 degrees higher than the steady temperature
shown on the display
16.After approximately 30 minutes the temperature will again start to rise and the alarm
will sound. Turn off the boiler, water and alarm. WARNING: the boiler and the
condenser are very hot and must be allowed to cool down before moving or starting
clean-up.
Fast Mode

Measure and Test Your Spirit
The spirit you have collected should be over 90% ABV, that’s 180 proof, it cannot be consumed
at this strength, it will result in alcohol poisoning or even death! To bring the spirit to a
strength suitable for consumption (it must be below 55% ABV), we first need to find its
strength:
1. Test the spirit you have collected with the alcometer, the alcometer will only measure
alcohol/water mixes, it cannot be used to measure the alcohol content of your wash.
2. The alcometer is calibrated to be accurate at a temperature of 20 degrees, if your
collected spirit is warmer than 20 degrees (it generally will exit the condenser at +40
degrees), the reading will need to be adjusted. There are many websites where this can
be calculated; google “alcometer temperature correction table”.
Dilute the Spirit
Once you have measured the ABV of the spirit, determine your final consumption strength,
generally 36 - 42% ABV. Add water to the spirit, as a general rule if 3 litres of spirit has been
measured at 90%, adding 3 litres of water will result in 6 litres at 45%. Keep adding water until
your alcometer reads the consumption strength you have picked.
Remember to adjust for temperature as the water you are adding will lower the mixed spirit
temperature.
Filter the Spirit
The spirit is now ready to be filtered, the activated carbon filter cartridge will attract and trap
chlorine and volatile organic compounds like acetone, benzene, ethylene glycol,
formaldehyde, methylene chloride, perchloroethylene, toluene and xylene. These volatile
organic compounds are present in very minute quantities in the tails of the distillation run.
Rinse the premium Pure Distilling Filter Cartridge under clean running water to remove any
dust and loose particles, then soak the Filter Cartridge in diluted spirit or water until no
bubbles can be seen coming from the Filter Cartridge, it will take about 20 minutes. This
process removes any chance of creating an airlock in the filter process.

Setting Up the Filter System
The following steps will get the filter setup correctly, remember the thumbscrew and nut will
only ever need to be fitted once, then it’s only a matter of fitting the soaked Filter Cartridge
onto the stainless spindle and screwing it on.
The Thumbscrew, O-ring and Nut shown below make up the fitting that the spindle will screw
into and will be fitted first onto the Top Bucket (the one with the small hole in the base)
1. The thumb screw fits through the bucket base, the O-ring is fitted under the bucket
base.
2. The nut which is done up tight with the recess for the O-ring facing up (toward the base
of the bucket as per photo below) and will tighten over the O-ring. Finger tight should
ensure no leaks, do not over tighten!

3. The stainless spindle screws into the base of the fitting we just assembled on the top
bucket, and is made up of the parts shown below.
4. This Filter Cartridge assembly allows easy replacement of the Pure Distilling Filter
Cartridges. It is assembled as per below:
a. The silicon O-ring with the small hole fits at the base of the spindle, it is packaged
like that.
b. Then the Pure Distilling filter cartridge slides over the spindle, after being soaked.
c. The silicon O-ring with the large hole goes over the nut on the bottom of the
bucket.
d. This whole assembly is then screwed into the base of the fitting already in place
in the top bucket, again finger tight should ensure no leaks, do not over tighten!

5. Fit the red handled plastic tap to the bottom filter bucket with the hole in the side
between the volume scale, The tap comes with two silicon washers, make sure there is
a silicon washer either side of the bucket. Do up tight and test for leaks.
6. Place the filter bucket lid with the big hole on the bucket with the tap.
7. Place the top filter bucket with the filter spindle onto the bottom bucket guiding the
filter spindle carefully through the hole in the lid.
8. The Smart Filter stainless steel stick plug pushes into the top of the thumbscrew (don’t
screw it in, the O-ring will break) and acts as a plug, stopping any flow, push it in position
now ready for your batch.
9. Make sure the tap on the bottom bucket is closed!
10.You are now ready to filter your spirits, remember you need to replace the filter
cartridge for each wash!

11.Once the spirit has filtered you can bottle directly from your tap or pour into a
Pourmaxx measuring jug and mix your essences.
Remember the filter cartridge needs to be replaced with every wash you process, so when
buying another Pure Distilling Premium Yeast and accessories, pick up a new filter
cartridge.
Congratulations you are now a distiller!

Cleaning & Maintenance
You may be a distiller, but the clean-up still has to be done! The wash we have distilled is very
corrosive (has a pH of about 5.5) and we need to clean the boiler and condenser very well to
stop any corrosion. If this is not done, over time the column can corrode and will not perform
as designed, the photo below is the worst we have seen:
Only start the cleaning once the system
has cooled down, the system will remain
very hot for a few hours after use. Once
the system is cool:
•Disconnect the hoses, drain & store.
•Remove the thermometer, turn it
off and store, do not get it wet.
•Remove the lid with the condenser
still attached, take care not to damage
the product output arm.
•Run warm water for a few minutes
down the column, letting it run out the
holes at the top of the column.
•Allow the column to dry before
storing.
Generally, this all that is required to keep the condenser in good working order. If during
the distillation run the wash surged up the column due to excess sugar or sediments
present in the wash, it is necessary to rinse until the water runs clear and then soak the
condenser in a citric acid wash. Pure Distilling Citric Acid Cleaning Shots are available from
your local home brew shop, to use:
•Use the contents of a Pure Distilling Citric Acid
Cleaning Shot or 15g of citric acid with 1.8 litres of
warm water.
•Block one end of the condenser or prepare a
suitable container to use as a bath, and pour in the
Citric Acid solution.
•Leave to stand for 20 minutes.
•Rinse with warm water for 3 minutes.
•Allow to dry before storing.

To clean the boiler ensure it is disconnected from the power supply, then:
•Empty the boiler, it is heavy, use the tap to drain the wash from the boiler until it is
a manageable weight, then empty into a suitable waste water drain.
•Rinse the inside of the boiler with warm water, use a cloth not a scourer or any
abrasive material.
•The best cleaner for stainless steel is Sodium Percarbonate, available from your
local home brew store, use as per the instructions. Do not use Sodium
Metabisulphite or Pure Distilling Easy Clean, these are only suitable for plastics and
glass.
•Rinse the boiler with warm water.
•Allow the boiler to dry before storing.
For legal reasons it is best to store the condenser and boiler disassembled, these are then still
parts not a still.
Now you have earned that drink!

Problems and Issues
Sometimes things go wrong, problems with Pure Distilling condensers are very rare due to the
simplicity of their design and no moving parts We will do our utmost to rectify any issues you
are having and ensure that your distilling is a fun and productive process, contact us on:
Email: info@puredistilling.com
Facebook: www.facebook.com/PureDistilling
Table of contents
Other Pure Distilling Distilling Equipment manuals