Pyxis SP-350RO User manual

Water Professionals Deserve Better Tools.
www.pyxis-lab.com
SP-350RO Handheld PTSA Meter
User Manual

Table of Contents
1 Introduction…………………………………………………………………………………………………………………………………………5
1.1 Main Features.....................................................................................................................................5
2Specifications .................................................................................................................. 5
3 Unpacking Instrument ..................................................................................................... 5
3.1 Standard Accessories .........................................................................................................................5
3.2 Optional Accessories..........................................................................................................................6
4 Installation ...................................................................................................................... 7
4.1 Battery Installation .............................................................................................................................7
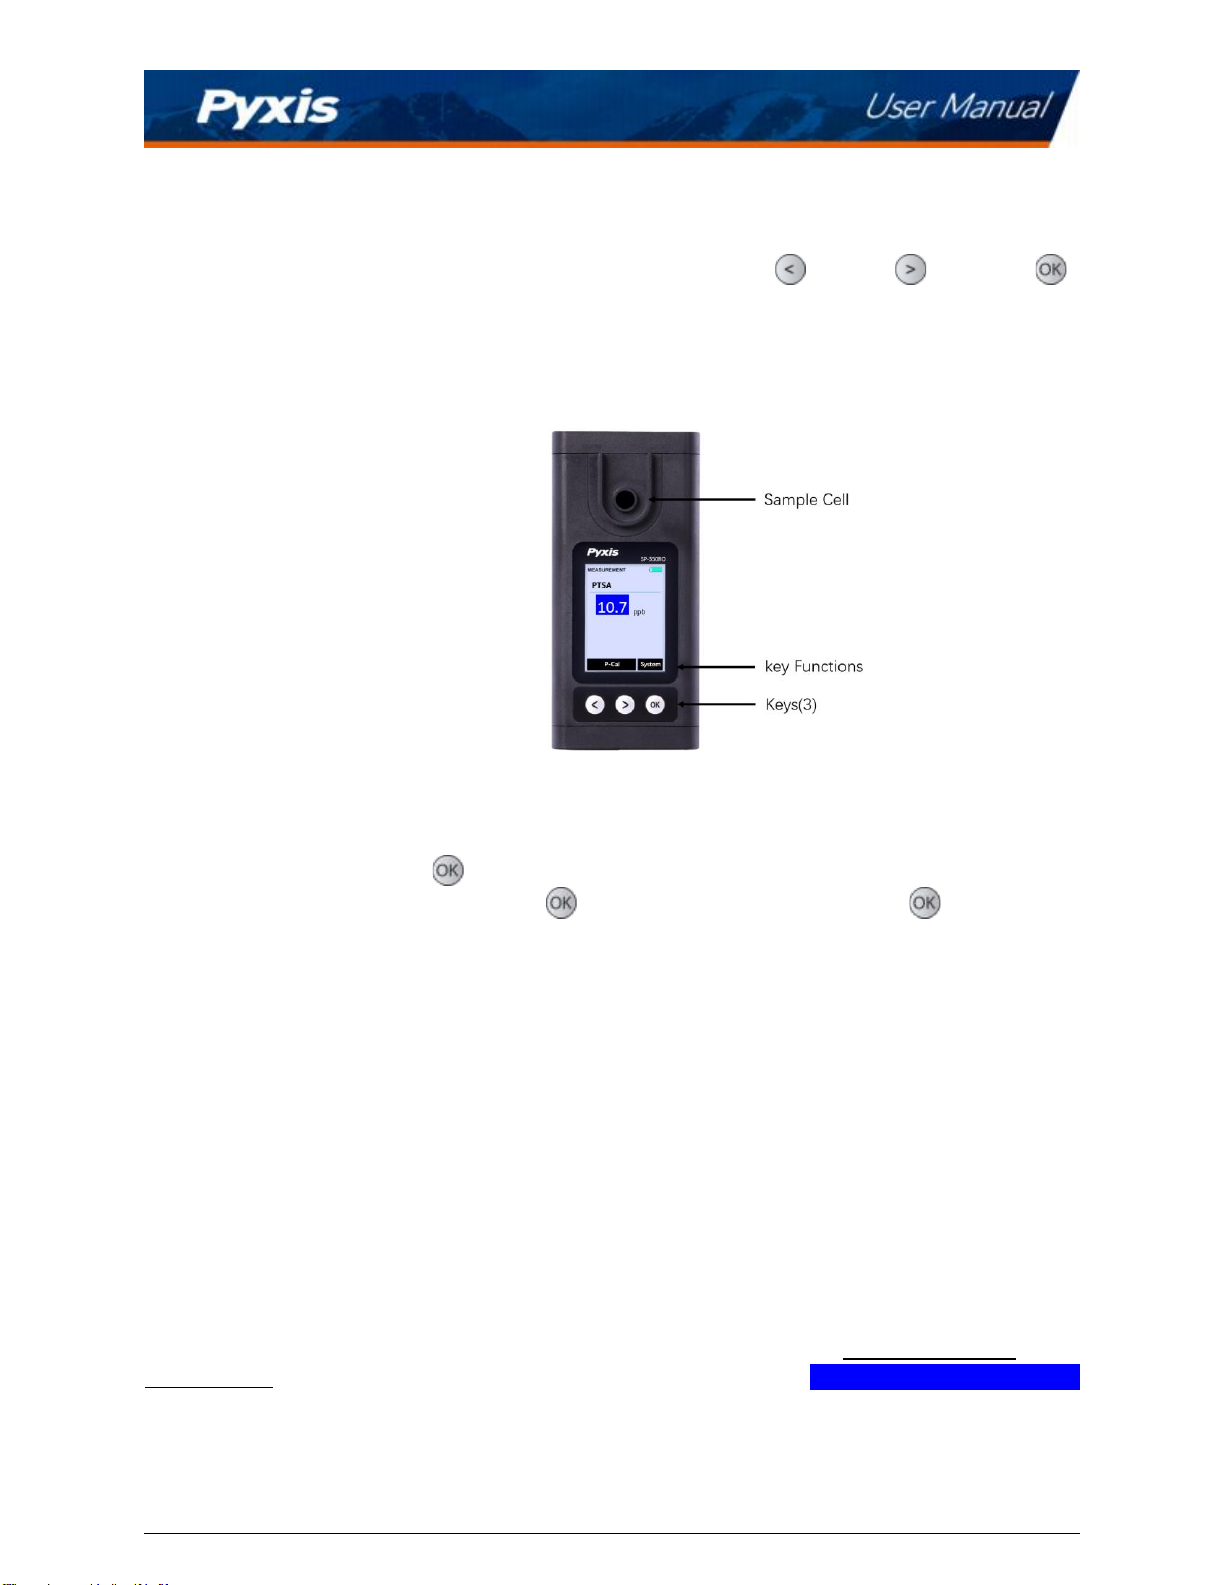
5 Instrument Overview ....................................................................................................... 8
5.1 Control Keys ........................................................................................................................................8
5.2 Main Module On/Off..........................................................................................................................8
6 Measurement .................................................................................................................. 8
6.1 PTSA Measurement............................................................................................................................8
6.2 High Color and Turbidity Warning.....................................................................................................9
7 Calibration ....................................................................................................................... 9
7.1 PTSA Calibration (Two-Point with Zero) ............................................................................................9
8Device Information and Diagnosis ................................................................................. 10
8.1 Sample Cell Cleanliness Check.........................................................................................................11
8.2 Bluetooth Connection to Devices....................................................................................................12
8.2.1 Calibrate an ST-500 Series Sensor with the SP-350RO via Bluetooth .................................13
8.3 Factory Reset ....................................................................................................................................15
9Use with uPyxis® Mobile App ......................................................................................... 16
9.1 Download uPyxis® Mobile App........................................................................................................16
9.2 Connecting to uPyxis® Mobile App .................................................................................................17
9.3 Setting Screen...................................................................................................................................18
9.4 System Screen...................................................................................................................................19
10 Use with uPyxis® Desktop App...................................................................................... 20
10.1 Install uPyxis® Desktop App...........................................................................................................20
10.2 Connecting to uPyxis® Desktop App..............................................................................................21
10.3 System Screen.................................................................................................................................22
10.4 Datalog Screen................................................................................................................................23
10.5 Setting Screen .................................................................................................................................23
11 Device Maintenance and Precaution ............................................................................ 24
11.1 Maintenance Best Practices and Quick Tips .................................................................................24
11.2 Methods to Cleaning the SP-350RO...............................................................................................24
11.3 Storage ............................................................................................................................................25
12 Contact Us.................................................................................................................... 25

SP-350R0 User Manual service@pyxis-lab.com | +1 (866) 203-8397 1
Warranty Information
Confidentiality
The information contained in this manual may be confidential and proprietary and is the property of Pyxis
Lab, Inc. Information disclosed herein shall not be used to manufacture, construct, or otherwise reproduce
the goods described. Information disclosed herein shall not be disclosed to others or made public in any
manner without the express written consent of Pyxis Lab, Inc.
Standard Limited Warranty
Pyxis Lab warrants its products for defects in materials and workmanship. Pyxis Lab will, at its option, repair
or replace instrument components that prove to be defective with new or remanufactured components
(i.e., equivalent to new). The warranty set forth is exclusive and no other warranty, whether written or oral,
is expressed or implied.
Warranty Term
The Pyxis warranty term is thirteen (13) months ex-works. In no event shall the standard limited warranty
coverage extend beyond thirteen (13) months from original shipment date.
Warranty Service
Damaged or dysfunctional instruments may be returned to Pyxis for repair or replacement. In some in-
stances, replacement instruments may be available for short duration loan or lease.
Pyxis warrants that any labor services provided shall conform to the reasonable standards of technical com-
petency and performance effective at the time of delivery. All service interventions are to be reviewed and
authorized as correct and complete at the completion of the service by a customer representative, or des-
ignate. Pyxis warrants these services for 30 days after the authorization and will correct any qualifying
deficiency in labor provided that the labor service deficiency is exactly related to the originating event. No
other remedy, other than the provision of labor services, may be applicable.
Repair components (parts and materials), but not consumables, provided during a repair, or purchased
individually, are warranted for 90 days ex-works for materials and workmanship. In no event will the in-
corporation of a warranted repair component into an instrument extend the whole instrument’s warranty
beyond its original term.
Warranty Shipping
A Repair Material Authorization (RMA) Number must be obtained from Pyxis Technical Support before any
product can be returned to the factory. Pyxis will pay freight charges to ship replacement or repaired
products to the customer. The customer shall pay freight charges for returning products to Pyxis. Any
product returned to the factory without an RA number will be returned to the customer. To receive an
RMA you can generate a request on our website at Request Return or Repair - Pyxis Lab, Inc. (pyxis-
lab.com)
Pyxis Technical Support
Contact Pyxis Technical Support at +1 (866) 203-8397 or service@pyxis-lab.com.

SP-350RO User Manual [email protected] | +1 (866) 203-8397 2
1 Introduction
The Pyxis SP-350RO is a uniquely designed handheld multimeter that measures PTSA. It is a cuvette-less
device. Less than 5 mL water sample is needed to fill the sample cell for proper measurement.
1.1 Main Features
The SP-350RO includes the following features:
• Measurement of the concentration of fluorescent tracer PTSA of a water sample.
•Pre-calibrated for measuring PTSA in the range of 0 to 40 ppb.
•The fluorescence PTSA measurement is automatically compensated for sample color and turbidity
interference up to 60 NTU without prefiltration.
• PTSA fluorescence can be calibrated using a single standard through a user-friendly, menu-driven
procedure.
•Large color graphic screen that can be read in direct sunlight.
2Specifications
Table 1. SP-350RO Specifications
Item
Specification*
P/N
61389
PTSA Range
0–40 ppb
PTSA Precision
1% or 1 ppb
Temperature Range
40–106 °F (4–41 °C)
Display
320×240 TFT-LCD, visible under direct sunlight
Power Supply
4 AA alkaline batteries
Typical Battery Life
10,000 readings
Dimension (L W H)
6.30 2.91 1.30 inch (160 74 33 mm)
Weight
0.68 lbs (310 g)
Enclosure Rating
IP67
*With Pyxis’s continuous improvement policy, these specifications are subject to
change without notice.
* Batteries excluded
3 Unpacking Instrument
Remove the instrument and accessories from the shipping container and inspect each item for any damage
that may have occurred during shipment. Verify that all items listed on the packing slip are included. If any
items are missing or damaged, please contact Pyxis Customer Service at service@pyxislab.com.
3.1 Standard Accessories
•Four (4) AA alkaline batteries
• Bluetooth/USB Adapter for Desktop P/N: MA-NEB
• User Manual available online at https://pyxis-lab.com/support/

SP-350RO User Manual [email protected] | +1 (866) 203-8397 3
3.2 Optional Accessories
The following optional accessories can be ordered from Pyxis Customer Service (order@pyxis-lab.com) or
Pyxis E-Store at https://pyxis-lab.com/shop/.
Table 2.
Accessory Name
P/N
Pyxis Carrying Case for Handhelds
MA-700
50725
Pyxis 30ppb PTSA Calibration Standard —500 mL
PTSA-30
Pyxis Handheld Cleaning Kit
SER-02

SP-350RO User Manual [email protected] | +1 (866) 203-8397 4
4 Installation
4.1 Battery Installation
The SP-350RO is powered by four alkaline batteries. Typical battery life lasts for 10,000 measurements or
10 months. When the battery capacity is critically low, the SP-350RO will display a ” LOW BATTERY”
warning for 5 seconds and then automatically turn off.
*NOTE*Do not use rechargeable nickel cadmium (NiCad) or lithium batteries.
Replace the batteries to resume operation of the SP-350RO after the battery warning. The SP-350RO will
automatically turn on in the measurement mode after new batteries are installation.
The SP-350RO battery compartment, shown in Figure 1, is on the back side of the instrument. Batteries
are held in place by a cover secured with two Phillips-head screws.
Figure 1. The SP-350RO battery compartment
Install batteries using the following steps:
1. Remove the battery compartment cover by loosening the two screws.
2. Remove old batteries and dispose of them properly.
3. Following the positive and negative terminal signs in the compartment bottom, snap four new AA
alkaline batteries firmly into the battery holder.
4. Replace the battery compartment cover and ensure that the sealing O-ring is lying flat on the battery
holder.
5. Fasten the two screws.
*NOTE*Failure to properly seat the O-ring may result in water damage to the SP-350RO.

SP-350RO User Manual [email protected] | +1 (866) 203-8397 5
5Instrument Overview
5.1 Control Keys
The SP-350RO has three control keys, as shown in Figure 2. The left ( ), right ( ), and ok ( )
keys are used to launch actions indicated on the LCD display directly above the keys. The labels above the
keys indicate the function associated with each key and functions can be changed in different operation
modes.
Figure 2.
5.2 Main Module On/Off
To turn on the SP-350RO: Press momentarily and release.
To turn off the SP-350RO: Press and hold for about three seconds. Release when the LCD
display turns off. The SP-350RO turns itself off after 60 seconds without user interaction detected. This
is done to conserve battery life.
*NOTE*This auto-time off setting may be customized by the user as desired through the
uPyxis@ Mobile or Desktop App.
6Measurement
6.1 PTSA Measurement
When powered on, the SP-350RO will default to the PTSA measurement mode. The water sample can
be transferred to the sample cell using a pipette or filled directly from a faucet, sample bottle, or
sample valve.
*NOTE*Special care should be taken when pouring the sample into the cell to avoid air
bubble entrainment, which can interfere with reading accuracy.
Before beginning a measurement, use the sample water to rinse the sample cell at least three times . Allow
5–10 seconds for the SP-350RO to stabilize. The values will be displayed in white with ablue background
if a stable value is reached (Figure 2). For a sample containing 30 ppb PTSA, the measured PTSA should
be stabilized within the range of 29–31 ppb.

SP-350RO User Manual [email protected] | +1 (866) 203-8397 6
*NOTE*The time required to reach a stable reading may be slightly longer if the water
sample temperature is significantly different than the environmental temperature at which
the SP-350RO had been equilibrated (stored).
6.2 High Color and Turbidity Warning
The SP-350RO has extra channels to measure sample turbidity and color to automatically compensate
sample color and turbidity interference. If sample turbidity and color values determined are too high, a
PTSA measurement warning will be displayed. In such a case, the user should filter the sample for PTSA
measurement.
7Calibration
7.1 PTSA Calibration (Two-Point with Zero)
1. Rinse the sample cell three times with DI water. Fill the sample cell with DI water.
*NOTE*In emergency, “non-PTSA”water, such as city water, may be used, but re-
calibrate using DI water for the zero step as soon as it is available.
2. Power on the SP-350RO by pressing . Allow 5–10 seconds for the SP-350RO to stabilize.
3. The unit is actively reading and displaying PTSA. The values will be very low if DI water is used; PTSA
value should be near zero. A low non-zero value (e.g.,0.2 or 0.4, etc.) is not problematic.
4. Press P-Cal ( or ) to launch the PTSA CALIBRATION screen (Figure 3).
5. Press Zero ( ) to start the zero (blank) calibration.
6. If the calibration succeeds, a checkmark ( ) and instructions for the slope calibration will appear
(Figure 4).
7. Rinse the sample cell three times with 30ppb PTSA standard. Fill the sample cell with 30ppb PTSA
standard.
8. Press Slope ( ) to start the slope calibration.
9. If the calibration succeeds, a checkmark ( ), a ”Calibration Success” message will appear (Figure
5). Otherwise, a warning message is displayed.
10. Calibration is now complete. Press Exit ( ) to return to measurement mode.
*NOTE*If Exit is pressed before the second checkmark appears, the calibration will
not be completed and must be re-done.

SP-350RO User Manual [email protected] | +1 (866) 203-8397 7
Figure 3.
Figure 4.
Figure 5.
8 Device Information and Diagnosis
The DEVICE INFORMATION screen is launched when System ( ) is pressed in the measurement mode.
This screen contains the device serial number, software version, and hardware version (Figure 6). The bat-
tery life as a percentage and the MAC addresses for main module also shown.
Press Diagnosis ( ) to launch the SYSTEM DIAGNOSIS screen where raw measurement data are displayed
(Figure 7). The information has no use for normal operation, but instead is used for device troubleshooting.
Provide an image of both the DEVICE INFORMATION screen and the SYSTEM DIAGNOSIS screen when you
contact Pyxis (service@pyxis-lab.com) for troubleshooting your device or call +1 (866) 203-8397.
Figure 6.
Figure 7.

SP-350RO User Manual service@pyxis-lab.com | +1 (866) 203-8397 8
8.1 Sample Cell Cleanliness Check
The SP-350RO is designed to provide reliable and accurate measurement on PTSA. Heavy fouling will
pre- vent the light from reaching the sensor, resulting in inaccurate readings. It is suggested that the
SP-350RO be checked for fouling and cleaned on a monthly basis. Heavily contaminated waters may
require more frequent cleanings. Cleaner water sources with less contamination may not require
cleaning for several months. The SP-350RO is designed to carry out a Cleanliness Check as described
below:
1. Power on the SP-350RO by pressing .
2. Press System ( ) to launch the DEVICE INFORMATION screen.
3. Press Diagnosis ( ) to launch the SYSTEM DIAGNOSIS screen.
4. Allow 5–10 seconds for the message in the top-right corner of the display change from Starting BTLE...
to BTLE Started
5. Press Cleanliness ( ). An instruction prompt appears to ask the user to put DI water into the
sample cell (Figure 8).
6. Pour DI water into the sample cell.
7. Press Confirm ( , , or ). The instruction prompt will disappear and the SP-350RO
displays a countdown toward the bottom of the display.
8. Once the Cleanliness Check is completed a Clean message (Figure9) or Sample cell fouled message
(Figure 10) will appear towards the bottom of the display.
9. Cleanliness check is now complete. Press Exit ( ) to return to measurement mode.
Figure 8.
Figure 9.
Figure 10.

SP-350RO User Manual service@pyxis-lab.com | +1 (866) 203-8397 9
8.2 Bluetooth Connection to Devices
The SP-350RO uses a built-in Bluetooth Low Energy Connection (BTLE) to connect wirelessly to a smart
phone via the uPyxis® Mobile App or to a computer via the included Bluetooth Adapter (P/N: MA-NEB)
and the uPyxis® Desktop App. To allow the SP-350RO to connect via Bluetooth with other devices
follow the steps below:
1. Power on the SP-350RO by pressing .
2. Press System ( ) to launch the DEVICE INFORMATION screen.
3. Press Diagnosis ( ) to launch the SYSTEM DIAGNOSIS screen.
4. Allow 5–10 seconds for the message in the top-right corner of the display change from Starting BTLE...
to BTLE Started (Figure 7).
5. Choose to connect via one of two options:
(a) The uPyxis® Mobile App (see the Use with uPyxis® Mobile Appsection), or
(b) The uPyxis® Desktop App (see the Use with uPyxis® Desktop Appsection).

SP-350RO User Manual service@pyxis-lab.com | +1 (866) 203-8397 10
8.2.1 Calibrate an ST-500 Series Sensor with the SP-350RO via Bluetooth
The SP-350RO can be used to verify the result of an inline Pyxis ST-500 Series sensor by measuring the
sample water taken from the inline sensor sample line. The SP-350RO can then be used to calibrate the
inline sensors over the Bluetooth connection. To calibrate an inline sensor, follow the steps below:
1. Power on the SP-350RO by pressing .
2. Press System ( ) to launch the DEVICE INFORMATION screen.
3. Press Comm ( ) to launch the COMMUNICATION screen (Figure 11).
4. Press Scan ( ) to begin scanning for Bluetooth devices.
5. Discoverable devices will begin to populate on the display with their name and MAC-Address (Figure
12).
6. If more than one device appears in the Device list, press »( ) to cycle through the devices.
7. If no devices or the incorrect device appear in the Device list, press Scan ( ) to re-scan for discov-
erable devices.
8. Press Connect ( ) to begin pairing to the selected sensor.
9. When the connection is established, the SP-350RO displays the latest PTSA measurement from the
connected sensor (Figure 13).
10. Fill the main module sample cell with the same sample water that the sensor is measuring.
11. Press Read ( ) to see PTSA measurement from the SP-350ROalong with the sensor
measurement (Figure 14).
12. Press Calib ( ) to begin sensor PTSA calibration.
13. The SP-350RO will take the sensor PTSA measurement three times to verify the calibration
(Figure15).
*NOTE*It takes about one minute for the sensor to approach the calibrated reading
and the three verifying readings may not be exactly the same as the value measured
by the SP-350RO press Read ()again to take more readings from the sensor, if nec-
essary.
14. If the calibration is successful, a “Verify calibration - OK” message will appear on the top of the display
(Figure 16).
15. Calibration is now complete. Long press Calib ( ) to return to measurement mode.

SP-350RO User Manual [email protected] | +1 (866) 203-8397 12
8.3 Factory Reset
Use the following steps to restore all device parameters to factory default:
1. Power on the SP-350RO by pressing .
2. Press System ( ) to launch the DEVICE INFORMATION screen.
3. Press Diagnosis ( ) to launch the SYSTEM DIAGNOSIS screen.
4. Allow 5–10 seconds for the message in the top-right corner of the display change from Starting BTLE...
to BTLE Started .
5. Press Help ( ) to launch the HELP screen (Figure17).
6. Press Factory Reset ( or ). The display updates as shown in Figure 18 appear and the user
can choose one of three options:
(a) Press to start the factory reset, or
(b) Press Cancel ( ) to return to the HELP screen, or
(c) Press Exit ( ) to abandon the factory reset entirely.
7. After a successful factory reset, the message “Factory reset done.” will appear on the display.
8. Press Exit ( ) to return to measurement mode.
Figure 17.
Figure 18.

SP-350RO User Manual service@pyxis-lab.com | +1 (866) 203-8397 14
9.2 Connecting to uPyxis® Mobile App
Connect the SP-350RO sensor to a mobile smart phone according to the following steps:
1. Follow the steps in the Bluetooth Connection to Devices section to make the SP-350RO discoverable.
2. Open uPyxis® Mobile App.
3. On uPyxis® Mobile App, pull down to refresh the list of available Pyxis devices.
4. If the connection is successful, the SP-350RO and its Serial Number (SN) will be displayed (Figure 20).
5. Press on the SP-350RO image.
Figure 20.

SP-350RO User Manual service@pyxis-lab.com | +1 (866) 203-8397 15
9.3 Setting Screen
When connected, the uPyxis® Mobile App will default to the Setting screen. From the Setting screen, the
user can set the Power off time and Screen off time in seconds. Be sure to press Apply Settings to save
any changes.
Figure 21.

SP-350RO User Manual service@pyxis-lab.com | +1 (866) 203-8397 16
9.4 System Screen
From the System screen, users can change the Device Name, find the Serial Number, Hardware Version,
and Firmware Version, as well as update the firmware of the SP-350RO by pressing Check Update. If a
firmware update is available, press Download. Once the new firmware is downloaded, press Upgrade.
*NOTE*The firmware update process takes some time and will require the SP-350RO to
stay within range (approximately 10 ft without obstructions) for the entire duration of the
update.
Once the update is complete, the SP-350RO will reboot which will disconnect the SP-350RO from the uPyxis®
Mobile App.
Figure 22.

SP-350RO User Manual service@pyxis-lab.com | +1 (866) 203-8397 17
10 Use with uPyxis® Desktop App
[uPyxis® Desktop App installation]
10.1 Install uPyxis® Desktop App
Download the latest version of uPyxis® Desktop software package from: https://pyxis-lab.com/upyxis/this
setup package will download and install the Microsoft.Net Framework 4.5 (if not previously installed on the
PC), the USB driver for the USB-Bluetooth adapter (MA-NEB), the USB-RS485 adapter (MA-485), and the
main uPyxis® Desktop application. Double click the uPyxis.Setup.exe file to install.
Figure 23. uPyxis® Desktop App installation
Click Install to start the installation process. Follow the screen instructions to complete the USB driver and
uPyxis installation.
Table of contents
Other Pyxis Measuring Instrument manuals

Pyxis
Pyxis ST-774 User manual

Pyxis
Pyxis SP-800 User manual

Pyxis
Pyxis SP-400 User manual

Pyxis
Pyxis PRISM RT-100 User manual

Pyxis
Pyxis SP-380P User manual

Pyxis
Pyxis SP-910 User manual

Pyxis
Pyxis PermaCheck EZ-101 User manual

Pyxis
Pyxis EM-400 User manual

Pyxis
Pyxis SP-380P User manual

Pyxis
Pyxis SP-350 User manual
Popular Measuring Instrument manuals by other brands

Hanna Instruments
Hanna Instruments HI 8014 instruction manual

ProfiTap
ProfiTap ProfiShark 10G Installation and configuration manual

Solartron
Solartron 1253A operating manual

LOVATO ELECTRIC
LOVATO ELECTRIC EXP10 31 instruction manual

VisionStat
VisionStat MA-BCKS-5.6 Installation and user manual

TSI Instruments
TSI Instruments AirAssure quick start guide