QUIEDAN COMPANY 2000 Series User manual

QUIEDAN COMPANY
22'x48' - 2000 Series Installation Manual

22'x48' - 2000 Series Components List
QUIEDAN COMPANY

QUIEDAN COMPANY
Instructions
1. Measure and map out your platform insertion
points (as shown).
2. Use appropriate tooling according to the
condition of the soil where the structure will
stand.
Overview:
Setting up the foundation is crucial to maximizing
the stability of your cold frame. Be sure to clear out
the portion of land you intend to cover and flatten
the ground to ensure continuity throughout the
heights of all platform posts.

QUIEDAN COMPANY
Instructions
1. Use pneumatic pounder to install 13 platforms 2'-6"
in the ground at insertion points.
2. Be sure that the top of the platforms are leveled.
Overview:
Inserting platform posts.
13 platform post (18)

QUIEDAN COMPANY
Instructions
1. Grab eight 21 40/42mm one bolt strap clamps. Drop
one onto the third and fourth 13 platform posts of
each corner (see picture below).
2. Set 25 uni-directional tops on the heads of 13 platforms
and align appropriately.
Overview:
Preparing platform posts by attaching
uni-directional tops.
13 platform post
21 40-42 one bolt strap clamp (8)
25 uni-directional top (18)

QUIEDAN COMPANY
Instructions
1. Using 17 33mm/42mm straight clamps, 19 3 way connectors,
23 pivot caps and 21 33mm/42mm one bolt strap clamps, connect
six foot 33mm tubes and 9 eight foot 33mm tubes
(as shown below) to reinforce corners.
Overview:
Connecting platform posts at all four corners to
create support bracing.
8 6' tube (8)
9 8' tube (4)
17 33/42mm straight clamp (8)
19 33/42/33mm 3-way clamp (4)
21 40-42mm one bolt strap clamp
23 pivot caps (8)

QUIEDAN COMPANY
Instructions
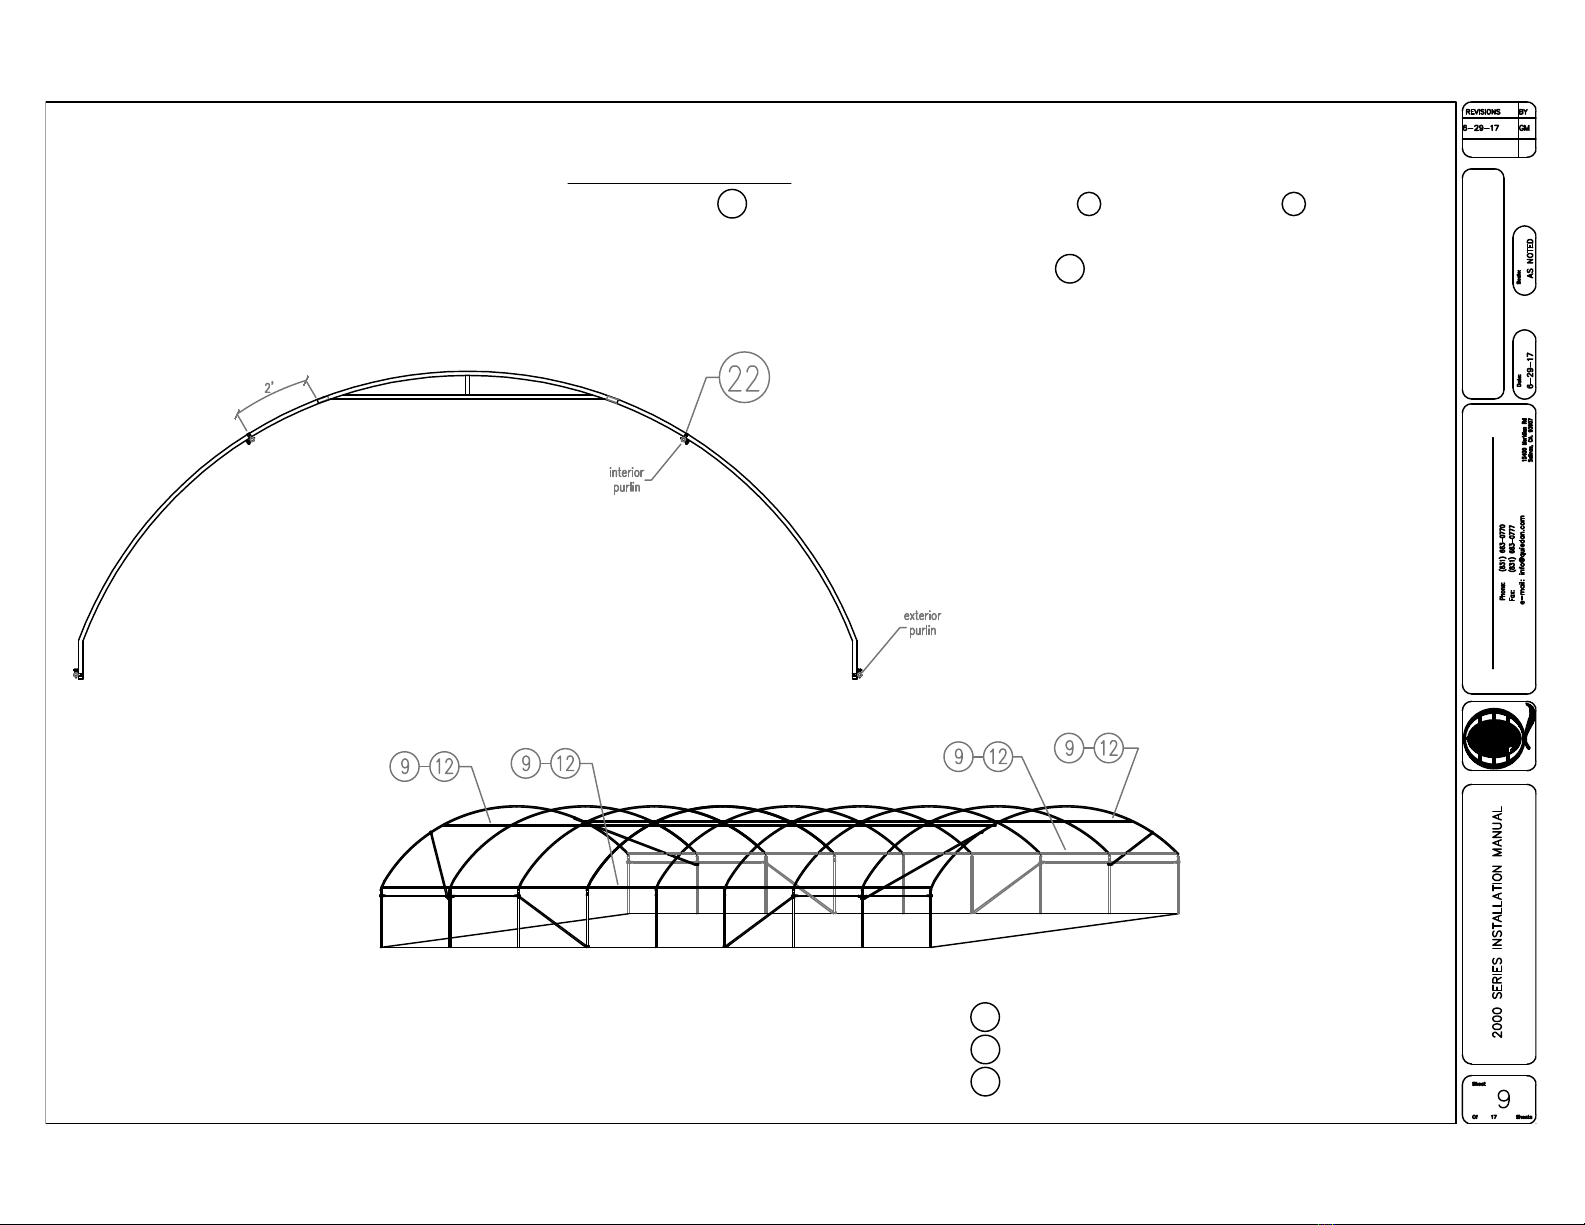
1. Slide one 33/33mm hinged double-clamp onto each 6 10' leg, 2' in from
the swaged end (see drawing).
2. Connect 6 10' legs to 7 8' reinforced center piece to create arc
(drill in two 1 screws at the unions to hold tubes together).
3. With one person on each side, insert one end at a time
and continue until all arc sets are installed onto 13 platforms.
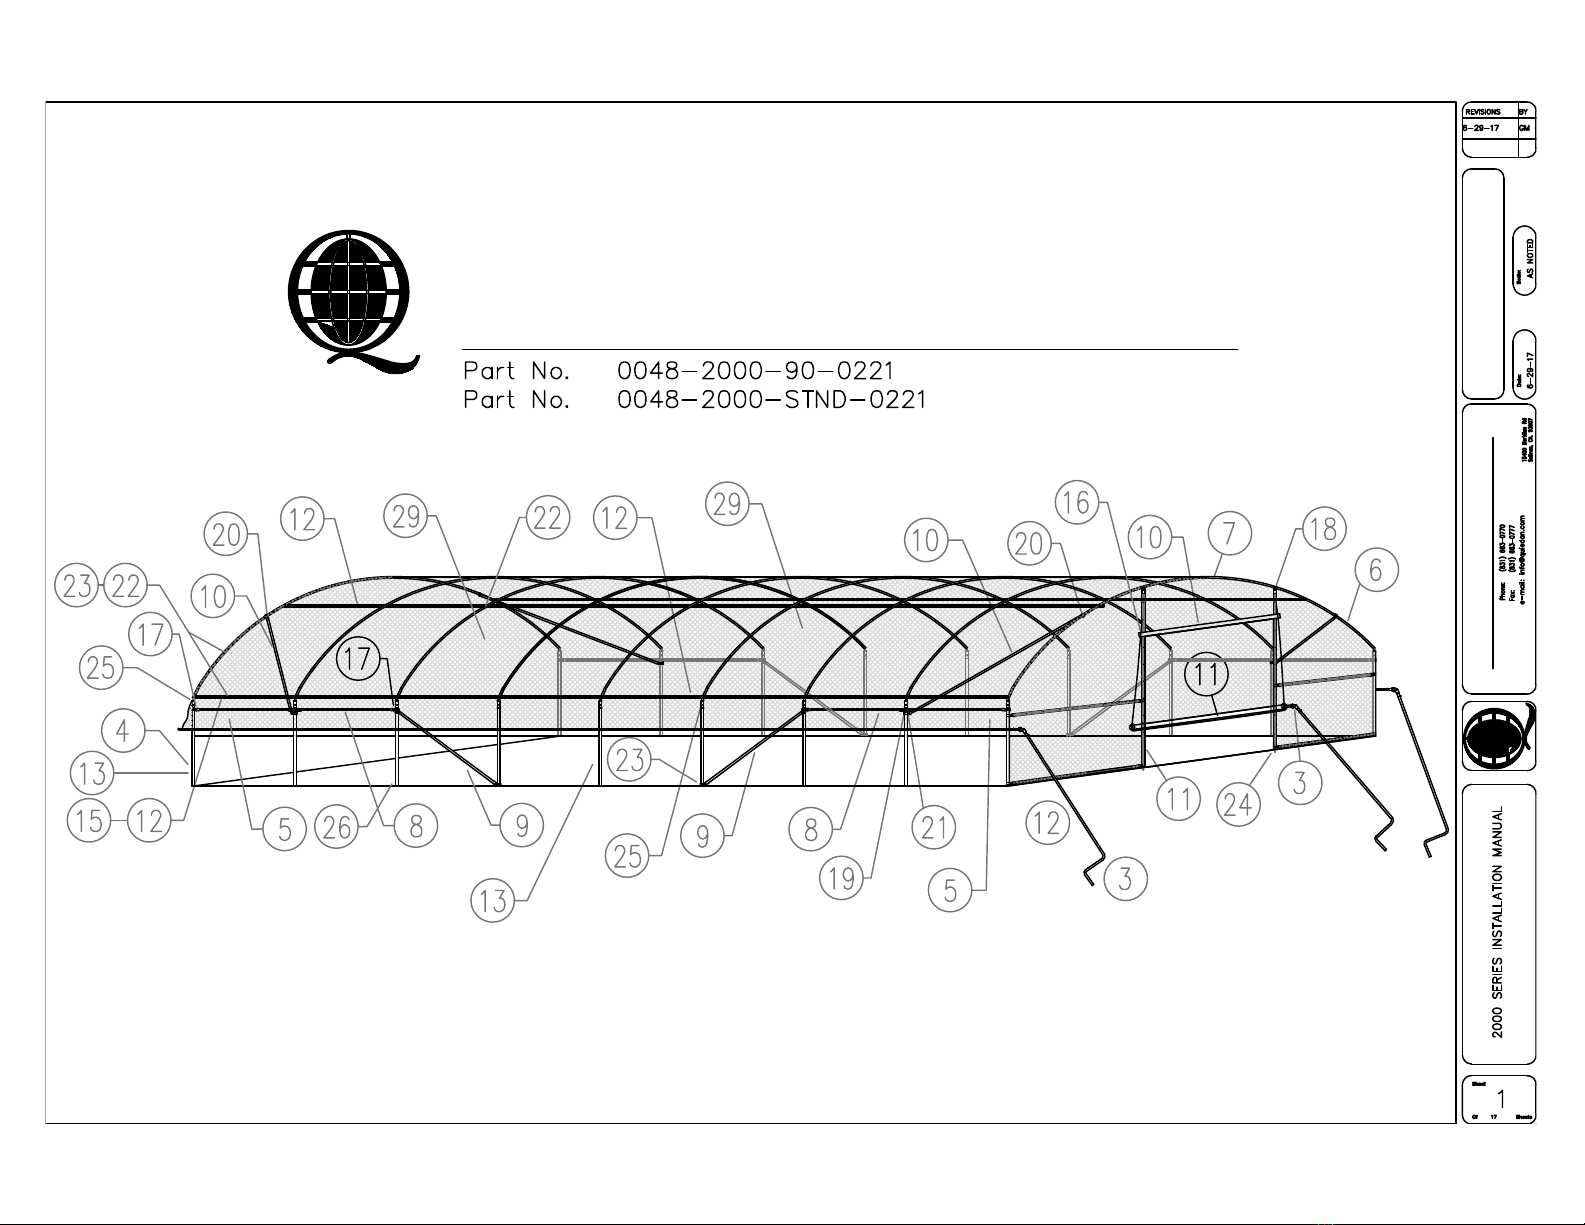
Overview:
Installation of arcs to begin over-head structure
assembly.
1 sds screws 13 platform post
6 10' leg section (pairs)(9) 22 33/33mm hinged double clamp (18)
7 8' reinforced center (9)

QUIEDAN COMPANY
Instructions
1. Using 20 33mm one bolt strap clamps, 21 42mm one-bolt
strap clamps, and 23 pivot caps, connect 10 10' tubes from the end
arcs to the appropriate platform posts as shown below.
Overview:
Attachment of the stretchers will provide additional
support to both ends of the cold frame since this is
where the most tension is placed.
10 10' tube (4)
20 33mm one bolt strap clamp (4)
21 40-42mm one bolt strap clamp (4)
23 pivot cap (8)

QUIEDAN COMPANY
Instructions
1. Connect four 12 10' swaged tubes together plus one 9 8' tube (drill in two 1 screws at the
unions to hold tubes in place) to create one purlin. Construct four purlins (two interior
and two exterior) and connect them to arcs using 22 33/33mm hinged double clamps.
See sketch below.
Overview:
Setting up arc purlins along the interior
and exterior sides of arc.
9 8' tube (4)
12 10' swaged tube (16)
22 33/33mm hinged double clamp (18)

QUIEDAN COMPANY
Instructions
1. Drill 28 aluminum channel along the top side of the first and last
arcs as well as on the exterior purlins as shown.
Overview:
Attaching aluminum channel to first and last
arcs.
28 aluminum channel (24)

QUIEDAN COMPANY
Overview:
Assembling side roll-up tube (a total of two).
1 sds screws
3 crank handle (2)
10 10' tubing (2)
12 10' swaged tube (10)
14 33mm swaged insert connector (4)
15 4" abs cuff (134)
Instructions
1. Connect five 12 10' swaged tubes (drill in two 1 screws at the
unions to hold tubes together) and connect all appropriate
pieces for 3 crank handle (including 14 33mm swaged insert
connectors if necessary). Once film is ready to be attached
to side roll-up tube, clamp on one 15 4" abs cuff at every foot
as shown (repeat this to create a second roll up for opposite
side of structure).
2. See page 18 for Large Crank Handle assembly details.

QUIEDAN COMPANY
Instructions
1. Gather four 8 6' tubes and add 28 aluminum channel beginning
at 12" in on both ends.
2. Using 17 33/42mm straight clamps connect prepped 8 6' tubes to the
first and last pairs of 13 platform posts.
3. Drive 24 prop stands into ground and insert 11 12' tubes at the
appropriate distance so that they can be connected by the
prepped 8 6' tubes.
4. Cut both 11 12' tubes approximately 12" below the hoop. Attach
the top of the the 12' tubes to the hoop using the 18 oblique clamps.
5. Using 16 33/33mm straight clamps, clamp the other ends
of 8 6' tubes to 11 12' posts.
6. Attach a 10 10' tube to create the door header
using 16 straight clamp 33/33mm
7. Repeat this for opposite side of structure.
Overview:
Setting up front and back enclosures.
8 6' tube (8)
10 10' tube (2)
11 12' tube (4)
13 platform post
16 straight clamp 33/33mm (16)
17 33/42mm straight clamp (8)
18 33/33 oblique clamp (4)
24 prop stop (4)
28 aluminum channel (20)

QUIEDAN COMPANY
Instructions
1. Begin by leaving 12" of film sticking outwards
past the sides, and 4" upwards past the top of the channel.
2. Use 27 wiggle wire to lock film inside 28 aluminum channel.
3. Wrap up the bottom excess film to the roll-up arms assembled
in a previous step (page 11).
4. Do this for both sides.
Overview:
Attaching film to create roll-up sidewalls. Be sure
to tape all corners and possible sharp edges before
attaching film to prevent puncturing.
5 6'x100' tarp clear
27 wiggle wire (16)
28 aluminum channel

QUIEDAN COMPANY
Instructions
1. Lay film over the cold frame.
2. Attach film to the last hoop (locking film into 28 aluminum
channel with 27 wiggle wire).
3. Pull the front very tight and lock film into the front hoop's
28 aluminum channel (film must be put on tightly to
prevent flapping which can cause potential tearing).
4. Trim excess film that hangs over the front and back of cold
frame (leave 6" of excess flap).
Overview:
Attaching film to create ceiling cover.
27 wiggle wire (8)
28 aluminum channel
29 super premium film (1)

QUIEDAN COMPANY
Instructions
1. Measure the height (x) of the cold frame and add two feet
to that distance (x+2').
2. Using the remainder of the 29 film, cut two sheets to be 32' wide
(assuming your roll of film is 32' wide) by x'+2' long (i.e. if the
cold frame height is 13', your sheet should be 32'x15').
3. Center the sheet and lock film into 28 aluminum channels with
12" of film going upwards past the top and 12" downwards past
bottom of 28 aluminum channel.
4. Do for front and back sides of cold frame.
Overview:
Attaching film to cover the front and back sides.
27 wiggle wire (28)
28 aluminum channel
29 super premium film

QUIEDAN COMPANY
Instructions
1. Cut out an opening 4" in from the 11 12' tubes and header.
Overview:
Cutting out your front and back doors.
11 12' tube

QUIEDAN COMPANY
Overview:
Creating your front and back roll up doors.
Step 1 Step 2
Step 1 of
poly web attachment
Step 2 of poly web
attachment
4 2" poly web strap
11 12' tube (2)
13 platform post
15 ABS cuff (16)
26 end "J" SDS strap clamp 42mm (18)
27 wiggle wire (18)
28 aluminum channel
Instructions
1. From the remaining film, cut out a 11'x12' sheet.
2. Lock the top portion of the film to the 23 aluminum channel with
27 wiggle wire approximately 6" above the header.
3. Wrap up the excess bottom portion of the sheet to the 11 12' tube using
15 4" abs cuffs. (For crank handle assembly, see page 18).
4. Screw on 26 42mm end "J" SDS clamp to the outside of each 13
platform, a few inches above ground with 4 poly web strip between the
26 "J" SDS clamp and the 13 platform (see illustration below, step 1).
5. Using the same strip of 4 poly web, screw the other end of the
strip into 28 aluminum channel. (see illustration below, step 2).

18
1.
Large Crank Handle,
remove nuts and bolts
from the universal joint
areas. Remove handle
and set aside.
2. Insert 11 swaged
connector into the
universal joint ends.
Crank Handle Assembly
3.
Once 11 swaged insert
connectors are in
place, drill in SDS
screws through both
sides to secure them in
place.
4.
For Side Roll-Up
Assembly insert the
swaged connector end
into the 8 8’tube roll
up assembly tube. Drill
SDS screws to connect.
5.
For the Front/Back roll-
up door assembly,
insert swaged
connector end into the
9 12’roll-up door
assembly.
4 Large Crank Handle (2)
8 8’Tubing (2)
9 12’Tube
11 Swaged connector (4)
This manual suits for next models
2
Other QUIEDAN COMPANY Farm Equipment manuals
Popular Farm Equipment manuals by other brands

Killbros
Killbros 590 Operator's Manual/Parts Catalog

GREAT PLAINS
GREAT PLAINS NTA3010 Predelivery Manual

Farmet
Farmet FALCON PRO Operating instruction

Agria
Agria Cyclone 5900 Translation of the original operating instructions

PRONAR
PRONAR PT512 Operator's manual

Land Pride
Land Pride LR3784 Operator's manual

Amazone
Amazone ZG-TS 7501 Truck operating manual

Rinieri
Rinieri CRV Instructions for use and maintanence

aivituvin
aivituvin AIR 29 instruction manual

EASY COOPS
EASY COOPS 4x12 Chicken Coop Plan manual

Wiesenfield
Wiesenfield WIHE-03201 user manual

Westermann
Westermann Cleanmeleon 800 Elektro operating instructions