manuals.online logo
Brands
  1. Home
  2. •
  3. Brands
  4. •
  5. RAB Lighting
  6. •
  7. Lighting Equipment
  8. •
  9. RAB Lighting SR2 User manual

RAB Lighting SR2 User manual

INSTRUCTIONS
FIELD-ADJUSTABLE SR™ INSTALLATION



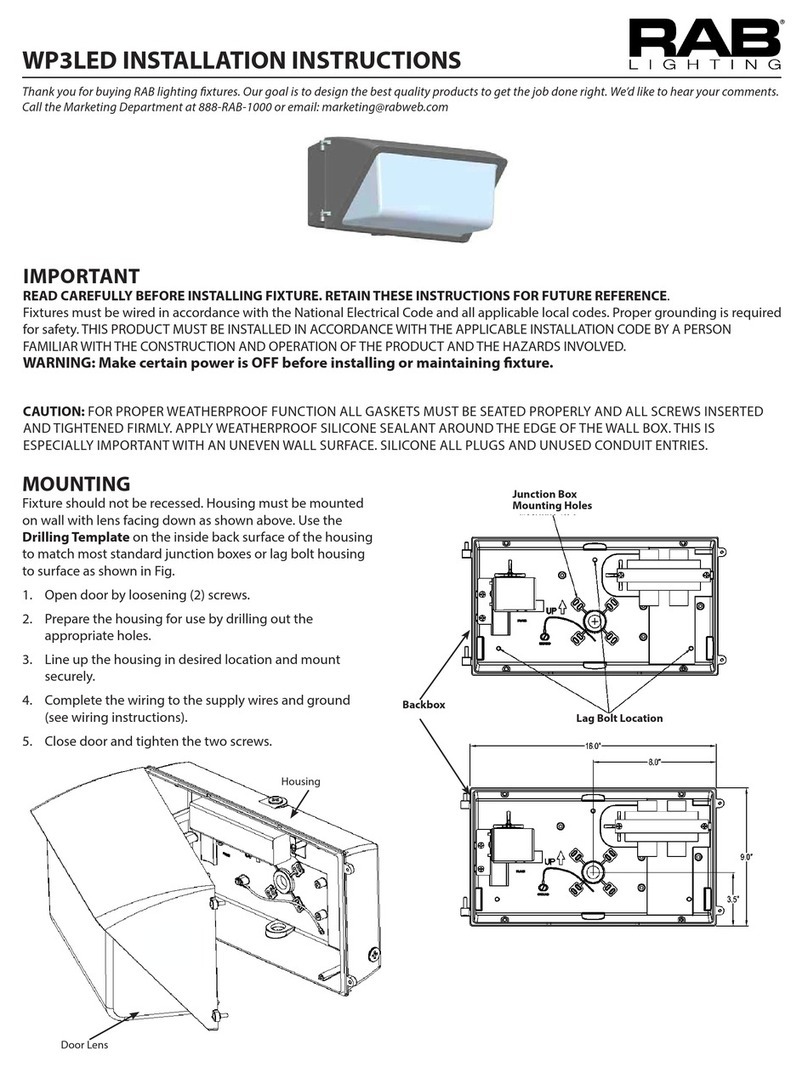
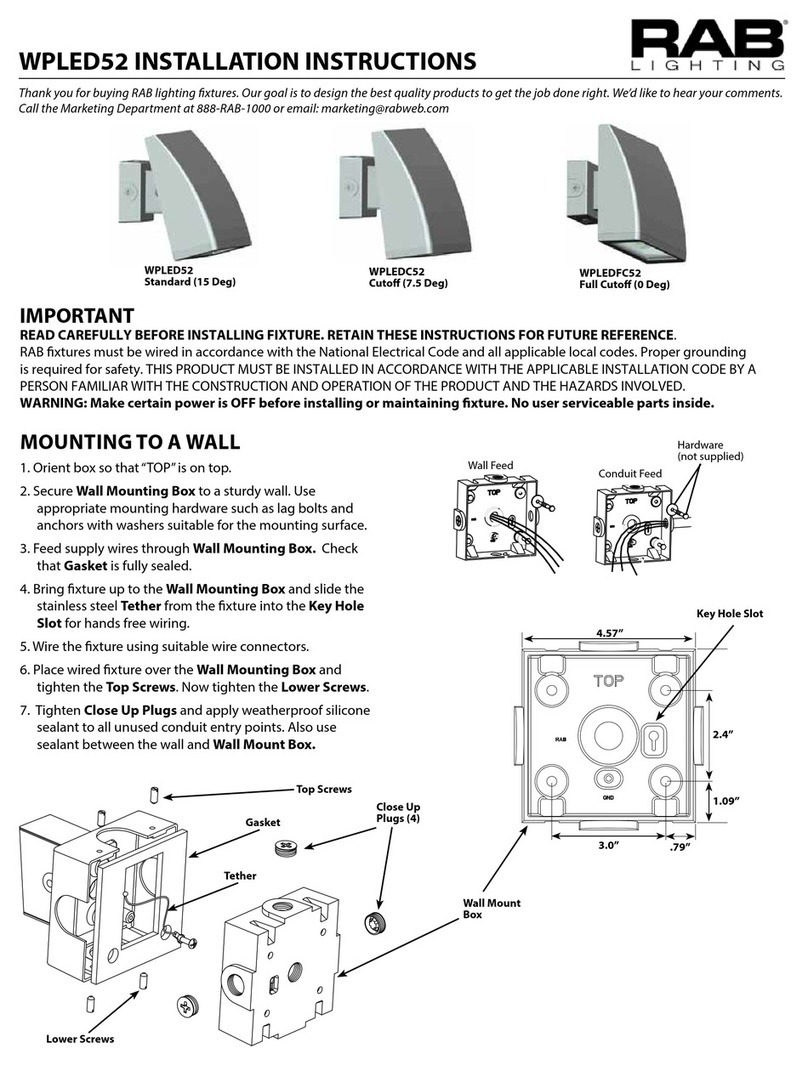
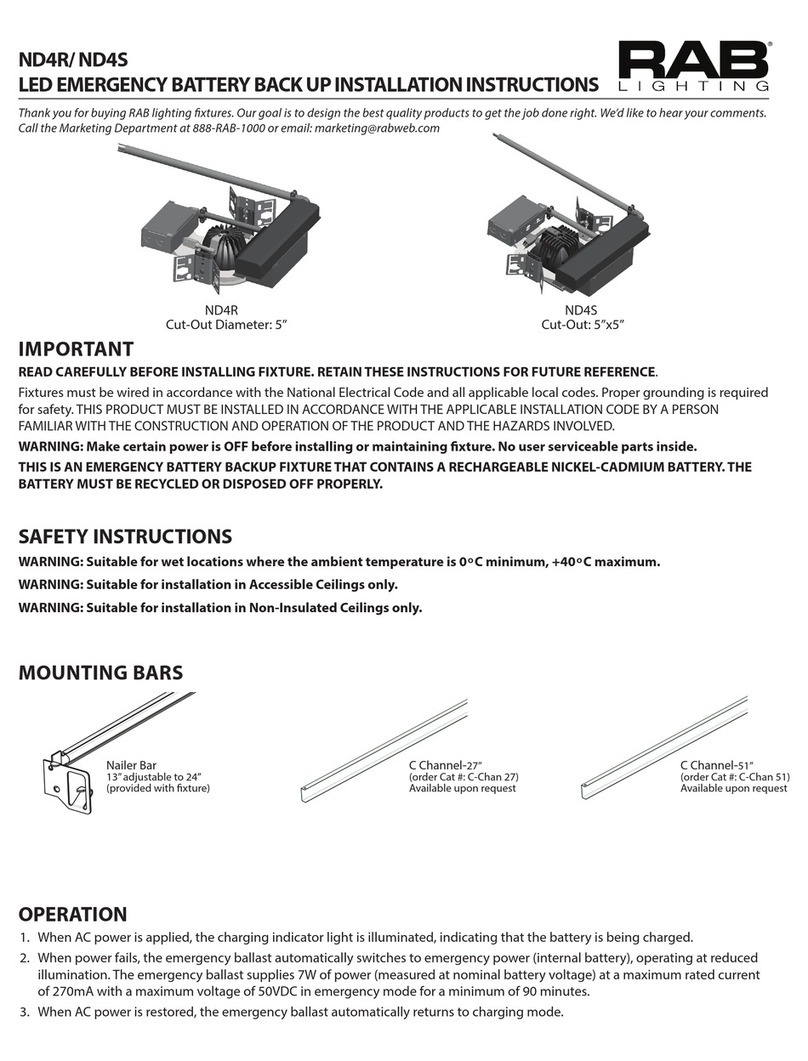
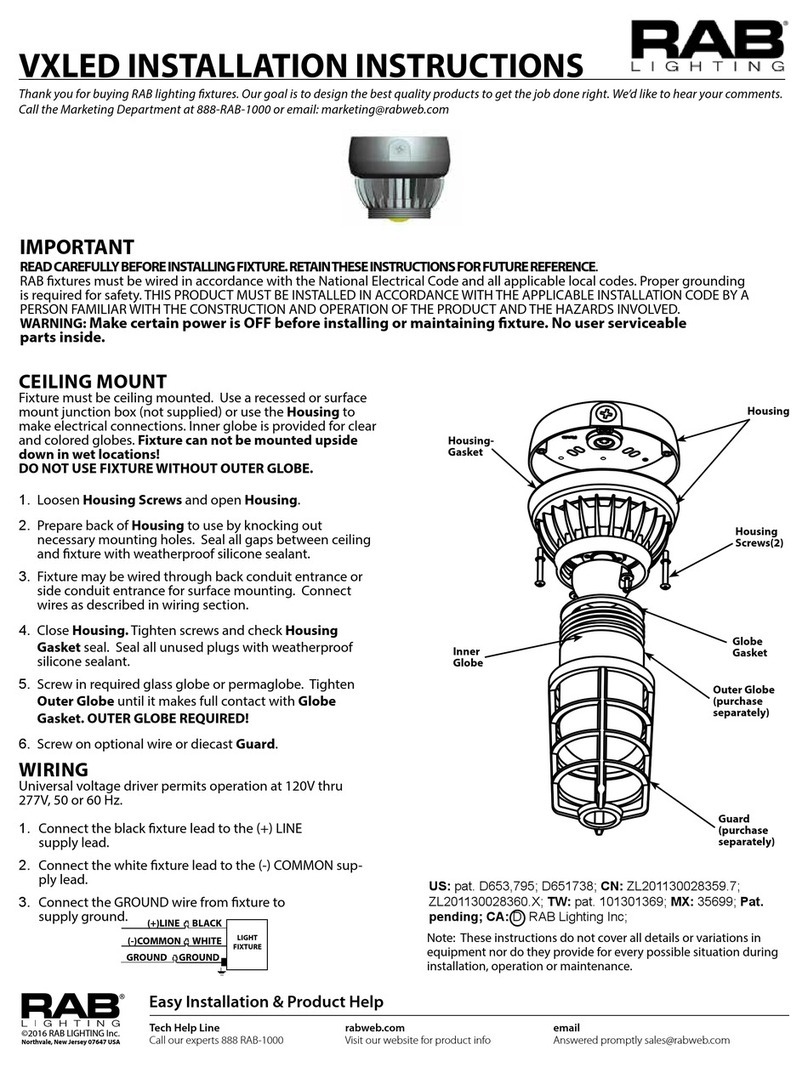
IMPORTANT
READ CAREFULLY BEFORE INSTALLING FIXTURE. RETAIN THESE INSTRUCTIONS FOR FUTURE REFERENCE.



WARNING: Disconnect or turn OFF power at the electrical panel before installing or maintaining xture. No User serviceable
parts inside xture.
Suitable for damp locations. Suitable for operation in ambient not exceeding 50°C.


 Press and hold the Release Buttons (4) 
Fixture Housing to release the Lens (Fig. 1)
Release Buttons use one hand to hold the Lens 
Release Buttons Fixture                     
CAUTION: The Lens may drop out quickly. Lens 
(2) Tether Cables (Fig. 3).
2. Junction Box Cover Plates to the Fixture Housing 
(2)
Screws (provided).
 Wire Access Hole. Secure Fixture
Housing
(Fig. 3).
4. 
(Fig. 12)
 Fixture Housing

5. Lens Fixture Housing 
Lens.
WARNING: To prevent wiring damage or abrasion, do not expose
wiring to sharp objects.
Lens
Release Buttons (4)
Fixture Housing
Screws (4)
Junction Box
Cover Plates
Tether Cables (2)
Wire Access Hole
Fixture Housing
Lens
SR2 SR4 


Screws (2)
INSTRUCTIONS
FIELD-ADJUSTABLE SR™ INSTALLATION



V-Hooks and Chain (ordered
separately, CAT# SR VHOOK KIT).
 V-Hooks into the Mounting Slots
Fixture Housing 
2.  Chains 
Fixture  V-HooksFig. 5.
 
V-Hook and Chain i
(4)
4. Press and hold the Release Buttons (4) 
Fixture Housing to release the Lens (Fig. 1)
Release Buttons use one hand to hold the Lens 
Release Buttons Fixture                     
CAUTION: The Lens may drop out quickly.Lens 
(2) Tether Cables (Fig. 3).
5. 
(Fig. 12)
(not provided)
Fixture Housing
6. LensFixture Housing 
Lens.
WARNING: To prevent wiring damage or abrasion, do not expose
wiring to sharp objects.
Mounting Slots

V-Hook
Chain
V-Hook
Chain
Mounting Surface

INSTRUCTIONS
FIELD-ADJUSTABLE SR™ INSTALLATION


 (multiple fixtures can be mounted together)

(Multiple fixture wiring kit sold separately, CAT# SR JOIN KIT)
 Release Buttons (4) 
Fixture Housing to release the Lens (Fig. 1)
Release Buttons use one hand to hold the Lens 
Release Buttons Fixture
hand. CAUTION: The Lens may drop out quickly.Lens is
(2) Tether Cables (Fig. 3).
2. Knockout Hole and install
 (provided with Junction Box Cover Plates) to
 (Fig. 7).
 Junction Box Cover Plates to the Fixture Housing

Screws (provided)

4. Wire Access Hole (Fig. 6). Secure
Fixture Housing
 
(Fig. 12)
 Fixture Housing

6. 

CAUTION:
 (Fig. 9).
WARNING: To prevent wiring damage or abrasion, do not
expose wiring to sharp objects.

(Multiple fixture wiring kit sold separately, CAT# SR JOIN KIT)
1. Knockout Hole and install
the Wire Guard (provided with Junction Box Cover Plates) to
 (Fig. 7).
2. Install Joiner Bracket
 (8) Screws (Fig. 8).
  Chains

 
. V-Hook and Chain 
 (4) 
5. Press and hold the Release Buttons (4) 
Fixture Housing to release the Lens (Fig. 1)
Release Buttons use one hand to hold the Lens 
Release Buttons 
hand. CAUTION: The Lens may drop out quickly.Lens is
 (2) Tether Cables (Fig. 3).
 
(Fig. 12)
(not provided)

7. LensFixture Housing
 Lens.
WARNING: To prevent wiring damage or abrasion, do not
expose wiring to sharp objects.
Catalog #
SR2
SR4

Maximum Number of Linked Fixtures
27
13
 
CAUTION: 
 (Fig. 9).
 


Wire Guard
Joiner Bracket
INSTRUCTIONS
FIELD-ADJUSTABLE SR™ INSTALLATION


SR - IN - 0922 RAB WARRANTY: RAB’s warranty is subject to all terms and conditions found at rablighting.com/warranty
Easy Answers
rablighting.com
Visit our website for product info
Tech Help Line
Call our experts: 888 722-1000
e-mail
Answered promptly - sales@rablighting.com
Free Lighting Layouts
Answered online or by request
© 2022 RAB LIGHTING Inc.
P-100266
PINK
LIGHT
FIXTURE
Vaux 12V
YELLOW
GROUND
GROUND
( - ) DIM V
( + ) DIM V
COMMON
LINE BLACK
WHITE
PURPLE

FIELD ADJUSTMENT
Fixture Power (W)
Color Temperature (CCT ) 
Factory Settings:



1. Locate the Field Adjustable SwitchesFixture
Housing 
2. Select Power (W) and Color Temperature (CCT) 
 (Fig. 10).
40W 30W 20W 5000K 4000K 3500K
Follow instructions below to change the Fixture Power (W) and/or Color Temperature
Power (W)
Color Temperature
(CCT)

PIR MODELS
 Sensor Head onto the Bracket
(optional remote sold separately for custom settings,
CAT# MSR1).
Factory Settings:
• 
• 
• 
• 
Bracket
Sensor Head

RISK OF FIRE. 


 
2. 
 
4. 
5. 
6. 


• 
• Nuts (12)


 

2. 

CAUTION: Be sure xture temperature is cool enough to touch.
Do not clean or maintain while xture is energized.
 
2. 

• (2) •  (2)
• Wires (12 - Tinned copper)

Note: These instructions do not cover all details or variations in equipment nor do
they provide for every possible situation during installation, operation
or maintenance.
 (Internal)
• 
• 
• 
(optional remote sold separately for custom settings, CAT# MSR1).

This manual suits for next models

2

Other RAB Lighting Lighting Equipment manuals

RAB Lighting Lightcloud Smart LED Post Top User manual

RAB Lighting

RAB Lighting Lightcloud Smart LED Post Top User manual

RAB Lighting FXLED78 User manual

RAB Lighting

RAB Lighting FXLED78 User manual

RAB Lighting WPLED10 User manual

RAB Lighting

RAB Lighting WPLED10 User manual

RAB Lighting VXLED User manual

RAB Lighting

RAB Lighting VXLED User manual

RAB Lighting ALED POST TOP User manual

RAB Lighting

RAB Lighting ALED POST TOP User manual

RAB Lighting FFLED18 Assembly instructions

RAB Lighting

RAB Lighting FFLED18 Assembly instructions

RAB Lighting Lightcloud BR30 Tunable White User manual

RAB Lighting

RAB Lighting Lightcloud BR30 Tunable White User manual

RAB Lighting WPLED52 User manual

RAB Lighting

RAB Lighting WPLED52 User manual

RAB Lighting SLIM 37 User manual

RAB Lighting

RAB Lighting SLIM 37 User manual

RAB Lighting VXBRLED User manual

RAB Lighting

RAB Lighting VXBRLED User manual

RAB Lighting ENTRA 12 User manual

RAB Lighting

RAB Lighting ENTRA 12 User manual

RAB Lighting EZLED User manual

RAB Lighting

RAB Lighting EZLED User manual

RAB Lighting WP3LED User manual

RAB Lighting

RAB Lighting WP3LED User manual

RAB Lighting VXLED13DG User manual

RAB Lighting

RAB Lighting VXLED13DG User manual

RAB Lighting LFLED5MBR User manual

RAB Lighting

RAB Lighting LFLED5MBR User manual

RAB Lighting ND4R User manual

RAB Lighting

RAB Lighting ND4R User manual

RAB Lighting EZPAN User manual

RAB Lighting

RAB Lighting EZPAN User manual

RAB Lighting LightAlert LOS1000 User manual

RAB Lighting

RAB Lighting LightAlert LOS1000 User manual

Popular Lighting Equipment manuals by other brands

Lighting Technologies ARS/S manual

Lighting Technologies

Lighting Technologies ARS/S manual

KNOP PU901 user manual

KNOP

KNOP PU901 user manual

GLI PROTECT-A-POOL installation instructions

GLI

GLI PROTECT-A-POOL installation instructions

American DJ FAB 4 User instructions

American DJ

American DJ FAB 4 User instructions

Conrad Curve manual

Conrad

Conrad Curve manual

American DJ Fire Burst DMX User instruction

American DJ

American DJ Fire Burst DMX User instruction

Eaton HALO Commercial PR6M Series manual

Eaton

Eaton HALO Commercial PR6M Series manual

Elation PRO FS 15R FOLLOWSPOT user manual

Elation

Elation PRO FS 15R FOLLOWSPOT user manual

Bestway H2OGO! Single instructions

Bestway

Bestway H2OGO! Single instructions

Elation impression rgb 120rz user manual

Elation

Elation impression rgb 120rz user manual

Advanced Illumination MicroBrite Series quick start guide

Advanced Illumination

Advanced Illumination MicroBrite Series quick start guide

PondMAX 24PL690 instruction manual

PondMAX

PondMAX 24PL690 instruction manual

Ledj Event Spot WW Triac user manual

Ledj

Ledj Event Spot WW Triac user manual

Kessil A160WE owner's manual

Kessil

Kessil A160WE owner's manual

ECOLOCITY RL-SC-RS50 Connection guide

ECOLOCITY

ECOLOCITY RL-SC-RS50 Connection guide

Nemo PROJECTEUR 365 Assembly instructions

Nemo

Nemo PROJECTEUR 365 Assembly instructions

American DJ DJ Spot 300 User instructions

American DJ

American DJ DJ Spot 300 User instructions

Claypaky C61331 instruction manual

Claypaky

Claypaky C61331 instruction manual

manuals.online logo
manuals.online logoBrands
  • About & Mission
  • Contact us
  • Privacy Policy
  • Terms and Conditions

Copyright 2025 Manuals.Online. All Rights Reserved.