Potensic Dreamer Pro User manual

Tel: 858-222-1895
Web: www.potensic.com
FB: www.facebook.com/Potensic
Email: [email protected](USA)
Email: [email protected](CA)
Email: [email protected](UK)
Dreamer Pro
User Manual
DANGER
Only suitable
for age 14+

Reading Tips
Get Tutorials
Package List
Download PotensicPro App
Product Overview
Daily Maintenance
Drone Installation
Drone Diagram
Remote Control Diagram
About Aircraft
Aircraft Overview
Flight Mode
Intelligent Flight Modes
Return to home (RTH)
Drone Smart Battery
Charging Indicator Status
Remote Control
Remote Control Mode
Remote Control Charging
Remote Control Frequency Linking
Camera and Gimbal
Camera Overview
Support Micro SD Card
Gimbal Overview
PotensicPro APP
Operation Interface
Intelligent Flight Mode
Setting Interface
About Flight
Flight Environment Requirements
Flight Precautions
Connection Between the Remote Control and the Drone
Geomagnetic Calibration
Beginner Mode
Take-off and Landing
Emergency Stop
Appendix
Specification
Frequent Q&A
Safety Precautions
Warning and Tips
FCC Requirement
Contents
01
03
08
12
14
15
17
19

User manual x1
Drone with camera x1 Remote control x1
AC cable x1
Smart battery x1
Extra blades x 1 pair (CCW & CW) Drone charger x1
USB charging cable x1
(for remote control)
01
Reading Tips
Packing List
It is recommended that users watch the tutorial video first, and then read the "User Manual". Please
click the link or scean the QR code below to get tutorial videos.
Link: https://www.youtube.com/channel/UCKjU1_4HmL0XAXng0J9-NCg
Get Tutorials
Micro USB adapter x3
QR Code

Register
After downloading the drone APP, it is necessary to register a personal account before using.
Register and log in
Download PotensicPro App
02
Android users
iOS Users
For Android
For iOS
Please search and download the drone App "PotensicPro" in Google Play or scan the QR code below
to download. This App is compatible with Android 5.0 and above.
Please search and download the drone App "PotensicPro" in APP store or scan the QR code below
to download. This App is compatible with IOS 9.0 and above.
Fill in email - fill in password - view agreement - click register. Please log in after successful
registration. (Note: Please keep your mobile phone connected with network during registration)

03
1. Daily Maintenance
1. Use a soft clean cloth to clean the product.
2. Avoid exposure to the sun or heat.
3. Do not immerse this product in water, otherwise the electronic parts will be damaged.
4. Regularly check the plug and other accessories. If there is any damage, please stop using until it
is completely repaired.
This chapter mainly introduces the functional features of Dreamer Pro, guides on how to install the
aircraft, and introduces the names of various parts of the aircraft and remote control.
Thank you for purchasing Potensic Dreamer Pro drone. Please read the user manual carefully and
with your order number from Amazon or official website.
Potensic Dreamer Pro is equipped with an intelligent flight control system. The integrated gimbal is
located under the fuselage. Dreamer Pro can realize functions such as Waypoint flight, intelligent
following, and automatic return to home. 5.8G image transmission is integrated inside the remote
control for image transmission.
The drone camera adopts a 1/3-inch Sony CMOS image sensor and a gimbal stabilization system to
stably shoot a 4K high-definition video with 30 frames per second and 16MP photos.
Product Overview
2.1. Gimbal Lock
Hold the fixed camera with one hand, and remove the gimbal clamp with the other hand in the
direction of the arrow shown as Pic.
2. Drone Installation

04
Make sure the propellers are installed correctly and tightly.
Note: When hearing a "click" sound, the battery is successfully installed in place.
2.3. Installation and removal of battery
Picture 1 Picture 2
Insert the battery in the right direction as shown in Picture 1.
Press the left and right sides of the battery and pull out the battery as shown in Picture 2.
2.2 Propeller Installation
1.When installing blades, pay attention to the "CW" and "CCW" marks on the blades.
2.Press down the blade in alignment with the central axis, and rotate according to the lock marked
direction by the blade lock until it is fully screwed. After installation, the propeller will pop up and
lock. Removal of the blades are reverse of the above steps.
Unlock Direction
Lock Direction

05
Drone Diagram
5
6
4
2
3
7
8
Dreamer LED light
2
Motor
3
Camera
1
Blade
4
Front footlight
5
Rear footlight
6
Damping plate
7
Tripod
8
Pad
9
Gimbal
Gimbal clamp
10
11
2.4 App Real-time Image Connecting
1
9
10
11
Follow these steps to connect your mobile device:
1. Expand and adjust the antenna position.
2. Open the remote control pull-out board, and then put your mobile phone into it. The size range of
the clamping machine is 97-178mm
3. Use the corresponding connecting cable to connect the mobile device to the micro USB interface of
the remote control.

06
14
13 12
Smart battery
12
Power indicator
13
Power switch (after short pressing once, long press for 2 seconds to switch on/off the drone)
14
Remote Control Diagram
Know Your Remote Control
Antenna
1
Control stick
2
7
5
1
2
6
3
4
2
Dreamer Pro uses a 5.8G remote control with complete function buttons. It can support various
operations and settings of the drone and camera within a maximum communication distance of
2000m, and can display real-time HD pictures on the mobile device through PotensicPro app. The
remote control has a built-in rechargeable lithium battery, which can work continuously for up to
2.5hours.

07
9
8
12
10
11
8
9
10
Camera adjustment thumbwheel
Turn the thumbwheel to adjust shooting angle of the camera.
Photograph
Click to take one picture at a time.
Video-recording
Press once to record, click again to exit.
Camera brightness adjustment thumbwheel
Turn the thumbwheel to adjust the exposure of the camera.
11
12
7Micro USB charging port
3
One-click take-off/landing
Press 2s to take off or land.
4
5
6
Power switch
Press 2s to turn the remote control on/off.
Control sticks storage box
A box to place control sticks.
One-click return
By pressing the button for 1s, the drone will perform auto returning after you hearing one
beep sound from the remote control; press it again and also hear one beep sound, then the
drone will stop the returning.
Standard Mode/Sport Mode
Push the button to the right side position to start sport mode, The standard mode is 5m/s
and the sport mode is 8m/s.
Dreamer Pro uses a 5.8G remote control with complete function buttons. It can support various
operations and settings of the drone and camera within a maximum communication distance of
1000m, and can display real-time HD pictures on the mobile device through PotensicPro app. The
remote control has a built-in rechargeable lithium battery, which can work continuously for up to 3
hours.

08
Photograph
Click to take one picture at a time.
About Aicraft
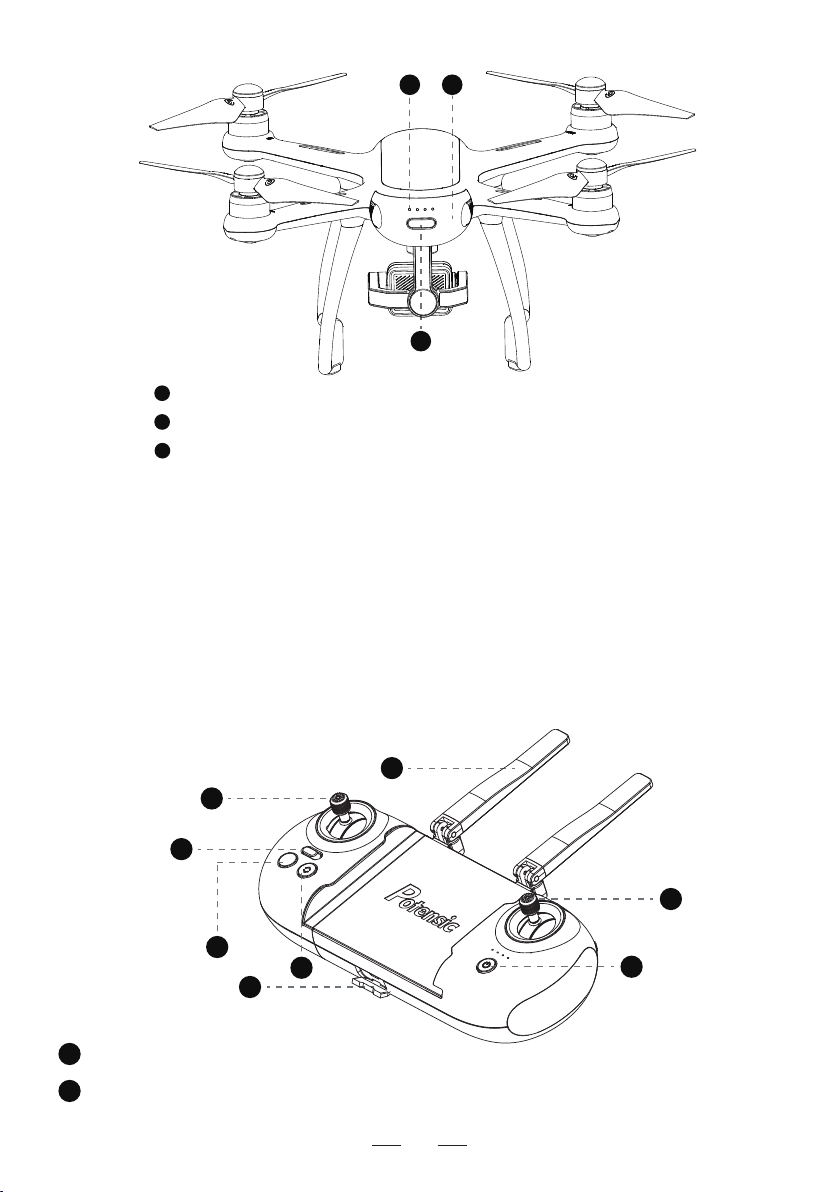
1. Aircraft Overview
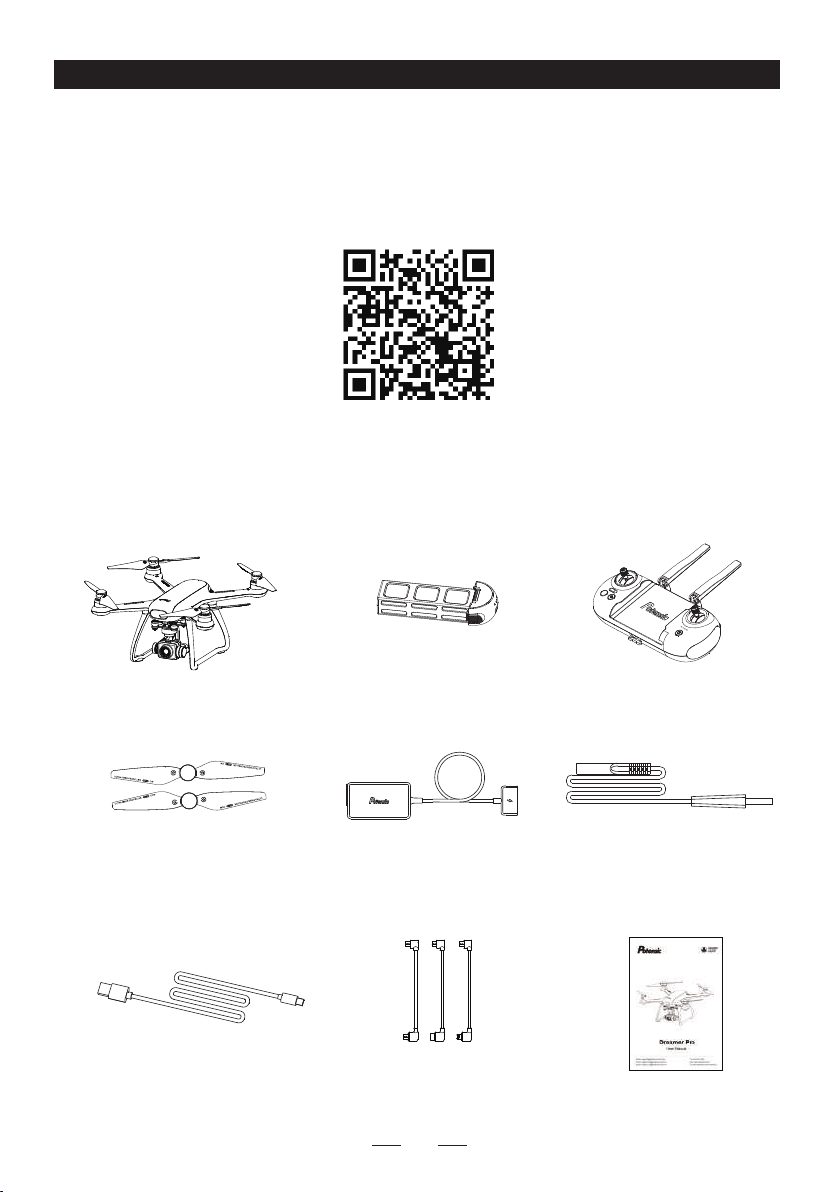
Dreamer Pro is mainly composed of flight control, communication system, positioning system, power
system and smart battery. In this chapter, the functions of various components on the aircraft are
described in detail.
2. Flight Modes
Dreamer Pro adopts a new generation of Potensic flight control, which supports the following two flight
modes:
GPS mode: Use GPS module to achieve precise hovering, waypoint flight and other intelligent flight
modes. In GPS mode, the GPS signal is good, the GPS can be used for accurate positioning; when
the GPS signal is not good, the aircraft cannot be accurately positioned, it only provides attitude
stabilization, and does not support the intelligent flight function.
Attitude mode: The GPS module is not used, only the stabilization of the altitude is provided, so that it
will drift in the horizontal direction. At this time, the operator needs to manually control the flight of the
aircraft. This mode is used by novices with caution. In this mode, the difficulty of controlling the aircraft
will be greatly increased. If you want to use this mode, you must be familiar with the behavior of the
aircraft in this mode and be able to skillfully control the aircraft. Do not fly the aircraft out of a long
distance during use, so as not to lose Judging the attitude of the aircraft poses risks.
Two Modes Switching: The default GPS mode is turned on, you can press the middle button of the left
joystick during flight or switch in the App function module.
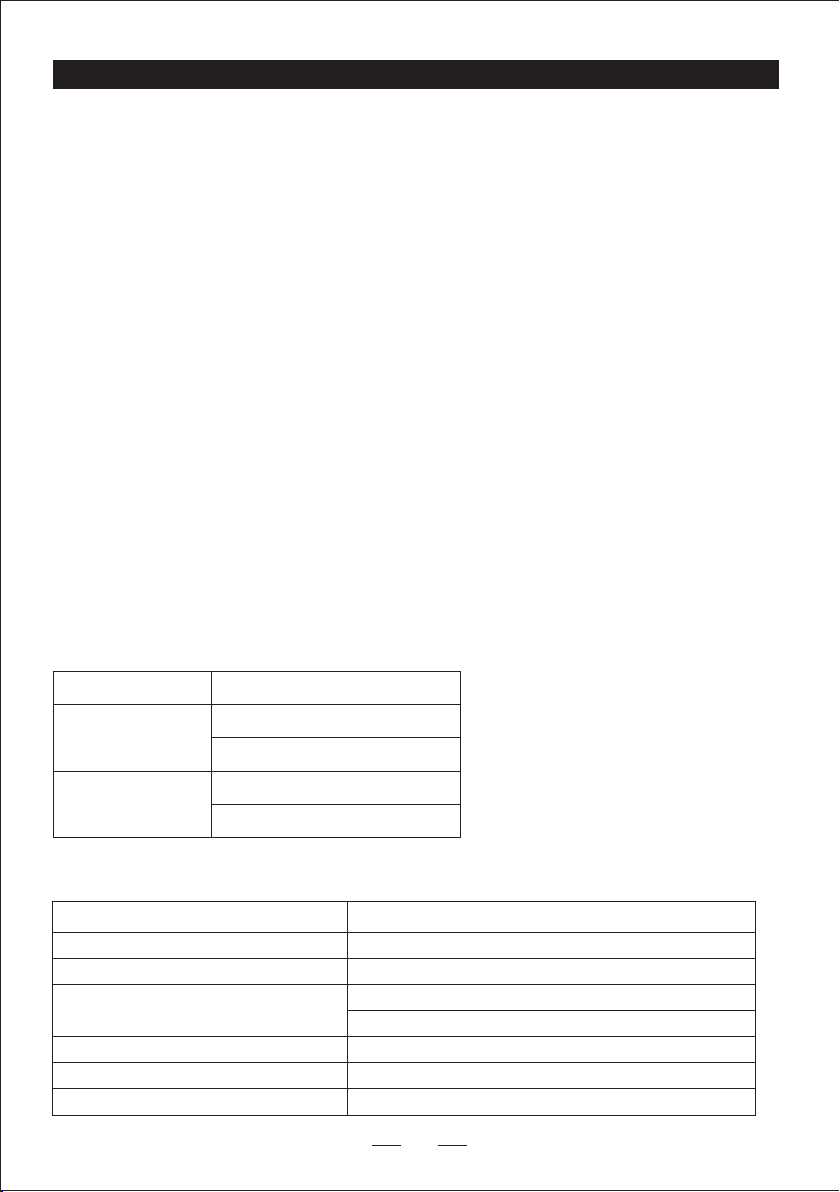
Drone Indicator Status
Attitude Mode
GPS Mode
Four lights always on
Front lights always on
Rear lights blink slowly
Headless Mode
Front lights blink slowly
Rear lights always on
Warning and Abnormal
Drone Low Power
Drone Disconnected
Drone Binding
Emergency Stop or Rollover(Motor stopped)
Firmware Upgrade
Sensor Abnormal
Four lights blink slowly
Four lights blink quickly
Left and right side lights blink alternately
Horizontal calibration: left lights blink slowly, right lights keep on
Vertical calibration: left lights keep on, right lights blink slowly
Four lights keep long off, short on cycling
Four lights on in turn clockwise
Rear left and right lights blink alternately
Geomagnetic Calibration

09
Under normal flight conditions (flight altitude is greater than 5m), the drone will take the current position
as the circling center by default, with a radius of 10m and a speed of 3m/s, and circle clockwise.
When normal flight altitude is above 5m, and GPS signal is no less than 6, the drone will follow move
position of mobile phone. In follow me mode, the drone can fly beyond the maximum distance limit.
Click the icon to enter circle flight mode
Click Icon to activate follow me mode.
3. Intelligent Flight Modes
3.3 Follow Me Mode
3.1 Headless Mode
After take-off, the headless mode can be started only when the flight distance is more than 10 meters.
Click the headless mode icon in app to enter headless mode, and then click once again to exit
headless mode and the drone will land on the ground to automatically.
In headless mode (take Mode 1 as an example), when you push the right control stick backward, the
drone will fly near to the Home Point(take-off point); when you push the right control stick forward, the
drone will fly away from the Home Point(take-off point); when you push the right control stick to the
left / right, the drone will fly circle counter clockwise / clockwise around the home point.
3.2 Circle Flight

*No signal return
*One Button Return:
*Low-power Return:
10
3.4 Waypoint Flight Mode
Set multiple position points on the map, and the drone will fly in the order of set points(15 point at
most). The map will identify the serial number of each point.
The normal flight altitude is more than 5m, and the GPS signal is no less than 6. The drone flies to
designated points on the map in the sequence of the number of points in the shortest path, and hovers
at the last designated point.
Click the icon to start the waypoint flight mode.
Long press the "home" button on the remote control for 1 second or click the "home" icon on the
app to start the one button return, the remote control emits the continuous "beep" sound, then the
aircraft will return. Press the "home" key for 1 second or click the icon “x” to cancel the return flight and
exit the return flight automatically. The "beep" sound disappears.
If the drone lose its connection to the remote control, it will automatically enter the return mode. The
drone will automatically return to the ground, If the drone and the remote control are reconnected
during return. The drone will hover at this time, and the operator can control it again.
Note: The drone does not have automatic obstacle avoidance function. If the drone crashes into
buildings or other obstacles on the way back, it will fall and break.
4. Return to Home (RTH)
The aircraft has the function of automatic return. The takeoff point is the home point of the aircraft. The
intelligent return (RTH) function enables the aircraft to return to the home point. There are three types of
aircraft return (RTH): one button return / intelligent low power return / no signal return. When the flight
altitude is less than 20 meters, the aircraft rises to 20 meters before returning. When the flight altitude is
more than 20 meters, and the aircraft will return with current altitude.
Low-power alarm: when power of the drone is less than 20%, there is continuous "beep" sound from the
remote control and the battery icon on the App flashes.
Low-power return: the drone system will automatically determine whether to return according to the
distance and battery power. When the drone returns, its four footlights remain flashing until it lands on
the ground, and the remote control emits the continuous "beep" sound. The Power will be 8%-12% left.

11
6. Charging Indicator Status
0%~25%
25%~50%
50%~75%
75%~100%
Fully charged
LED 1 LED 2 LED 3 LED 4 Current battery level
Flash state Off state
Note
Please return in time and charge the battery when the drone in low battery. Connect the adapter
correctly as shown in the figure to charge. The indicator flashes when charging, and goes out when
fully charged. It takes about 2 hours.
1. Please use the original charger to charge.
2. Do not charge on a carpet to avoid fire.
3. Recharge every 3 months to keep battery active.
4. Do not put a charged battery under high temperature, such as open fire or electric heating
device, otherwise it will be damaged or explode.
5. Do not strike or knock surface of hard objects with a battery.
6. Do not disassemble a battery.
7. Do not leave the battery alone during charging.
5. Drone Smart Battery

12
Mode 1
Mode 2
Left stick Right stick Forward
Backward
Turn counterclockwise Turn clockwise
Move Left Move right
Upward
Downward
Right stick
Forward
Backward
Upward
Downward
Left stick
(The plug is not included in packing list)
5V
Remote Control
1. Remote Control Mode
There are two remote control modes of this product, mode 1 and mode 2.
Mode 1 is the default setting.
2. Remote Control Charging
Connect the remote controller's Micro USB port to the commonly used 5V2A charger to charge, it
takes about 2 hours to fully charge.

13
Picture 1
Camera and Gimbal
3. Remote Control Frequency Linking
If you replace the remote control, it is necessary to follow the below steps to re-connect the new
remote control and the drone.
1.Install the drone battery; short press the power button once, then quickly long press it for 7s, the
drone 2 front LED foot lights and 2 rear lights start quick flashing alternately;
2.Press down the remote controller’s right joystick and power button for 2s, then the remote controller
emit 2 beep sounds, and its power indicator is quickly flashing.
3.Then the remote controller and the drone enters auto linking status, please wait about 30s, the
remote controller will emit one beep sound and its power indicator is stably on, the drone 4 foot lights
are quickly flashing, 10s later, the 4 foot lights keep stable bright, which means the frequency linking
is completed.
1. Camera Overview
The Dreamer Pro adopts a 1/3-inch CMOS Sony sensor with 16MP camera. Equipped with low
distortion wide-angle lens. The blue glass filter can effectively improve the picture quality. Standard UV
lens to protect the lens. When recording video, Dreamer Pro supports 4K ultra-high-definition video
recording at up to 30 frames per second, providing 4 times the full HD resolution of image details.
Support MPEG-4 AVC (H.264) format, and can achieve high-quality video recording with a high bit rate
of 60Mbps.

14
2. Support Micro SD Card
* Insert micro SD card with the metal side up
3. Gimbal Overview
The three-axis stable gimbal provides a stable platform for the camera, so that the camera can also
shoot a stable picture even when the aircraft is flying at high speed. The pitch angle can be adjusted
via the gimbal dial on the remote control, and the camera can also be adjusted by sliding the camera
pitch adjustment slider on the main interface of the PotensicPro APP. The controllable angle of the
pitch direction is -90° to 0°.
Insert the micro SD card into the camera SD card slot. It is recommended to use SD card products of
class10 or above, brand such as SanDisk, Kingston or Samsung, which require a minimum SD card
capacity of 4GB and a maximum of 256GB. All pictures and video files will only be recorded on SD
card, instead of storing in the App or your phone. Upload to your phone from the photo album. The
product package list does not include SD card.

15
PotensicPro App
2
10
13
22
21
20
19
Drone status
2
Standard mode/Sport mode
3
Return to the menu
1
Head mode/Headless mode
4
Lock/Unlock
5
GPS mode/Attitude mode
6
GPS signal level
7
Transmission signal level
8
Drone power
9
Setting interface
10
Photo Taking/Video Recording
12
13
14
15
Camera setting
Photo/Video switch
11
Camera pitch adjustment
16
17
18
19
Vertical flight speed
Distance
Flight height
Horizontal flight speed
Altitude ball/map
20
21
22
Intelligent flight mode settings
One-click return
One-click take-off/one-click landing
13
4
5
6
7
8
9
11
12
15 14161718
1. Operation Interface

2. Intelligent Flight Mode
Lock / Unlock
2
GPS mode / Attitude mode
3
Headless mode / Head-hold
1Circling mode
4
Waypoint mode
5
Follow me mode
6
Virtual control stick
7
16
1 2 3
5 67
4
3. Setting Interface
1
2
3
4
5
Calibration settings
2
Remote control settings
3
Main controller settings
1
About smart batteries
4
More
5

17
About Flight
This chapter introduces flight environment requirements, precautions, and flight operation procedures.
1. Flight Environment Requirements
1. Please do not fly in bad weather, such as strong wind (wind speed 5 and above), snow, rain, foggy
weather, etc.
2. Choose an open place without surrounding tall buildings as the flight site. Buildings that use a lot of
steel will affect the geomagnetic work, and will block the GPS signal, resulting in poor positioning of
the aircraft or even unable to locate.
3. When flying, please keep your eyes in control and keep away from obstacles and crowds.
4. Please do not fly in areas with high voltage lines, communication base stations or transmission
towers to avoid interference from the remote control.
5. Flying above 5000 meters above sea level, due to environmental factors, the performance of the
aircraft battery and power system will be degraded, and the flight performance will be affected.
Please fly with caution.
2. Flight Precautions
1. Check whether the remote controller, intelligent flight battery and mobile device have sufficient
power.
2. Check whether the fuselage is complete and the propeller is correctly installed.
3. Check whether the camera works normally after the power is turned on.
4. Check if the App is running normally.
5. Check if the SD card is inserted, make sure the camera is clean.
6. Low battery protection: Low battery alarm is triggered when the power is less than 20%. Based on
the distance between the current position and the Home point, the aircraft will intelligently trigger a
low-power return.
7. Loss of connection protection: It is triggered after 3 seconds of loss of connection; the re-connection
is successful during the return flight, and it can be canceled manually.
8. Out-of-control protection: After the aircraft's horizontal tilt angle is over 80 degrees for 2 seconds,
the motor will automatically stop.
Because the remote control and the aircraft have completed frequency linking before leaving the
factory, they can be connected directly.
3. Connection Between the Remote Control and the Drone
1.Install the drone battery; click the power button once, then quickly press it for 2s to turn on the
drone; the battery indicator will light, the drone will emit beep sound and its 4 LED foot lights start
quick flashing;
2.Press the power button of the remoter controller for 2s, then the remote controller emit 2 beep
sound and the indicator lights up;
3.Please wait about 35s, the 4 LED foot lights on the drone will stably light, which means it is done.

18
4. Geomagnetic Calibration
Step 1: Enter the PotensicPro App setting interface, click the second column, and select geomagnetic
calibration in thelist, then click"Star Calibration" on the right side. The left front light flashes
green and the left rear light flashes red indicate that it's ready for calibration.
Step 2: Rotate the drone 720° horizontally, than the right front light flashes green and right rear light
flashes red. (Picture 1)
Step 3: Rotate the drone 720° vertically with camera upwards. The four indicator light are solid on(the
2 front lights are green while the rear lights are red), and calibration is completed. (Picture 2)
If no less than 6 satellites are searched by the drone, the 2 front lights are stably on, and the 2
rear lights flash slowly. Then, the drone can take off.
Picture
1
Picture
2
(1) (2)
(3)
Geomagnetic calibration is required for the first flight (after once calibration, the same region within
300km doesn't need calibration). If the geomagnetism of the aircraft is disturbed, the manual
re-calibration may need to done to the drone.
Note: If the left front light flashes green and the left rear light flashes red slowly, it indicates that
calibration fails. It is recommended to recalibrate geomagnetic after changing the take-off location.
Table of contents
Other Potensic Drone manuals

Potensic
Potensic A30 User manual

Potensic
Potensic ATOM SE User manual

Potensic
Potensic U47 User manual

Potensic
Potensic ATOM SE User manual

Potensic
Potensic Dreamer Mini User manual

Potensic
Potensic Dreamer 4K User manual

Potensic
Potensic Wisp User manual

Potensic
Potensic Dreamer Mini User manual

Potensic
Potensic P7 User manual

Potensic
Potensic T25 User manual