manuals.online logo
Brands
  1. Home
  2. •
  3. Brands
  4. •
  5. Rain Bird
  6. •
  7. Controllers
  8. •
  9. Rain Bird Image Series User manual

Rain Bird Image Series User manual

123
123
123
123
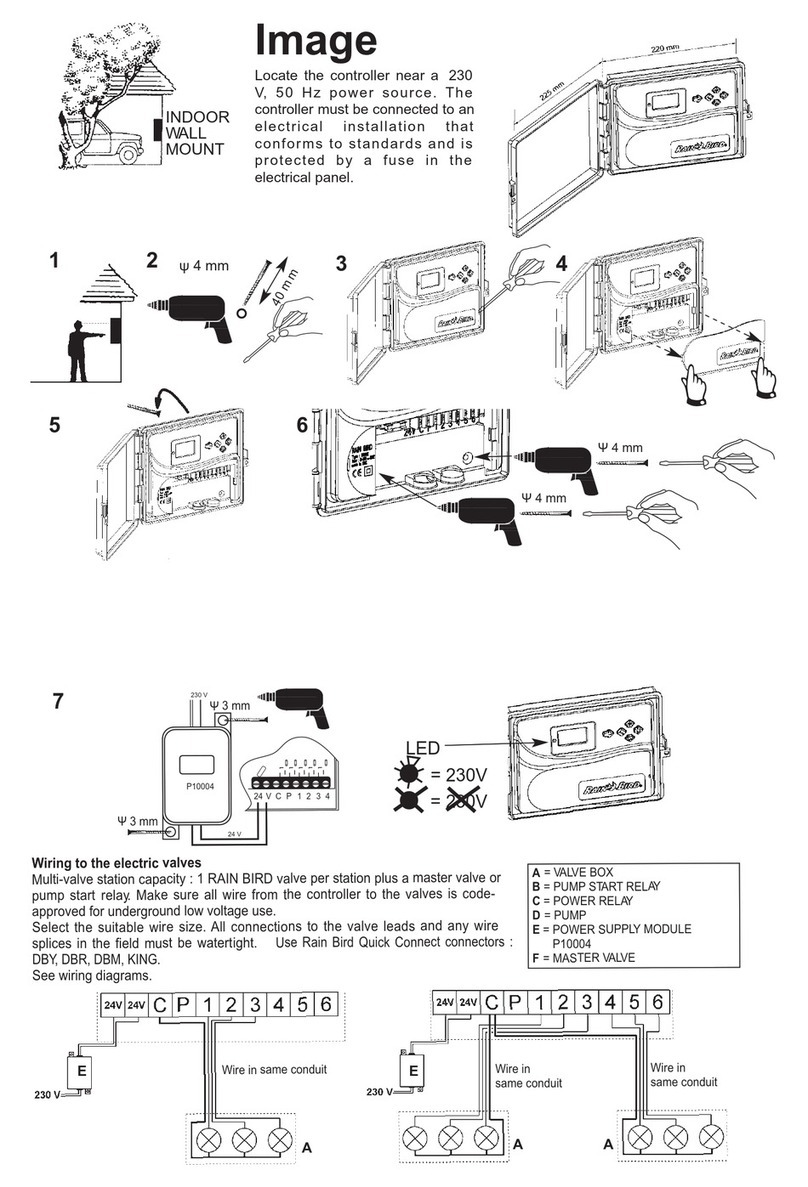
12345 6 7
12345
123
12
123
12 3 45 6 7
PROGRAMMING
The IMAGE has a circular menu. Repeatedly pressing the key will display the 8 screens in the menu.
The programming data you enter is automatically stored when you move from one screen to the next by pressing
Icons symbolize the various functions and indicate wich part of the irrigation schedule you are programming. To call up a specific function, repeatedly
press the until the desired function icon appears in the display.
I - Set clock
A - Set current time of day
Use the +/On and -/Off keys.
The +/On key increases the setting. The -/Off key decreases the setting.
Holding down either key for over 2 seconds will cause the time setting to change rapidly.
B - Set current day for 5, 3, or 2 day cycles
If you have selected the 5, 3, or 2 day cycle, you can make the current day ("Today") any day number
you wish. Press the key to move the square cursor to the day number you select for "Today".
B - Set current day for 7 day cycle
Press key to move the square cursor through the days of the week numbered 1 to 7
(1 = Monday, 2 = Tuesday, etc,). Place the cursor on the current day of the week = today.
Example : Today is Wednesday. Place the cursor on "3"
Now snap the front panel on the cabinet
RAIN BIRD IMAGE SERIE SOLID STATE CONTROLLER
INSTRUCTION MANUAL
DAY CYCLE
= VARIABLE 7
DAY CYCLE
= VARIABLE 3
DAY CYCLE
= VARIABLE 5
DAY CYCLE
= VARIABLE 2
DAY CYCLE
L.C.D.
Example : if you have selected a 3 day cycle and you want tomorrow to be the first watering day place the cursor
on "2". See step II.
STA
STA
B
A
12 3 45 6 7
A
%
%
II - Set the days of the week for each program (7 day cycle)
Select the desired program by pressing the A/B cursor.
Use the key to move the cursor through the days of the week (1 to 7, 1 = Monday).
The +/ON and -/OFF keys are used to set or cancel water days.
The -/OFF key cancels water days and the square disappears. To set a water day, place the cursor on the
corresponding day number and press +/ON.
Repeat the above procedure for the other program.
In this example, Monday, Thursday and Friday are watering days in program A
Note: The same procedure is used for 5, 3 and 2 day cycles.
III - Set time of day to start watering.
You can start a watering cycle up to 8 times per day if you prefer short waterings . At each start time, all
the stations in the same program will operate in sequential order for the length of time you program in step
IV. Now set the start times. Select the desired programm with the A/B key.
Use the +/ON and -/OFF keys to set the first start time.
Then press the key to move to the next start time. Repeat the same procedure.
Press the key to validate and move to next function.
Note : It is not necessay to use all 8 start times !
The Image will automatically file your start times in chronological order from 00.00 to 23.59.
To cancel a start time : press the key to display the start times.
When you see the start time you want to cancel, hold down the for at least 2 seconds.
IV - Set the length of watering time per station.
Each station must be assigned to a program. Assign the stations to program A or B using the A/B key.
Press the to mover to the next station. .
Use the +/ON and -/OFF keys to set the station watering time from 1 minute to 4 hours in 1 minute
increments
The station watering time appears in hours and minutes.
Note : If programs overlap with a 2nd watering set to start before the1rst has finished, the controller will
"stack" the 2nd start and delay it until the previous cycle is completed.
V - Water Budget.
The controller has a Water Budget function used to adjust watering time for both programs from 0 to 200%
without re-setting time for each station. A setting of 100% means that all stations will run according to their
programmed watering time. The Water Budget feature can be useful for cutting back watering during cool
winter months, or for increasing watering during periods of unusual heat. Use the +/ON and -/OFF keys to
increase or decrease the watering time in 10% increments.
Example : "80%" in the display means you have reduced watering time by 20% on all stations. An initial
duration of 10 minutes, wich you previously programmed will be cut to 8 minutes. The increased or
decreased run time will not appear in the step IV display. Howether, the step I display shows the
% icon to indicate that the Water Budget is being used.
Keep in mind that the percentage you set applies to all stations for both programs.
To turn off the Water Budget, call up the % display and set the percentage to 100%.
VI - Manual single station start.
The station number appears in the upper left hand corner (example: station 2)
Use the key to display the other stations.
Example: to manually start station 2, press the key until number 2 appears. Then press +/ON.
Watering starts and is indicated on the screen by a blinking sprinkler stream. The display counts down the
remaining programmed watering time (example : 12 minutes) in 1 minute increments.
If you wish to stop watering before the programmed time is completed, press the -/OFF key.
The blinking stream disappears.
Note : Water Budgeting does not operate in the manual single station mode.

B
CYC
CYC
VII - Manual cycle start.
A cycle consists of the sequential operation of all stations assigned to the same program.
Use A/B key to select the program.
Then press the +/ON key to start the cycle. The sprinkler stream will blink. The 1rst station number in the
program appears and the remaining water time for the stations is counted down. The rest of the stations
will appear in sequence. If the Water Budget function is used, the % icon will appear next to "A" or"B". The
increased or decreased watering time will also appear in the display.
To stop watering before the cycle is completed, press the -/OFF key. the controller will revert to the time of
day display.
Note : if the controller is in the OFF mode (a non-blinking cross on the sprinkler), no manual or automatic
watering will occur. See step VIII
VIII - System ON/Shutdown.
The default mode is "ON" wich allows programmed watering to take place.
You can prevent watering (rainy weather shutdown) without changing the scheduled watering programs
Call up the display with the blinking cross on the sprinklers. To prevent watering, press the -/OFF. The
cross stops blinking. If you move through the menu by pressing key, you will see that the non-
blinking cross appears in all the displays except one.
No watering, either automatic or manual, will take place. To return to the watering mode, press the
key until the blinking cross display appears.
Now press the +/ON key. The cross disappers.
ACTION AFTER POWER OUTAGE
If the LED is out, the LCD is blank. There is no 230 V power input. No irrigation will take place. However, the Image has
an electronic memory safeguard component that will maintain the irrigation programs for at least 24 hours. If the power
outage lasts longer, the programs are lost. A default program will cause each station to revert to program "A" and to
water for 10 minutes a day beginning 8 hours after power is restored. It is then necessary to reprogram the controller.
CERTIFICATE OF CONFORMITY TO EUROPEAN DIRECTIVES
I declare that the IMAGE device, an irrigation controller, conforms to the 72/23/CEE European Directives for electrical
safety and to 89/336/CEE and 93/31/CEE concerning electromagnetic compatibility.
The applicable standards in accordance with the technical file are :
EN 60065 for electrical safety.
EN 55022 class B for interference.
CEI 801-2 class 2, CEI 801-3 class 3, CEI 801-4 level 3 and CEI 801-5 class 4 for interference resistance.
The IMAGE type device is powered by 230 V~, 50 Hz, single phase.
Aix en Provence, 10/06/96
General Manager
RAIN BIRD EUROPE

Other Rain Bird Controllers manuals

Rain Bird E-6C Instruction manual

Rain Bird

Rain Bird E-6C Instruction manual

Rain Bird ESP-Me User manual

Rain Bird

Rain Bird ESP-Me User manual

Rain Bird ESP-LXIVM Series Installation guide

Rain Bird

Rain Bird ESP-LXIVM Series Installation guide

Rain Bird ESP-RZXe User manual

Rain Bird

Rain Bird ESP-RZXe User manual

Rain Bird ESP-SMT Original operating instructions

Rain Bird

Rain Bird ESP-SMT Original operating instructions

Rain Bird ESP-ME3 User manual

Rain Bird

Rain Bird ESP-ME3 User manual

Rain Bird ESP-TM2 User manual

Rain Bird

Rain Bird ESP-TM2 User manual

Rain Bird EZ1-D Installation manual

Rain Bird

Rain Bird EZ1-D Installation manual

Rain Bird ET Manager Series User manual

Rain Bird

Rain Bird ET Manager Series User manual

Rain Bird IC System Guide

Rain Bird

Rain Bird IC System Guide

Rain Bird PRS-D Operating instructions

Rain Bird

Rain Bird PRS-D Operating instructions

Rain Bird ESP-TM2 User manual

Rain Bird

Rain Bird ESP-TM2 User manual

Rain Bird LXME2 User manual

Rain Bird

Rain Bird LXME2 User manual

Rain Bird E-6C User manual

Rain Bird

Rain Bird E-6C User manual

Rain Bird ESP-LXD User manual

Rain Bird

Rain Bird ESP-LXD User manual

Rain Bird ESP-SMTe User manual

Rain Bird

Rain Bird ESP-SMTe User manual

Rain Bird ESP-MC User manual

Rain Bird

Rain Bird ESP-MC User manual

Rain Bird ESP-RZ User manual

Rain Bird

Rain Bird ESP-RZ User manual

Rain Bird ESP-9V User manual

Rain Bird

Rain Bird ESP-9V User manual

Rain Bird ESP-ME3 User manual

Rain Bird

Rain Bird ESP-ME3 User manual

Rain Bird WPX2 User manual

Rain Bird

Rain Bird WPX2 User manual

Rain Bird ESP-LXD Operating instructions

Rain Bird

Rain Bird ESP-LXD Operating instructions

Rain Bird Image Series User manual

Rain Bird

Rain Bird Image Series User manual

Rain Bird WPX User manual

Rain Bird

Rain Bird WPX User manual

Popular Controllers manuals by other brands

Controlli NR9003 Mounting instructions

Controlli

Controlli NR9003 Mounting instructions

GOK ODR Assembly and operating manual

GOK

GOK ODR Assembly and operating manual

janitza Prophi 6R manual

janitza

janitza Prophi 6R manual

Samson 3271 Mounting and operating instructions

Samson

Samson 3271 Mounting and operating instructions

Emerson Bettis XTE3000 Installation, operation and maintenance manual

Emerson

Emerson Bettis XTE3000 Installation, operation and maintenance manual

Furman SPR-20 owner's manual

Furman

Furman SPR-20 owner's manual

Mitsubishi FX2NC-16EX Supplementary manual

Mitsubishi

Mitsubishi FX2NC-16EX Supplementary manual

Roger Technology CTRL Instruction and warnings for the installer

Roger Technology

Roger Technology CTRL Instruction and warnings for the installer

HP E-MSM720 installation guide

HP

HP E-MSM720 installation guide

RKC INSTRUMENT FB900 Series installation manual

RKC INSTRUMENT

RKC INSTRUMENT FB900 Series installation manual

PSL K1255 user manual

PSL

PSL K1255 user manual

Turbosmart e-Boost-40 instructions

Turbosmart

Turbosmart e-Boost-40 instructions

Halma ALICAT SCIENTIFIC PCD3 quick start guide

Halma

Halma ALICAT SCIENTIFIC PCD3 quick start guide

3M Versaflo V-100E instructions

3M

3M Versaflo V-100E instructions

ICI Caldaie ICI Kronos INSTRUCTIONS FOR USER, INSTALLER AND TECHNICAL SERVICE CENTRE

ICI Caldaie

ICI Caldaie ICI Kronos INSTRUCTIONS FOR USER, INSTALLER AND TECHNICAL SERVICE CENTRE

Gotting HG G-73650ZD Basics, Setup and Software

Gotting

Gotting HG G-73650ZD Basics, Setup and Software

AMALGAMATED INSTRUMENT PM4-RT8 Operation and instruction manual

AMALGAMATED INSTRUMENT

AMALGAMATED INSTRUMENT PM4-RT8 Operation and instruction manual

Barthelme CHROMOFLEX RC instruction manual

Barthelme

Barthelme CHROMOFLEX RC instruction manual

manuals.online logo
manuals.online logoBrands
  • About & Mission
  • Contact us
  • Privacy Policy
  • Terms and Conditions

Copyright 2025 Manuals.Online. All Rights Reserved.