RCA IP115 User manual

IP115/125
IP Phone

2
3
Interference Information
This device complies with Part 15 of the FCC Rules. Operation is subject to the following two
conditions: (1) This device may not cause harmful interference; and (2) This device must accept
any interference received, including interference that may cause undesired operation. Privacy of
communications may not be ensured when using this phone.
This equipment has been tested and found to comply with the limits for a Class B digital device,
pursuant to Part 15 of the FCC Rules. These limits are designed to provide reasonable protection
against harmful interference in a residential installation.
This equipment generates, uses, and can radiate radio frequency energy and, if not installed and
used in accordance with the instructions, may cause harmful interference to radio communica-
tions. However, there is no guarantee that interference will not occur in a particular installation.
If this equipment does cause harmful interference to radio or television reception, which can be
determined by turning the equipment o and on, the user is encouraged to try to correct the
interference by one or more of the following measures:
• Reorient or relocate the receiving antenna (that is, the antenna for radio or television that is
“receiving” the interference).
• Reorient or relocate and increase the separation between the telecommunications equipment
and Receiver.
• Connect the telecommunications equipment into an outlet on a circuit dierent from that to
which the receiving antenna is connected.
If these measures do not eliminate the interference, please consult your dealer or an experienced
radio/television technician for additional suggestions. Also, the Federal Communications Commission
has prepared a helpful boOKlet, “How To Identify and Resolve Radio/TV Interference Problems. This
booklet is available from the U.S. Government Printing Oce, Washington, D.C. 20402. Please specify
stock number 004-000-00345-4 when ordering copies.
Warning: The changes or modications not expressly approved by the party responsible for compli-
ance could void the user’s authority to operate the equipment.
The RCA IP115/IP125 phone is designed for business environment use. It is a full-featured SIP
solution, interoperable with most IP PBX and VoIP providers.
Please read through the instruction booklet before you get started to better understand the
features of the IP115/IP125.
FCC RF Radiation Exposure Statement
This equipment complies with FCC RF radiation exposure limits set forth for an uncontrolled
environment. This equipment should be installed and operated with a minimum distance of 20
centimeters between the radiator and your body. This transmitter must not be co-located or oper-
ated in conjunction with any other antenna or transmitter.”
This is a class B device, in a domestic environment; this product may cause radio interference, in
which case the user may be required to take adequate measures. To avoid the potential eects on
the environment and human health as a result of the presence of hazardous substances in electri-
cal and electronic equipment, end users of electrical and electronic equipment should understand
the meaning of the crossed-out wheeled bin symbol. Do not dispose of WEEE as unsorted munici-
pal waste and have to collect such WEEE separately.

3
Getting Started 5
About 5
Illustrate 5
Feature Highlights: 6
Technical Features 6
Connecting Your Phone 6
Phone overview 7
Understanding Buttons and
Hardware 7
Understanding Phone Screen
Features 7
Basic Call Handling 9
Placing a Call 9
Answering a Call 10
Ending a Call 11
Using Hold and Resume
11
Transferring Calls 12
etuMgnisU 12
Do Not Disturb 13
3-way Conference 13
Expansion Installation
(only IP125 has this item) 14
Expansion Settings(only IP125
has this item) 14
etaD&emiT 15
VOIP Call Forwarding 15
Advanced Call Handling 16
Hot Line
Message Code
Fuzzy Search
16
16
16
Using the phone book
16
sgoLllaCgnisU 18
Keypad Instruction
19
19
Language
20
SIP Account Settings
Create an SIP account
Disable sip account
19
19
Network Setting 20
Change network settings
Load default settings
20
21
21
21
21
21
21
21
Customizing Rings and Volume
Change the ring tone
Adjust the volume level
Adjust the Contrast
Backlight On/O
noisreverawtfosehtkcehC
nafosutatsehtkcehC
eludomnoisnapxe
Adjust the Brightness
Customizing Screen settings
21
21
22
22
22
Test the keys
Check the LCD screen
Check the lights
Check the sound
Diagnose
22
22
22
23
23
32ecafretnIbeW
24
Network 25
SIP Account 26
Expansion Module 28
Audio
Favorite Ring Tone
29
30
Phone Book 30
Group
Contact
30
31
LDAP
Overview
32
32
32
BanList 33
Enterprise Phonebook 34
Reboot
Modify Password
Using Multiple SIP Accounts
27

HTTP Upgrade 45
Reboot 46
Phone Status 46
System info 47
48
48
49
50
50
51
Appendix
Resetting to Default Settings 40
Auto Provision 41
FTP Upgrade 43
44
TFTP Upgrade
Auto Provision
Conguration les on
TFTP/HTTP/HTTPS/FTP Server
Extern.xml les on
Phonebook on
TFTP/HTTP/HTTPS/FTP Server
TFTP/HTTP/HTTPS/FTP Server
Automatic Provisioning using
DHCP Option 66
49
49
49
49
Name of conguration le
Normal Conguration le
Broadsoft Conguration les
Download a conguration
le from the phone
54
54
54
55
55
55
59
60
61
62
AES Encryption
LDAP
1. LDAP Overview
2. Conguration
3. Attributes
3.1 Common Attributes
3.2 LDAP
3.3 Example for Conguration
4. Conguration on the RCA Phone
Service
Warranty
38
36
VLAN Settings
VPN Settings
36
Dial Plan
Global SIP
39
39
Phone Maintenance
Log 39
Password 39
51
51
51
DHCP Server
92.168.0.201
IP Phone
53
53
Password
Auto Download Software
53
53
53
53
53
54
54
54
Auto Download Kernel
Broadsoft Compatibility
Auto Download Expansion
Auto Download Enterprise
Phonebook
Booting Checked
Auto Provision Time
Examples of Auto Provision
Frequency and Time
52
53
IP Phone
Username
52
TFTP/HTTP/HTTPS/FTP Server
Auto-Provision via xable
Advance Settings 35
35
Phone Setting
4
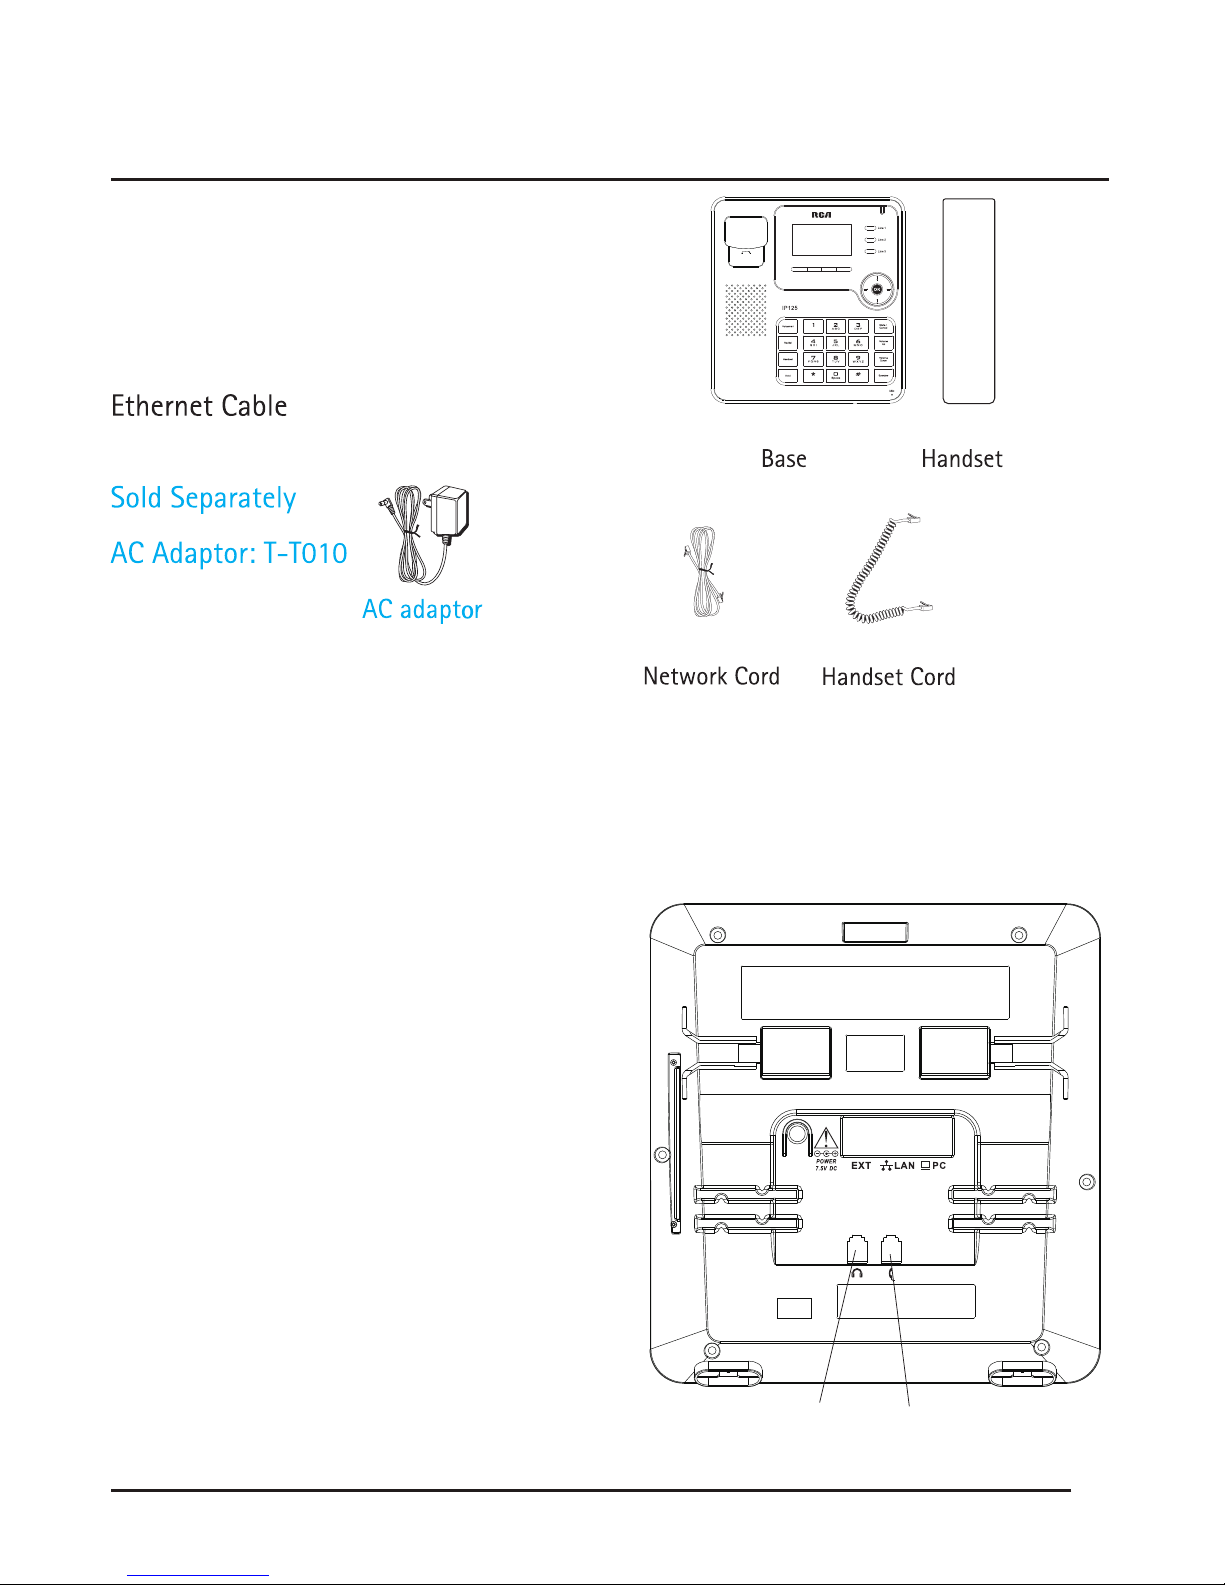
Packing List
The following components are included:
IP115/IP125
Handset & Handset Cord
Setting up your IP115/IP125
This section introduces how to set up the phone with the components in the pack-
ing list:
Connecting the Handset Cord
Connecting to the Network and Power.
Connecting the Handset and Headset
(not included) as shown to the side:
Note: A headset is not provided.
Note:The IP125 has a EXT port which
connect EM32 programmable key
module.
5
Getting Started
Headset
socket
Handset
socket

6
7
Connect Network and Power
Connect the phone to a Power over Ethernet enabled Hub/Switch/IP PBX
using Ethernet cable.
Alternatively, the phone can also be powered using an AC adaptor, which is
sold separately.
The LAN Port can also be connected to Hub/Switch/IP PBX or other internet devices.
The phone can also share the network connection with other network devices such
as a PC. Connect the phone’s PC port to the computer’s network port using an
Ethernet cable.
Note: If connect the Ethernet cable not the AC adapter (sold separately), make sure
the ethernet cable and switch/hub are PoE compliant.
Telephone Features and your VoIP Service Provider
Not all phone features are available with all VoIP service providers. Please make
the IP115/IP125.
Power Socket
Headset
PC
Handset
Network Socket

7
Overview
2 Lines
Menu/Back
Hold/DND
Conference
DIR/Toggle
Mute/Cancel
Volume Up
Volume Down
Speaker
Voicemail
Call Transfer
Headset
Hold
3 Lines
Soft Keys
Mute/Cancel
Volume Up
Volume Down
Speaker
Voicemail
Redial
Headset
Hold
8
9
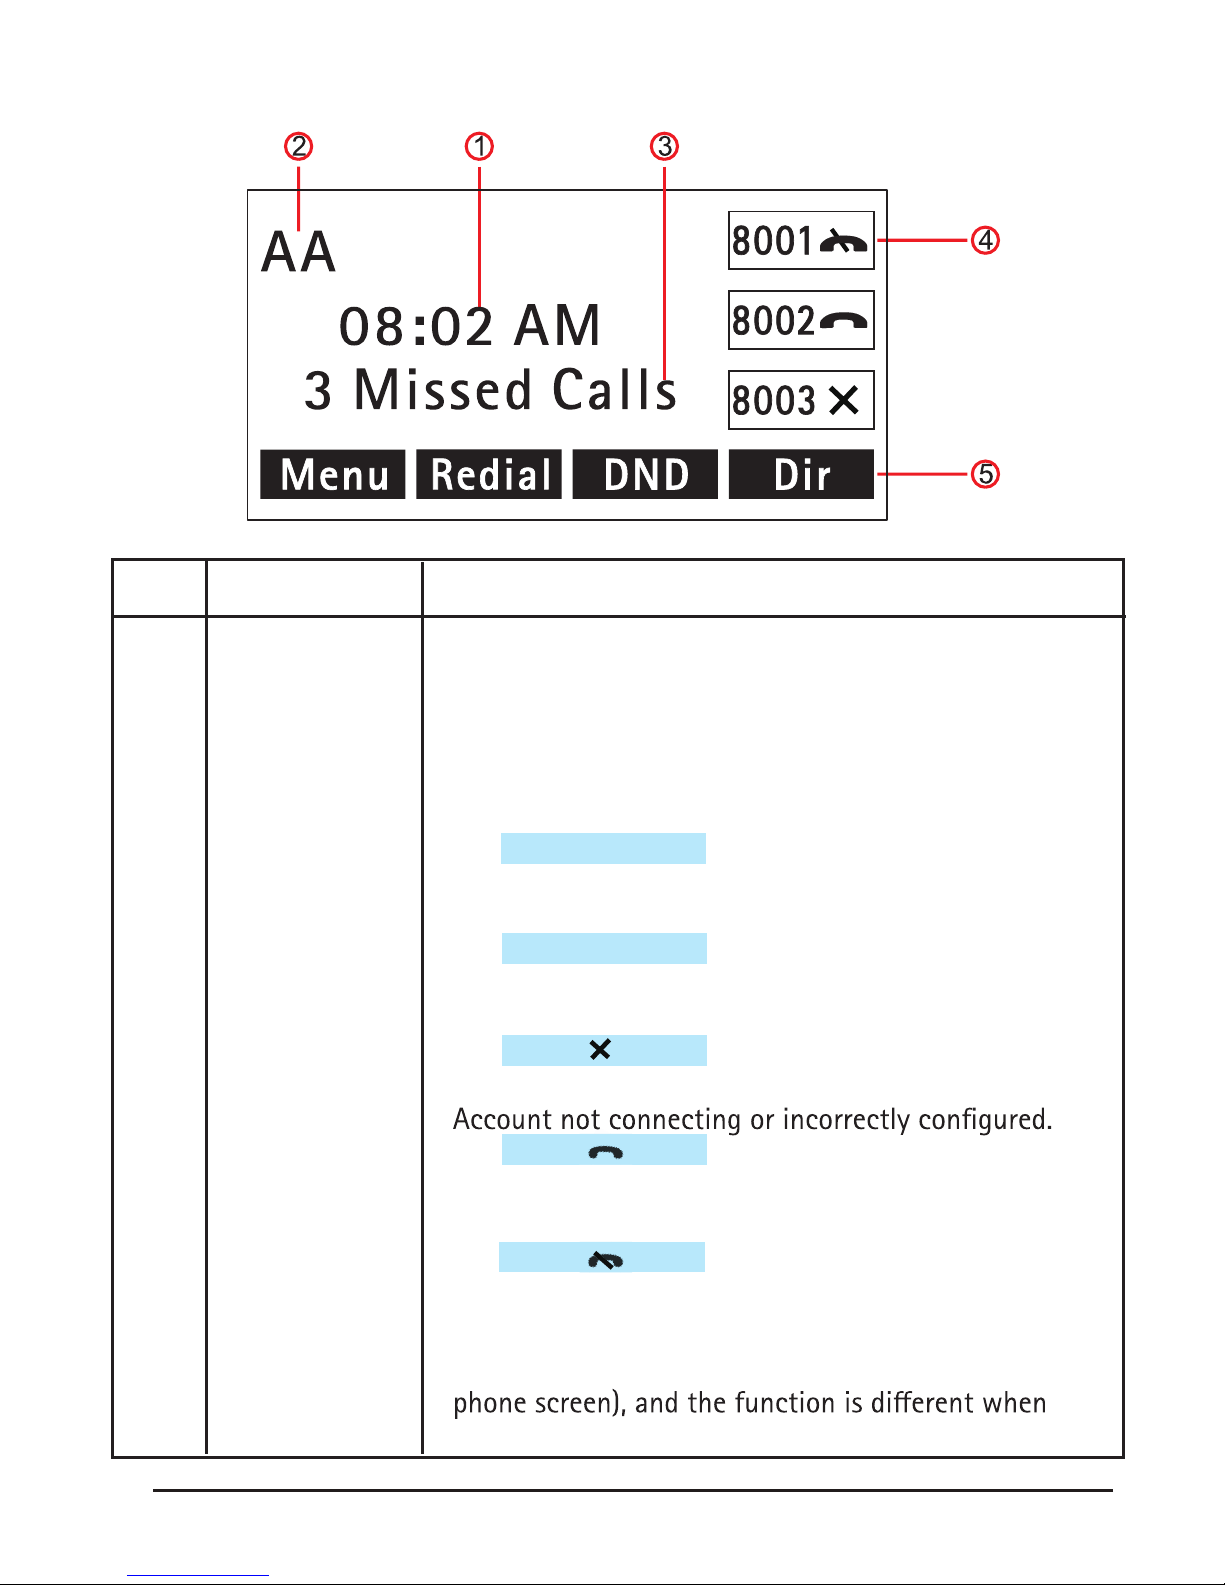
Num Screen Functions
1 Time Shows current time.
2 Auto-answer When auto-answer is enabled, the screen displays “AA”
3 Missed calls or
date Shows the number of missed calls or show current date.
4 Line status Show the phone line status:
1) :
Disconnected from the network.
2) :
Only Peer-to-Peer call.
3) :
4) :
Network is connected and the line is available.
5) :
DND is activated.
5 Softkey labels Each displays a softkey function (displayed on your
menu changes.
LAN Dis connect
Peer-to Peer
8001
8001
8001
8
9
9
Basic Call Handling
Users can perform basic call-handling tasks using a range of features and services.
Feature availability can vary; consult the system administrator or service provider
for more information.
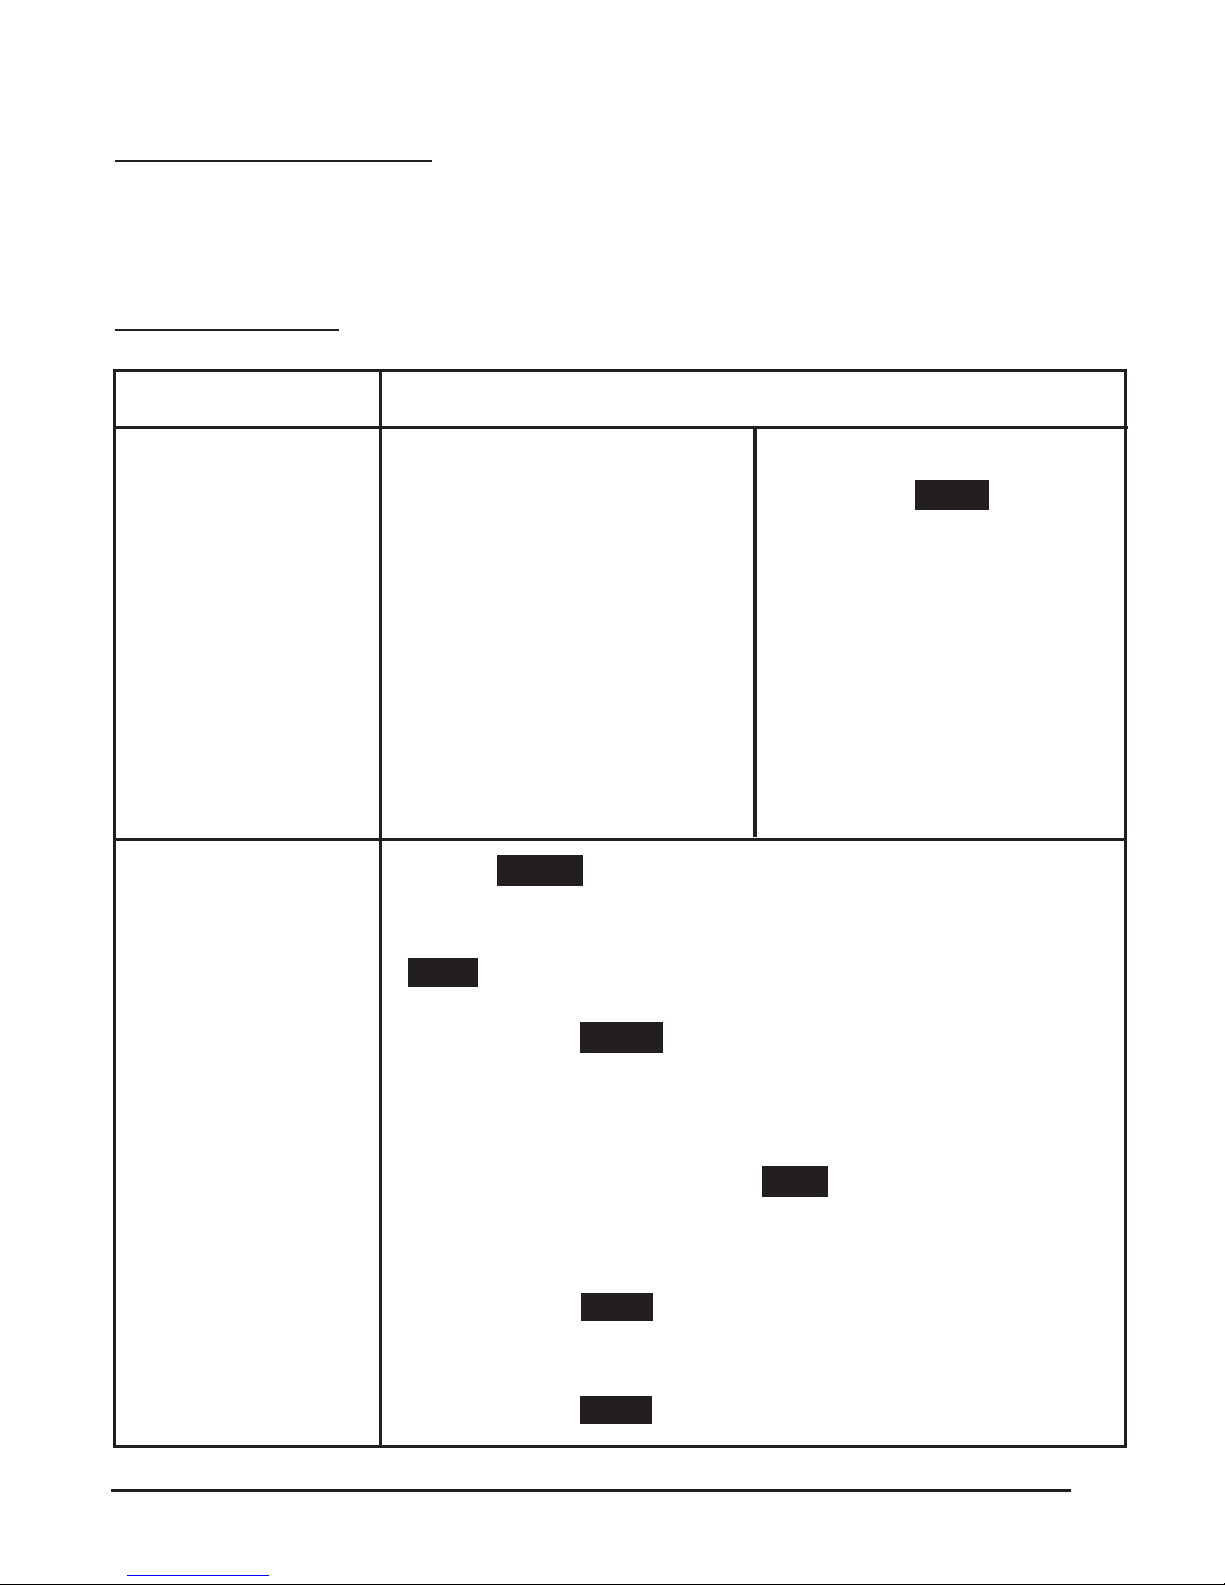
Placing a Call
If you want to:
Place a call using
the handset
Place a call using a
speakerphone
Place a call using a
headset
Redial
Dial from a call log
Place a call while
Another call is
active
Pick up the handset
Press the Speaker button,
or a Line button
Press the Headset button
• Dial a number
• Press the SEND softkey
or press the ‘#’ button
or wait 5 seconds and the
call will begin automatically
Then
--Press Redial softkey to dial the last number
-or press Right Navigation to access the Dialed Numbers
list, select a number, and press the Enter softkey then the
Enter softkey again. .
--1) Press the MENU softkey or OK button > Call history,
you can select Missed calls, Received calls and Dialed numbers,
- or while in idle mode press Navigation key > select Missed
calls (down), Received calls (left) and Dialed numbers (right)
--2) Then press OK button or Enter softkey, then the
Enter softkey again.
--1) Press the HOLD softkey;
--2)Press another Line button or Dial softkey
--3) Enter a number;
--4) Press the SEND softkey;

10
11
Tips
• Users can dial on-hook, without a dial tone (pre-dial). To pre-dial, enter a number,
and then lift the handset or press the softkey, Headset or Speaker buttons.
• To delete digits before dialing, press the Del softkey to erase.
Answering a Call
Users can answer a call by simply lifting the handset, or using the following meth-
ods to active the speakerphone, headset, or other options.
Basic Call Handling
Users can perform basic call-handling tasks using a range of features and services.
Feature availability can vary; consult the system administrator or service provider
for more information.
Placing a Call
If you want to:
Answer with a
handset
Answer with the
speakerphone
Answer with the a
headset
--1) Users phone rings;
--2) Line button of the
ringing line is Blue
and ashing.
--Pick up the handset
--Press Speaker button
-or press the ashing
Line button,
-or press the ANS
softkey
--Put on headset and
press the Headset but-
ton
Then
Other manuals for IP115
1
This manual suits for next models
1
Table of contents
Other RCA IP Phone manuals


