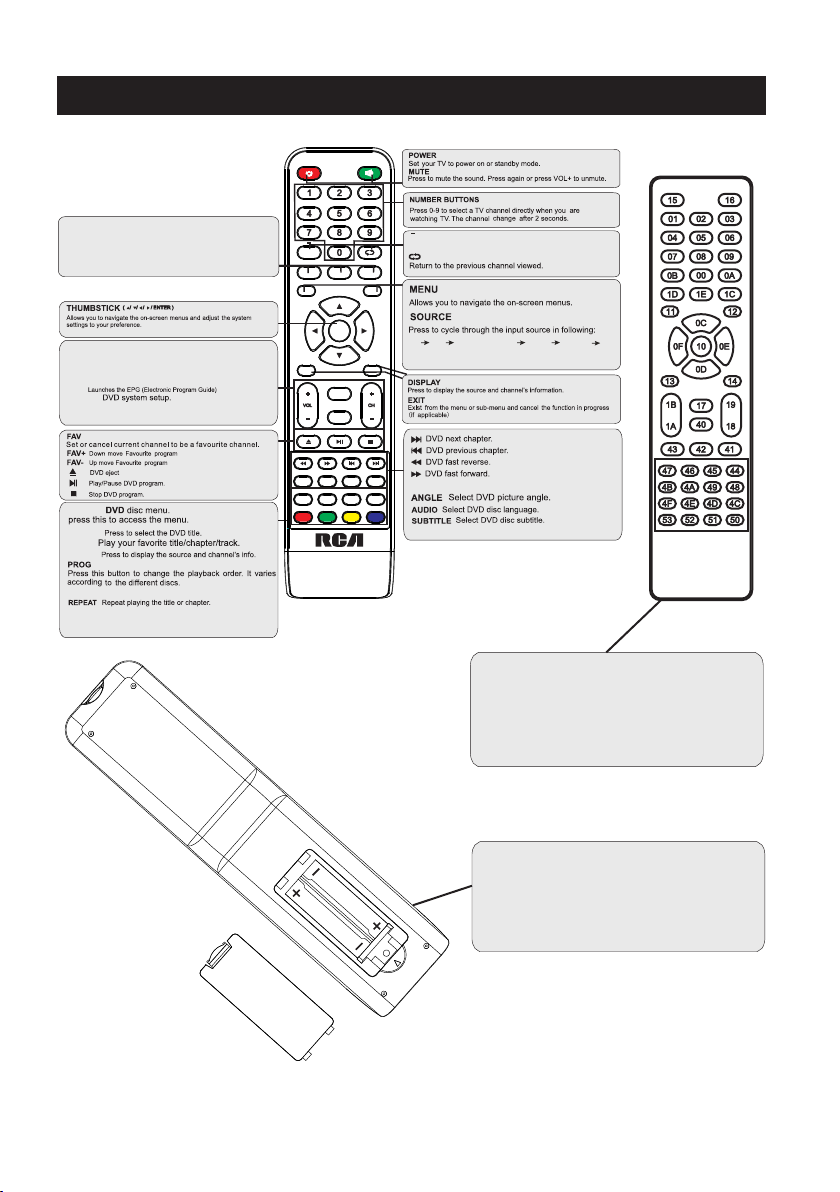
RCA RTDVD2409 User manual

RTDVD2409
INSTRUCTION MANUAL
This device complies with Part 15 of the FCC Rules.
Operation is subject to the following two conditions:
(1) this device might not cause harmful interference, and
(2) this device must accept any interference received,
including interference that might cause undesired operation
Before using the TV, please read this manual thoroughly, and
retain it for future reference.

Caution
Important Safety Precautions
Top/Side panel diagram
Remote Controller
Battery Installation
Using the Remote Control
Install TV
Set your TV
Connect Antenna and power
Turn On TV
Help
2
3
4
6-7
8
9
12-13
15-18
24
25
TV Bracket assembly 5
Specifications
Setup Wizard
Wall Mount Installation
Main Menu Operation
Sound Menu
Time Menu
Setup Menu
Lock Menu
Channel Menu
15
15-16
16
16-18
Systems Connection 10
14
Select Input Source
TV
19
20
PC 21
PC Menu
DVD Setup 22-23
Table of Contents
1

The lightening flash with arrowhead symbol, within an equilateral triangle is
intended to alert the user to the presence of un-insulated "dangerous voltage"
within the products enclosure that may be of sufficient magnitude to constitute a
risk of electric shock to the persons.
The exclamation point within an equilateral triangle is intend to alert the user to
the presence of important operating and maintenance (servicing) instructions in
the literature accompanying the appliance.
Correct disposal of this Product
W aste Electrical & Electronic Equipment (WEEE)
Your product is designed and manufactured with high quality materials and
components which can be recycled and reused.
This symbol means that electrical and electronic equipment, at their end-of-life,
should be disposed of separately from your household waste.
Please dispose of this equipment at your local community waste
collection/recycling centre.
In the European Union there are separate collection systems for used electrical
and electronic products. Please help us to conserve the environment we live in!
Caution
2
This Compact disc player is classified as a Class 1 LASER PRODUCT.
This is class Ⅱ apparatus whis double insulation, and no protective earth provided.

Important Safety Instructions
3
The use of apparatus in moderate climates;
Minimum distances 5cm around the apparatus for sufficient ventilation;
To preserve our environment,dispose of used batteries according to your local laws or regulations.
The mains plug is used as disconnect device,the disconnect device shall remain readil.
The ventilation should not be impeded by covering the ventilation openings with items, cloths,
curtains, etc.
Refer all servicing to qualified service personnel. Servicing is required when the apparatus
has been damaged in any way, such as power-supply cord or plug is damaged, liquid has been
spilled or objects have fallen into the apparatus, the apparatus has been exposed to rain or
moisture, does not operate normally, or has been dropped.
Warning: The batteries shall not be exposed to excessive heat such as sunshine, fire or the like.
23)

4
8
3.95”
3.95”
4
3.95” x 3.95”
100 100
Wall Mount Installation
BB4 * 12mm

1.Match the TV unit into the stand, then hold the TV stand,
revolve and lock the tv unit tightly as the arrowhead point.
2.Fix the screws into the TV stand after installing the tv
unit and tv stand.
3screws
TV Bracket assembly
5

VOL
CH+/-:When watching TV: select channels.
(DVD Mode. CH-:DVD Eject. CH+:Play/Pause DVD Program)
/
/MENU:
1.Press Menu.
2.Use CH+/- to shift UP/DOWN.
3.Press VOL+/-to adjust.
SOURCE External signal input selection
1.Use CH+/- to shift UP/DOWN.
2.Press VOL+ to enter.
Indicator on(Red) Standby mode
Indicator on(Green) Power on mode
(IR) Infrared Receiver: Receives IR signals from the remote control.
(Power on/Standby) LED Indicator: Press to turn on and off
The functions of the buttons on the are as follows:TV
Top panel diagram
6

Side Panel Diagram
7
(Left Side)
(Back Side)
Connect to ANT or cable source
PC AUDIO IN PC audio input
VGA IN VGA signal from computer output
YPbPr Connect to the composite terminal of your DVD/VCR
EARPHONE
For Upgrade Use
AV INPUT
Earphone output
Digital Audio Output
Service Port
HDMI IN Connect to HDMI of DVD or other equipment
Name Function Description
(The service Port is intended for service use only.Please do not connect any device to the port)
Digital Audio Out
service port
HDMI(ARC)
INPUT R
L
INP UT
CVBS/Y
Pb Pr
Digital
Audio out
AC IN

Remote Controller
8
Universal remote code
This is the code for remote control of
RTDVD2409,if you want to change to a
universal remote control,you can edit
this code into your universal remote control.
(1)Open the battery compartment cover
on the back side
(2)Insert two 1.5V batteries of AAA type
with correct polarity
(3)Close the battery compartment cover
on the back side
Universal Remote Control code:007F
(Universal Remote control is not included)
MEN U SOURC E
ENT ER
EXI T
SLE EP
P.MOD E S.M ODE
DISPLAY
MTS / MP3PROG
EPG
REV FWD PREV
FAV-
FAV FAV+
NEXT
D.setup
D.Menu D.Title Goto D.Disp
PROG STEP REPEAT AD /TT S
Zoom Angle Subtitle
Audio
D.TITLE:
TTS/AD Press the button to select (On/Off) the TTS or AD
SLEEP: :Select amount of time before TV turn
off
automatically.
S.MODE: :Press to cycle through the different sound settings
P.MODE::Press to cycle through the different picture settings
D.DISP:
D.MENU:
Press "-" to enter a program number for multiple program
channel, such as 2-1 etc.
GOTO:
STEP:Play for single frame image
ZOOM In DVD source adjust DVD picture size
MTS / MP3PROG::
Press to select the audio mode,you can select stereo,Mono,
or SAP(second audio program)./When playing mp3 disc,
press MP3 PROG and add the favorite music to playlist,
press PROG two times to see the programmed playlist.
CH +/- : Press to scan through or to select a channel.
V +/-: Press to increase / decrease the sound level.
EPG::
D.Setup::
AVTV HDMI
PC
COMPONENT DVD
function( TTS: Text To Speech, AD: Audio
Description)

3
side
indicator
9
10cm
10cm 10cm
LED TV

2
10
Component
INPUT R
L
INP UT
CVBS/Y
Pb Pr
Dig ital
Aud io out
AC IN
INPUT R
L
INP UT
CVBS/Y
Pb Pr
Dig ital
Aud io out
AC IN
INPUT R
L
INP UT
CVBS/Y
Pb Pr
Dig ital
Aud io out
AC IN

11
INPUT R
L
INP UT
CVBS/Y
Pb Pr
Dig ital
Aud io out
AC IN
service port
HDMI(ARC)

12
Setup Wizard
Connect an RF cable from the TV’s input called “RF-In” and to your TV Aerial socket.
Select Time
Press ▼ / ▲ button to select the time zone, daylight saving time and time format you want to.
Press / button on the remote control to adjust.
Press ▼ / ▲ button on the remote control to select go to next step and press ENTER/ button
to go.
Select TV Configuration

13
Auto Scan
Press </ > button to select the antenna type.
Press ▼ / ▲ button to select go to next step and press ENTER/ button to start auto scan.
Setup Wizard

14
Select Input Source
Press SOURCE button to display the input source list,
Press ▼ / ▲ or SOURCE button to select the input
source you want to,
Press ENTER button to enter the input source,
Press EXIT button to quit.
Main Menu
Press MENU to display the main menu or return to the previous menu or close the main menu.
Press </ > to highlight the desired menu icon, and press ENTER to select.
Source Select
TV
AV
Component
DVD
HDMI
PC

d)HDMI MODE Video Mode will do overscan, use different aspect ratio;
Graphic Mode do not overscan, display 100 video.%
Adjusting tint will affect the skin tone. -50 will increase red,+50 will increase green.
Ideally, the tint scale on the TV OSD should show the red/green color for easy adjustment.
This feature changes the white balance of the color (It only works in user mode).
Press MENU to enter the main menu, Press button to select.
Press ENTER / to enter.
Press MENU again to exit or back to parent menu.
Press MENU to enter the main menu, Press button to select.
Press ENTER / to enter.
Press MENU again to exit or back to parent menu.
c)DYNAMIC CONTRAST This feature allows the TV to automatically adjust the contrast of the
TV depending on the picture you are viewing.

16
TV
Time Menu
ENU to enter the main menu, Press button to select.Press M/
Press to enter.ENTER / ▼
ENU again to exit or back to parent menu.Press M
button to select among Sleep Timer / Time Zone / Daylight Saving Time / Time Format / Auto Press ▼ / ▲
Clock / Clock.
Press to enter. ENTER / ▼
Press button to adjust./
ENU again or back to parent menu. Press M
button to select among /Sound Mode / Bass / Treble / Balance /MTS/ Audio LanguagePress ▼ / ▲
/Digital Audio Output/Surro und Sound/ AVL .
Press to enter. ENTER / ▼
Press button to adjust./
ENU again or back to parent menu. Press M
Setup Menu
ENU to enter the main menu,Press button to select.Press M◄ / ►
Press to enter.ENTER / ▼
ENU again to exit or back to parent menu.Press M

17
TV
Press ▼ / ▲ button to select among Menu Language / Transparent / OSD Timeout / Closed Caption /Over Scan/ Input Label /
Other settings / Restore Default / Setup Wizard/HDMI CEC/Voice Guidance/Video Description/Shopping Mode.
Press to enter. ENTER / ▼
Press button to adjust.◄ / ►
ENU again or back to parent menu. Press
M

18

19
TV
Enter your 4-digital password. Default password is 0000,and if forget what you set, please call the
service center.
Lock Menu
, .
ENU to enter the main menu Press button to selectPress M/
.
Press to enterENTER / ▼
.
ENU again to exit or back to parent menuPress M
buttontoselectamong Change Password / System Lock / Input Block / US Rating / Canada Press / ▲
▼
Rating /RRT Setting / Reset RRT
.
Press to enter
ENTER / ▼
.
Press button to adjust
/
.
ENU again or back to parent menuPress M
ReturnNextMove
Table of contents
Other RCA TV manuals
Popular TV manuals by other brands

Sony
Sony Trinitron KV-ES34 operating instructions

Samsung
Samsung TX-R2735G Owner's instructions

Sony
Sony KV-BZ212 operating instructions

Sony
Sony KDL-40V3000, KDL-46V3000 Quick setup guide

Atec-Haier
Atec-Haier 21TV6H Manual Del Usuario

Zenith
Zenith Concierge H20D35DT Installation and operating guide, warranty