Rcom MINI User manual

R-COM3_v01_ALL
1
R-COM MINI (R-COM3) USER
GUIDE
ENGLISH

R-COM3_v01_ALL
2
INDEX
General use.............................................................................................................................................................. 3
Overview parts and composition......................................................................................................................... 3
Operating of the display and its parts.................................................................................................................. 4
Warnings............................................................................................................................................................. 4
General warnings ............................................................................................................................................ 4
Warnings during usage.................................................................................................................................... 4
Usage................................................................................................................................................................... 5
Preparations for usage..................................................................................................................................... 5
Set up for other bird species............................................................................................................................ 6
Stopping of the incubator................................................................................................................................ 6
Precautions and aftercare during the incubation period ...................................................................................... 6
Maintenance........................................................................................................................................................ 7
Cleaning.............................................................................................................................................................. 7
Raising chicks ......................................................................................................................................................... 8
Incubation period and hatching period per species ............................................................................................. 8
When is an egg fertilized?................................................................................................................................... 8
Candling.............................................................................................................................................................. 9
How do I make a nest?...................................................................................................................................... 11
Feeding the chicks............................................................................................................................................. 12
Incubation journal ............................................................................................................................................. 13
The incubation process...................................................................................................................................... 15
Appendix1: adjusting manually the temperature settings.................................................................................. 16
Appendix2: Accessoires.................................................................................................................................... 16

R-COM3_v01_ALL
3
GENERAL USE
OVERVIEW PARTS AND COMPOSITION
This package includes:
1. An adapter 12V
2. A transparent lid/window for closing the incubator and for controlling the progress of the incubation
process
3. An egg tray for keeping the incubator clean during the hatching of the eggs
4. An incubator
Bottom
Backside
Ventilation grid
(inlet)
Egg turning system
(roller)
Groove for placing the
egg
Opening water tank
Behuizing broedmachine
Drainage tray
Display & Control panel
Ventilation grid
(outlet)
Input adapter

R-COM3_v01_ALL
4
OPERATING OF THE DISPLAY AND ITS PARTS
WARNINGS
GENERAL WARNINGS
Do not drop or damage the incubator by scratching it
Do not use any metal object in the incubator
Use only the included accessories
Never unplug the incubator while it is operating
Never hold the incubator upside down, if there is still some water in the water tank
Do not damage or overstretch the cable
WARNINGS DURING USAGE
Never expose the incubator to direct sunlight
Make sure that there are no great temperature fluctuations during the incubation period, like extreme
cold or extreme warmth
Selection quail
Selection other bird species
andere vogels
Selection duck
Selection chicken
Selectie pheasant
OK key
Selectio key
Indication temperature
Indication waterl evel
Indication egg turning system
Indication remaining incubation
days

R-COM3_v01_ALL
5
Make sure that the environment the incubator is placed in, is not too humid or wet
Place the incubator on a level and vibration free spot
Place the incubator in a clean and dust free environment
Make sure that children do not have access to the incubator
USAGE
PREPARATIONS FOR USAGE
The following steps have to be followed to make sure that the incubator works correctly.
1. Connect the adapter to the backside of the incubator and connect its plug to a suitable socket. The
LCD/display will light up and will show the temperature of that moment.
ATTENTION: it is possible that during the start-up a normal reaction.
2. Open the cap of the water tank and carefully fill the tank of the incubator with water. During the filling
of the water tank a little Styrofoam spherule will be pushed upwards. As soon as this spherule has
reached the opening of the tank, the tank is full. The water level indication LED will light up
approximately every five days to indicate that the water level in the incubator is too low. If so, refill the
water tank with lukewarm water .
ATTENTION: the water level indication LED will still keep burning for a short time after the tank has
been refilled.
WARNING: after refilling the water tank, do not shake or hold the incubator upside down, as this may
cause a leak or an infiltration and therefore, a short circuit.
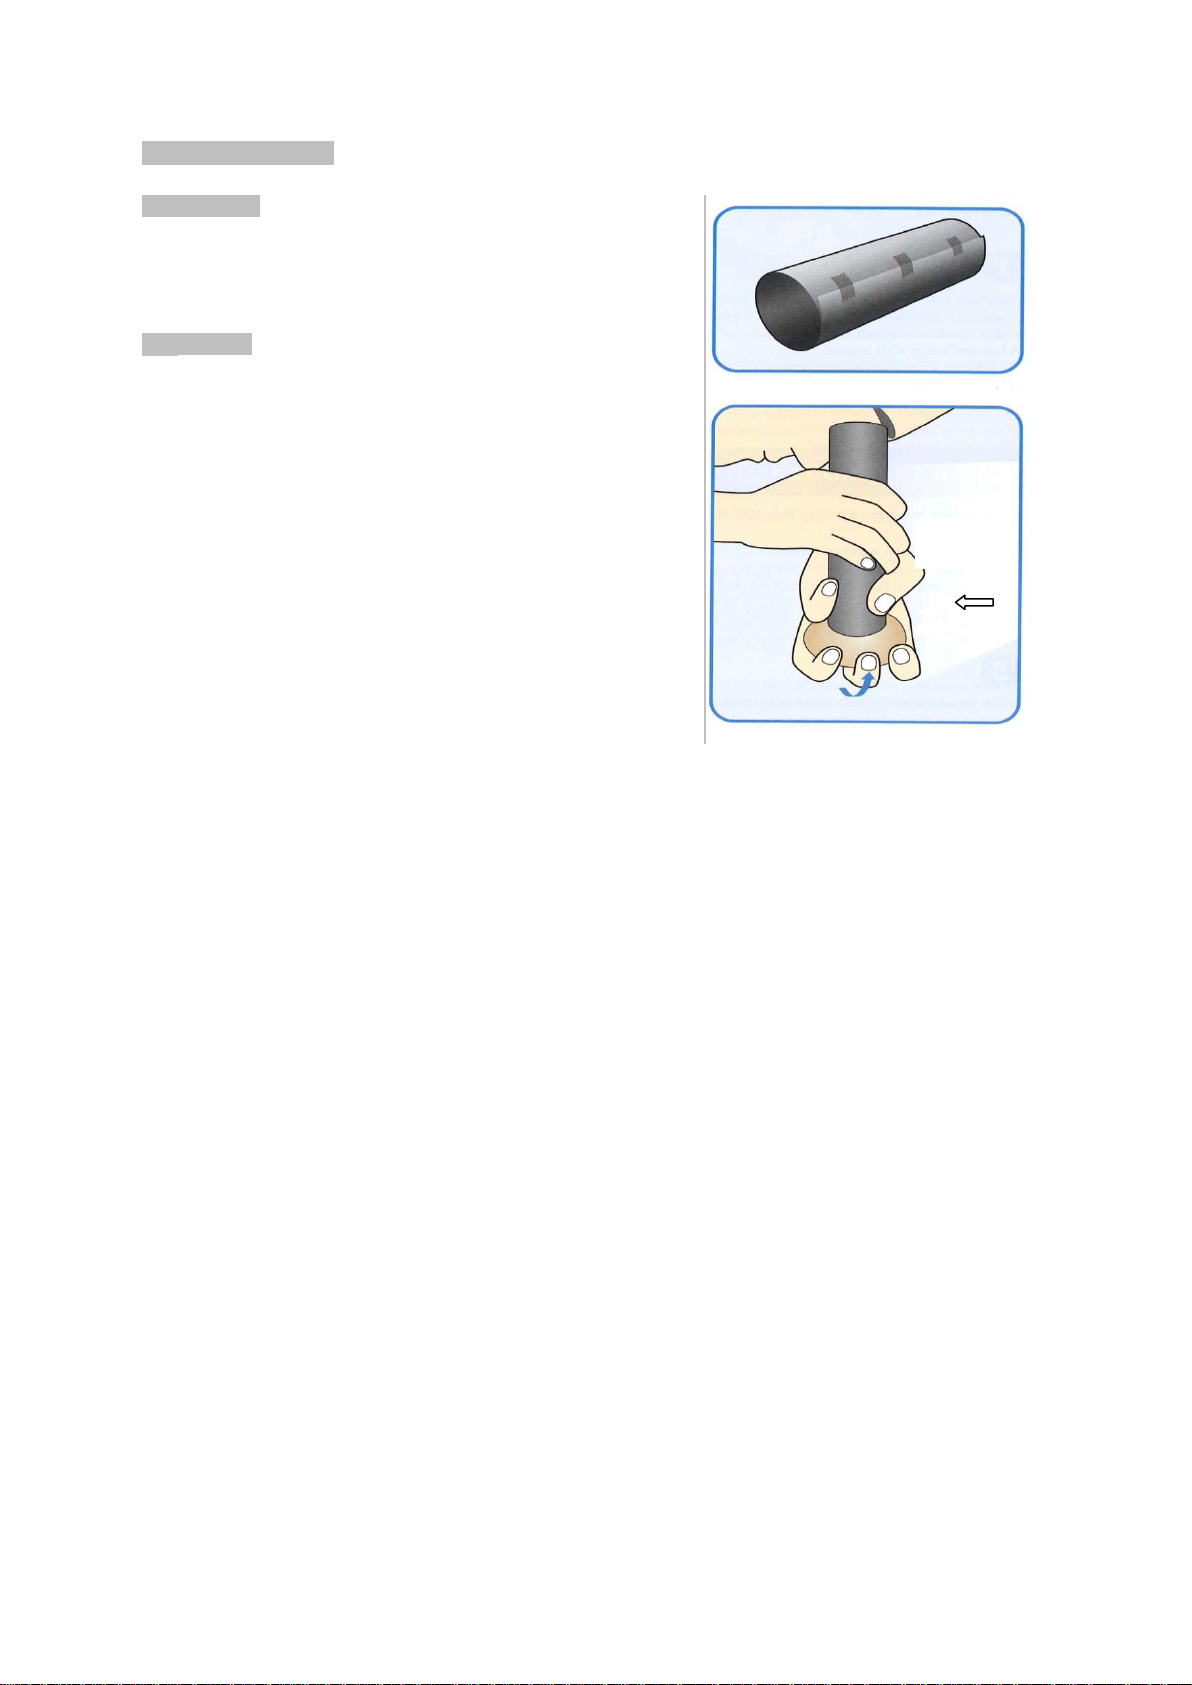
3. Open the lid of the incubator and take out the egg tray. Place the fertilized eggs in the grooves and close
the lid.
WARNING: do not throw away the egg tray as you will need it later on during the hatching of the eggs.
WARNING: make sure that the lid of the incubator is closed WELL as, otherwise, the incubator will
not reached the desired temperature.
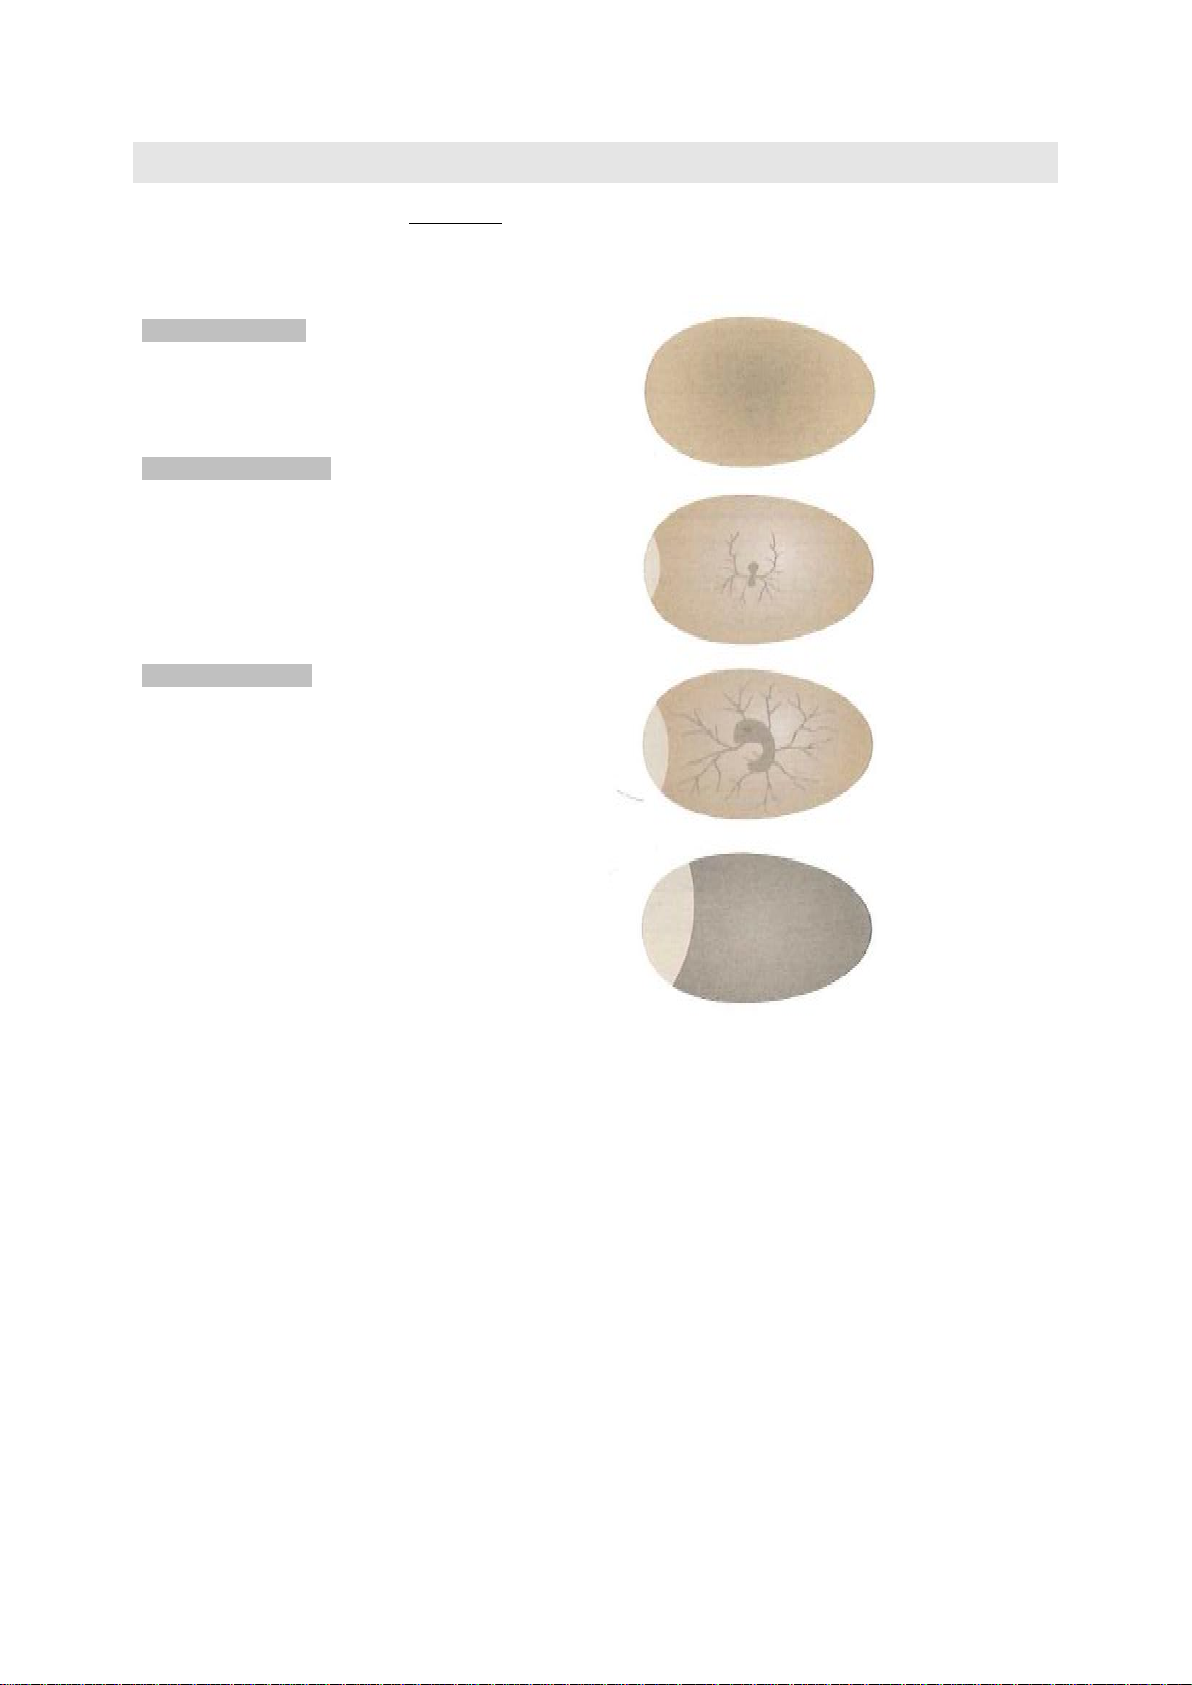
ATTENTION: the eggs to incubate have to be fertilized.
fertilized? can be found at page 13 of this user guide.
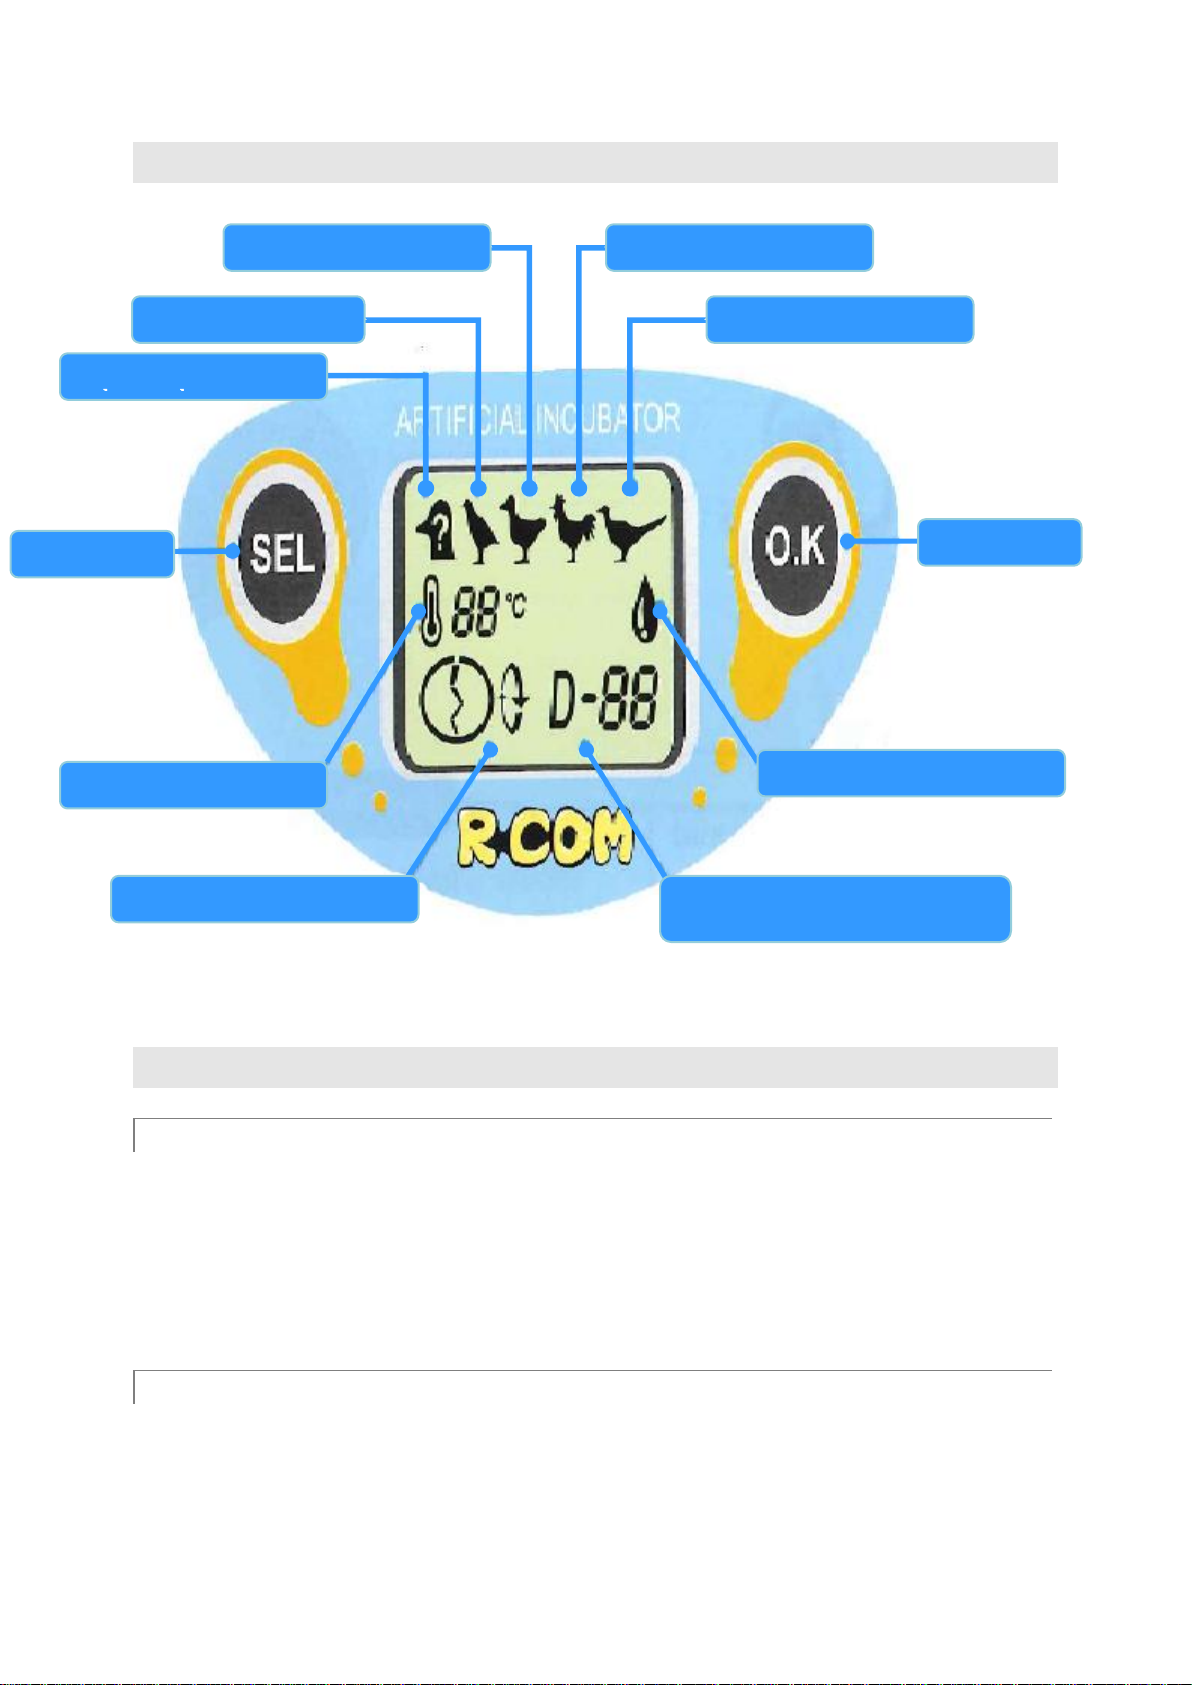
4. Press the <SEL> key of the control panel. The bird symbol on the display will start to flash. Each time
the <SEL> key is pressed again the next species symbol on the display will start flashing.
5. Press as many times as needed the key until you have reached the bird species you want to incubate the
eggs of. Press hereafter approximately for 2 seconds the <OK> key to confirm/save your selection. The
symbol will flash briefly a few times, the light in the incubator will switch on, you will hear a short
beep and the incubator will start running.
6. From this moment on the incubator will optimize automatically all functions. The temperature as well
as the humidity will be kept on a constant level and the eggs will be turned once an hour. Besides all
that, you will hear a beep to warn you each time that the water level in the tank of the incubator is too
low, the lid is open or the temperature is irregular.
Note: a warning signal sounds also 10 seconds before the eggs are turned.
ATTENTION: Why turn the eggs? Turning the eggs is needed until 3 days before the their hatching and
is necessary to get good incubation results and healthier chicks.

R-COM3_v01_ALL
6
SET UP FOR OTHER BIRD SPECIES
1. Press the <SEL> key on the control panel and sele
2. Press briefly (for less than one second) the <OK> key. The incubation period indication (D-01) will
start flashing on the display.
3. Press the <SEL> key to specify the correct amount of incubation days. In dependence of the egg species
to be incubated, the <SEL> key will have to be pressed as many times as it is necessary to reach the
right amount of incubation days (e.g. pheasant = 23 days). The selectable amount of incubation days has
a range from 1 to 40 days.
4. Make sure you have input the right amount of incubation days and, after that, press the <OK> key for
approximately 2 seconds to confirm/save your selection.
ATTENTION: in case the incubation period is interrupted by a human error, you can just
restart/continue the incubation process again by setting the remaining incubation days using the
abovementioned keys. Example: if the incubation period of an egg with an incubation period of 21 days
is interrupted on the 15th day, you just have to input 6 days (21-15 = 6).
STOPPING OF THE INCUBATOR
ATTENTION! THIS ACTION IS ONLY ALLOWED IN VERY SPECIFIC CASES. IN CASE THIS ACTION
IS CARRIED OUT DURING REGULAR OPERATION OF THE INCUBATOR, IT MAY CAUSE THE
DEATH OF THE EGGS!
ATTENTION: Stop the incubator only in the following cases.
The incubator has to be set up again as the amount of incubation days previously set was not correct.
WARNING: a power failure or malfunction during a short period of time may not be fatal to the eggs, provided
that the room temperature at that moment was mild. In case of a brief failure you just can restart/continue the
incubation process where it has been interrupted and according to the remaining incubation days left.
ATTENTION: regardless of whether the malfunction has been caused by human error or by a power failure,
there is a chance that the settings still are available in the memory of the incubator, provided that the failure has
been really short.
STOPPING THE INCUBATOR
Press on both keys of the control panel at the same time for at least three seconds (<SEL> and <OK> key). A
warning signal will sound, the incubator will stop running and the light in it will shut off.
PRECAUTIONS AND AFTERCARE DURING THE INCUBATION PERIOD
After 18 days of the incubation period (in case of chicken eggs) open the lid of the incubator and take the eggs
out carefully. Place the egg tray first in and after that the eggs back into the incubator and then close the lid. The
tray prevents that, during the hatching of the eggs, dirt and dust get into the incubator or in-between the rolls of
the egg turning system.
ATTENTION: when it is time to put the egg tray into the incubator, the display of the control panel will
automatically show. The egg turning is stopped and the symbol of the egg turning system is not showed on the
display anymore.

R-COM3_v01_ALL
7
During the hatching of the eggs it is advisable to not open too often the lid of the incubator. Opening the lid too
often causes a humidity and warmth loss whereby the feathers of the chicks dry to fast and the chick cannot
hatch as their feathers are stuck to the eggshell.
ATTENTION: from the first break in the egg shell until complete hatching of the chicks approximately 12 hours
occur. Do not open the lid, even if the chicks are struggling to come out of their eggs.
After all chicks have hatched , still keep them for approximately one day in the incubator. This way they get the
opportunity to let their feathers dry and get some rest. Besides, it is not necessary to feed the chicks during this
period as they are born with enough reserves to stay without food for 1-2 days without any problem.
ATTENTION: the hatching of the eggs may also be delayed for 2-3 days. This depends on the condition of the
eggs. After the days of the hatching period have elapsed, the LCD display shows the scheduled hatching date.
One day after hatching the chick can be moved from the incubator to a nest. The box of this product can be used
as a nest.
WARNING: make sure the egg tray has been removed before you start cleaning the incubator.
ATTENTION:
MAINTENANCE
1. Unplug the adapter from the mains and, after that, from the incubator.
2. Put the incubator on a table letting one third of it protrudes over the table edge. The protruding edge
should be the one where the outlet of the water tank is situated. Take the cap off from the outlet (on the
bottom of the incubator) and let the remaining water drain from the water tank. Lift the incubator a
little and incline it, first to one side and then to the other, in order to make sure that all the water is
being drained.
WARNING: watch out for losing the cap.
ATTENTION: put a bucket or bowl beneath the table to collect the water.
3. Clean the incubator with a damp cloth and let it dry properly before storing it.
WARNING: NEVER clean the incubator with organic solvents, like benzene or turpentine.
CLEANING
Dried out chick feathers and dust can get into your incubator after several incubation cycles.
1. and 2. Follow the instructions at point 1 and 2
3. Take off the nozzle of the vacuum cleaner.
4. Open the incubator lid and clean its inside and the ventilation grid (outlet). In case there is some dirt or
dust nearby or between the rolls of the egg turning system, vacuum clean these too to avoid they get
jammed. After that clean the incubator with a damp cloth and let it properly dry before storing it.

R-COM3_v01_ALL
8
RAISING CHICKS
INCUBATION PERIOD AND HATCHING PERIOD PER SPECIES
Species
Quail
Chicken
Duck
Pheasant
Turkey
Total incubation
period
17
21
28
23
28
Day egg turning
system stops
14th day
18th day
25th day
20th day
25th day
Species
Pigeon
Gold
pheasant
Silver
pheasant
Finch
Lovebird
Total incubation
period
17
23
23
14
19
Day egg turning
system stops
14th day
20th day
20th day
11th day
16th day
ATTENTION: healthy animal common sense
A chick uses an
inside and throws his little head backwards to break this way the shell more easily. t falls
from the beak of the chick after hatching..
WHEN IS AN EGG FERTILIZED?
FERTILIZED OR NOT?
A fertilized egg is an egg laid by a hen that has paired by a rooster.
not fertilized, it can be eaten and, if incubated, will not
generate any chick.
BUYING FERTILIZED EGGS
To get good incubation results, the bought eggs must be fresh. Best practice is to buy these eggs from a breeder.
It is preferable that the eggs are marked with the laying date so that you may choose eggs laid in the same week.
The older is the egg, the poorer the incubation results. It is advisable to buy eggs laid by a local hen, fertilized by
a rooster from the neighbourhood.

R-COM3_v01_ALL
9
CANDLING
An egg has to be candled at least three times during the whole incubation process.
FIRST CANDLING
6th day of the incubation process.
The blood vessels in the egg resemble a spider web
and during accurate candling the movements of the
embryo can be seen.
SECOND CANDLING
12th day of the incubation process.
The blood vessels are thicker and the movements of
the embryo are more lively. If the colour of the blood
may be that the development/growth of the egg has
ble anymore.
THIRD CANDLING
18th day of the incubation process.
During the growth of the embryo the air chamber
becomes smaller and smaller. At candling the whole
egg will be black/dark with exception of the air
chamber.
A fertilized egg
before the start
of the incubation
process
At candling on
the 6th day of the
incubation period
At candling on
the 12th day of
the incubation
period
At candling on
the 18th day of
the incubation
period

R-COM3_v01_ALL
10
CANDLING AN EGG
In a dark room
Lay the egg on a flat and soft surface, like a towel. Then
switch the candling light on and put it gently against the large
side of the egg. This way you can inspect the development of
the blood vessels and the embryo.
With daylight
1. Roll up a sheet of black paper or thin cardboard (this
cylinder and fasten it with some adhesive tape. The
diameter of the cylinder should be less than that of the
egg to candle.
2. Now take the egg into your left hand and hold it firmly
with your index, middle finger and ring finger (see
picture on the right).
Put the cylinder/roll on the egg and make sure that no
light can come between the roll and the egg; then walk to
a window and make sure that direct sunlight falls on the
egg.
3. Turn the egg with your middle finger of your left hand
until you have reached the best candling point.
ATTENTION: wait approximately one minute before
candling the egg, in order to give your eye the chance to get
used to the darkness in the cylinder.
WARNING: the edges of the paper sheet can be rather sharp.
Direct
zonlicht

R-COM3_v01_ALL
11
HOW DO I MAKE A NEST?
A new born chick is very sensible to cold. Therefore it is very important to keep it warm. For this purpose a nest
is essential. You may easily use the box of this product to build a nest and raise your chicks in it..
1. The needed materials to build a nest are as in the
picture on the right (cable, dish, product packing
box, energy saving light bulb with 20W, fitting
and waste newspaper)
WARNING: make sure that the light bulb you use
is an effectively, energy saving one with 20W.
Light bulbs with more than 20W let the
temperature in the incubator raise which can be
deadly for the chicks or may cause a fire.
2. Open the product packing box and make some
holes in the back of it, as indicated on it.
ATTENTION: indications regarding the making
of the holes-
nr. 4 = bulb, nr. 1,2,3,5 = ventilation
The following holes must be made in case of
Very cold room: nr. 1
Cold room: nr. 1,2
Warm room: nr. 1,2,3
Very warm room: nr. 1,2,3,5
3. Fasten de bulb in the box by inserting it from the
inside of the box through hole nr. 4. The screw-
thread of the bulb should be outside the back of
the box. Screw it on the lamp fitting.
WARNING: make sure that when screwing the
bulb on the lamp fitting, the plug of the cable is
not connected to the mains. Otherwise you might
get an electric shock.
4. Cover the bottom of the packing box with waste
newspaper and fill the dish with water. Put the
dish in one corner of the box.
WARNING: when you put too much water in the
dish, you may run the risk that your chicks fall
into the water and get soaked, therefore loose
body warmth and may die. In case of your chicks
becoming wet, dry them well as soon as possible
with a towel or a hair dryer.

R-COM3_v01_ALL
12
5. Put the chicks approximately one day after
hatching in the packing box , close the lid and
switch on the light by connecting the plug to the
mains.
FEEDING THE CHICKS
One day after hatching the chicks are covered with soft feathers and are so cute!
They can be fed for the first time at this moment.
Give them the chopped yolk of a hard-boiled egg mixed with some water in a dish or bowl.
no matter how cute they are!
It is also recommendable to add some sand or soil to their forage. Birds have a gizzard and sand or soil eases the
digestions of the forage.
Chicks likes also chopped lettuce or cabbage.
Feed your chicks with yolk for about two weeks; after that feed the a mixture of yolk of a hard-boiled egg and
chicken feed or some soaked millet. Approximately one week later you can feed them with a specific chicken
feed, bird feed, wet cereals or boiled rice.
WARNING: in case your chicks cheep very hard they need assistance.
It might be that they are fallen into the water and have wet feathers, that they are cold, thirsty, hungry , lonely or
afraid.
The chicks will only be quiet if they are happy and satisfied.

R-COM3_v01_ALL
13
INCUBATION JOURNAL
INCUBATION JOURNAL
Incubation start
First candling
Date: Y M D
Eggs bought at:
Name of the egg nursery::
Laying date: Y M D
Date: Y M D
Notes:
:
Second candling
Third candling
Date: Y M D
Notes:
Date: Y M D
Notes:

R-COM3_v01_ALL
14
DOSSIER VAN HET UITKOMEN VAN DE EIEREN
(1) Chick name:
Characteristics (colour, habits, etc.)
Hatching start time:
Hatching time:
Y M D Minutes
Y M D Minutes
Y M D
(2) Chick name:
Characteristics (colour, habits, etc.)
Hatching start time:
Hatching time:
Y M D Minutes
Y M D Minutes
Y M D
(3) Chick name:
Characteristics (colour, habits, etc.)
Hatching start time:
Hatching time:
Y M D Minutes
Y M D Minutes
Y M D

R-COM3_v01_ALL
15
THE INCUBATION PROCESS
On the second day of the
incubation period
The head, including the eyes, the heart and the blood vessels start to develop.
On the 4th day
The brains are separated into frontal-, middle- and rear brains.
The heart and the blood vessels are getting bigger and bigger.
On the 6th day
The wings and the paws start developing and the brains and eyes can be clearly
seen. The embryo starts moving.
On the 8th day
The brains are fully developed now, the neck is getting longer, the beak starts
growing and the wings and the paws are being separated.
On the 10th day
The wings and the paws are now totally separated and the toes are starting to
are becoming visible.
On the 12th day
The chicks is getting considerably bigger and is able to listen now. The feathers
are good visible and the skeleton starts hardening.
On the 14th day
The little head is bent towards the chest and the back is bent tot the left. The
whole little body is now covered with feathers and the head is looking in the
direction of the air chamber.
On the 16th day
The little head moves until under the right wing and gets this way in the best
position for hatching.
On the 18th day
The quantity of amniotic fluid decreases and the chick gets ready for hatching.
The time has come to stop the automatic egg turning system.
On the 19th day
The air chamber of the egg gets bigger and bigger and the yolk is attached to the
lung breathing function is activated.
On the 20th day
The yolk has been totally assimilated by the little body and the belly button is
still not fully closed. The yolk will serve as nutrition to the chick during the first
two to three days after the incubation period.
On the 21st day
The chick stt out of the egg shell. With the aid of
its limps the chick turns in the egg and pushes against the inner side of the egg
shell to break it. A too low humidity level may cause the feathers to dry up too
quick and stick to the inside of the egg shell whereby the chick cannot turn and
therefore cannot hatch.
It may take up to 12 hours to break the egg shell and hatch.

R-COM3_v01_ALL
16
APPENDIX1: ADJUSTING MANUALLY THE TEMPERATURE SETTINGS
User can adjust manually the temperature settings of their R-COM incubator to meet the requirements of specific
bird species or in order to reduce the temperature during the incubation process.
TEMPERATURE CHANGE PROCESS
1. Press for 5 seconds the <SEL> key while the R-COM is operational or while in stand-by mode. The display
2. As soon as the software version appears on the screen, press three times the <OK> key (within 2,5 seconds).
The incubator will get into the temperature change menu.
3. The display shows the set temperature value and the symbol of the thermometer flashes. To increase the
temperature press the <OK> key. To lower the temperature press the <SEL> key. The temperature varies
with each pressure with 0.1 degree. If no key is pressed within 8 seconds, the configured temperature
settings will be saved automatically and the incubator will return to the operating mode or the stand-by
mode.
4. From this moment on the temperature of the incubator will slowly change to the set value.
To reset the temperature settings again to the default factory settings of C, follow step 1 and 2.
In the temperature change menu; Press both keys at the same time for 3 seconds . The settings will change to
the factory default of C. After this do not touch any key for at least 8 seconds. The incubator will save
automatically the new temperature settings and will return to the operating mode or the stand-by mode.
ATTENTION: The default factory temperature settings of C should only be adjusted or changed by
experienced users with an extended knowledge. Wrong temperature settings can damage the eggs and put
the hatching results at risk.
APPENDIX2: ACCESSOIRES
Egg tray little (Model nr. SR-07) Egg tray for large eggs (Model nr. SR-01)

R-COM3_v01_ALL
17
Candling lamp (Model nr. RC-100) Transparent egg tray (Model nr. RT-300)
TECHNICAL SPECIFICATIONS
Adapter (adapter outlet)
DC 12V == 1.2A adapter
Consumption
Approx. 10W max.
Operating temperature
C
Dimensions
W = 260 L = 200 H = 110
Weight
Nett weight = 700g Brut weight = 1,770g

R-COM3_v01_ALL
18
R-COM MINI (R-COM3)
GEBRUIKSAANWIJZING
NEDERLANDS

R-COM3_v01_ALL
19
INHOUDSOPGAVE
Algemeen gebruik................................................................................................................................................. 20
Overzicht onderdelen & samenstelling ............................................................................................................. 20
Werkwijze onderdelen (display) ....................................................................................................................... 21
Waarschuwing................................................................................................................................................... 21
Algemene Waarschuwingen.......................................................................................................................... 21
Waarschuwing tijdens de ingebruikname...................................................................................................... 21
Ingebruikname .................................................................................................................................................. 22
Voorbereidingen ter ingebruikname.............................................................................................................. 22
Instellingen voor Andere vogelsoorten ......................................................................................................... 23
Stoppen van de broedmachine....................................................................................................................... 23
Voor- en nazorg gedurende de broedperiode .................................................................................................... 23
Onderhoud......................................................................................................................................................... 24
Reiniging........................................................................................................................................................... 24
OPFOKKEN van kuikens ..................................................................................................................................... 25
Broedperiode & Uitkomstperiode per vogelsoort ............................................................................................. 25
Wanneer is een ei bevrucht?.............................................................................................................................. 25
Schouwen.......................................................................................................................................................... 26
Hoe maak ik een nest?....................................................................................................................................... 28
De kuikens voeden............................................................................................................................................ 29
Broeddagboek ................................................................................................................................................... 30
Het broedproces ................................................................................................................................................ 32
Appendix1: handmatig aanpassen temperatuursinstellingen............................................................................. 33
Appendix2: Accessoires.................................................................................................................................... 33

R-COM3_v01_ALL
20
ALGEMEEN GEBRUIK
OVERZICHT ONDERDELEN & SAMENSTELLING
Bij deze broedmachine zijn inbegrepen:
1. Een adapter 12V
2. Doorzichtig raampje/deksel ter afsluiting van de broedmachine en het controleren van het broedproces
3. Een eierrekje om de broedmachine schoon te houden tijden het uitkomen
4. Een broedmachine
Ventilatierooster
luchtingang
Keersysteem (rolletjes)
Groef voor het plaatsen
van het ei
Water bijvulgaatje
Behuizing broedmachine
Drainage bak
Display & Controle paneel
Ventilatierooster
uitgang
Aansluiting adapter
Onderkant
Achterkant
This manual suits for next models
1
Table of contents
Languages:
Other Rcom Accessories manuals

Rcom
Rcom MARU DELUXE Hatcher & Brooder MX-100HBD User manual

Rcom
Rcom Juragon PX-20R User manual

Rcom
Rcom INSECT MAX 140 User manual

Rcom
Rcom 20 User manual

Rcom
Rcom REPTILE PRO 90 User manual

Rcom
Rcom KINGSURO MAX 20 User manual

Rcom
Rcom REPTILE 90 Series User manual

Rcom
Rcom KingSuro ECO 20 User manual

Rcom
Rcom USB 20 User manual

Rcom
Rcom R-Com 20 User manual