Recsea RVH-X1000 User manual

SONY FDR-X1000V 4K Action Cam Waterproof Hou ing
Recsea RVH-X1000
MANUAL
Plea e read thi manual before u e.
NTF CORPORATION UH Divi ion
http://www. eatool.net

INTRODUCTION
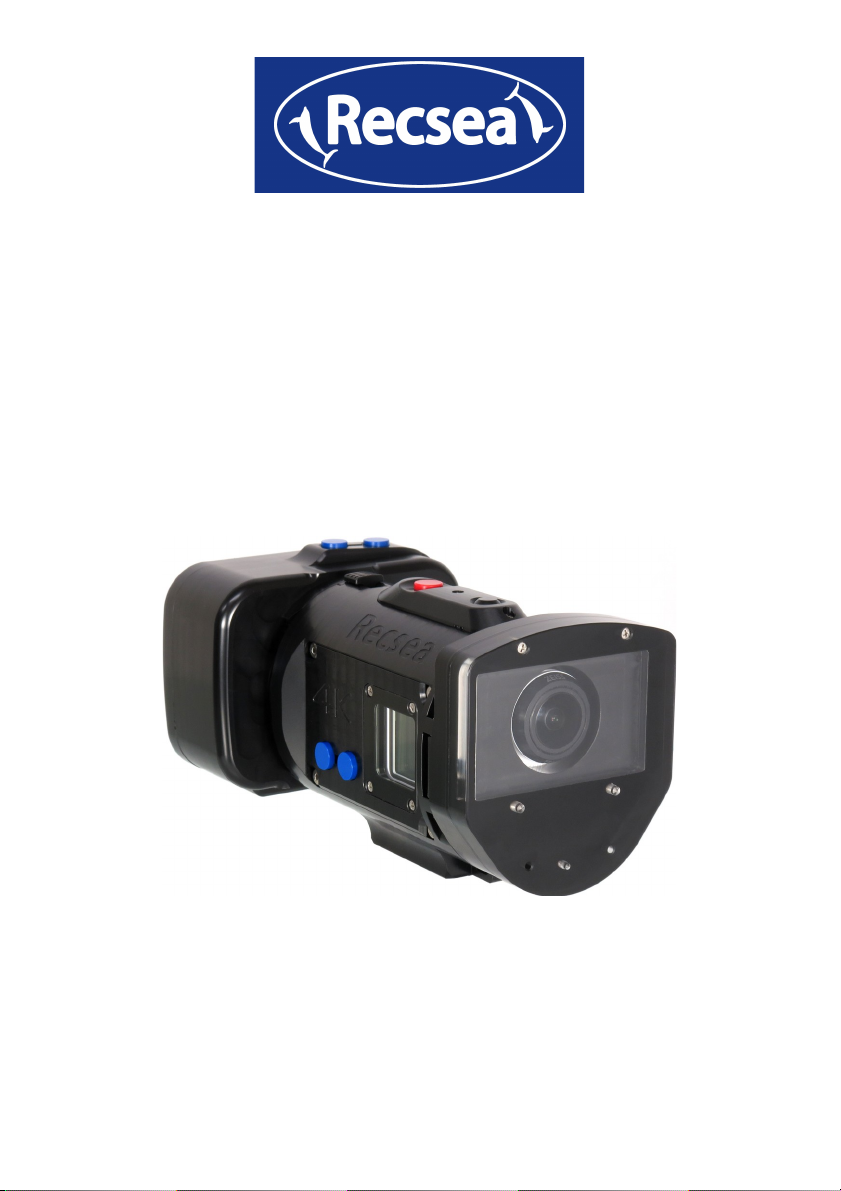
SONY FDR-X1000V 4K Action Cam Waterproof Hou ing RVH-X1000
※Thank you for purcha ing the RECSEA RVH-X1000 Waterproof Hou ing.
※ To en ure proper and afe u e, plea e thoroughly read thi manual.
※ Improper u e may cau e leakage cau ing irreparable damage to your digital camera.
※ Plea e check, and te t the hou ing according to thi manual prior to u e.
※Neither NTF Corporation, Seatool/Re ea nor their agent hall warrant or bear any
re pon ibility for any incident related to water leakage, damage or lo of data,
unauthorized modification, di a embly and repair; or any accident cau ing phy ical or
material damage while u ing thi product.
※Thi product i manufactured by machining method . A a re ult, there may be minor
cratching or tool mark . The e are a normal part of the manufacturing proce , do not
effect operation of the hou ing or camera, and are not ubject to warranty or any other
claim .
WARNING!
※ Do not tore or leave hou ing in reach of infant or mall children. The trap may cau e
chocking and uffocation, or mall part may be wallowed cau ing injury.
※Plea e remove digital camera from hou ing when not in u e. Battery malfunction or
damage may cau e fire.
※The hou ing body i made of Polyoxymethylene (POM). However, altwater can cau e
ru ting to ome part o be ure to rin e thoroughly u ing fre h water without fail.
CAUTION!
※ To prevent water leakage and damage, DO NOT di a emble or modify thi hou ing.
※ Do not tore the hou ing in area of high humidity, high or low temperature , or area of
extreme temperature fluctuation. Doing o may cau e deterioration of part .
※ When diving, u e a method of water entry that protect the hou ing from hock, which can
cau e water leakage. If at all po ible have hou ing handed to you after entering the
water.
※ Thi hou ing i de igned to with tand depth of 120 meter (393 feet). U ing the hou ing
at deeper depth may cau e damage and water leakage. U e caution and monitor depth.
※Remove O-ring or leave hou ing lightly open when tran porting by plane. Pre urization
of a ealed hou ing during tran port may cau e damage or make it difficult to open.
※ When opening and clo ing the hou ing be mindful of du t and other contaminant , which
may adhere to the O-ring , po ibly cau ing water leakage and damage.
※ Alway check O-ring prior to each u e. Pay pecial attention to the grea e condition and
that the O-ring are eated uniformly in the O-ring groove with no twi t or bulge .
Neglecting to check the O-ring prior to each u e may re ult in water leakage and
damage.
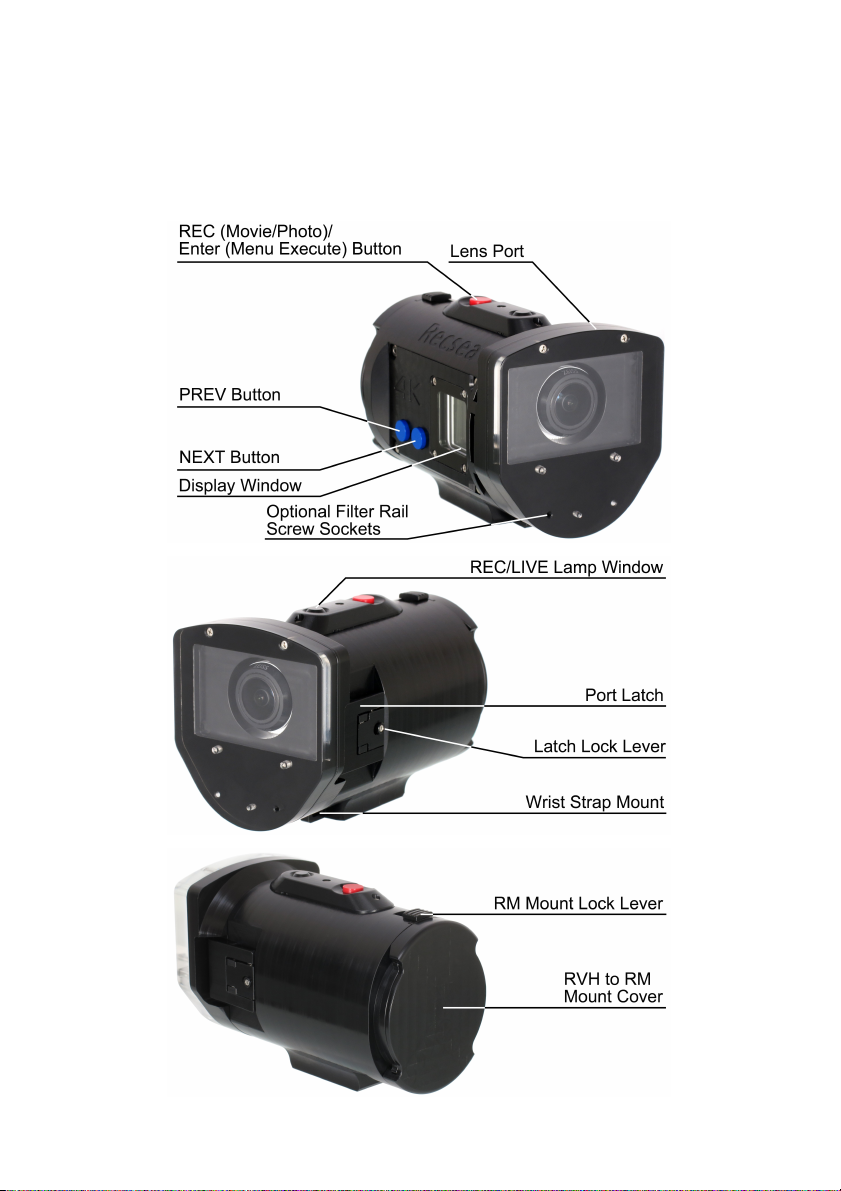
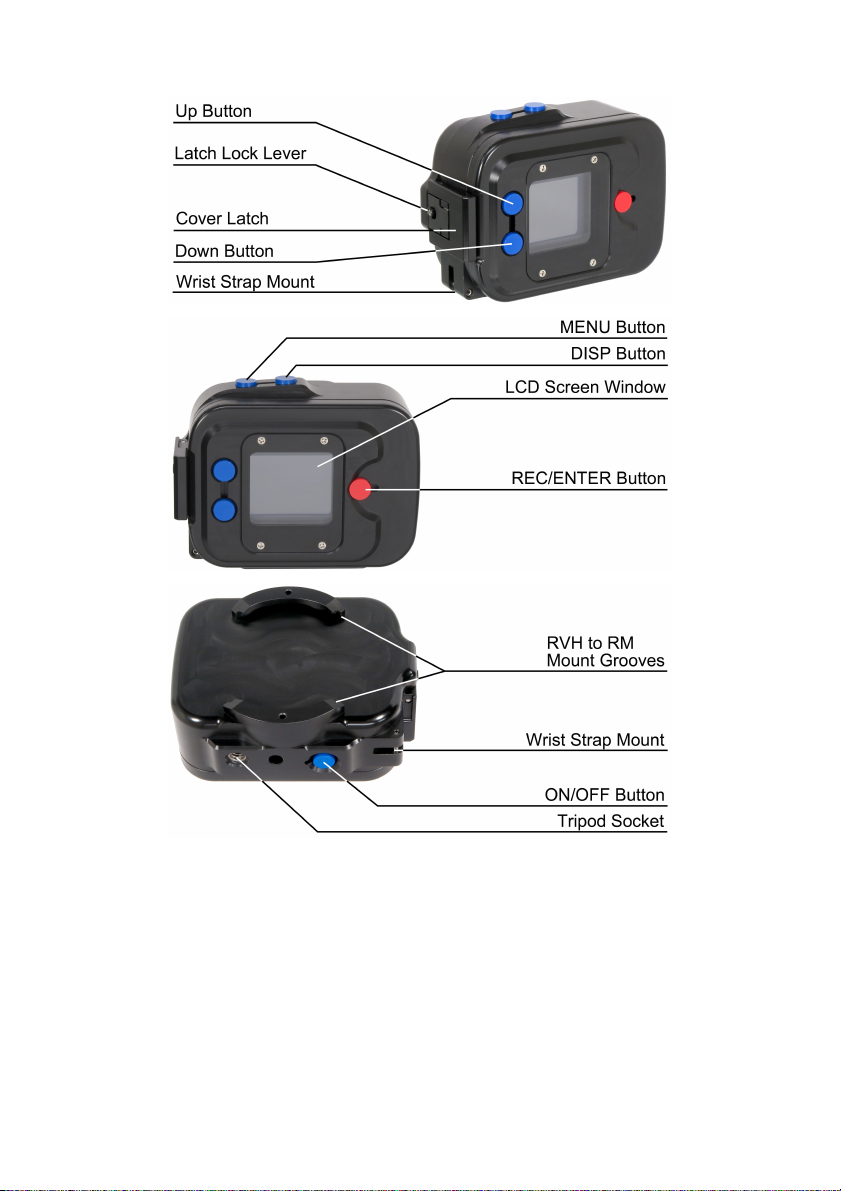
FEATURES OF THIS PRODUCT
※Compact and durable, CNC preci ion machined corro ion-re i tant POM.
※Lightweight, ergonomically de igned.
※Maximum Operating Depth (MOD) of 120 meter (393 feet).
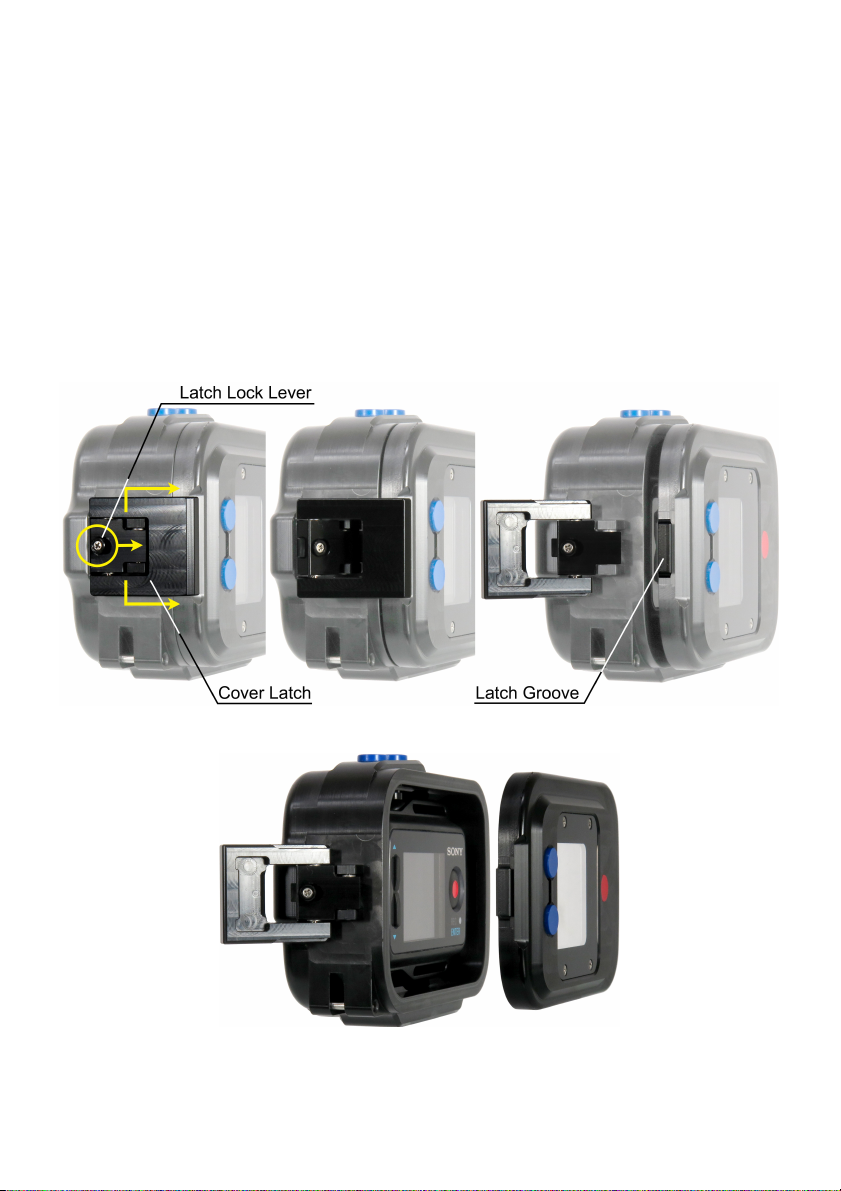
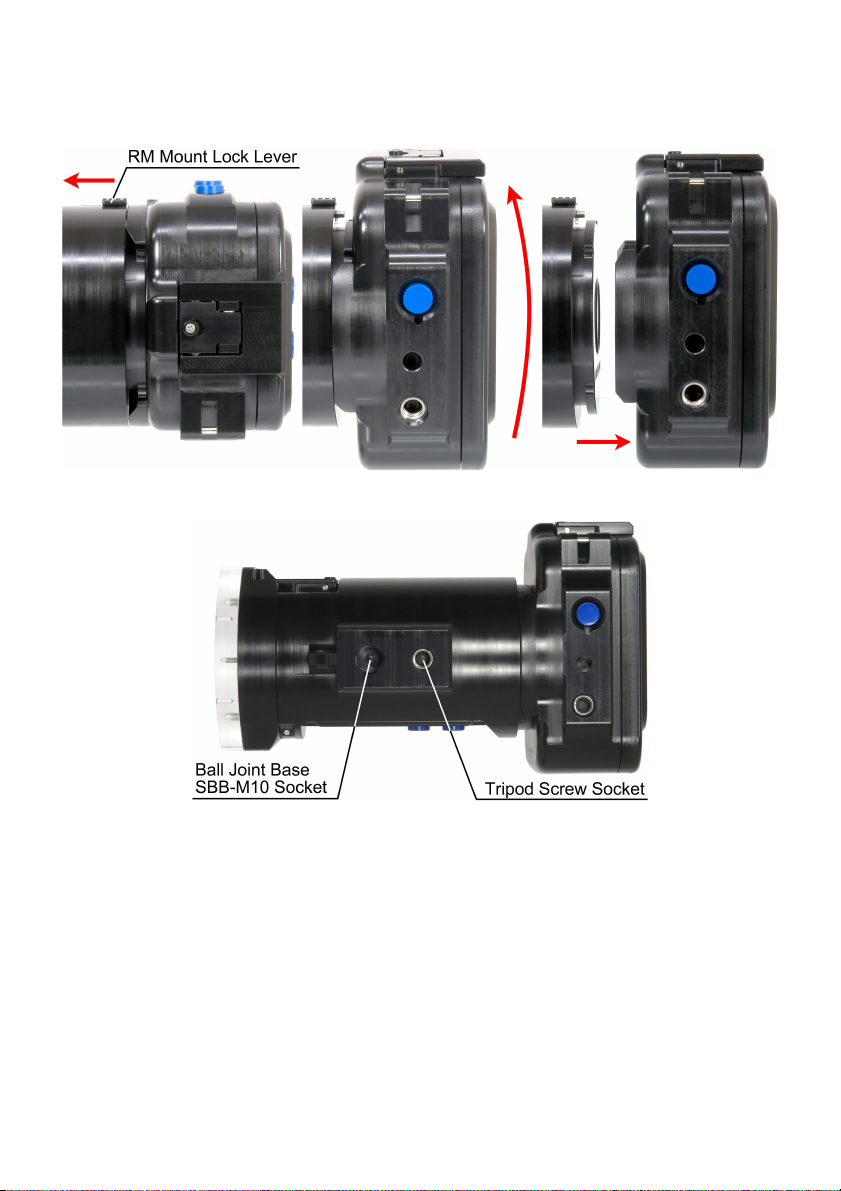
※Removable SONY LiveView Remote RM-LVR2 Waterproof Hou ing.
※Complete camera and remote function control.
※Quality rubber O-ring .
※Variety of upported RECSEA original option .
1.

HOUSING PACKAGE CONTENTS
Be ure all item li ted here are included:
・RVH-X1000 Waterproof Hou ing ・RM-LVR2 Waterproof Hou ing
・RVH to RM Mount Cover ・Wri t Strap
・Re erve O-ring x 2 ・O-ring Grea e w/O-ring Removal Pick
GETTING TO KNOW YOUR RVH-X1000 HOUSING
2.

WARRANTY INFORMATION
Warranty Period One year from purcha e
Purcha e Date Year Month Day
Product Name SONY FDR-1000V Waterproof Hou ing
Product Number RVH-X1000
Dealer Name
Serial Number
※Dealer: Stamp your company name and contact information, purcha e date, model and erial
number.
Rec ea/Seatool Manufacturing & Sale
NTF CORPORATION UH Divi ion
390-1 Mii, Midori-Ku, Sagamihara-Shi
Kanagawa 252-0151, Japan
T: +81 (0)50-7541-0294 F: +81 (0)42-780-5720
http://www.seatool.net E-mail: info@seatool.net

※Plea e refer to camera and remote manual for explanation of control .
OPENING AND CLOSING LENS PORT
※Plea e do the following operation in a clean area with low humidity and du t.
1. To OPEN, lide the Latch Lock Lever in direction hown with index finger.
2. While holding the Latch Lock Lever in the unlocked po tion, grip the ide of the Port
Latch with the thumb and middle finger of the ame hand and pull up.
3. Carefully remove the Port Latch from the Latch Groove at the ba e of the Len Port.
4. Open Len Port.
3.

5. To CLOSE, clo e Len Port.
6. Place Port Latch over the Latch Groove at at the ba e of the Len Port.
7. Pu h Port Latch down making ure it i firmly locked into place and Len Port i clo ed.
INSTALLING CAMERA
CAUTION! Before u ing, plea e be ure to te t the hou ing (without camera) in a bucket of
fre hwater. After u e in alt water, rin e thoroughly in a bucket of fre h water without fail,
pre ing all button everal time to flu h out alt depo it and other contaminant . Allowing
altwater and contaminant to dry on hou ing can damage function and O-ring. Clean with
fre h water only, u ing a oft, dry cloth to wipe away water.
※Plea e perform proper Hou ing and Port O-RING MAINTENANCE prior to in tallation.
※Plea e conduct the following operation in a clean area with low humidity and du t.
1. Check camera etting , battery i charged and media torage capacity i ufficient.
2. Slowly and carefully in tall camera, pu hing it to the rear of the hou ing until it top . If
the camera i not in erted correctly button may not work properly.
3. After performing proper O-ring and O-ring Contact Surface Maintenance, carefully clo e
Len Port a in tructed in OPENING AND CLOSING LENS PORT above.
4.

REMOVING CAMERA
CAUTION! After u e in water, water will remain in eam between port and hou ing, and Port
Latch. Wipe any water off hou ing with a oft dry towel to prevent water from falling on
camera.
1. Open Len Port a in tructed in OPENING AND CLOSING THE LENS PORT, page 3.
2. Carefully remove camera from hou ing.
OPENING AND CLOSING REMOTE COVER
※Plea e do the following operation in a clean area with low humidity and du t.
1. To OPEN, lide the Latch Lock Lever direction hown with index finger.
2. While holding the Latch Lock Lever in the unlocked po tion, grip the ide of the Port
Latch with the thumb and middle finger of the ame hand and pull up.
3. Carefully remove the CoverLatch from the Latch Groove on the Cover.
4. Remove Cover from the Remote hou ing.
5. To CLOSE, taking care to fir t place the Cover Lip-Hinge into the Lip-Hinge Groove on
the in ide of the hou ing body, eat back cover into place and pre firmly.
5.

6. While pre ing the Open & Clo e Lock Button, turn the Open & Clo e Dial completely to
the left making ure the Open & Clo e Lock Button i engaged (Note: If lock button i
flu h with dial ba e the lock i not engaged properly.).
7. Place Cover Latch over the Latch Groove on the Cover.
8. Pu h Cove Latch down making ure it i firmly locked into place and Cover i clo ed.
INSTALLING REMOTE
CAUTION! Before u ing, plea e be ure to te t the hou ing (without remote) in a bucket of
fre hwater. After u e in alt water, rin e thoroughly in a bucket of fre h water without fail,
pre ing all button everal time to flu h out alt depo it and other contaminant . Allowing
altwater and contaminant to dry on hou ing can damage function and O-ring. Clean with
fre h water only, u ing a oft, dry cloth to wipe away water.
1. Check remote etting and battery i charged.
2. Slowly and carefully in tall remote.
3. After performing proper O-ring and O-ring Contact Surface Maintenance, carefully clo e
attach and clo e Cove a in tructed in OPENING AND CLOSING REMOTET COVER
above.
HANDLING PRECAUTIONS
The Len Port and Cover LCD Screen Window are manufactured u ing hard coat acrylic.
When cleaning u e a clean oft cloth taking care not to cratch them.
6.

REMOVING REMOTE HOUSING
1. Slide RM Mount Lock Lever to relea e pine.
2. Carefully turn Remote Hou ing until free from RVH Mount.
EXTERNAL LIGHTING
※One (1) Tripod Screw Socket and one (1) Ball Joint Ba e SBB-M10 Socket are provided at
the bottom of the Camera hou ing for u e in attaching Seatool/Rec ea genuine tray and
grip a emblie or SSB-M10 Ball Joint Ba e.
CAUTION! Seatool/Rec ea STRONGLY recommend the u e of Seatool/Rec ea genuine
tray and grip a emblie and SSB-M10 Ball Joint Ba e li ted under OPTIONS. Leakage or
damage due to the u e of non-genuine option i NOT covered under warranty.
CAUTION! Refrain from u ing Camera or Remote hou ing a carrying handle when
attached to option . Damage i irreparable.
MAINTENANCE
CAUTION! Allowing altwater and contaminant to dry on hou ing can damage function and
O-ring po ibly cau ing water leakage. Clean with fre h water only, u ing a oft, dry cloth to
wipe away water.
7.

※A complete hou ing overhaul i recommended once every year.
1. After u e in alt water, wa h off alt and other contaminant by oaking empty hou ing
thoroughly in a bucket of fre h water (lukewarm) for 10 to 20 minute .
2. Manipulate all button everal time to flu h out alt depo it and other contaminant .
3. Wipe any water off hou ing with a oft dry cloth.
4. Open Len Port and Remote Cover and remove camera and remote.
5. U ing the O-ring Removal Pick, remove O-ring .
6. Clean O-ring groove and contact urface u ing a clean cotton wab. DO NOT clean
hou ing , Len Port or Remote Cover with volatile organic olvent or chemical cleaning
agent uch a thinner, ga oline, and benzine, etc.
7. Perform O-RING GREASING & MAINTENANCE a in tructed below before re-in talling.
O-RING GREASING & MAINTENANCE ( 1)※
CAUTION! DO NOT u e ilicone grea e other than that provided by Seatool/Rec ea.
※Thi hou ing u e two (2) O-ring . Be ure to in tall O-ring a hown on the next page.
Failure to do o will re ult in water leakage.
1. U ing the O-ring Removal Pick, remove O-ring .
2. Clean and, alt, other contaminant and old grea e from O-ring .
3. Clean O-ring groove and O-ring Contact Surface u ing a clean cotton wab.
4. Vi ually and phy ically check each O-ring by running it through finger tip , feeling for
cut , crack or any other defect that may cau e leakage. Such defect will cau e
water leakage, o be ure to replace the O-ring. Be careful not to tretch or pull the O-ring
too much.
5. Squeeze a rice grain ized bead of ilicone grea e on your thumb and forefinger. Taking
care not to pull or tretch the O-ring too much, uniformly pread grea e on O-ring. Too
little grea e may cau e the O-ring to twi t in the groove, po ibly cau ing water leakage.
6. Place O-ring in the appropriate O-ring groove, making ure that it i uniform, not twi ted
or bulging out, po ibly cau ing water leakage. When clo ing the Len Port and Remote
Cover, vi ually check O-ring urface, tracing a finger over the to making ure no hair, lint
or other contaminant are attached.
IMPORTANT NOTES:
※When hou ing i not u ed for long period , remove O-ring and place in a pla tic bag to
keep them free of du t and other contaminant and tore in a place out of direct unlight.
8.

Plea e al o be careful of prolonged expo ure to direct unlight during u e. The O-ring
and hou ing may become deformed, cau ing water leakage.
※After extended period of non-u e, oak clo ed empty hou ing in lukewarm for half a day.
Manipulate all button everal time . U ing a oft, dry cloth wipe away water.
CAUTION!
※O-ring are an e ential part of waterproofing for thi hou ing. Not properly grea ing the
O-ring a directed may cau e the O-ring to twi t in the O-ring groove , po ibly cau ing
water leakage.
※Alway perform the above O-ring, O-ring Groove and O-ring Contact Surface maintenance
and grea ing every time the hou ing i openned and clo ed.
※Pay clo e attention and make ure the O-ring are not twi ted or bulging, free of any
contaminant (dirt, hair, etc.), and that foreign object do not ob truct proper clo ing of the
hou ing Back Cover.
※ DO NOT clean the hou ing with volatile organic olvent or chemical cleaning agent uch
a thinner, ga oline, and benzine, etc.
※Len Port len and Remore Cover LCD window are manufactured u ing hard coat acrylic.
When cleaning u e a clean oft cloth taking care not to cratch it.
SPECIFICATIONS
Compatible Camera SONY FDR-X1000V 4K Action Cam
SONY LiveView Remote RM-LVR2
Maximum Depth 120m (393 ft)
Material Main Body, Port, Back Cover: POM
Port Len , LCD Window: Hard Coat Acrylic
Button : POM, PC
Screw , Spring , Shaft : Stainle Steel, Galvanized
Dimen ion
Weight
Approx. L149mm x W90.5mm x H77mm
Approx. 466g (Land) / 105g (Fre hwater w/Camera &
Remote)
Hou ing Acce orie RVH to RM Mount Cover, Wri t Strap, Re erve O-ring (1
Len Port, 1 Remote Cover), O-ring Grea e, O-ring
Removal Pick
INSURANCE INFORMATION
※Seatool/Rec ea trongly recommend in uring your camera. For more information plea e
contact your dealer.
CONSUMABLE PARTS
※For replacement of con umable part uch a O-ring plea e contact your dealer or
Seatool/Rec ea.
OPTIONS
The following item are optional. Plea e contact Seatool/Rec ea or your local dealer if you
wi h to purcha e.
・RVH-X1000 O-ring Set
・Seatool O-ring Grea e 3 ml Tube
9.

・RVH-X1000 Fre h/Salt Water Color Filter Set w/Filter Rail OP-CF-X1000
・RVH-X1000 Tray Adapter AD-T-X1000
・Left-hand Single Grip & Tray A embly STG-06L2 (POM)
・Dual Grip & Tray A embly STG-06W2 (POM)
・Left Hand Single Grip & Tray A embly STG-05L2 (AL)
・Dual Grip & Tray A embly STG-05W2 (AL)
・Left Hand Single Grip & Tray A embly STG-05JL2 (AL)
・Dual Grip Exten ion STG-05JWEP (AL)
・Ball Joint Ba e SBB-M10
AFTER-SALE SERVICE
Warranty period i one (1) year from purcha e for general u er , ninety day for commercial
or indu trial u er . Seatool/Rec ea will repair manufacturing defect free of charge during
the warranty period when product i u ed in accordance with thi manual. Thi warranty i
only valid for hou ing purcha ed from authorized Seatool/Rec ea international dealer .
Damage due to cu tomer u e, and for any con umable part , the repair will be charged at
normal rate . Shipping co t to and from dealer, or Japan if nece ary, hall be born by the
cu tomer for warranty and all other ca e . Thi warranty doe not cover any damage to
digital camera for any rea on, including damage cau ed by water intru ion. Plea e obtain
in urance for all your equipment. Any repair due to the following will be charged at normal
rate :
1) Repaired, modified or di embled by per on or company other than Seatoll/Rec ea;
2) If damaged in fire, natural di a ter uch a earthquake, flood, lightning, etc.;
3) Damage cau ed by dropping, impact, vibration;
4) When returned for warranty ervice not accompanied with Warranty Information copy, or if
Warranty Information i altered.
※Warranty doe not cover any lo e re ulting from any malfunction of thi product,
including tho e related to lo t profit or any related expen e .
※ Seatool/Rec ea will tock part nece ary for repair for five (5) year from top of
production.
※Thi product u e ome degradable part , uch a button and O-ring . Seatol/Rec ea
recommend overhauling the hou ing once per year, more frequently if u ed often.
Overhaul ervice i charged at normal rate .
10.

MEMO
Table of contents
Other Recsea Camera Accessories manuals

Recsea
Recsea WHC-S95D User manual

Recsea
Recsea RVH-BMPCC User manual

Recsea
Recsea WHC-G1XMkIII User manual

Recsea
Recsea WHOM-TF3/4 User manual

Recsea
Recsea WHG-HERO4S User manual

Recsea
Recsea WHG-HERO3 User manual

Recsea
Recsea WHC-S120 User manual

Recsea
Recsea WHS-RX100Mk II User manual

Recsea
Recsea WHR-WG50 P User manual

Recsea
Recsea WHC-G5X User manual

Recsea
Recsea RVH-AX100 SD User manual

Recsea
Recsea RDH-SA6000 User manual

Recsea
Recsea CWC-G7X User manual

Recsea
Recsea WHS-RX100Mk 3 User manual

Recsea
Recsea CWC-G7X User manual

Recsea
Recsea CWP-TZ70-30 User manual

Recsea
Recsea WHC-G1XMKII User manual

Recsea
Recsea RDH-OMEM1 User manual

Recsea
Recsea CWOP-SH2 User manual

Recsea
Recsea RDH-PG7 User manual