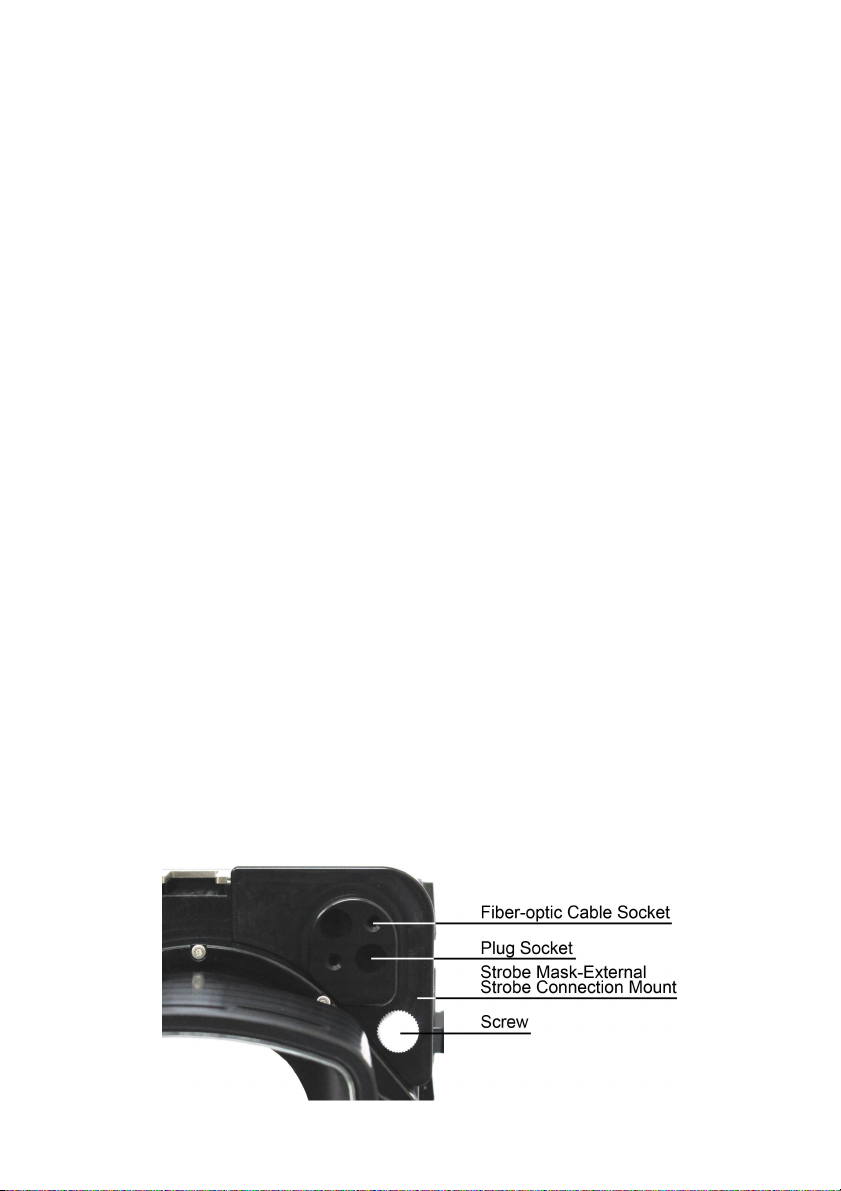
1. Attach the Strobe Mask-External Strobe Connection Mount to the housing using the screw
by screwing it into the Strobe Mask Screw socket.
2. Insert bear iber-optic cable (INON) or plug (SEA&SEA) into sockets provided.
HANDLING PRECAUTIONS
※The Lens Port is made o polycarbonate resin (POM). Excessive vibration or impact rom
dropping or striking can damage the port . Such damage is not covered by warranty.
※The Lens is manu actured using hard coat acrylic. When cleaning please take care not to
scratch it. Should the Lens become scratched please send port to Seatool/Recsea or
replacement. (Repair ee and return shipping will be charged at normal rates)
MAINTENANCE
CAUTION! Allowing saltwater and contaminants to dry on housing can damage unctions and
O-rings possibly causing water leakage. Clean with resh water only, using a so t, dry cloth to
wipe away water.
※A complete housing overhaul is recommend once every year.
1. A ter use in salt water, wash o salt and other contaminants by soaking empty Housing,
with Lens Port attached, thoroughly in a bucket o resh water (lukewarm) or 10 to 20
minutes.
2. Manipulate all buttons and dials several times to lush out salt deposits and other
contaminants.
3. Wipe any water o Housing with a so t dry cloth.
4. Remove Lens Port and open Back Cover.
5. Using the O-ring Removal Pick, remove O-rings.
6. Clean O-ring grooves and contact sur aces using a clean cotton swab. DO NOT clean
Housing or optional Lens Ports with volatile organic solvents or chemical cleaning agents
such as thinner, gasoline, and benzine, etc.
7. Per orm O-RING GREASING & MAINTENANCE as instructed below be ore re-installing.
O-RING GREASING & MAINTENANCE ( 1)※
CAUTION! DO NOT use silicone grease other than that provided by Seatool/Recsea.
※Be ore conducting grease-up o the housing Back Cover and Port O-rings, thoroughly
clean O-ring grooves (Back Cover and Port), and O-ring contact sur aces (Back Cover and
Port). Be sure to also apply a thin layer o grease to contact sur aces.
CAUTION! This housing uses two (2) O-rings, one (1) housing main body O-ring which
comes in contact with the housing main body Contact Sur ace shown below, and one (1) Port
O-ring. Please be sure to install the correct O-ring in the proper place. Failure to do so will
result in water leakage.
1. Using the O-ring Removal Pick, remove O-rings.
2. Clean sand, salt, other contaminants and old grease rom O-rings.
3. Clean O-ring grooves and O-ring contact sur aces using a clean cotton swab.
4. Visually and physically check each O-ring by running it through inger tips, eeling or
cuts, cracks or any other de ects that may cause leakage. Such de ects will cause water
leakage, so be sure to replace the O-ring. Be care ul not to stretch or pull the O-ring too
much.
5. Squeeze a rice grain sized bead o silicone grease on your thumb and ore inger. Taking
care not to pull or stretch the O-rings too much, uni ormly spread grease on O-ring. Too
little grease may cause the O-ring to twist in the groove, possibly causing water leakage.
6. Place O-ring in O-ring grooves, making sure that it is uni orm, not twisted or bulging out,
possibly causing water leakage. When closing back cover, visually check O-ring sur ace,
tracing a inger over it making sure no hair, lint or other contaminants are attached.
8.