Recsea WHR-WG50 P User manual

RICOH WG-50, WG-40, WG-30 & PENTAX Optio WG-2
Under ater Housing
WHR-WG50 P
MANUAL
Please read this manual before use.
NTF CORPORATION UH Division
http:// .seatool.net

INTRODUCTION
RICOH WG-50/40/30 & PENTAX Optio WG-2 Under ater Housing WHR-WG50 P
※Thank you for purchasing the RECSEA WHR-WG50 P Under ater Housing.
※ To ensure proper and safe use, please thoroughly read this manual.
※ Improper use may cause leakage causing irreparable damage to your digital camera.
※ Please check, and test the housing according to this manual prior to use.
※Neither NTF Corporation, Seatool/Resea nor their agents shall arrant or bear any
responsibility for any incident related to ater leakage, damage or loss of data,
unauthorized modification, disassembly and repair; or any accident causing physical or
material damage hile using this product.
※This product is manufactured by machining methods. As a result, there may be minor
scratching or tool marks. These are a normal part of the manufacturing process, do not
effect operation of the housing or camera, and are not subject to arranty or any other
claims.
WARNING!
※ Do not store or leave housing in reach of infants or small children. The strap may cause
chocking and suffocation, or small parts may be s allo ed causing injury.
※Please remove digital camera from housing hen not in use. Battery malfunction or
damage may cause fire.
※The housing body of the WHR-WG50 P is made of Polyoxymethylene (POM, Delrin) and
the Back Cover is hard coat Acrylic. Ho ever, salt ater can cause rusting to some parts
so be sure to rinse thoroughly using fresh ater ithout fail.
CAUTION!
※ To prevent ater leakage and damage, DO NOT disassemble or modify this housing.
※ Do not store the housing in areas of high humidity, high or lo temperatures, or areas of
extreme temperature fluctuation. Doing so may cause deterioration of parts.
※ When diving, use a method of ater entry that protects the housing from shock, hich can
cause ater leakage. If at all possible have housing handed to you after entering the
ater.
※ This housing is designed to ithstand depths of 40 meters (131 feet). Using the housing at
deeper depths may cause damage and ater leakage. Use caution and monitor depth.
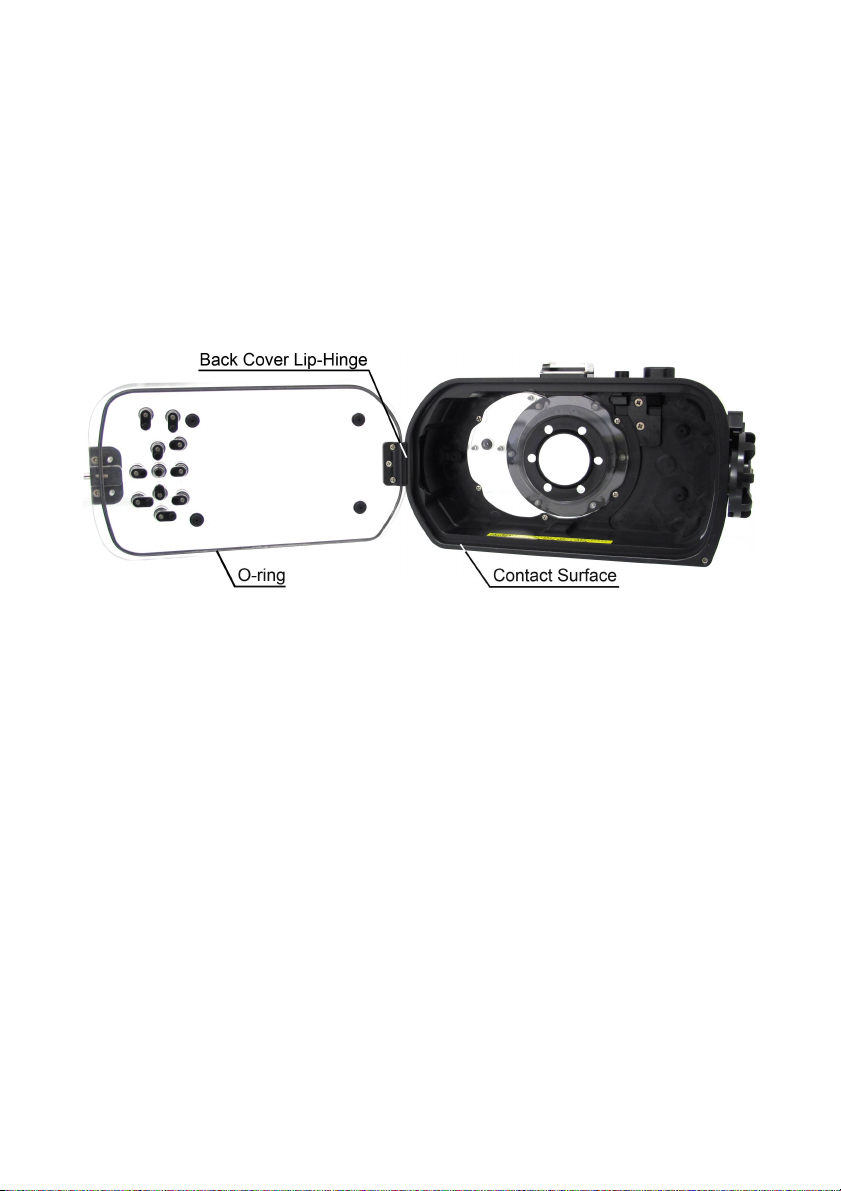
※Remove O-rings or leave housing slightly open hen transporting by plane. Pressurization
of a sealed housing during transport may cause damage or make it difficult to open.
※ When opening and closing the housing be mindful of dust and other contaminants, hich
may adhere to the to the O-rings, possibly causing ater leakage and damage.
※Al ays check the O-ring prior to each use. Pay special attention to the grease condition
and that the O-ring is seated uniformly in the O-ring Groove ith no t ists or bulges.
Neglecting to check the O-ring prior to each use may result in ater leakage and damage.
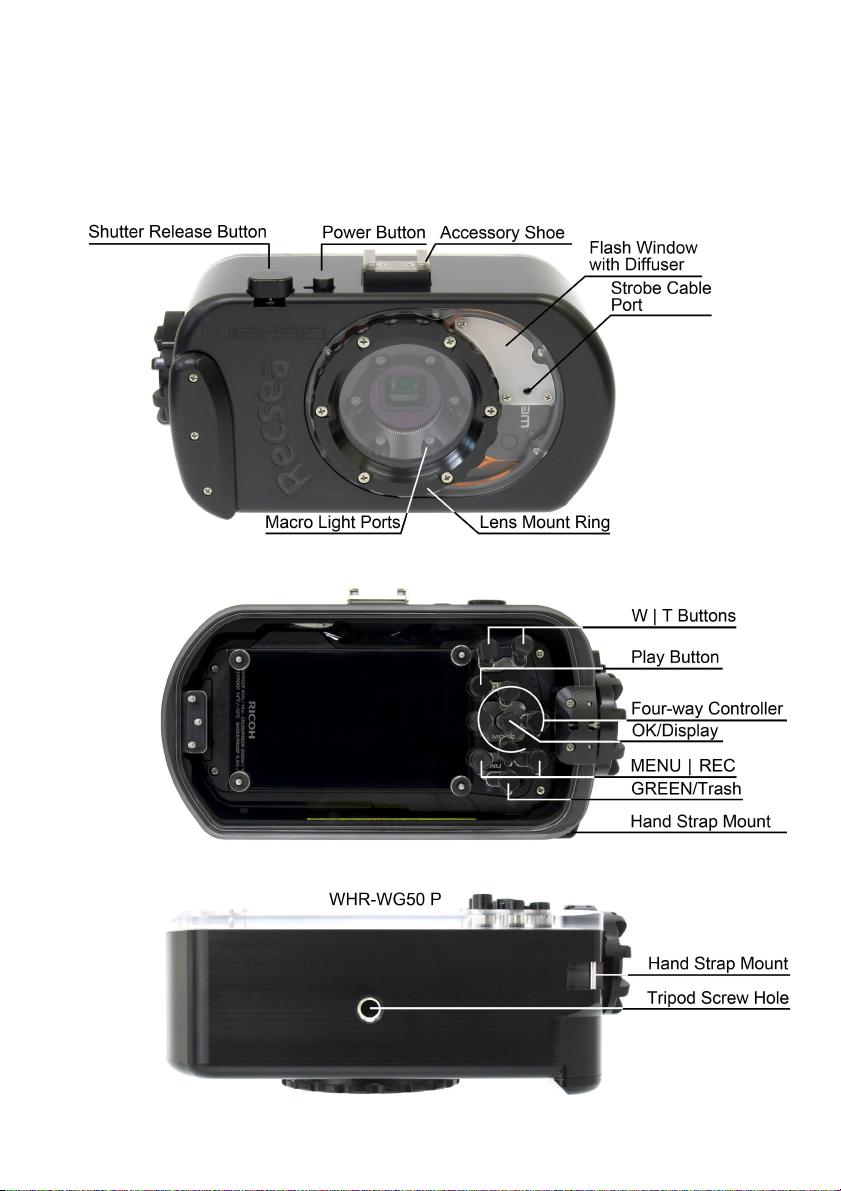
FEATURES OF THIS PRODUCT
※Compact and durable CNC precision machined corrosion-resistant POM and Acrylic
housing.
※Light eight, ergonomically designed.
※Maximum Operating Depth (MOD) of 40 meters (131 feet).
※Port Bayonet Ring.
※Flash Windo ith Diffuser.
※Macro Light Ports.
※RECSEA dial locking system for easier opening and closing.
※Complete camera function control.
※Wide variety of supported RECSEA original options.
1.

PACKAGE CONTENTS
Be sure all items listed here ere included ith your housing:
・Housing ・Hand Strap ・Lens Cap
・O-ring Removal Pick ・Reserve O-ring ・O-ring Grease
・Monitor Windo Protector Sheet
GETTING TO KNOW YOUR WHR-WG50 P HOUSING
※ Use Strobe Cable Port as required for attaching fiber optic flash cable.
※Please refer to camera manual for explanation the various buttons.
2.

WARRANTY INFORMATION
Warranty Period One year from purchase
Purchase Date Year Month Day
Product Name RICOH WG-50, WG-40, WG-30 & PENTAX Optio WG-2
Under ater Housing
Product Number WHR-WG50 P
Dealer Name
Serial Number
※Dealer: Stamp your company name and contact information, purchase date, model and serial
number.
Recsea/Seatool Manufacturing & Sales
NTF CORPORATION UH Division
390-1 Mii, Midori-Ku, Sagamihara-Shi
Kanaga a 252-0151, Japan
T: +81 (0)50-7541-0294 F: +81 (0)42-780-5720
http://www.seatool.net E-mail: info@seatool.net

OPENING AND CLOSING THE BACK COVER
※Please do the follo ing operations in a clean area ith lo humidity and dust.
Open & Close Dial Locks in t o places, in the open position and in the closed position.
1. To open, hile pressing the Open & Close Lock Button, turn the Open & Close Dial to the
right (clock ise). Due to pressurization, the back cover may be difficult to open, turn
strongly.
2. The back cover ill open once the dial is turn completely to the right.
3. To close, taking care to first place the Back Cover Lip-Hing into the groove provided on the
inside of the housing body, seat back cover into place and press firmly (Note: Dial ill turn
to the left (counterclock ise). While pressing the Open & Close Lock Button, turn the
Open & Close Dial completely to the left making sure the Open & Close Lock Button is
engaged (Note: If lock button is flush ith dial base the lock is not engaged properly.)
※NOTE: Firmly press Lock Button hile turning dial. Failing to do so may cause damage to
locking mechanisms.
INSTALLING CAMERA
CAUTION! Before using, please be sure the test the housing ( ithout camera) in a bucket of
fresh ater. After use in salt ater, rinse thoroughly in a bucket of fresh ater ithout fail,
pressing all buttons several times to flush out salt deposits and other contaminants. Allo ing
salt ater and contaminants to dry on housing can damage functions and O-rings. Clean ith
fresh ater only, using a soft, dry cloth to ipe a ay ater.
※Please perform proper O-RING MAINTENANCE & GREASING.
※Please conduct the follo ing operations in a clean area ith lo humidity and dust.
1. Check camera settings, battery is charged and media storage capacity is sufficient.
2. Slo ly and carefully install camera making sure camera does not hit housing's internal
controls. Gently push camera for ard into housing to make sure it is properly seated. If
the camera is not seated correctly, buttons, dials, and levers may not ork properly.
3. After performing O-RING MAINTENANCE & GREASING, carefully attach and close Back
Cover making sure nothing is caught bet een the Back Cover O-ring and housing body
Contact Surface.
REMOVING CAMERA
CAUTION! After use in ater, ater ill remain in seams bet een housing body, Back Cover
and Lip-hinge Groove. Wipe any ater off housing ith a soft dry to el to prevent ater from
falling on camera.
3.

1. Open and remove Back Cover as instructed in OPENING AND CLOSING THE BACK
COVER.
2. Tip Housing back ards, gently sliding camera out of housing.
HANDLING PRECAUTIONS
The Lens Port lens is manufactured using hard coat acrylic. When cleaning use a clean soft
cloth taking care not to scratch it.
INTERNAL AND EXTERNAL STROBE
※ For heavy strobes and lights please use optional Grip & Tray Assembly and compatible
connector.
Fiber optic cable:
Connect fiber optic cable for external strobe use by inserting the bare fiber optic end into
Strobe Cable Port provided.
※A single Tripod Sockets is provided at the bottom of the housing for use in attaching tray
and grip assemblies.
CAUTION! Seatool/Recsea STRONGLY recommends the use of Seatool/Recsea genuine
tray and grip assemblies listed belo under OPTIONS. Leakage or damages due to the use
of non-genuine options are NOT covered under arranty.
Target Light:
The Accessory Shoe on top of the housing can be used for installation of a target light.
※Please be mindful of the eight of the light you intend to use. For heavy lights and strobes
please use Seatool/Recsea genuine tray and grip assemblies.
※Please refrain from using lights attached to the Accessory Shoe as a carrying handle.
CAUTION! Damage is irreparable.
MAINTENANCE
CAUTION! Allo ing salt ater and contaminants to dry on housing can damage functions and
O-rings possibly causing ater leakage. Clean ith fresh ater only, using a soft, dry cloth to
ipe a ay ater.
※A complete housing overhaul is recommend once every year.
1. After use in salt ater, ash off salt and other contaminants by soaking empty housing
thoroughly in a bucket of fresh ater (luke arm) for 10 to 20 minutes.
2. Manipulate all buttons and dials several times to flush out salt deposits and other
contaminants.
3. Wipe any ater off housing ith a soft dry cloth.
4. Open Back Cover and remove camera.
5. Using the O-ring Removal Pick, remove O-ring.
6. Clean O-ring Groove and O-ring contact surface using a clean cotton s ab. DO NOT
clean housing or Lens Port ith volatile organic solvents or chemical cleaning agents
such as thinner, gasoline, and benzine, etc.
7. Perform MAINTENANCE & O-RING GREASING as instructed belo before re-installing.
O-RING GREASING & MAINTENANCE ( 1)※
CAUTION! DO NOT use silicone grease other than that provided by Seatool/Recsea.
4.

1. Using the O-ring Removal Pick, remove O-ring.
2. Clean sand, salt, other contaminants and old grease from O-ring.
3. Clean O-ring Groove and O-ring Contact Surface using a clean cotton s ab.
4. Visually and physically check O-ring by running it through finger tips, feeling for cuts,
cracks or any other defects that may cause leakage. Such defects ill cause ater
leakage, so be sure to replace the O-ring. Be careful not to stretch or pull the O-ring too
much.
5. Squeeze a rice grain sized bead of silicone grease on your thumb and forefinger. Taking
care not to pull or stretch the O-ring too much, uniformly spread grease on O-ring. Too
little grease may cause the O-ring to t ist in the groove, possibly causing ater leakage.
6. Place O-ring in the Back Cover O-ring Groove, making sure that it is uniform, not t isted
or bulging out, possibly causing ater leakage. When closing back cover, visually check
O-ring and O-ring Contact Surface to make sure no hair, lint or other contaminants are
attached.
IMPORTANT NOTES:
※When housing is not used for long periods, remove O-ring and place in separate plastic
bags to keep it free of dust and other contaminants and store in a place out of direct
sunlight. Please also be careful of prolonged exposure to direct sunlight during use. The
O-ring and housing may become deformed, causing ater leakage.
※After extended periods of non-use, install the O-ring and soak closed empty housing in
luke arm for half a day. Manipulate all buttons several times. Using a soft, dry cloth ipe
a ay ater.
CAUTION!
※The O-ring is an essential part of aterproofing for this housing. Not properly greasing the
O-ring as directed may cause the O-ring to t ist in the O-ring groove, possibly causing
ater leakage.
※Al ays perform the above O-ring, O-ring groove and O-ring contact surface maintenance
and greasing every time you open/close the housing.
※Please pay close attention and make sure the O-ring is not t isted or bulging, free of any
contaminants (dirt, hair, etc.), and that foreign objects do not obstruct proper closing of the
housing Back Cover.
※DO NOT clean the housing ith volatile organic solvents or chemical cleaning agents such
as thinner, gasoline, and benzine, etc.
※Housing Monitor is manufactured using hard coat acrylic. When cleaning use a clean soft
cloth taking care not to scratch it.
INSURANCE INFORMATION
※Seatool/Recsea strongly recommends insuring your camera. For more information please
contact your dealer.
5.

CONSUMABLE PARTS
※For replacement of consumable parts such as O-rings please contact your dealer or
Seatool/Recsea.
SPECIFICATIONS
Compatible Camera RICOH WG-50, WG-40, WG-30 & PENTAX Optio WG-2
Maximum Depth 40 meters (131 feet)
Material Main Body: POM
Back Cover: Hard Coat Acrylic
Lens & Flash Windo : Hard Coat Acrylic
Diffuser: POM
Levers, Dials & Buttons: POM, PC
Scre s, Springs, Shafts: Stainless Steel, Galvanized
Dimensions
Weight Approx.
W150mm x D61mm x H83mm
370g (Land) / 50g (Fresh ater /Camera)
Accessories Lens Cap, Hand Strap, Monitor Windo Protector Sheet,
Reserve O-ring, O-ring Removal Pick, O-ring Grease
OPTIONS
The follo ing items are optional. Please contact Seatool/Recsea or your local dealer if you
ish to purchase.
・WHR-WG50-OR O-ring
・Seatool-OG3ml O-ring Grease 3ml Tube /O-ring Pick
・AD-M52-WG1 Quick M52 Mount Adapter (Bayonet Type)
・AD-M67-WG1 Quick M67 Mount Adapter (Bayonet Type)
・AD-28AD-WG1 Quick INON 28AD Mount Adapter (Bayonet Type)
・AD-28LD-WG1 Quick INON 28LD Mount Adapter
・SAL-02-WG1 Bayonet Flip Close-Up Lens 50mm x2
・SAL-03-WG1 Bayonet Flip Close-Up Lens 20mm x3
・STG-06L POM Left Hand Grip & Tray Assembly (1 Tripod Scre )
・STG-06W POM Dual Grip & Tray Assembly (1 Tripod Scre )
・STG-05L AL Left Hand Grip & Tray Assembly (1 Tripod Scre )
・STG-05W AL Dual Grip & Tray Assembly (1 Tripod Scre )
・RHA-150 AL Lens Caddy Arm
・STG-ADH-4652 Quick Mount Lens Caddy (Bayonet Type)
AFTER-SALE SERVICE
Warranty period is one (1) year from purchase for general users, ninety days for commercial
or industrial users. Seatool/Recsea ill repair manufacturing defects free of charge during
the arranty period hen product is used in accordance ith this manual. This arranty is
only valid for housings purchased from authorized Seatool/Recsea international dealers.
Damage due to customer use, and for any consumable parts, the repairs ill be charged at
normal rates. Shipping costs to and from dealer, or Japan if necessary, shall be born by the
customer for arranty and all other cases. This arranty does not cover any damage to
digital camera for any reason, including damage caused by ater intrusion. Please obtain
insurance for all your equipment. Any repairs due to the follo ing ill be charged at normal
rates:
6.

1) Repaired, modified or dissembled by person or company other than Seatoll/Recsea;
2) If damaged in fire, natural disaster such as earthquake, flood, lightning, etc.;
3) Damage caused by dropping, impact, vibration;
4) When returned for arranty service not accompanied ith Warranty Information copy, or if
Warranty Information is altered.
※Warranty does not cover any losses resulting from any malfunction of this product,
including those related to lost profits or any related expenses.
※ Seatool/Recsea ill stock parts necessary for repair for five (5) years from stop of
production.
※This product uses some degradable parts, such as buttons and O-rings. Seatol/Recsea
recommends overhauling the housing once per year, more frequently if used often.
Overhaul service is charged at normal rates.
7.

MEMO
Table of contents
Other Recsea Camera Accessories manuals

Recsea
Recsea WHC-G1XMKII User manual

Recsea
Recsea WHG-HERO4S User manual

Recsea
Recsea WHC-G5X User manual

Recsea
Recsea RVH-AX100 SD User manual

Recsea
Recsea CWS-RX100IV User manual

Recsea
Recsea WHS-RX1 User manual

Recsea
Recsea WHG-HERO3 User manual

Recsea
Recsea RVH-BMPCC User manual

Recsea
Recsea WHC-S120 User manual

Recsea
Recsea RDH-SA6000 User manual

Recsea
Recsea CWC-G7X User manual

Recsea
Recsea RDH-OMEM1 User manual

Recsea
Recsea WHC-G7X User manual

Recsea
Recsea WHC-S95D User manual

Recsea
Recsea CWC-G7X User manual

Recsea
Recsea CWOP-SH2 User manual

Recsea
Recsea WHC-G1XMkIII User manual

Recsea
Recsea WHS-RX100Mk II User manual

Recsea
Recsea RVH-X1000 User manual

Recsea
Recsea WHOM-TF3/4 User manual