Recsea WHS-RX1 User manual

SONY CYBER-SHOT DSC- RX1 & RX1R Underwater Housing
Recsea WHS-RX1
MANUA
Please read this manual before use.
NTF CORPORATION UH Division
http://www.seatool.net

INTRODUCTION
SONY CYBER-SHOT DSC-RX1 & RX1R Underwater Housing WHS-RX1
※Thank you for purchasing the WHS-RX1 Underwater Housing.
※ To ensure proper and safe use, please thoroughly read this manual.
※ Improper use may cause leakage causing irreparable damage to your digital camera.
※ Please check, and test the housing according to this manual prior to use.
※Neither NTF Corporation, Seatool/Resea nor their agents shall warrant or bear any
responsibility for any incident related to water leakage, damage or loss of data,
unauthorized modification, disassembly and repair; or any accident causing physical or
material damage while using this product.
※This product is manufactured by machining methods. As a result, there may be minor
scratching or tool marks. These are a normal part of the manufacturing process, do not
effect operation of the housing or camera, and are not subject to warranty or any other
claims.
WARNING!
※ Do not store or leave housing in reach of infants or small children. The strap may cause
chocking and suffocation, or small parts may be swallowed causing injury.
※Please remove digital camera from housing when not in use. Battery malfunction or
damage may cause fire.
※The housing body is made of corrosion-resistant aluminum. However, saltwater can cause
rusting so be sure to rinse thoroughly using fresh water without fail.
CAUTION!
※ To prevent water leakage and damage, DO NOT disassemble or modify this housing.
※ Do not store the housing in areas of high humidity, high or low temperatures, or areas of
extreme temperature fluctuation. Doing so may cause deterioration of parts.
※ When diving, use a method of water entry that protects the housing from shock, which can
cause water leakage. If at all possible have housing handed to you after entering the
water.
※ This housing is designed to withstand depths of 100 meters (328 feet). Using the housing
at deeper depths may cause damage and water leakage. Use caution and monitor depth.
※Remove O-ring or leave housing slightly open when transporting by plane. Pressurization
of a sealed housing during transport may cause damage or make it difficult to open.
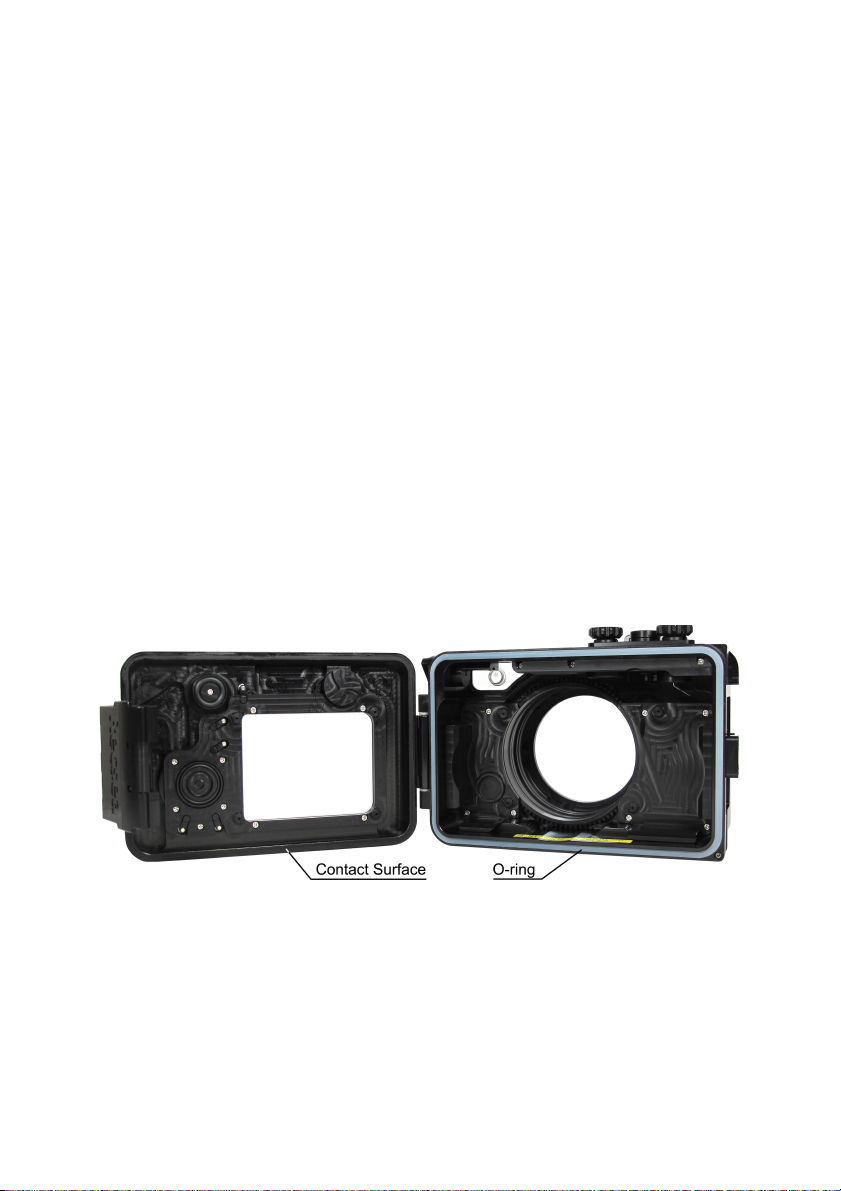
※ When opening and closing the housing be mindful of dust and other contaminants, which
may adhere to the O-ring, possibly causing water leakage and damage.
※ Always check O-ring prior to each use. Pay special attention to the grease condition and
that the O-ring is seated uniformly in the O-ring groove with no twists or bulges. Neglecting
to check the O-ring prior to each use may result in water leakage and damage.
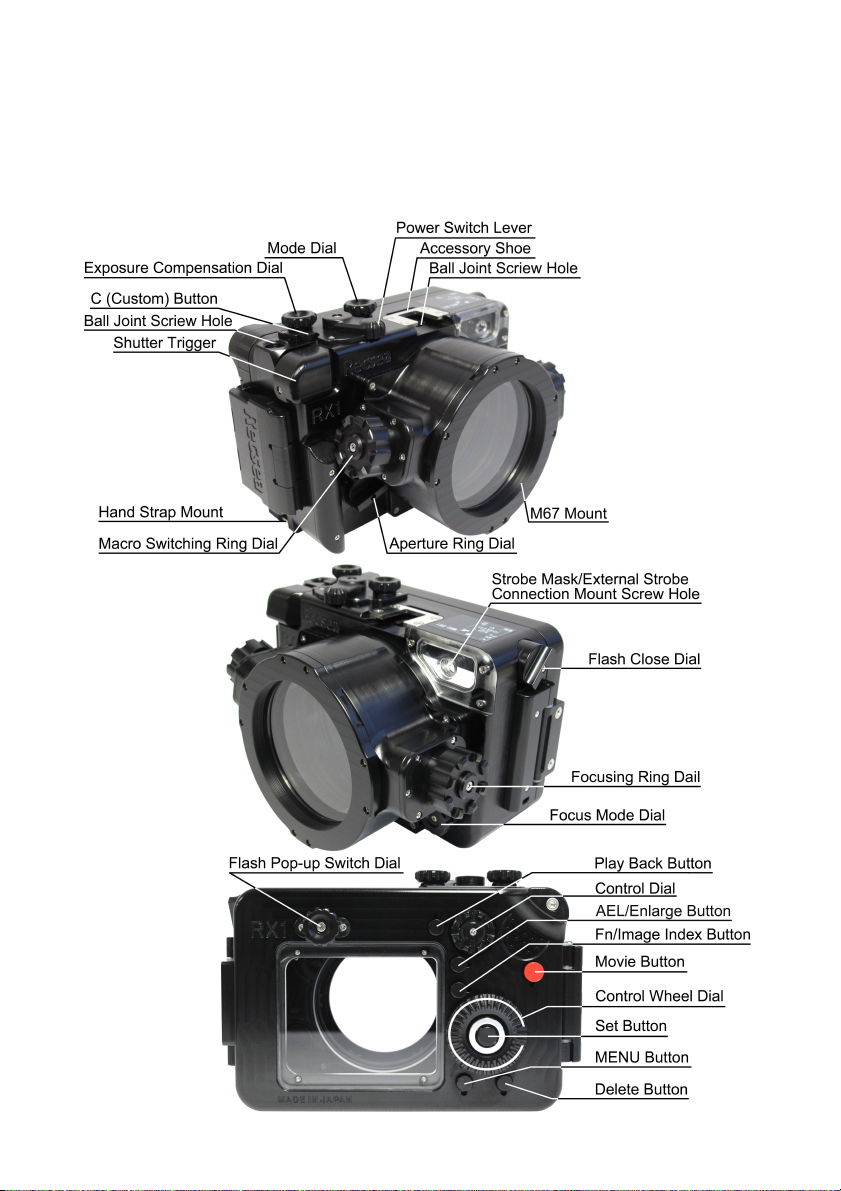
FEATURES OF THIS PRODUCT
※Compacted and durable, precision machined corrosion-resistant aluminum housing.
※Designed to withstand depths of 100 meters (328 feet).
※Fixed ens Port with M67 thread mount.
※Original Secure- atch locking mechanism for easy opening and closing.
※Front Port Macro Switching Ring and Focusing Ring Dials.
※Rear Control Wheel Dial.
※Half-Press Shutter Trigger for precise camera shutter control.
※Quality silicone O-ring with wider Back Cover contact surface for added protection at
greater depths.
※Complete camera function control.
※Variety of supported RECSEA original options.
1.

PACKAGE CONTENTS
Be sure all items listed here were included with your housing:
・Diffuser ・Camera Extraction Tabs x 2
・Strobe Mask ・External Strobe Connection Mount
・Hand Strap ・Reserve O-ring
・O-ring Removal Pick ・O-ring Grease
GETTING TO KNOW YOUR WHS-RX1/RX1R HOUSING
2.

WARRANTY INFORMATION
Warranty Period Two years from purchase
Purchase Date Year Month Day
Product Name SONY CYBER-SHOT DSC-RX1/RX1R Waterproof Housing
Product Number WHS-RX1
Dealer Name
Serial Number
※Dealer: Stamp your company name and contact information, purchase date, model and serial
number.
Recsea/Seatool Manufacturing & Sales
NTF CORPORATION UH Division
390-1 Mii, Midori-Ku, Sagamihara-Shi
Kanagawa 252-0151, Japan
T: +81 (0)50-7541-0294 F: +81 (0)42-780-5720
http://www.seatool.net E-mail: info@seatool.net

ATTENTION!
※The housing Mode and Exposure Compensation Dials are designed to turn the camera's
Mode and Exposure Compensation dials back and forth via friction from the o-rings that
come in contact with theses dials inside the housing. When installing or removing camera
pull both the housing Mode and Exposure Compensation Dials up. After installation be
sure to push the dials down in the proper position for contact. Should the O-rings begin to
slip, use a soft dry cloth to wipe away any oil and other contaminates that may cause the
loss of friction.
※Please refer to camera manual for explanation of controls and functions.
※Use Strobe Mask with External Strobe Connection Mount are required for attaching fiber
optic flash cables.
※The Diffuser may be attached as shown above. Attache Diffuser using the grooves
provided on the ens Port.
NOTE: During use make sure the housing Mode and Exposure Compensation Dials are
down.
OPENING AND C OSING THE BACK COVER
※Please do the following operations in a clean area with low humidity and dust.
To OPEN, press ock ever while pulling Secure- atch away from housing main body.
To C OSE, press Secure- atch into place making sure the latch on the underside is properly
placed in the Secure- atch groove attached to the main housing body. Push into the locked
position. Double check to make sure it is firmly locked into place.
3.

INSTA ING CAMERA
CAUTION! Before using, please be sure to test housing (without camera) in a bucket or
aquarium if available. After use in salt water, rinse thoroughly in a bucket of fresh water
without fail, pressing all buttons, turning all dials and levers several times to flush out salt
deposits and other contaminants. Allowing saltwater and contaminants to dry on housing can
damage functions and O-ring. Clean with fresh water only, using a soft, dry cloth to wipe
away water.
※Please perform proper housing O-RING MAINTENANCE.
※Please conduct the following operations in a clean area with low humidity and dust.
1. Check camera settings, battery is charged and media storage capacity is sufficient.
2. Using the lanyards provided, attach Camera Extraction Tabs to the camera’s shoulder
strap Hooks eyelet. As shown above.
3. Make sure the housing Mode and Exposure Compensation Dials are pulled (or pushed)
outward away from housing.
4. Set camera and housing Focus Mode Dials to the same position. As shown above the
cameras Focus Mode Dial set between the AF and DMF so the line on the dial is
horizontal. The housing Focus Mode Dial is set to the same position.
5. Turn camera ON and set housing Power Switch ever to the ON position.
6. Make sure the camera flash is closed.
4.

IMPORTATNT: If steps 3. through 6. are not taken the camera may not seat properly into
housing and which may caused dials, levers and button not to function as intended.
7. Slowly and carefully install camera making sure camera does not to hit housing's internal
controls. If the camera is not inserted correctly, buttons, dials, and levers may not work
properly, making sure the Camera Extraction Tabs do NOT become wedged between the
camera and inside of the housing.
NOTE: The O-rings of the housing Aperture Ring Dial and Macro Switching Ring Dial Gears
will cause some resistance. Slowly and gently push camera forward into housing until camera
is properly seated in housing.
8. Test housing Focus Mode Dial by turning it to assure the camera Focus Mode Dial is
properly seated.
9. Place Camera Extraction Tabs at side of camera inside housing as shown above.
10. After performing O-ring Maintenance, carefully close back cover making sure nothing is
caught between the housing main body and back cover or the Secure- atch and housing.
Push Secure- atch into the locked position making sure the ock ever is in the locked
position. Double check to make sure the Secure- atch is securely locked into place.
REMOVING CAMERA
CAUTION! After use in water, water will remain in gaps between housing, back cover and
Secure- atch. Wipe any water off housing with a soft dry towel to prevent water from falling
on camera.
1. Pull housing Mode and Exposure Compensation Dials outward away from housing.
2. Use housing Flash Close Dial to manually close camera flash.
3. Open the back cover as instructed above.
5.

4. Gently pull Camera Extraction Tabs to dislodge camera lens from ens Port and gently
slide camera out of housing.
HAND ING PRECAUTIONS
CAUTION! The housing Port ens, CD and Flash Windows are manufactured using hard
coat acrylic. When cleaning use a clean soft cloth taking care not to scratch them.
INTERNA AND EXTERNA STROBE
※For heavy strobes and lights please use optional Grip & Tray Assembly and compatible
connector.
※While in the housing, the camera's on-board strobe can be deployed using the housing
Flash Pop-up Switch Dial. The DSC-RX1 and RX1R camera on-board strobe do NOT
close when camera is turned OFF. Be sure to manually close the strobe using the Flash
Close Dial prior to removing camera from housing.
※Use the Strobe Mask and External Strobe Connection Mount to connect external strobe
fiber optic cable.
Connecting fiber optic cable for external strobe use:
CAUTION! Store Strobe Mask-External Strobe Connection Mount and Screw in a secure
place so as not to lose them.
1. Using the External Strobe Connection Mount attach the Strobe Mask by screwing the
Mount into the Screw Hole provided.
2. Insert bare fiber optic cable or plug into Fiber Optic Sockets or Plug Sockets provided at
the Mount.
※Two (2) screw holes are provided at the bottom of the housing for use in attaching
Seatool/Recsea genuine tray and grip assemblies.
CAUTION! Seatool/Recsea STRONG Y recommends the use of Seatool/Recsea genuine
tray and grip assemblies listed below under OPTIONS. eakage or damages due to the use
6.

of non-genuine options are NOT covered under warranty.
※The Accessory Shoe on top of the housing can be used for installation of a target light.
Please be mindful of the weight of the light(s) you intend to use. For heavy lights and
strobes please use Seatool/Recsea genuine tray and grip assemblies.
※Please refrain from using lights attached to the Accessory Shoe as a carrying handle.
CAUTION! Damage is irreparable.
MAINTENANCE
CAUTION! Allowing saltwater and contaminants to dry on housing can damage functions and
O-rings possibly causing water leakage. Clean with fresh water only, using a soft, dry cloth to
wipe away water.
※A complete housing overhaul is recommended once every year.
1. After use in salt water, wash off salt and other contaminants by soaking empty housing
thoroughly in a bucket of fresh water (lukewarm) for 10 to 20 minutes.
2. Manipulate all buttons and dials several times to flush out salt deposits and other
contaminants.
3. Wipe any water off housing with a soft dry cloth.
4. Open Back Cover.
5. Using the O-ring Removal Pick, remove O-ring.
6. Clean O-ring groove and contact surface using a clean cotton swab. DO NOT clean
housing or ens Port with volatile organic solvents or chemical cleaning agents such as
thinner, gasoline, and benzine, etc.
7. Perform O-RING GREASING & MAINTENANCE as instructed below before re-installing.
O-RING GREASING & MAINTENANCE ( 1)※
CAUTION! This housing uses one (1) O-ring. Please be sure to install O-ring as shown
below. Failure to do so will result in water leakage.
1. Using the O-ring Removal Pick, remove O-ring.
2. Clean sand, salt, other contaminants and old grease from O-rings.
3. Clean O-ring groove and O-ring Contact Surface using a clean cotton swab.
4. Visually and physically check each O-ring by running it through finger tips, feeling for
cuts, cracks or any other defects that may cause leakage. Such defects will cause water
leakage, if found be sure to replace the O-ring. Be careful not to stretch or pull the O-ring
too much.
5. Squeeze a rice grain sized bead of silicone grease between your thumb and forefinger.
Taking care not to pull or stretch the O-ring too much, uniformly spread grease on O-ring.
Too little grease may cause the O-ring to twist in the groove, possibly causing water
leakage.
7.

6. Place O-ring in the O-ring groove, making sure it is uniform, not twisted or bulging out,
possibly causing water leakage. When closing back cover, visually check O-ring Contact
Surface, tracing a finger over it to making sure no hair, lint or other contaminants are
attached.
IMPORTANT NOTES:
※When housing is not used for long periods, remove O-rings and place in sep arate plastic
bags to keep them free of dust and other contaminants and store in a place out of direct
sunlight. Please also be careful of prolonged exposure to direct sunlight during use. The
O-ring and housing may become deformed, causing water leakage.
※After extended periods of non-use, soak closed empty housing in lukewarm for half a day.
Manipulate all buttons and dials several times. Using a soft, dry cloth wipe away water.
CAUTION!
※The O-ring is an essential part of waterproofing for this housing. Not properly greasing the
O-ring as directed may cause the O-ring to twist in the O-ring groove, possibly causing
water leakage.
※Always perform the above O-ring, O-ring Groove and O-ring Contact Surface maintenance
and greasing every time you open/close the housing.
※Please pay close attention and make sure the O-ring is not twisted or bulging, free of any
contaminants (dirt, hair, etc.), and that foreign objects do not obstruct proper closing of the
housing Back Cover.
※DO NOT clean the housing with volatile organic solvents or chemical cleaning agents such
as thinner, gasoline, and benzine, etc.
※ens Port, Flash and CD windows are manufactured using hard coat acrylic. When
cleaning use a clean soft cloth taking care not to scratch them.
SPECIFICATIONS
Compatible Camera SONY Cyber-shot DSC-RX1 & DSC-RX1R
Maximum Depth 100 meters (328 feet)
Material
Main Body and Back Cover:
ens Port:
ever, Buttons, Dials:
ens, Flash, CD Window:
Screws, Springs, Shafts:
Corrosion-resistant Aluminum Alloy, Anodized
Corrosion-resistant Aluminum Alloy, Anodized and POM
POM, PC
Hard Coat Acrylic
Stainless Steel, Galvanized
Size (Housing) Dimensions: W158mm x D111mm x H105mm
Weight: Approx. 1120g ( and)
Accessories Diffuser, Strobe Mask, External Strobe Connection Mount,
Camera Extraction Tabs x 2, Hand Strap, Reserve O-ring,
O-ring, Removal Pick, O-ring Grease
INSURANCE INFORMATION
※Seatool/Recsea strongly recommends insuring your camera. For more information please
contact your dealer.
CONSUMAB E PARTS
※For replacement of consumable parts such as O-rings please contact your dealer or
Seatool/Recsea.
8.

OPTIONS
The following items are optional. Please contact Seatool/Recsea or your local dealer if you
wish to purchase.
・M67-ST Mount Adapter ST-NV-M67
・M67- D Mount Adapter AD-M67/28 D
・ST Close-Up 50mm ens x2 SA -02-ST
・ST Close-Up 50mm ens x3 SA -03-ST
・WHS-RX1 Housing O-ring
・Seatool O-ring Grease 3 ml Tube
・Ball Joint Base SBB-M10
・eft Hand Single Grip & Tray Assembly STG-06 2 (POM)
・Dual Grip & Tray Assembly STG-06W2 (POM)
・eft Hand Single Grip & Tray Assembly STG-05 2 (A )
・Dual Grip & Tray Assembly STG-05W2 (A )
・eft Hand Single Grip & Tray Assembly STG-05J 2 (A )
・Dual Grip Extension STG-05JWEP (A )
・ens Caddy Arm RHA-150
・M67 Mount ens Caddy STG-ADH-M67
・ST Mount ens Caddy ST-H-01
・INON Tray Adapter ADT-1S
・Tray Knurled Knob Screw
AFTER-SA E SERVICE
Warranty period is two (2) year from purchase for general users, six (6) months for
commercial or industrial users. Seatool/Recsea will repair manufacturing defects free of
charge during the warranty period when product is used in accordance with this manual. This
warranty is only valid for Housings purchased from authorized Seatool/Recsea international
dealers. Damage due to customer use, and for any consumable parts, the repairs will be
charged at normal rates. Shipping costs to and from dealer, or Japan if necessary, shall be
born by the customer for warranty and all other cases. This warranty does not cover any
damage to digital camera for any reason, including damage caused by water intrusion.
Please obtain insurance for all your equipment. Any repairs due to the following will be
charged at normal rates:
1) Repaired, modified or dissembled by person or company other than Seatool/Recsea;
2) If damaged in fire, natural disaster such as earthquake, flood, lightning, etc.;
3) Damage caused by dropping, impact, vibration;
4) When returned for warranty service not accompanied with Warranty Information copy, or if
Warranty Information is altered.
※Warranty does not cover any losses resulting from an defect of this product, including
those related to lost profits or any related expenses.
※Seatool/Recsea will stock parts necessary for repair for five (5) years from stop of
production.
※This product uses some degradable parts, such as buttons and O-rings. Seatool/Recsea
recommends overhauling the housing once per year, more frequently if used often.
Overhaul service is charged at normal rates.
9.

MEMO
Table of contents
Other Recsea Camera Accessories manuals

Recsea
Recsea CWP-TZ70-30 User manual

Recsea
Recsea WHC-G5X User manual

Recsea
Recsea RDH-SA6000 User manual

Recsea
Recsea WHG-HERO3 User manual

Recsea
Recsea WHC-G1XMkIII User manual

Recsea
Recsea CWC-G7X User manual

Recsea
Recsea WHC-S95D User manual

Recsea
Recsea WHS-RX100Mk 3 User manual

Recsea
Recsea WHC-G7X User manual

Recsea
Recsea RDH-OMEM1 User manual

Recsea
Recsea RVH-X1000 User manual

Recsea
Recsea CWC-G7X User manual

Recsea
Recsea CWS-RX100IV User manual

Recsea
Recsea RVH-BMPCC User manual

Recsea
Recsea WHG-HERO4S User manual

Recsea
Recsea WHC-G1XMKII User manual

Recsea
Recsea RDH-PG7 User manual

Recsea
Recsea WHR-WG50 P User manual

Recsea
Recsea CWOP-SH2 User manual

Recsea
Recsea WHOM-TF3/4 User manual