RedBack Lasers 3L360 Series User manual


CONTENTS
User Safety 2
Introduction and 3L360™ Accessories 3
3L360™Diagram 4
Operating Instructions 7
Batteries 7
Power 8
Manual Mode. 9
Pulse Mode 10
LLR705 Receiver (optional 3L360R only) 11
Mounting Options 12
Calibration Self Check & Technical Specications 13
Care & Maintenance, Trouble Shooting 15
Warranty 16
User Safety
• Laser output sign lies near the output aperture.
• Do not stare directly into laser beam.
• Do not disassemble the instrument or attempt to
perform any internal servicing. Repairs and service
should be performed only authorised service
centres of Redback Lasers.
• This instrument complies with the safety
Classication standards of laser radiation.
2
3L360R CAUTION: Class 3r laser <5mW at 635nm.
3L360G CAUTION: Class 3r laser <5mW at 522nm.
Do NOT stare into laser beam or aim at another
person.
Follow relevant Australian Standards
Copyright © CMI LasersTM RedBack lasersTM and Level1LasersTM . All rights reserved CMI Industries Pty Ltd 2016
No artwork or photographs produced by CMI Industries Pty Ltd may be used copied or reproduced without the written consent
from CMI Industries Pty Ltd

3
3L360TM INTRODUCTION
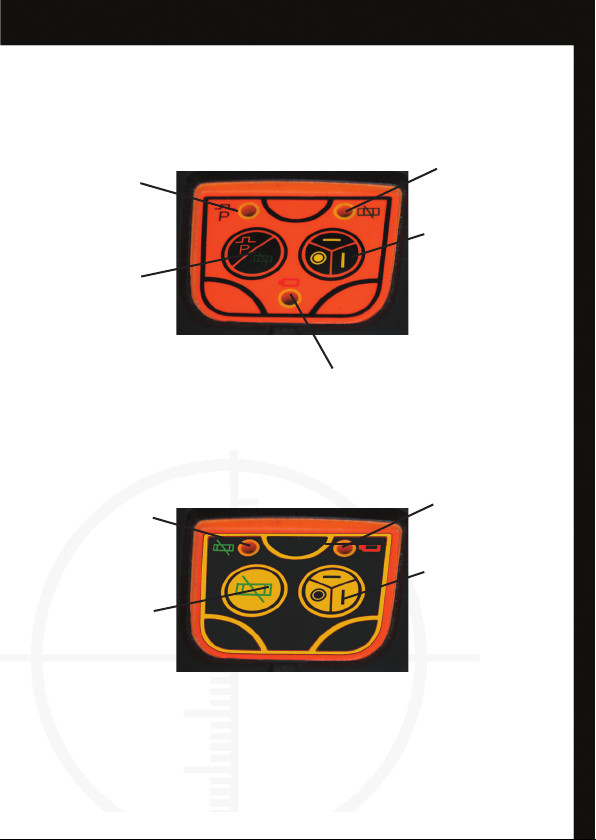
Congratulations on purchasing one of the RedBack 3L360™ Auto Levelling
3x 360 line laser models. These instructions cover both the 3L360R (red
beam) and 3L360G (green beam) models. Please note that some of the
features described in this manual may be specic to just one of these
models and will be indicated as so.
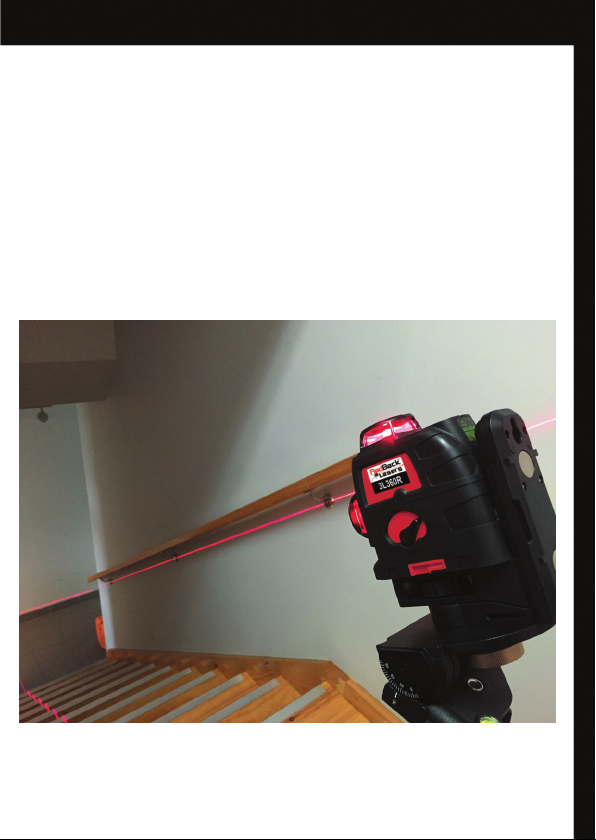
Both the 3L360R and 3L360G feature three full 360olines, one horizontal
and two vertical at 90 degrees to each other. The 3L360R has a red beam
laser and the 3L360G has a high visibility green beam laser.
The 3L360 models are ideal for all manner of internal t out and installation
application by providing a fast self levelling horizontal line around the whole
room as well as 2 vertical lines again 360ocoverage and at 90oto each other
for alignment and squaring plus also providing plumb up and down crosses.
In addition the 3L360R (red) model has pulse mode and so can be used
outdoors with an optional line receiver such as the LLR705 by RedBack.
The 3L360’s Comes with superior Li-ion rechargeable batteries and charger
as well as being able to operate with standard “AA” Alkaline batteries.
The 3L360’s feature manual mode for setting on a manual slant and comes
with an elevating magnetic base which can also be mounted on an optional
tripod such as the RedBack IET68.
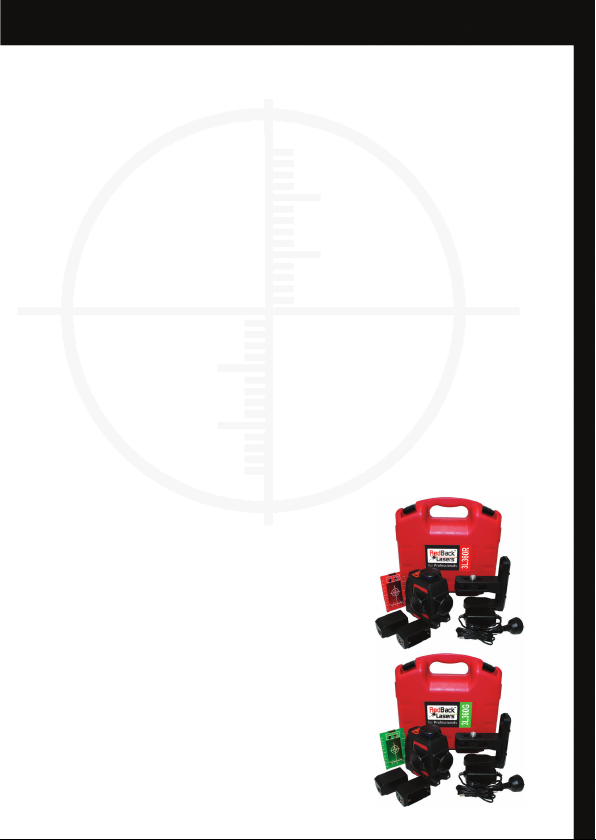
3L360™ Kit Included Accessories
• a 3L360™ Laser Unit (either R or G)
• Protective Carry Case
• Rechargeable Li-ion Batteries
• Charger
• Std Battery Compartment
• Elevating Magnetic Base
• Laser Target (either Red or Green)
• Instruction Manual
www.redbacklasers.com.au

4
3L360TM DIAGRAMS
3L360R & 3L360GTM Laser Units
1
2
3
1. Laser Output Windows
2. Control Keypad
3. Pendulum Locking Knob
4. Battery Compartment
5. Tripod/Mounting Threads 5/8”, 1/4”
4
1
5

5
Keypad
www.redbacklasers.com.au
Power LED
Pulse Mode LED
3L360R (red beam)
Laser Line Function
Button
Pulse Mode &
Manual Mode
Function Button
Manual Mode LED
3L360G (green beam)
Power LED
Laser Line Function
Button
Manual Mode LED
Manual Mode
Function Button

6
3L260TM DIAGRAMS
Mounting Bracket
5/8” Thread
Magnetic
Mount
Tripod Mounts
5/8” Thread &
1/4” Thread
Lock for Elevating
Laser Level Platform
Locking Knob
3L360 to Bracket

7
www.redbacklasers.com.au
3L360TM OPERATING INSTRUCTIONS
Battery Instructions
To charge this battery pack simply insert the charger plug into the charging
socket on the Li-ion battery pack itself. The LED on the charger is illuminated
red during the charging process and will turn green once the battery is fully
charged.
When the power LED on the keypad ashes, the rechargeable battery pack
needs recharging or standard “AA” batteries need replacing. Note the
charger will only charge the supplied rechargeable battery pack.
Handy Hints
•
Prior to initial use, fully charge the rechargeable battery.
•
If when you insert a battery pack the laser does not power up try re-
loading the battery pack to make sure there is a good connection.
•
Remember the 3L360™ can operate using standard “AA” batteries
when rechargeable pack is out of charge or charging.
•
When laser is not going to be used for an extended period of time it is
best to remove both “AA” and Rechargeable pack if installed.
The 3L360’s have two battery options either 4 x standard “AA” size Alkaline
or the Li-ion rechargeable pack. For standard 4 x “AA” alkaline operation
simply insert “AA” batteries into standard battery holder in the direction
indicated and slide the holder into battery recess and close the battery
compartment cover.
To use the rechargeable
battery pack rst
remove standard pack
if inserted and place
into the same battery
recess in direction
indicated and close the
battery compartment
cover.
5/8” Thread
Tripod Mounts
5/8” Thread &
1/4” Thread
Locking Knob
3L360 to Bracket

8
Turning On the 3L360
To power up, simply unlock the pendulum by moving it to the “ON” position,
this will automatically self level the laser and power up the horizontal beam.
If when you unlock the pendulum all laser ash and a beeping sound is
emitted then the laser is out of self levelling range, place the laser on a more
level surface for the device to self level and power up.
To power up the other lasers press the right function button on the keypad,
each press will cycle trough the dierent lasers. 1st press powers up the
front vertical, 2nd press the side vertical, 3rd press both verticals and 4th
press all laser lines. To power down the laser level simply re-lock the
pendulum by switching it to the “OFF” Position.
Always transport the 3L360 laser level with the pendulum in the locked “OFF”
position to protect the device when not being used.
3L360TM OPERATING INSTRUCTIONS cont.
3L360G
(green beam)
3L360R
(red beam)

9
www.redbacklasers.com.au
Manual Mode
Manual mode allows you to turn on one or more of the 360 degree lines with
the pendulum in the locked position and so allows you to set up a laser line
at an angle such as for installing balustrades. Manual mode is activated by
pressing the manual mode left button when the pendulum is in the locked
“OFF” position. The manual mode LED light will ash warning you that the
laser is not self levelling. You can turn on the various lines in the normal way
by using the right laser function button.
Note that the 3L360R left button has two functions, Manual Mode and Pulse
Mode. See page 10
Unit featured is 3L360R in manual mode. Also pictured is an optional iet68 elevating tripod and
optional GD12 grade dial plate; a camera style tripod with pan and tilt will provide a similar result.

10 www.redbacklasers.com.au
3L360TM OPERATING INSTRUCTIONS cont.
Pulse Mode (3L360R only)
Pulse mode is only available on the 3L360R red beam model. Pulse mode
allows the 3L360R to be used with a line receiver such as the RedBack
LLR705 and so allowing the laser to be used outside for general site levelling,
patios, decking etc.
To enable pulse mode you press the left function button once when the laser
is powered up. The Pulse LED light on the left will indicate when pulse mode
is enabled, to disable once again press the left function button.

11
www.redbacklasers.com.au
Laser Receiver LLR705 (OPTIONAL Accessory for 3L360R only)
The receiver can be used hand held or together with the sta clamp with a
sta. The LLR705 has a 1mm level zone for maximum accuracy.
• A press of the Power button on the receiver will turn on and o
the receiver.
• Pressing the Speaker button toggles speaker on and o.
The LLR705 has 3 LED light displays which indicate laser is above, below and
on level and a large LCD display which has a progressive display indicating
when the laser gets closer to the level mark. If the receiver is left turned on
without a laser being received it will auto power down after 10 minutes. For
picking up horizontal lines hold the receiver as shown below, for picking up
vertical lines place on its side.
Indicates laser beam is below
line - slide receiver down.
Indicates laser beam is above
line - slide receiver up.
Indicates laser beam is on the
line.
LED lights
duplicate LCD
results.
The RedBack LLR705 is an OPTIONAL receiver for the 3L360R (red beam)
model. It allows the laser beam to be picked up outside at up to 150m in any
lighting conditions. Ideal for decking, sheds, slabs, framing and much more.

12 www.redbacklasers.com.au
3L360 Mounting Options
The 3L360’s come with a magnetic mounting bracket and this mounting
bracket features an elevating plate which allows the height of the horizontal
laser line to be nely adjusted. The elevating plate also features a locking
knob to prevent the lasers height changing once set.
The bracket and laser housing features a 5/8” survey thread which allows the
3L360 to be mounted onto an indoor elevating tripod such as the RedBack
Lasers IET68 or outdoor heavy duty tripod HDF94. The bracket and housing
of the laser level also feature a 1/4” thread allowing it to be mounted onto
a camera style tripod.
Finally the bracket features strong vertical magnets that allow mounting onto
ferrous metals for installation applications.
3L360TM OPERATING INSTRUCTIONS cont.

13
3L360TM TECHNICAL SPECIFICATIONS
Laser Wavelength 635nm Red
Laser Class 3r <5mW
Visible Range (light dependent) Up To 30m
Range with Optional Receiver Up to 150m radius (300m diam)
Accuracy ±2mm/10m
Number 360olines 3
Self Levelling Range ±3o
Temperature Range -10oC - +40oC
IP Dust Water Resistance IP55
Power 4 x “AA” Alkaline or Li-ion pack
Low Power Power LED Flash
Size 132x122x75mm
Weight 1.0Kg
Technical Specications
3L360R - Red Beam
Range with Receiver as tested with RedBack LLR705 receiver, range may vary depending on type of
line receiver used.

14 www.redbacklasers.com.au
3L360TM TECHNICAL SPECIFICATIONS
Technical Specications
Laser Wavelength 522nm Green
Laser Class 3r <5mW
Visible Range (light dependent) Up To 40m
Accuracy ±2mm/10m
Number 360olines 3
Self Levelling Range ±3o
Temperature Range -10oC - +40oC
IP Dust Water Resistance IP55
Power 4 x “AA” Alkaline or Li-ion pack
Low Power Power LED Flash
Size 132x122x75mm
Weight 1.0Kg
Calibration & Self Check
All Redback Lasers have been checked for calibration and certied by one
of our technicians here in Australia prior to despatch and should under
normal conditions not go out of calibration. A calibration certied sticker
with the date and name of technician is located on the laser itself. It is
worth checking calibration from time to time particularly after any known
knocks or drops. An easy way to continually check calibration is to always
double check you work with the laser located in a dierent position or use
an alternate vertical line. Various other methods for checking calibration can
be found at www.redbacklasers.com.au/downloads or the laser can
be returned to our service department for checking and re-calibration. We
at Redback Lasers provide a once o free calibration and check within the
duration of the warranty period see page 16 for details.
3L360G - Green Beam

15
3L360TM TROUBLE SHOOTING
• Keep laser and accessories stored in protective case.
• Make sure laser is stored dry, dry out before storage to prevent damage.
• Remove batteries when not used for an extended period of time to prevent
leakage. (battery leakage not covered by warranty)
• The 3L360TM is a precision instrument and should not be subjected to excessive
knocks, drops or vibrations.
• Self check calibration from time to time. See page 14
• For service contact Redback Lasers. www.redbacklasers.com.au
www.redbacklasers.com.au
Care & Maintenance

REDBACK LASERS WARRANTY
Duration of warranty is xed and automatic, when we advertise 2 years on a particular model,
its two years. No drop down to a lesser time if you forget to register, registration is NOT
required just proof of purchase showing date.
Although the duration of our warranties are for a particular period it does not mean we will
charge you for a genuine warranty failure a month or two outside that warranty period, we
believe in a fair go.
Even though a product shows signs of accidental damage, scratches and the like, we will not
automatically fail the warranty claim, if the fault is NOT caused by a drop or misuse and is a
genuine warranty failure then we will cover it.
Calibration is not covered by warranty much the same as the wheel balance on your car is not
covered by warranty, we do however oer a one o free re-calibration service during the period
of warranty, conditions and details below.
RedBack LasersTM distributed by CMI Industries Pty Ltd
P.O. Box 7324 - Geelong West - Victoria - 3218 - Australia
CMI Industries Pty Ltd provides consumers with a warranty to our products, this is in addition to requirements of any
relevant legislation such as the Competition and Consumer Act 2010. Denitions:
“CMI”, “We” or “Our” refers to CMI Industries Pty Ltd (ABN 29 102 713 922) of 8 Autumn St, Geelong West, Victoria
3218 ph (03) 5228 0777
“You” or “Consumer” refers to the initial purchaser of the product.
“Product” refers to goods manufactured by or for CMI Industries Pty Ltd under the brands of RedBack Lasers,
Level1Laser and CMI Lasers.
“Material” refers to material or component used in the construction and manufacture of the product.
“Workmanship” refers to handling, assembly and manufacturing processes done by or for CMI Industries Pty Ltd in
order to manufacture the products.
“Warranty Period” For the 3L360R and 3L360G is Two Years. Warranty period is from original purchase date, no
extension is made in the event of warranty replacement products supplied or time spent being repaired.
Our goods come with guarantees that cannot be excluded under the Australian Consumer Law. You are entitled to a
replacement or refund for a major failure and for compensation for any other reasonably foreseeable loss or damage.
You are also entitled to have the goods repaired or replaced if the goods fail to be of acceptable quality and the failure
does not amount to a major failure. LLR705 receivers 2 Year warranty, Ni-Mh Battery/Charger 1 Year Warranty.
CMI warrants that our products will be free from defects in material and workmanship for the warranty period.
CMI promises to repair or replace, free of charge, the product or part of product if found to be faulty due to defective
workmanship or materials within the duration of the warranty as long as the following terms and conditions are met;
• Product must not have been misused or abused, must not have incurred accidental damage or had un-authorised
repair or tampering that has caused or contributed to its fault or failure.
• You must contact CMI by phone, mail or email immediately when a fault or defect has become apparent and within
the warranty period.
• Product must be returned to store of purchase or directly to CMI, we will cover cost of postage only when sent by
our reply paid Australia Post service (Australian Main land and Tasmania only) details will be provided upon phone, post
or email communications with us.
• CMI will cover cost of freight back of repaired or replaced product to original purchase store or you directly
(depending on how it was sent Australian Main Land and Tasmania only).
• CMI will determine whether to repair or replace the product or part of product on a case by case basis.
• Further exclusions in this warranty include damage or defect caused by use of non-original accessories or parts,
damage in transportation, normal wear and tear, damage through moisture, damage due to electric surge, failure due
to neglect or damaged caused by adjustments not outlined in CMI’s instructions.
Subject to the requirements of all applicable Australian Acts or legislation and to the extent permitted by law, CMI
accepts no liability (whether expressed or implied) of any nature whatsoever for any loss of earnings, hiring of
replacement equipment, Inaccurate work carried out by the consumer or agent, damage or injury arising as a result of
any fault in the product. It is the consumers responsibility to maintain good working practices and regularly test their
tools for accuracy and serviceability.
Calibration of the product is not covered by warranty subject to the requirement of all applicable Australian Acts or
legislation and to the extent permitted by law, CMI does however oer a free re-calibration service (once within the
period of the warranty) you are liable for the cost to send the product to us then we will recalibrate and return the
product to you free of charge. Note this oer is invalid if the product shows signs of misuse or accidental damage that
has caused it to go out of calibration.
A CMI product returned that fails to fall within the terms and conditions of this warranty will be quoted for repair.
This manual suits for next models
2
Table of contents
Other RedBack Lasers Laser Level manuals

RedBack Lasers
RedBack Lasers 3D3XR User manual

RedBack Lasers
RedBack Lasers XLG44 User manual

RedBack Lasers
RedBack Lasers ARL516G User manual

RedBack Lasers
RedBack Lasers D27 Series User manual

RedBack Lasers
RedBack Lasers Unilevel UNG6631 User manual

RedBack Lasers
RedBack Lasers EL614 User manual

RedBack Lasers
RedBack Lasers BASIC614 User manual

RedBack Lasers
RedBack Lasers AT1 User manual

RedBack Lasers
RedBack Lasers LSR Series User manual

RedBack Lasers
RedBack Lasers Unilevel UNL59 User manual