manuals.online logo
Brands
  1. Home
  2. •
  3. Brands
  4. •
  5. RedBack Lasers
  6. •
  7. Laser Level
  8. •
  9. RedBack Lasers ARL516G User manual

RedBack Lasers ARL516G User manual

Other RedBack Lasers Laser Level manuals

RedBack Lasers LSR Series User manual

RedBack Lasers

RedBack Lasers LSR Series User manual

RedBack Lasers PRO5 User manual

RedBack Lasers

RedBack Lasers PRO5 User manual

RedBack Lasers Unilevel UNL59 User manual

RedBack Lasers

RedBack Lasers Unilevel UNL59 User manual

RedBack Lasers Unilevel UNG6631 User manual

RedBack Lasers

RedBack Lasers Unilevel UNG6631 User manual

RedBack Lasers D27 Series User manual

RedBack Lasers

RedBack Lasers D27 Series User manual

RedBack Lasers AT1 User manual

RedBack Lasers

RedBack Lasers AT1 User manual

RedBack Lasers EL614 User manual

RedBack Lasers

RedBack Lasers EL614 User manual

RedBack Lasers XLG44 User manual

RedBack Lasers

RedBack Lasers XLG44 User manual

RedBack Lasers BASIC614 User manual

RedBack Lasers

RedBack Lasers BASIC614 User manual

RedBack Lasers 3L360 Series User manual

RedBack Lasers

RedBack Lasers 3L360 Series User manual

RedBack Lasers 3D3XR User manual

RedBack Lasers

RedBack Lasers 3D3XR User manual

Popular Laser Level manuals by other brands

Sokkia DT7C Operator's manual

Sokkia

Sokkia DT7C Operator's manual

Nedo ET-5 operating instructions

Nedo

Nedo ET-5 operating instructions

geo-FENNEL Maxi-Liner FL 65 HP user manual

geo-FENNEL

geo-FENNEL Maxi-Liner FL 65 HP user manual

LaserLiner X2-Laser manual

LaserLiner

LaserLiner X2-Laser manual

Spectra LL300N manual

Spectra

Spectra LL300N manual

geo-FENNEL Selection PRO FLG 40-PowerCross GREEN SP user manual

geo-FENNEL

geo-FENNEL Selection PRO FLG 40-PowerCross GREEN SP user manual

Nedo Crossliner 4 operating instructions

Nedo

Nedo Crossliner 4 operating instructions

Lasertec FX360G instruction manual

Lasertec

Lasertec FX360G instruction manual

Flex ALC 8 Original operating instructions

Flex

Flex ALC 8 Original operating instructions

Cocraft HL 20-SG Original instructions

Cocraft

Cocraft HL 20-SG Original instructions

Johnson 40-6692 instruction manual

Johnson

Johnson 40-6692 instruction manual

LaserLiner SuperCross-Laser SCL 2 operating instructions

LaserLiner

LaserLiner SuperCross-Laser SCL 2 operating instructions

Leica iCON robot 60 user manual

Leica

Leica iCON robot 60 user manual

DeWalt DW082 Original instructions

DeWalt

DeWalt DW082 Original instructions

LaserLiner ActiveFinder XP user manual

LaserLiner

LaserLiner ActiveFinder XP user manual

imex EL20 manual

imex

imex EL20 manual

Fixturlaser NXA D I-0912 user manual

Fixturlaser

Fixturlaser NXA D I-0912 user manual

Skil 560 Original instructions

Skil

Skil 560 Original instructions

manuals.online logo
manuals.online logoBrands
  • About & Mission
  • Contact us
  • Privacy Policy
  • Terms and Conditions

Copyright 2025 Manuals.Online. All Rights Reserved.

CONTENTS
User Safety 2
Introduction and ARL516G™ Accessories 3
ARL516G™Diagram 4
Operating Instructions 6
Batteries 6
Power and Rotation Speed 7
Scan Modes & Site Layout 8
Laser Receiver LRG715 9
Calibration Self Check & Technical Specications 10
Care & Maintenance, Trouble Shooting 11
Warranty 12
User Safety
• Laser output sign lies near the output aperture.
• Do not stare directly into laser beam.
• Do not disassemble the instrument or attempt to
perform any internal servicing. Repairs and service
should be performed only authorised service
centres of Redback Lasers.
• This instrument complies with the safety
Classication standards of laser radiation.
2
CAUTION: Class 3R laser <5mW at
522-542nm.
Do NOT stare into laser beam or aim at
another person.
Follow relevant Australian Standards
Copyright © CMI LasersTM RedBack lasersTM and Level1LasersTM . All rights reserved CMI Industries Pty Ltd 2010
No artwork or photographs produced by CMI Industries Pty Ltd may be used copied or reproduced without the written consent
from CMI Industries Pty Ltd
3
ARL516GTM INTRODUCTION
Congratulations on purchasing the ARL516G™ a heavy duty self levelling
green beam rotating laser for builders built for the toughest of work sites.
The ARL516G™ is ideal for general site levelling and internal t out, simply
set it up on a tripod, unlock the pendulum, it self levels and the laser starts
rotating. Then using the supplied LRG715 receiver you can set up your
levels.
The ARL516G™ is manual levelling when set up on its side for vertical
alignment and site layout.
The ARL516G™ with 4X brighter green beam laser technology together with
scan line modes makes this ideal for visible indoor alignment and levelling.
Other features of the ARL516G™ include remote control, rechargeable Ni-
Mh and Std “C” Size battery operation and Two Year Redback Warranty.
(See page 12)
www.redbacklasers.com.au
ARL516G™ Included Accessories
• ARL516G™ Laser Unit
• Protective Carry Case
• Rechargeable Ni-Mh Battery Pack
• Standard “C” Cell Battery Pack
• Charger
• Laser Receiver LRG715
• Receiver Staff Clamp
• Remote Control
• Magnetised Target
• Glasses to Assist Viewing of Laser
• Instruction Manual
4
ARL516GTM DIAGRAMS
ARL516GTM Laser Unit
1
3
5
7
1. Laser Output Window
2. Heavy Duty Rubberised Casing
3. Battery Pack (rechargeable)
4. Keypad
5. Recharging Socket
6. Levelling Knob Side Mounted
7. Side/Wall Mount
8. Datum Marker
9. Pendulum Locking Knob
10. 5/8” – 11tpi Screw
2
4
6
9
Power On/Off and LED
Manual Bubble Vial
for Side Mounted
Operation
Rotating Mode
Speed Control
(Rotation Mode)
Scan Control
(Scan Mode)
10
10
Keypad
Scan Mode and LED
8
5
Remote Control
www.redbacklasers.com.au
Receiver - LRG715
9
Reception Sensors
Fine/Coarse Mode
Speaker Control
Power On/Off
Rubber Casing
LCD Display
(Repeated on rear)
Bubble Vial
Display back light
Magnetic Mounting
Power Off (only)
Scan Mode
Rotating Mode
Speed Control
(Rotation Mode)
Scan Control
(Scan Mode)
Operating LED
6www.redbacklasers.com.au
ARL516GTM OPERATING INSTRUCTIONS
Battery Instructions
To charge the battery pack simply insert the charger plug into the charging
socket. The LED on the charger is illuminated red during the charging
process and will turn green once the battery is fully charged. Only the
special rechargeable pack can be charged and it can be charged either when
inserted or when not inserted into the laser.
When the power LED on the keypad ashes, the rechargeable battery packs
need recharging or standard batteries need replacing. Note the charger will
only charge the supplied rechargeable battery pack.
Handy Hints
•
Prior to initial use, charge the rechargeable batteries for at least 8
hours.
•
Running rechargeable batteries completely at will increase battery life.
•
The ARL516G™ can operate off mains by plugging the charger (for
indoor use only) into the unit.
•
Remember the ARL516G™ can operate using standard batteries when
rechargeable pack is out of charge.
The ARL516G has two battery options either 4 x standard “C” size Alkaline
or the Ni-Mh rechargeable pack. For standard 4 x “C” alkaline operation
simply insert into standard battery holder in the direction indicated and
tighten the locking screw.
To use the rechargeable
battery pack rst remove
standard battery pack if
inserted and replace with
the rechargeable battery
pack and tighten the
locking screw.
7
www.redbacklasers.com.au
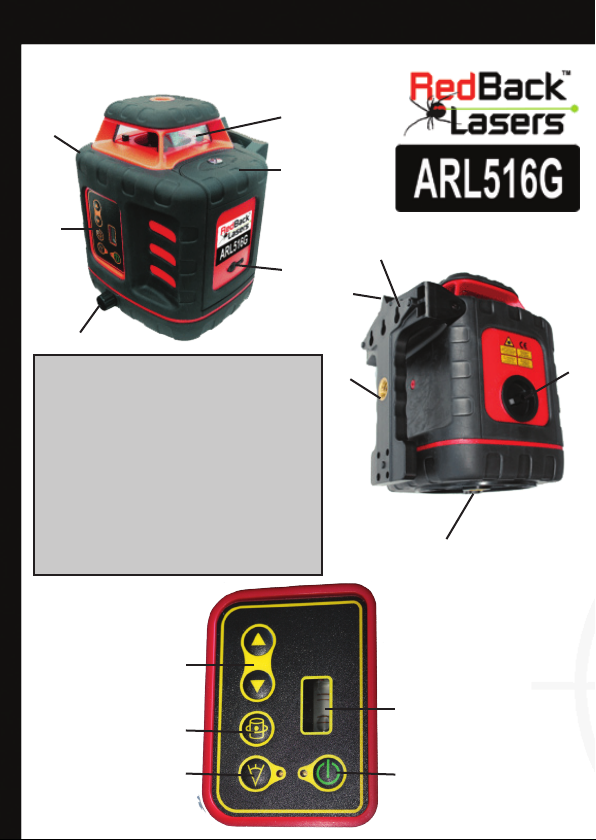
Turning Laser On (Horizontal Operation)
Before the ARL516GTM can be powered up
for normal horizontal rotation the pendulum
locking knob rst needs to be rotated to the
“ON” position, this disengages the protective
pendulum lock.
Now when the power button is pressed
the laser will be powered up and the head
of laser begins to rotate and after a couple
of seconds the magnetically dampened
pendulum will be self levelled.
If the laser emits a loud beeping sound
then the laser housing is setup outside self
levelling range, re-setup and try again.
Rotation Speed Settings
• The ARL516GTM starts by default in rotation mode and so the rotation
button only needs to be pressed when switching from scan
mode back to rotation. Whilst rotating the speed of rotation can be
changed by pressing the up and down arrow buttons on the keypad
or remote . Rotation speed will effect receiver performance
at different distances and also help visibility of the laser beam when
used indoors.
Turning Laser On (Vertical Operation)
The ARL516GTM can be used on its side for
vertical rotation and alignments. In this
orientation the Pendulum lock must remain
in the “OFF” locked position, levelling of the
laser is manual and is achieved by levelling
off the bubble vial built into the keypad
using the “Levelling Knob” see page 4.
Power up with power button . Note
the power button on the remote is to turn
off ONLY.
8www.redbacklasers.com.au
Vertical Rotation Operation for Site Layout
ARL516GTM OPERATING INSTRUCTIONS
The ARL516GTM can be used on its side for vertical alignment or together
with the dot laser out of the front to produce a 90 degree square for site
layout. The ARL516GTM can be placed on its side with the datum marker
over the correct point and the laser levelled with the bubble vial and manual
levelling knob.
For site layout squaring;
• Place datum marker over the datum point marking the conjunction of
the 90 degree lines.
• Align laser housing so dot is striking target point along the one line of
the 90 degrees, adjust the housing of the laser left and right to achieve
this.
• Once the dot is on the target use the receiver to pick up the rotating line
on the second line of the 90 degree. Your square is now set.
Rotation Scan Modes - For Indoor Visibility
The Scan Mode stops the laser from rotating and toggles the beam left to
right, intensifying the beam making the laser more usable indoors as a visible
laser. You can set the scan angle to 0o, 20oand 40oand shift the beam both
left and right. The Scan Mode can be operated by both the Control key pad
on the laser and also the Remote Control.
• Press the Scan button to enter scan mode, LED will ash.
• The rst press, area scan 20 °, second press 40°, third press 0°, fourth
press 20° etc….
• Move the scan line by pressing Scan Control buttons.
• Press and hold Scan Control button to rotate the scan line quickly.
• To return to rotation mode press the Rotate button .
9
Laser Receiver LRG715 (refer to diagram page 5)
The LRG715 is a heavy duty dual sided display rotating laser receiver, it
can be either hand held or with the staff bracket clamped onto a staff. The
bubble vials can be used to keep the receiver level.
The LRG715 has two large LCD displays with progressive bars indicating
when the laser gets closer to the level mark. Move the receiver up and down
(side to side vertical rotation) slowly and watch the display change when the
solid tone is heard and the centre line is shown then the receiver is at the
height of the laser beam plane. The receiver will auto power down after 10
minutes when not receiving laser pulses.
LRG715TM RECEIVER INSTRUCTIONS
Indicates laser beam is below
line - slide receiver down.
Indicates laser beam is above
line - slide receiver up.
Indicates laser beam is on the
line.
Power and Battery Life Indicator
Coarse/Fine and Speaker Indicator
www.redbacklasers.com.au
• A press of the power button toggles the receiver on and off.
• The Speaker button toggles through 3 speaker volumes.
• Pressing the Coarse/Fine Mode button toggles through 3 levels
the rst being ne mode indicated by on the LCD the accuracy of
level is at its highest with 1mm tolerance movement by the receiver
before showing it off level. The next coarser mode allows 2mm
before showing off level the third press shows no symbol on the LCD
and allows 3mm before showing off level, these two coarser modes are
more suitable for general site levelling.
• The Back Light button toggles the LCD display back light.
10 www.redbacklasers.com.au
ARL516GTM TECHNICAL SPECIFICATIONS
Laser Wavelength 522-542nm <5mW
Laser Class 3R
Range with Receiver 600m Diam Rotating
Horizontal Accuracy ±3mm/20m
Rotation Speeds High, Medium, Low
Scan Angles 0o - 20o - 40o
Self Levelling Range ±3.5o
Temperature Range -10oC - +40oC
IP Dust Water Resistance IP66
Power 4 x “C” Alkaline or Ni-Mh pack
Low Power Power LED Flash
Size 162x180x202mm
Weight 2.55Kg
Technical Specications
Calibration & Self Check
All Redback Lasers have been checked for calibration and certied by one
of our technicians here in Australia prior to despatch and should under
normal conditions not go out of calibration. A calibration certied sticker
with the date and name of technician is located on the laser itself. It is
worth checking calibration from time to time particularly after any known
knocks or drops. An easy way to continually check calibration is to always
double check you work with the laser located in a different position or use
an alternate vertical line. Various other methods for checking calibration can
be found at www.redbacklasers.com.au/downloads or the laser can
be returned to our service department for checking and re-calibration. We
at Redback Lasers provide a once off free calibration and check within the
duration of the warranty period see page 12 for details.