Reely GeNii Mini RtF User manual
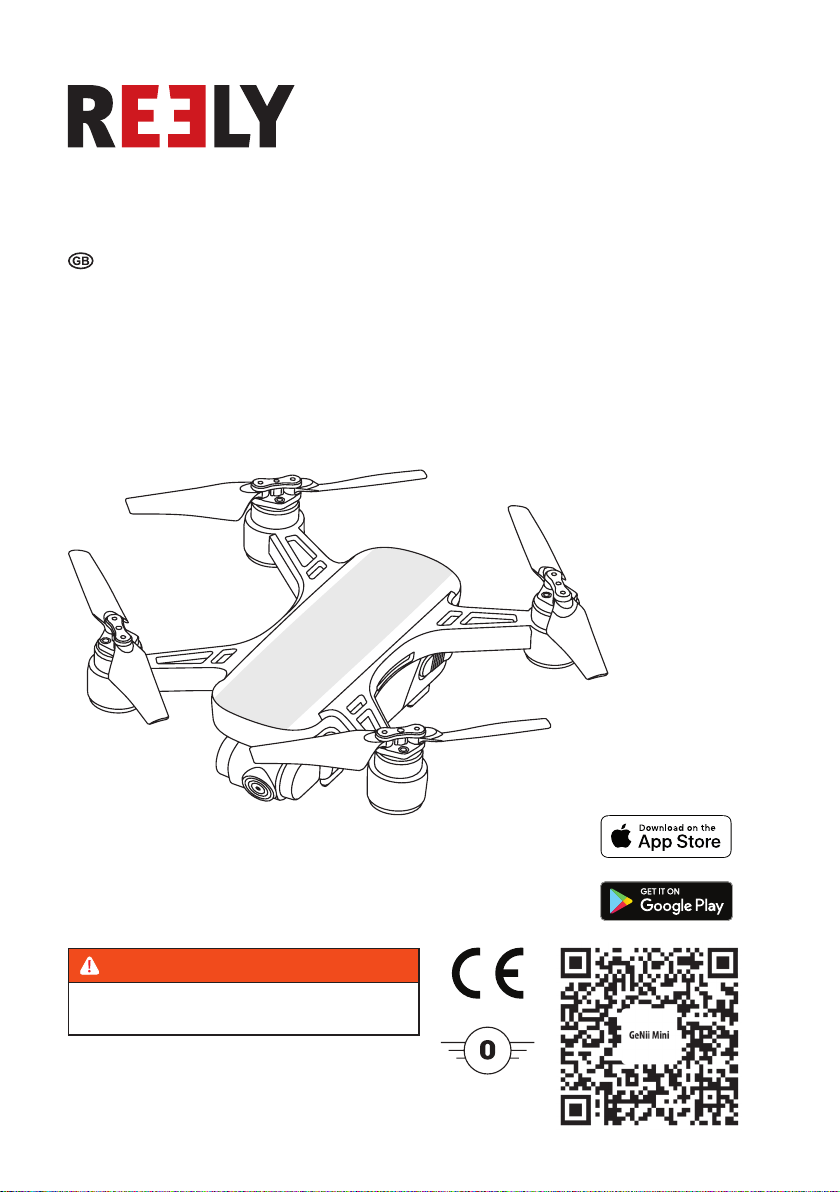
Operating Instructions
GPS Drone GeNii Mini RtF
Item No. 2280967
Item No. 2282654 Super Combo
WARNING
Read the safety instructions before using the product!

2
Table of contents
1. Intended use........................................................................................................................................................4
2. Know the aircraft..................................................................................................................................................5
2.1 Components ..................................................................................................................................................5
2.2 Flight Status Indicator Lights .........................................................................................................................6
3. Know the remote controller..................................................................................................................................7
3.1 Components ..................................................................................................................................................7
3.2 Indicator lights................................................................................................................................................8
3.3 Using the mobile support...............................................................................................................................9
4. Beforeying.......................................................................................................................................................10
4.1Chargingtheaircraftbattery ........................................................................................................................10
4.2Installing(andremoving)theightbattery...................................................................................................10
4.3Gettingtheremotecontrollerready ............................................................................................................. 11
4.4 Installing an SD card for media storage....................................................................................................... 11
5. FlyingwiththeRemotecontroller ......................................................................................................................12
5.1 Introduction..................................................................................................................................................12
5.2 Understanding the controls..........................................................................................................................12
5.3Flying–Gettingreadyfortake-off ...............................................................................................................13
5.4Flying–Takingoff........................................................................................................................................14
5.5Flying–Landing ..........................................................................................................................................15
5.6Flying–Switchingoff...................................................................................................................................16
5.7Flying–UsingReturn-To-Home ..................................................................................................................16
5.8Flying–Usingightmodes..........................................................................................................................17
5.9Flying–Whensafetyfeaturestakeover .....................................................................................................18
5.10Takingphotosandrecordingvideo ............................................................................................................19
6. FlyingwiththeMobileapp .................................................................................................................................21
6.1 Introduction..................................................................................................................................................21
6.2 Understanding the controls..........................................................................................................................21
6.3Flying–Gettingreadyfortake-off ...............................................................................................................22
6.4Flying–Takingoff........................................................................................................................................24
6.5Flying–Landing ..........................................................................................................................................25
6.6Flying–Switchingoff...................................................................................................................................25
6.7Flying–UsingReturn-To-Home ..................................................................................................................26

3
6.8Flying–Usingightmodes..........................................................................................................................27
6.9Flying–Whensafetyfeaturestakeover .....................................................................................................29
6.10Flying–Usingwaypoints...........................................................................................................................30
6.11Takingphotosandrecordingvideo ............................................................................................................31
7. Maintenance ......................................................................................................................................................34
7.1 Pairing aircraft and remote controller...........................................................................................................34
7.2 Calibrating the compass ..............................................................................................................................34
8. Technicaldata....................................................................................................................................................36
8.1 General........................................................................................................................................................36
8.2 Drone...........................................................................................................................................................36
8.3Remotecontrol ............................................................................................................................................36
8.4Flightbattery................................................................................................................................................37
8.5Balancecharger(fordronebatterycharging)..............................................................................................37
8.6 App...............................................................................................................................................................37
9. Disposal.............................................................................................................................................................37
9.1 Product ........................................................................................................................................................37
9.2(Rechargeable)batteries .............................................................................................................................37
10. DeclarationofConformity(DOC).......................................................................................................................38
11. Appendix–Aboutopticalowpositioning..........................................................................................................38
11.1 Introduction ................................................................................................................................................38
11.2 Usage Scenarios........................................................................................................................................38
4
1. Intended use
Theproductisareadytoyremotecontrolledquadcopterwithcamera.
Itissuitableforpersonsaged16yearsorolder.
Theproductcanbecontrolledwiththeremotecontrollerorwiththemobileapp.Usethemobileapptodisplayreal
timeightdata.
It can be used indoors and outdoors under moderate wind conditions. Contact with moisture must be avoided under
all circumstances.
Forsafetyandapprovalpurposes,youmustnotrebuildand/ormodifythisproduct.Ifyouusetheproductforpurposes
otherthanthosedescribedabove,theproductmaybedamaged.Inaddition,improperusecanresultinshortcircuits,
res,electricshocksorotherhazards.
Allcompanynamesandproductnamesaretrademarksoftheirrespectiveowners.Allrightsreserved.
Google Play and the Google Play logo are trademarks of Google LLC.
App Store is a service mark of Apple Inc.
Safety instructions:
Downloadthesafetyinstructionsfromwww.conrad.com/downloads or scan
theQRcodeshown.Followtheinstructionsonthewebsite.
WARNING: SAFETY AND OPERATING INSTRUCTIONS
• Readtopreventaccidents!
• Readsafetyinstructionsbeforeusingtheproduct!
• Retaintheseoperatinginstructionsforreference!
• Ifyoupassontheproducttoanythirdpartyalsopassonsafetyandoperatinginstructions.
5
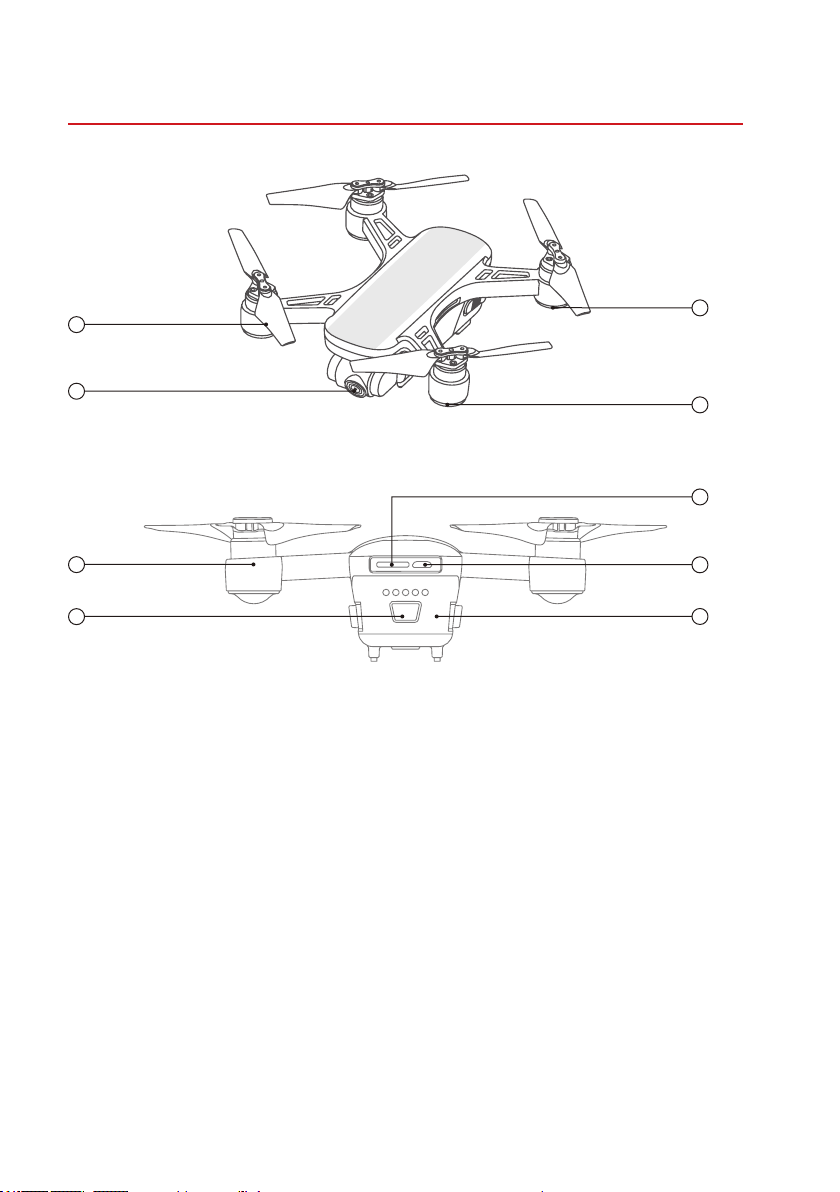
2.Know the aircra
2.1 Components
1
2
5
6
3
4
7
8
9
1 Propeller
2 Gimbal Camera
3 Flight Status Indicator Light
4 OpticalPositioningStatusIndicatorLight
5 Motor
6 Power button
7 MemoryCardSlot
8 MicroUSBInterface(formanufactureronly)
9 AircraftBattery

6
2.2 Flight Status Indicator Lights
Rear indicator lights (Quadcopter) Status indication
BBBSolidbluelightonstart-up Self-inspection
GSolid green light
• Remotecontrollerandaircraftare
paired
• GPS is located
GFlashing green light
• Remote controller and aircraft is
paired
• GPS is not located
BBBRBlueandredlightashingalternately Horizontalcalibrationprocess
GRRedandgreenlightashingalternately Vertical calibration process
BBB Flashing blue light No remote controller signal
BBBSolid blue light
• Remotecontrollerandaircraftare
not paired
• GPS is located
RSolid red light Serious error
RDouble-ashingredlight Seriouslylowbatterylevel
RFlashing red light Lowbatterylevel
BBBGBlueandgreenlightashingalternately Compass data error
7
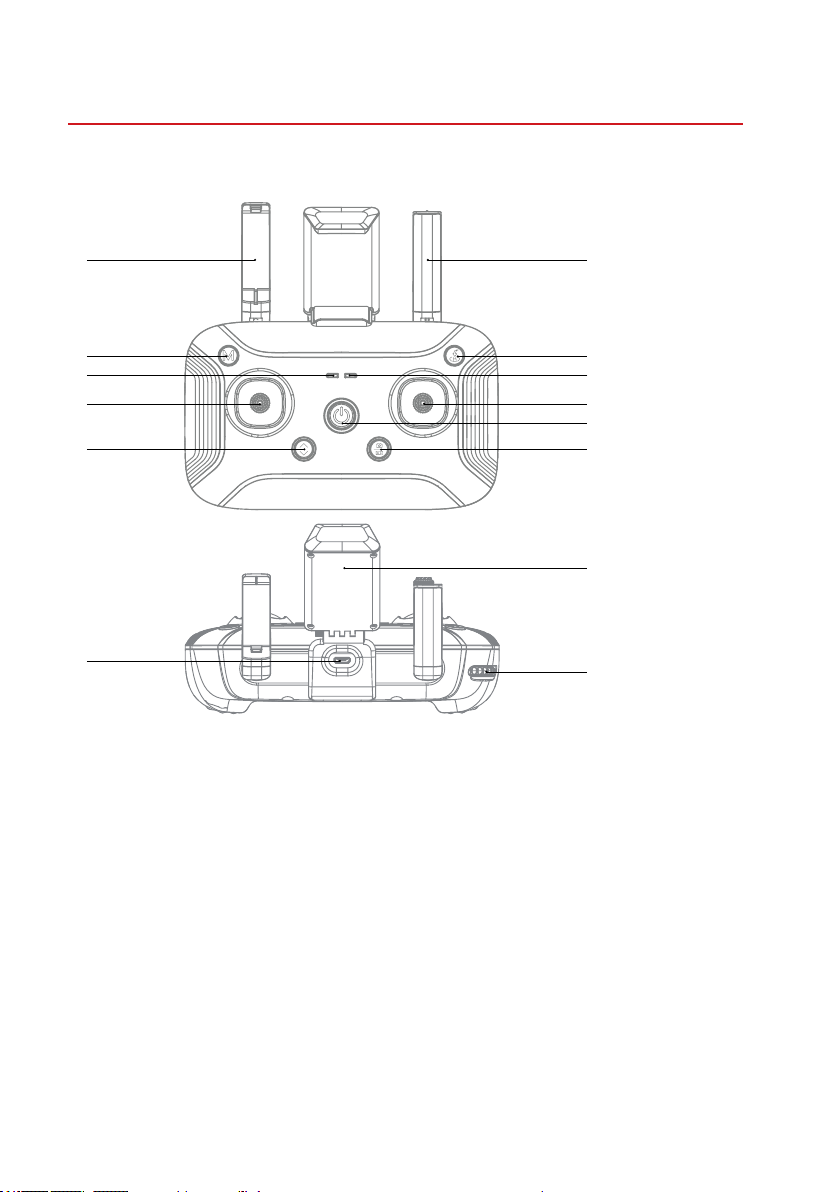
3.Know the remote controller
3.1 Components
lm
k
a a
c
g
h
j
b
d
f
i
e
a Antenna
b FlightModeSwitch
c OneKeyReturn
d ModeIndicator
e Status Indicator
f LeftJoystick
g RightJoystick
h Power
i OneKeyTakeOff/Land
j Picture/Video
k MobilePhoneBracket
l USB Charge Port
m Gimbal Adjustment

8
3.2 Indicator lights
3.2.1 Charging
Indicator light Status indication
GBlinkinggreen Charging
GSolid green Charging completed
3.2.2 In operation
Indicator light Sound Status indication
GSolid green light Workingnormally.
RSlowlyashingredlight B-B-B... Lowbatterywarning.
Immediatelychargethebattery.
RQuicklyashingredlight B-B-B...
Batterylevelcriticallylow.
Remotecontrollerturnsoffwhenthe
sound stops.
RSolid red light Serious error
GDouble-ashinggreen
light
BB-BB-
BB...
If there is no input for 5 minutes the
transmitterswitchesoffautomatically.
3.2.3 Flight mode indication
Indicator light Sound Status indication
GSolid green light GPS mode
RSlowlyashingredlight B-B... Altitude hold mode
9
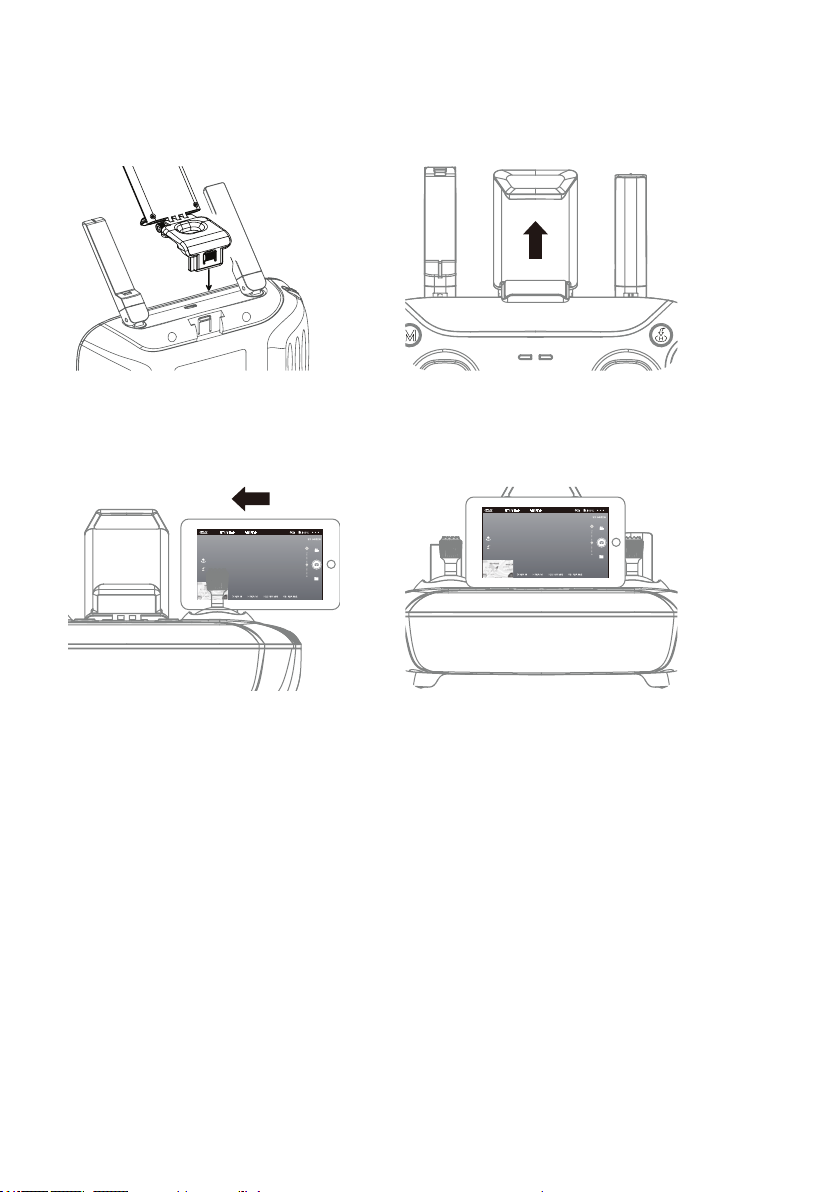
3.3 Using the mobile support
Step 1 Step 2
Installthemobilephonesupportintheslotoftheback
of the remote controller.
Pull the support up.
Step 3 Step 4
Put the mobile device on the mobile support. Adjust support and mobile phone to the right angle.
10
4.Before flying
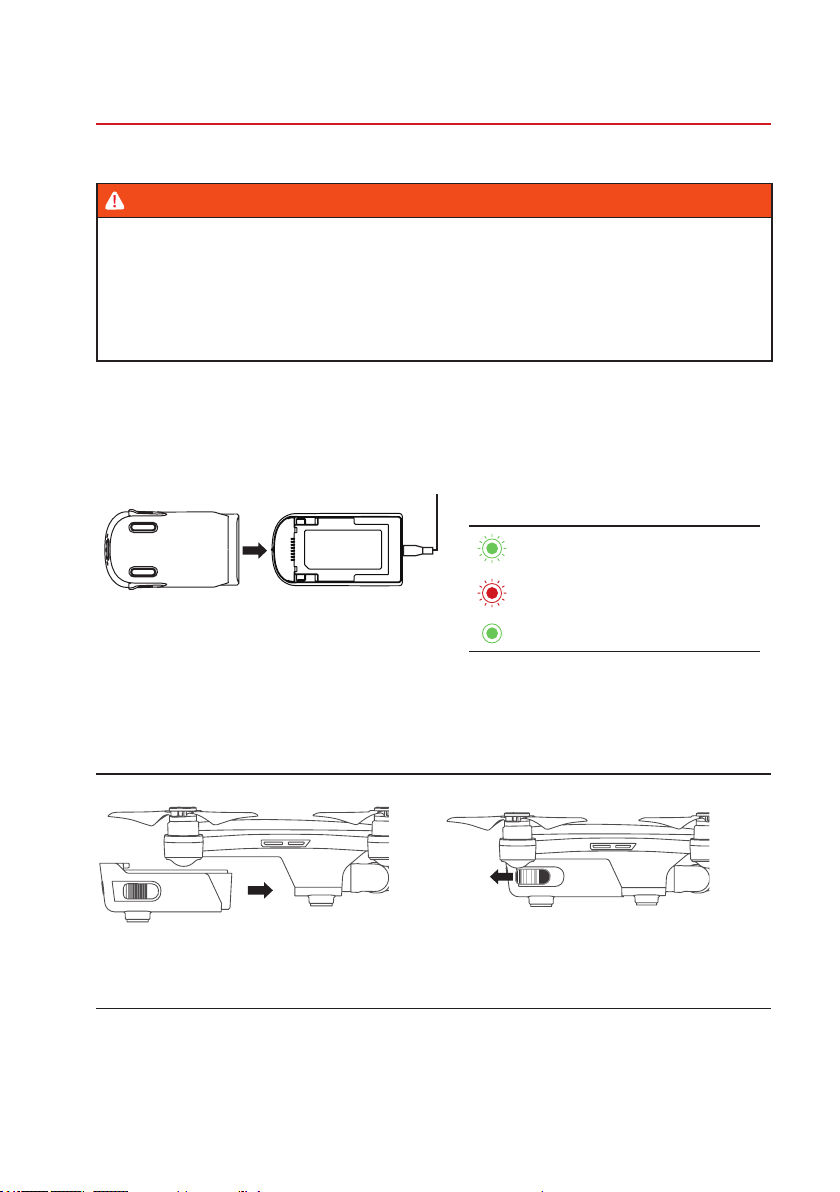
4.1 Charging the aircraft battery
WARNING
• Makesureyouhavereadandunderstoodthesafetyinstructionsrelatedtobatteries.
• Chargebatteriesinawell-ventilatedenvironmentandkeepawayfromheatsources.
• Donotchargebatteriesnexttoammableoronthesurfaceofelectro-conductiveobjects.
• Monitorbatterieswhiletheyarecharging.
1. ConnecttheUSBchargingcabletotheightbatterycharger.
2. ConnecttheendofthechargingcabletoaUSBpowersupply.CAUTION! Do not charge on a computer USB
port.
3. Inserttheaircraftbatteryintothechargerasshownbelow.
Indications
Blinkinggreenlight(Insertabattery)
Blinkingredlight(Charging)
Solidgreenlight(Batteryfullycharged)
4.2 Installing (and removing) the ight battery
Installing Removing
Pushthebatteryintothebatterycompartmentuntilit
locks.
Unlockthebatteryandpullitout.
Other manuals for GeNii Mini RtF
1
This manual suits for next models
2
Table of contents
Other Reely Drone manuals

Reely
Reely GeNii Mini RtF User manual

Reely
Reely 2346659 User manual

Reely
Reely X6 User manual

Reely
Reely 1574078 User manual

Reely
Reely TQ Performance Drone RtF User manual

Reely
Reely X-82 RTF User manual

Reely
Reely SKYRIDER User manual

Reely
Reely VORTEX MINI 2 in 1 drone and hovercraft FPV User manual

Reely
Reely Mercury VR V2.0 User manual

Reely
Reely 1577674 User manual


 user manual")


