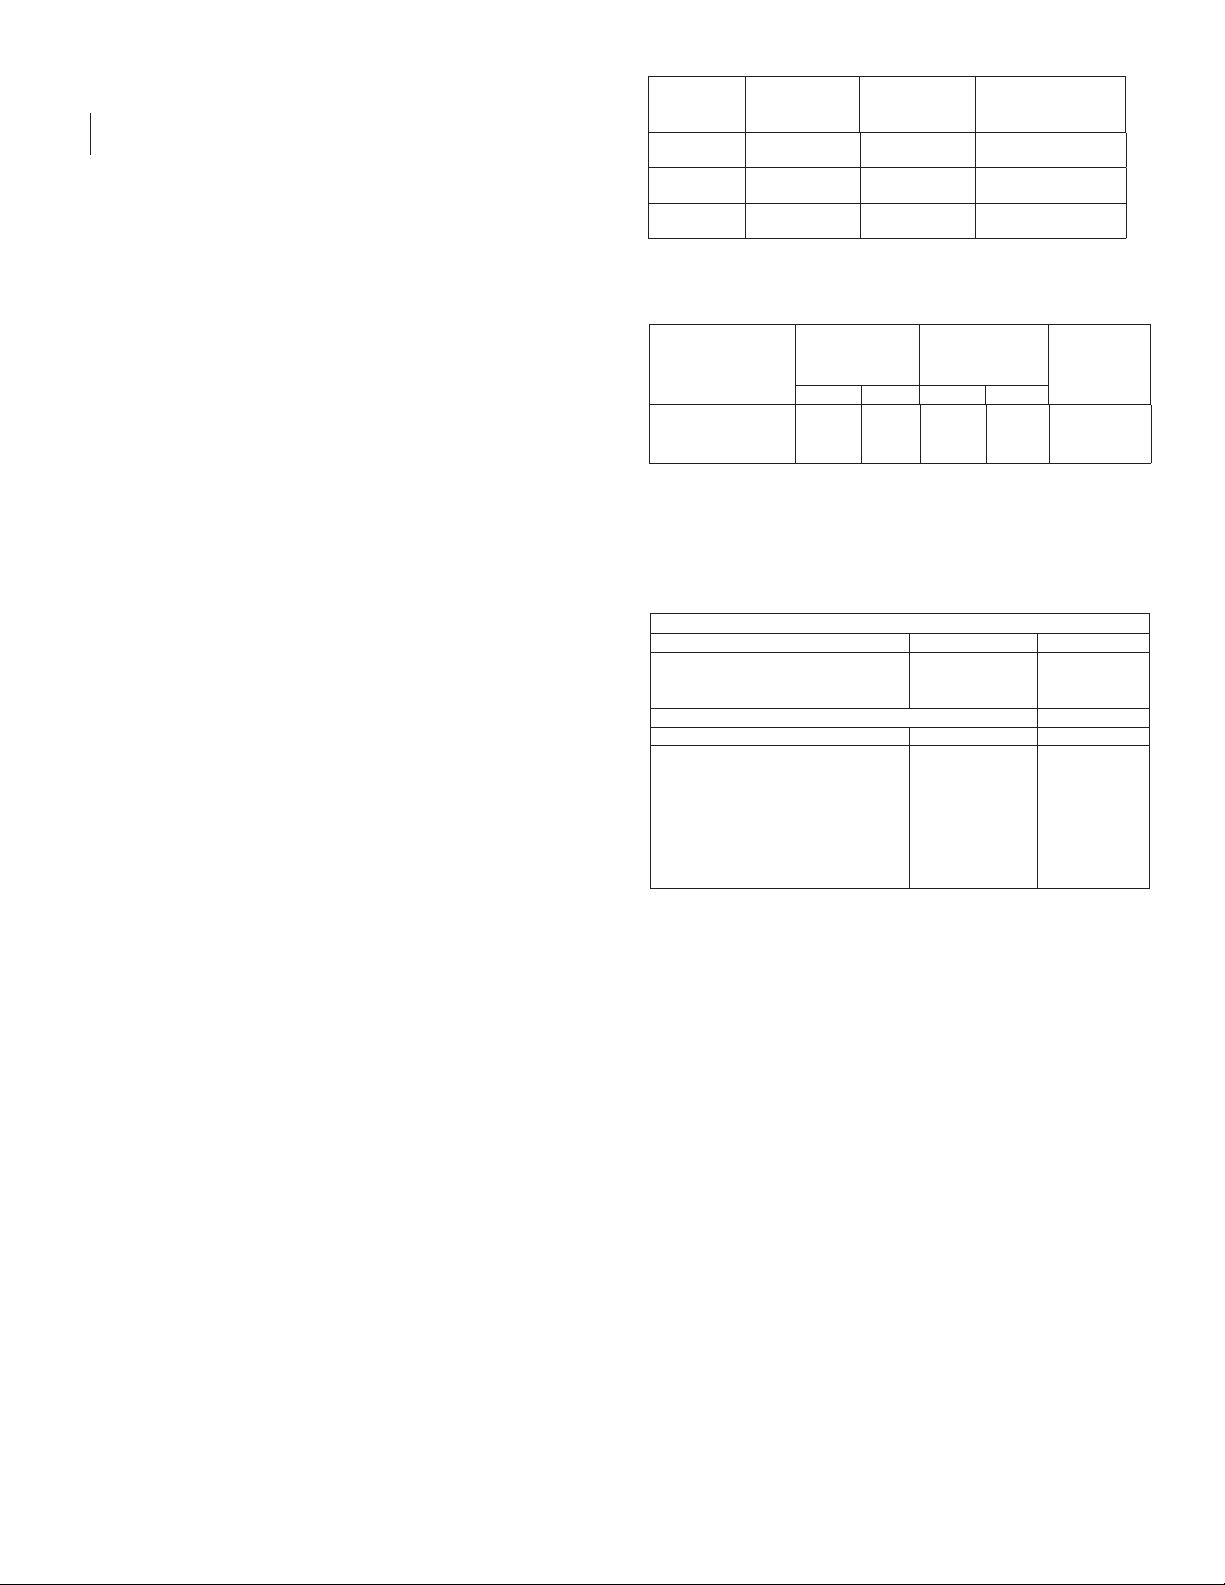
Escutcheon Data:
Escutcheon
Model Adjustment “A”
Dimension
Face of Fitting
to Ceiling
Wall Dimension
F1 Max Recessed
Min Recessed
11/2” (38.1mm) (1)
3/4” (19.1mm) (2)
3/16” - 15/16”
(5m - 24mm)
F2 Max Recessed
Min Recessed
11/2” (38.1mm) (1)
1” (25mm) (2)
3/16” - 11/16”
(5m - 17mm)
FP Push-on/
Thread-off
Max Recessed
Min Recessed
7/16” (11mm)
15/16” (24mm)
11/2” (38.1mm)
1” (25mm)
(1) EC Pendent.
(2) EC HSW.
Temperature Rating
Classification
Sprinkler
Temperature
Maximum
Ambient
Temperature
Bulb
Color
°F °C °F °C
Ordinary
Ordinary
Intermediate
135
155
175
57
68
79
100
100
150
38
38
66
Orange
Red
Yellow
Maximum Working Pressure
175 psi (12 bar)
SIN RA2845 cULus listed for 250 psi (17 bar)
100% Factory tested hydrostatically to 500 psi (34.5 bar)
Finishes (1)
Standard Finishes
Sprinkler (2) Escutcheon Coverplate
Bronze
Chrome Plated
White & Black Polyester Coated(3)
Brass
Chrome Plated
White Painted
Chrome
White
Special Application Finishes
Sprinkler (2) Escutcheon Coverplate
Electroless Nickel
PTFE(3)
Bright Brass
Black Plated
Black Paint
Off White
Chrome Dull
Electroless
Nickel PTFE
Bright Brass
Black Plated
Black Paint
Off White
Chrome Dull
Bright Brass
Black Plating
Black Paint
Off White
(1) Other colors and finishes are available on special order. Consult factory
for details.
(2) FM Approvals limited to Bronze, Bright Brass, Satin Chrome Plated,
Black Plated and Polyester Coated.
(3) cULus Listed Corrosion Resistant Sprinkler.
Note: Paint or any other coating applied over the factory finish will void
approvals and warranties.
Ordering Information
Specify:
1. Sprinkler Model: F1FR56 QREC
2. Sprinkler Type
3. Temperature Rating
4. Sprinkler Finish
5. Sprinkler Thread Type: [½” NPT] [ISO 7-1R½]
6. Escutcheon Finish (where applicable)
7. Coverplate Finish (where applicable)
8. Coverplate Finish (where aplicable)
9. Coverplate Adjustment
10. Coverplate Thread Size
11. Coverplate Temperature Rating
Note: When Model F1FR56 QREC Recessed sprinklers are ordered,
the sprinklers, escutcheons and coverplates are packaged
separately.
should be applied to the sprinkler threads only.
After a 25/8(67mm) inch diameter hole is cut in the ceil-
ing, the sprinkler is easily installed with the Model GFR2
Wrench. When installing a sprinkler, the protective cap
is removed and the wrench is positioned into the sprin-
kler/cup assembly until the two wrench faces engage the
wrenching flats on the Model F1FR56 QREC Sprinkler.
The sprinkler is then tightened into the pipe fitting. When
inserting or removing the wrench from the sprinkler/cup
assembly, care should be taken to prevent damage to
the sprinkler. DO NOT WRENCH ON ANY OTHER PART
OF THE SPRINKLER. The cover plate assembly is then
pressed into the cup. Final adjustment is made by turning
the cover plate until the skirt flange makes full contact with
the ceiling surface. Cover plate removal requires turning in
the counter clockwise direction.
After installation, inspect all sprinklers to ensure that
there is a gap between the cover plate and ceiling and
that the four cup slots are open and free from any air flow
impediment to the space above.
Concealed cover plate/cup assemblies are listed only
for use with specific sprinklers. The use of any other con-
cealed cover plate/cup assembly with the Model F1FR56
QREC Pendent Sprinkler or the use of the Model CCP con-
cealed cover plate assembly on any sprinkler with which
it is not specifically listed may prevent good fire protection
and will void all guarantees, warranties, listings and ap-
provals.
Glass bulb sprinklers have orange bulb protectors to
minimize bulb damage during shipping, handling and
installation. REMOVE THIS PROTECTION AT THE TIME
THE SPRINKLER SYSTEM IS PLACED IN SERVICE FOR
FIRE PROTECTION. Removal of the protectors before this
time may leave the bulb vulnerable to damage. RASCO
wrenches are designed to install sprinklers when covers
are in place. REMOVE PROTECTORS BY UNDOING THE
CLASP BY HAND. DO NOT USE TOOLS TO REMOVE
THE PROTECTORS.
Maintenance
The Models F1FR56 QREC and F1FR56 QREC Re-
cessed Sprinklers should be inspected and maintained in
accordance with NFPA 25. Do not clean sprinklers with
soap and water, ammonia or any other cleaning fluids. Re-
move dust by gentle vacuuming. Replace any sprinkler
which has been painted (other than factory applied) or
damaged in any way. A stock of spare sprinklers should
be maintained to allow quick replacement of damaged or
operated sprinklers. Prior to installation, sprinklers should
be maintained in the original cartons and packaging until
used to minimize the potential for damage to sprinklers
that would cause improper operation or non-operation.
5.