2.
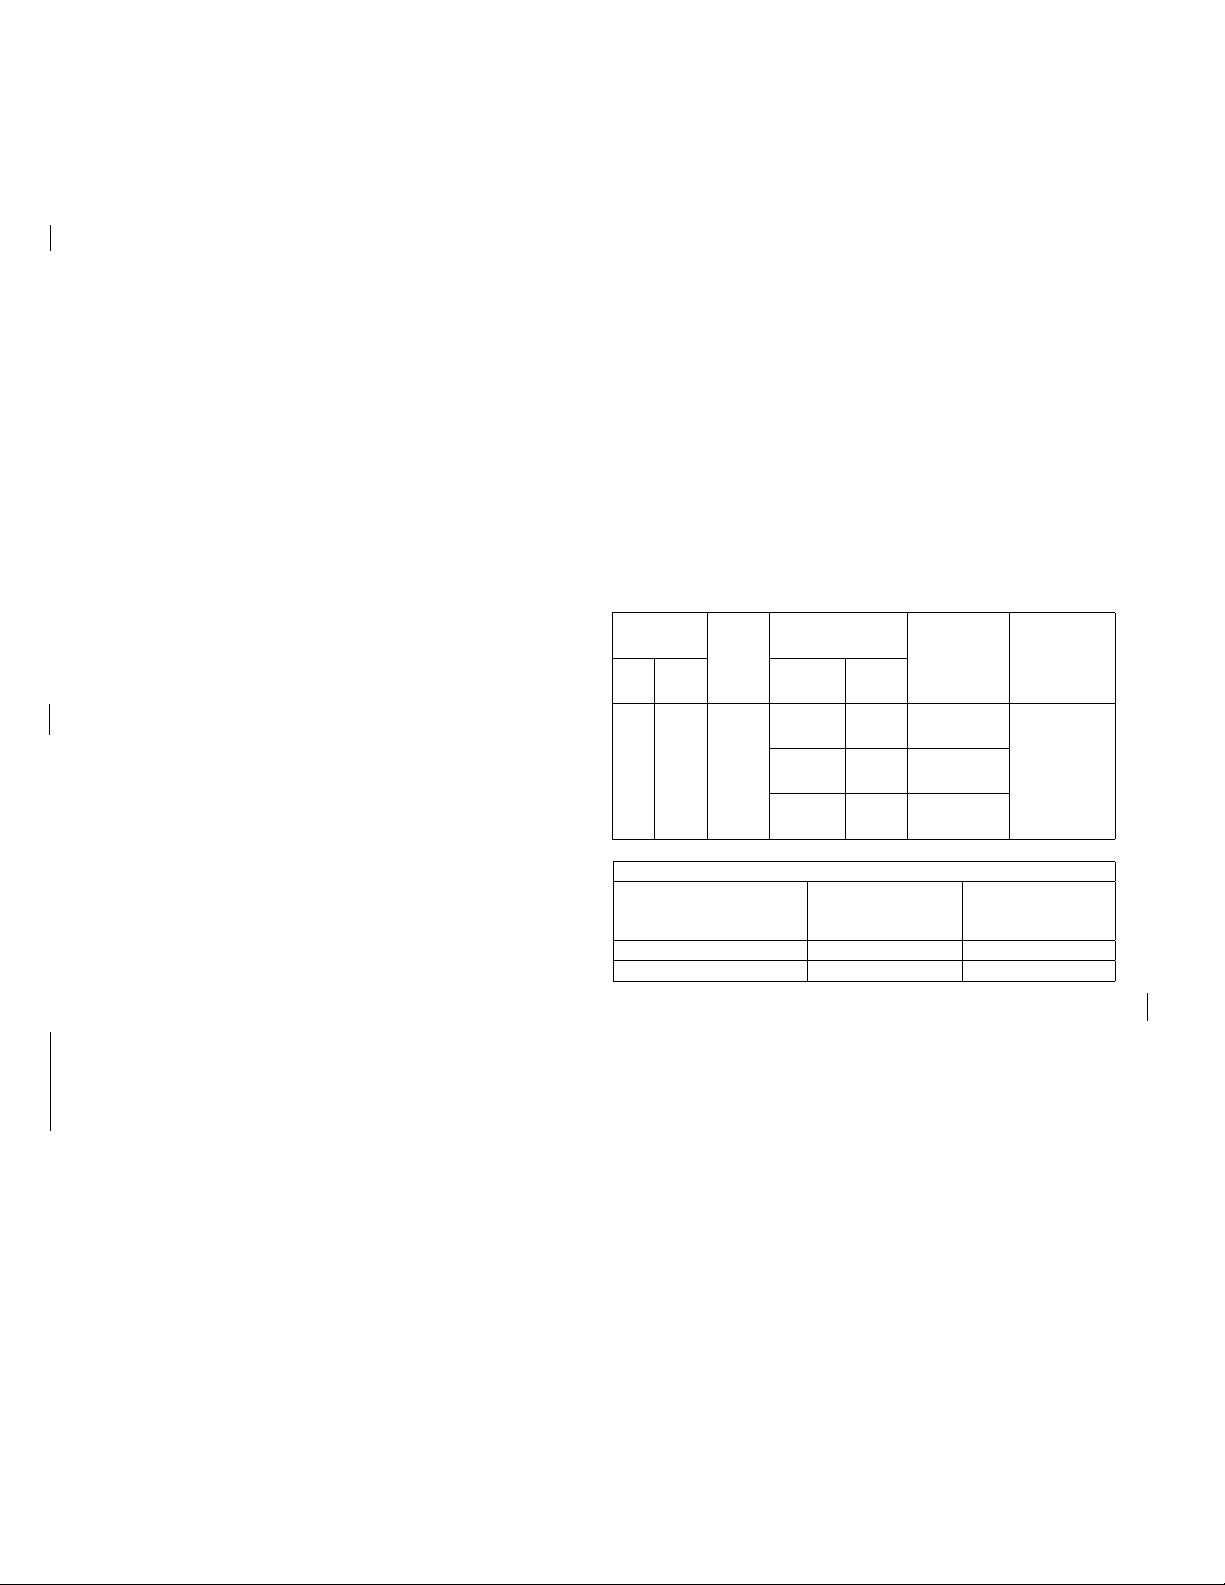
Technical Data:
K Factor Thread
Size
Temperature
Rating Maximum
Ambient
Temperature
Sprinkler
Identication
Number
(SIN)
US Met-
ric Sprinkler SWC
Cover
5.6 80
1/2”
NPT
R1/2
155°F
(68°C)
135°F
(57°C)
100°F
(38°C)
RA1564
175°F
(79°C)
165°F
(74°C)
150°F
(66°C)
200°F
(93°C)
165°F
(74°C)
150°F
(66°C)
Coverage Area
Maximum Coverage
Area Width x Length
ft x ft (m x m)
Flow Rate
gpm (L/min)
Pressure
psi (bar)
28 x 8 (8,5 x 2,4) 23 (87,1) 16.9 (1,2)
28 x 10 (8,5 x 3) 28 (106) 25 (1,7)
Note: Minimum spacing between DH56 sprinklers is 14’ (4.3m).
Approval Type:
• Quick Response, Extended Coverage.
• Approved for installation in accordance with NFPA 13
for light hazard occupancies.
Maintenance
Model DH56 should be inspected and the sprinkler maintained
in accordance with NFPA 25. Do not clean sprinklers with soap
and water, ammonia or any other cleaning fluids. Remove dust
by using a soft brush or gentle vacuuming. Remove any sprin-
kler/cover assembly, which has been painted (other than factory
applied) or damaged in any way. A stock of spare sprinklers
should be maintained to allow quick replacement of damaged
or operated sprinklers. Prior to installation, sprinklers should be
maintained in their original cartons and packaging until used to
minimize the potential for damage to sprinklers that would cause
improper operation or non-operation.
Installation
DH56 Recessed, FP Escutcheon
To install the DH56 with the FP Escutcheon as a recessed
sprinkler cut a 2 5/8” diameter hole in the wall as shown in
Figure1. Remove temporarily the plastic protective cap, then
use the W4 wrench to tighten the sprinkler until secured in
the sprinkler tting. This wrench can only be inserted one
way. Care must be taken not to damage the deflector dur-
ing tightening. Apply a PTFE based sealant to the sprinkler
threads before installing in the tting. When inserting or
removing the wrench from the sprinkler cup, care must be
taken to prevent damage to the sprinkler. Wrench only on
the square boss. DO NOT WRENCH ON ANY OTHER PART
OF THE SPRINKLER. It is recommended that the sprinkler
be protected during plastering and painting operations by re-
installing the protective cap P/N 6802710003. Installation is
completed by removing the protective cap and inserting the
push-on escutcheon. Turn clockwise to adjust the escutch-
eon against the wall.
DH56 Recessed, F2 Escutcheon
To install the DH56 with the F2 Escutcheon as a recessed
sprinkler cut a 2 ¼” diameter hole in the wall as shown in
Figure 2. Thread the DH56 into the collar hand tight. Ap-
ply a PTFE based sealant to the sprinkler threads and install
in the tting. Wrench only on the square boss. The W4
wrench can only be inserted one way. When inserting or re-
moving the wrench from the sprinkler cup care must be taken
to prevent damage to the sprinkler. DO NOT WRENCH ON
ANY OTHER PART OF THE SPRINKLER. It is recommended
that the sprinkler be protected during plastering and paint-
ing operations by using the protective cap P/N 6999991009.
These must be ordered separately. Installation is completed
by removing the protective cap and inserting the F2 Escutch-
eon over the collar.
DH56 with SWC Cover Plate Concealed
To install the sprinkler, cut a 2 5/8” diameter hole into the wall
as shown in Figure 3. A PTFE based thread sealant should
be applied to the sprinkler threads only. Remove the protec-
tive cap (P/N 6802710003) and then position the W4 wrench
into the sprinkler/cup assembly until the wrench engages
the flats of the square boss and tighten the sprinkler into the
pipe tting. The W4 wrench can only be inserted one way.
When inserting or removing the wrench from the sprinkler/
cup assembly, care should be taken to prevent damage to
the sprinkler. DO NOT WRENCH ON ANY OTHER PART OF
THE SPRINKLER. The protective caps should be reinstalled
for protection during plastering and painting. Remove caps
only when covers are being installed. The cover assembly
is then pushed onto the cup. Cover assemblies provide ½”
(13mm) of adjustment. Final adjustment is made by turning
the cover clockwise until the skirt flange makes full contact
with the wall surface. Cover removal requires turning in the
counter- clockwise direction.
Concealed cover/cup assemblies are listed only for use with
specic sprinklers. The use of any other concealed cover/cup
assembly with the Model DH56 Horizontal Sidewall Sprinkler
or the use of the concealed cover assembly on any sprinkler
with which it is not specically listed will void all guarantees,
warranties, listings and approvals.
Note: DH56 and DH56 Recessed Sprinklers have orange
bulb protectors to minimize bulb damage during shipping,
handling, and installation. REMOVE THIS PROTECTION AT
THE TIME THE SPRINKLER SYSTEM IS PLACED IN SER-
VICE FOR FIRE PROTECTION. Removal of the protectors
before this time may leave the bulb vulnerable to damage.
RASCO wrenches are designed to install sprinklers when
covers are in place. REMOVE PROTECTORS BY UNDOING
THE CLASP BY HAND. DO NOT USE TOOLS TO REMOVE
THE PROTECTORS.


