RIDGID 46378 User manual

Core Barrel Wrench Instructions
WARNING
Read and understand these instructions and the warnings
and instructions for all equipment being used before oper-
ating this tool to reduce the risk of serious personal injury.
•Properly support the work piece. Improper support can cause tip-
ping, falling and serious injury.
•Do not overreach and maintain proper footing and balance at all
times. This allows better control in unexpected situations.
•Use personal protective equipment. Always wear eye protection.
Protective equipment such as safety shoes, protective clothing, hard
hats, etc.used for appropriate conditions will reduce the risk of personal
injury.
•Do not use handle extensions (cheaters), excessive force, or in
powered applications.This may damage the tool, work piece and/or
cause serious injury.
•Do not apply a side load to the wrench handle.Do not use as a lift-
ing device.This can twist or damage the wrench, allow the tube to slip
or fall and/or cause serious injury.
•Do not hit wrench with a hammer to break connections loose. Do
not use the wrench as a hammer. This can damage the wrench and
may cause serious injury.
•Do not use near a flame or high heat.This can damage and weaken
the wrench.
Description
RIDGID®Core Barrel Wrenches are specifically designed for loosening
and tightening the core barrel assemblies of spearhead type wireline
core barrel systems per ISO 10097.The Core Barrel Wrenches are not
for use on other types of pipe or tube.Replaceable inserts with tungsten
carbide coating are used to grip the core barrel assembly components.
Wrench Size Designations
*Nominal per ISO 10097. Size may vary by individual manufacturers systems.
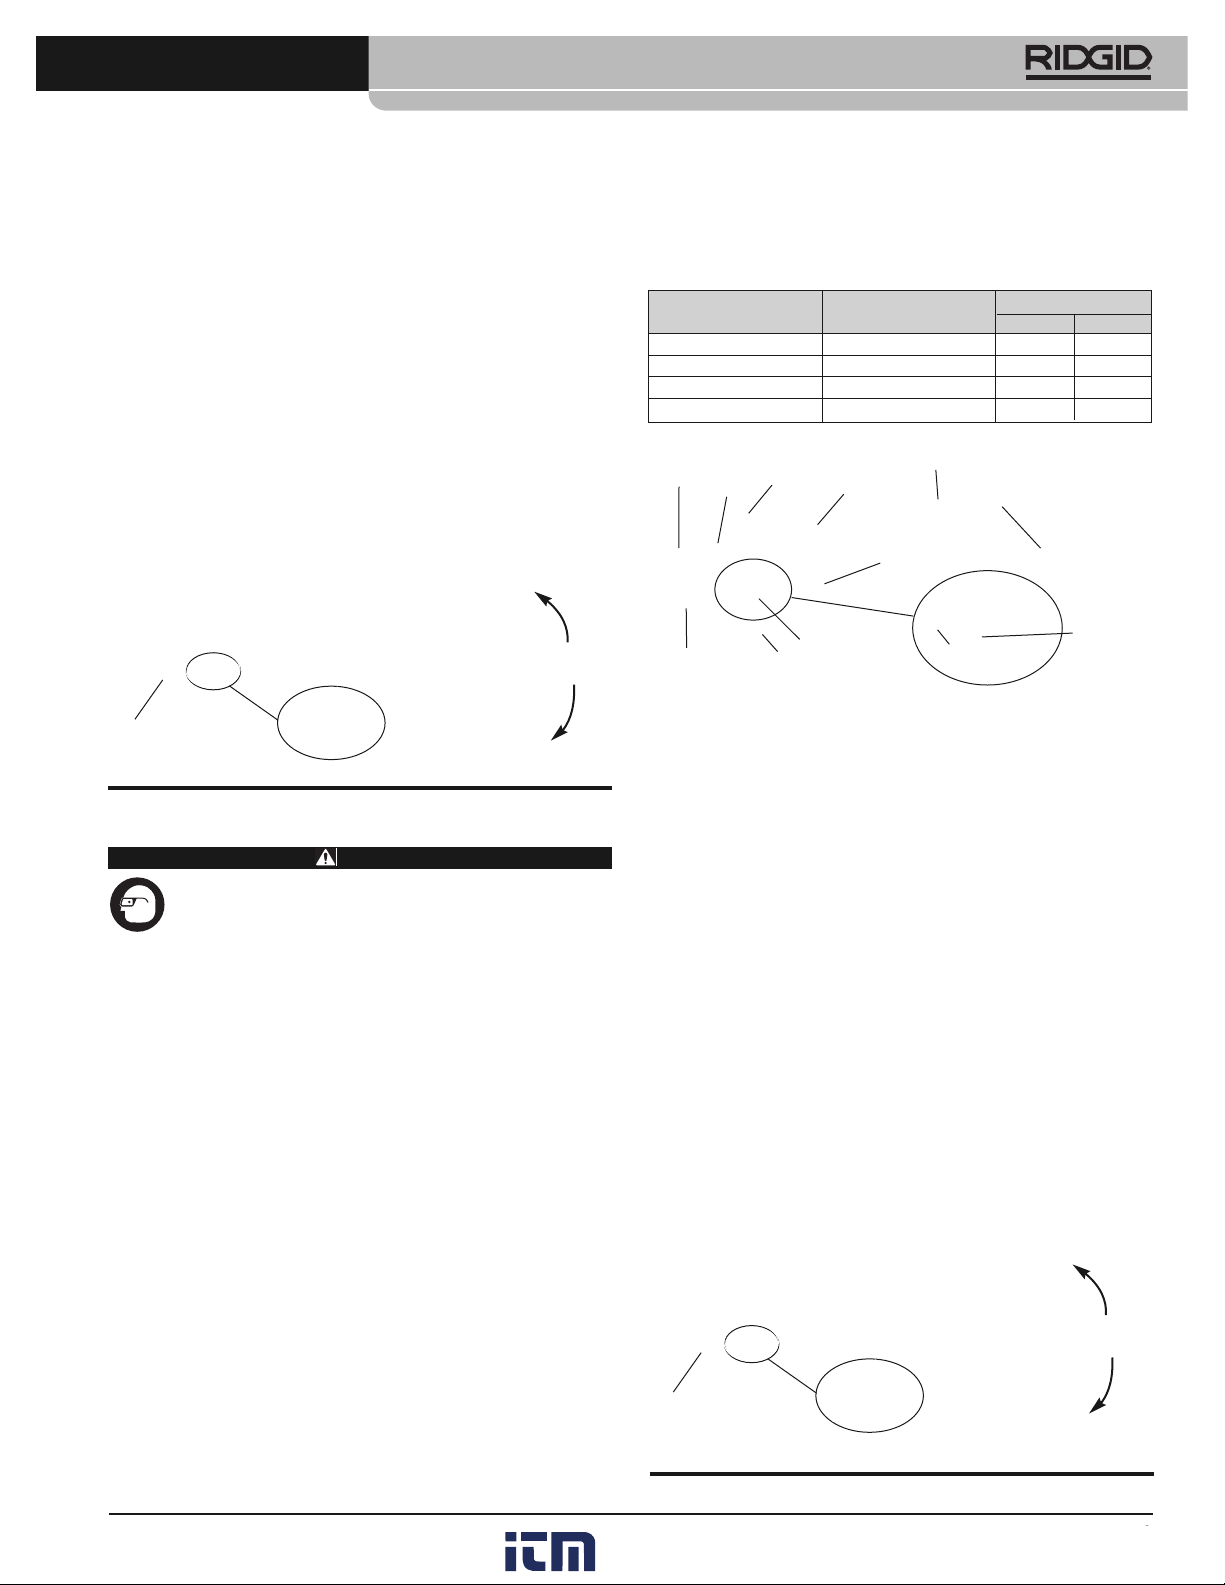
Figure 1 – Core BarrelWrench
Inspection/Maintenance
Clean the wrench to aid inspection and improve control. Clean the in-
serts with a wire brush if needed.
Inspect the wrench before each use for proper assembly, damage, mod-
ifications or other issues that could affect safe use.If problems are found,
do not use until corrected.
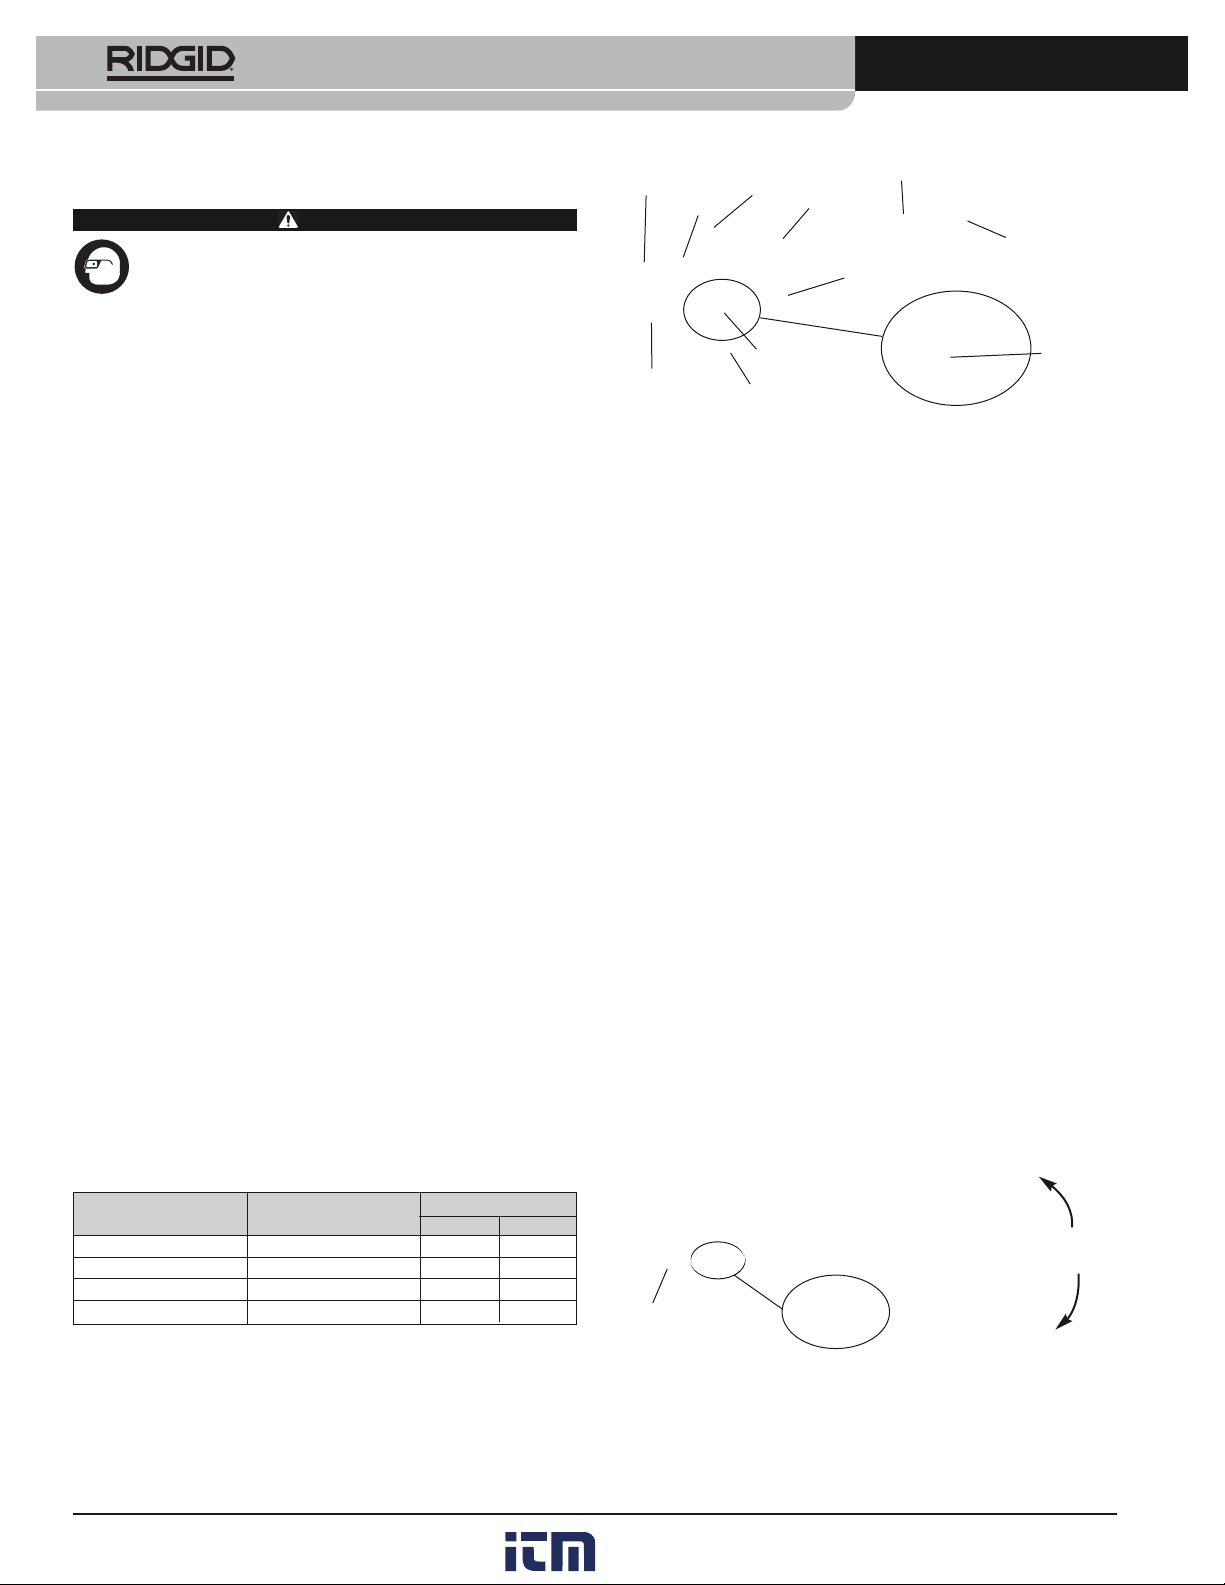
With the wrench engaged around a representative piece of tube, inspect
the gap between the cam segment and handle segment
(Figure 2).
If no
gap is present, slipping may occur during use.
Lubricate wrench pins with a light lubricating oil as needed.
To change inserts, use 1/8" hex key to remove shoulder screws. Make
sure insert pockets are clean.Install new matched set of RIDGID inserts
and screws. Firmly tighten screws.Inserts will move slightly.
Set-Up/Operation
1. Locate a clear, level, stable location for the equipment and the oper-
ator.
2. Wipe any oil, grease, antiseize or excessive dirt from the tube in the
area that the wrench will be applied.
3. Appropriately place the wrench around the pipe. Make sure handle
cam fully engages the cam segment.
4. Applying force in one direction causes the wrench to grip, while in the
other it will loosen enough to allow the wrench to be repositioned.
Figure 2 – Working with the Core Barrel Wrench
Clé à tubes carottiers : Notice d’emploi
AVERTISSEMENT
Familiarisez-vous avec les instructions suivantes et avec
celles visant l’ensemble du matériel utilisé afin de limiter
les risques de blessure corporelle grave.
•Soutenez l’ensemble de manière appropriée. Un ensemble mal
soutenu augmenterait les risques de renversement, de chute et de
grave blessure corporelle.
•Ne vous mettez pas en porte-à-faux ;maintenez une bonne assi-
ette et un bon équilibre à tout moment.Cela assurera une meilleure
maitrise du processus en cas d’imprévu.
•Prévoyez les équipements de protection individuelle nécessaires.
Always wear eye protection. Portez systématiquement une protection
oculaire.Selon les conditions particulières, le port du casque, de chaus-
sures de sécurité, de vêtements de protection, etc.permettra de limiter
les risques de blessure corporelle.
•Ne jamais utiliser de rallonges de manche (bras de levier), de
force excessive ou de systèmes d’entraînement quelconques.
Ce faire pourrait endommager à la fois la clé et les tubes, voire provo-
quer de graves blessures corporelles.
•Ne jamais appuyer latéralement sur le manche de la clé. Je jamais
utiliser la clé comme moyen de levage. Ce faire pourrait déformer ou
endommager la clé, provoquer le dérapage ou le renversement du tube,
voire provoquer de graves blessures corporelles.
•Ne jamais frapper la clé à coups de marteau pour débloquer les
raccords. Ne jamais utiliser la clé comme marteau. Ce faire pour-
rait endommager la clé et provoquer de graves blessures corporelles.
•Ne jamais utiliser la clé à proximité de flammes ou en présence
d’une chaleur élevée. Cela pourrait endommager ou affaiblir la clé.
Description
Les clés à tubes carottiers RIDGID®sont exclusivement prévues pour le
RIDGID®
© RIDGID, Inc. 3/14
EC39952 999-002-000.10
REV. B
Core BarrelWrench Instructions
Designation Core Barrel Size Inner Tube OD
inch* mm
WLB-IT B 1.69 42.9
WLN-IT N 2.19 55.7
WLH-IT H 2.88 73.1
WLP-IT P 3.75 95.3
Middle
Segment
Handle
Segment
Spring
Handle
Wrench Size
Designation
Handle
Cam
Insert
Cam Segment
Wrench Size
Designation
Position Wrench or Remove From Tube
Grip the Tube
Pin
Inner
Tube
Gap
Insert Shoulder
Screw
www. .com information@itm.com1.800.561.8187

Core BarrelWrench Instructions
montage et démontage des tubes carottiers appartenant aux systèmes de
carottage par câble « wireline » décrits par la norme ISO 10097.Elles ne
doivent servir à aucune autre application.Des inserts remplaçables et en-
duits au carbure de tungstène servent à immobiliser les tubes carottiers.
Désignation des clés par taille
*Diamètre nominal selon ISO 10097. Le diamètre réel peut varier selon le fabricant.
Figure 1 – Clé à tube carottiers
Inspection préalable et entretien
Nettoyez la clé afin d’en faciliter l’inspection et la manipulation. Au be-
soin, nettoyez les inserts à l’aide d’une brosse métallique.
Examinez la clé avant chaque intervention pour vous assurer de son in-
tégrité et de l’absence de toute anomalie ou modification susceptible de
nuire à sa sécurité.Le cas échéant, corrigez toute anomalie éventuelle
avant d’utiliser la clé.
Engagez la clé sur un morceau de tube représentatif afin de vous assurer
d’un minimum d’écart entre son crochet et son manche
(Figure 2)
.Si les
deux surfaces se touchent, la clé risque de glisser en cours d’opération.
Au besoin, lubrifiez les axes de la clé à l’aide d’une huile minérale légère.
Pour remplacer les inserts, utilisez une clé Allen de 1/8" pour retirer leur
vis d’épaulement.Assurez-vous de la propreté du logement des inserts.
Préparation et utilisation
1. Installez le matériel dans un endroit dégagé, de niveau et stable.
2. Nettoyez et dégraissez soigneusement la partie du tuyau concerné
avant d’y monter la clé.
3. Montez la clé sur le tube dans le sens voulu en vérifiant que la came
du manche s’engage bien sur le segment à came.
4. Appuyez sur le manche pour gripper le tube et le faire tourner, puis
ramenez-le en sens inverse pour libérer le tube et repositionner la clé.
Figure 2 – Utilisation de la clé à tubes carottiers
Modo de empleo: Llave de tubos
internossacanúcleos
ADVERTENCIA
Antes de operar esta herramienta, lea y entienda estas
instrucciones y las advertencias e instrucciones de todos
los equipos siendo utilizados con el fin de reducir el riesgo
de lesiones personales graves.
2
•Sostenga la pieza trabajada correctamente. Si no se sostiene de-
bidamente se podría volcar, caer y causar lesiones graves.
•No se estire para alcanzar algo, mantenga su equilibrio en todo
momento. Así evita lesionarse en situaciones inesperadas.
•Póngase los equipos de protección personal adecuados.Siempre
use protección ocular.El uso oportuno de equipos de protección como
zapatos de seguridad, casco, ropa de seguridad, etc.reducen el riesgo
de sufrir lesiones personales.
•No emplee extensiones (como tubos) para alargar el mango de la
llave ni excesiva fuerza. No la utilice en tareas motorizadas. Po-
dría dañarse la herramienta, la pieza trabajada y/o producirse lesiones
graves.
•No aplique fuerza lateral sobre el mango de la llave.No la use para
hacer palanca o como dispositivo de elevación. Esto puede torcer
o dañar la llave, hacer que el tubo resbale o caiga y causar lesiones
graves.
•No golpee la llave con un martillo para soltar conexiones.Tam-
poco utilice la llave para martillar. Podría dañarse la llave u ocurrir
lesiones graves.
•No la utilice cerca de una llama o de altas temperaturas. Se de-
bilitaría o dañaría la llave.
Descripción
La Llave de tubos sacanúcleos de RIDGID®ha sido diseñada específi-
camente para aflojar y apretar los ensambles de tubos sacanúcleos de
sistemas de barriletes de núcleo al hilo (
wireline core barrel systems
, en
inglés) ISO 10097 del tipo punta de lanza. La Llave de tubos sacanú-
cleos no está hecha para usarse en otros tipos de tubos o tuberías. Las
piezas de inserción reemplazables con revestimiento de carburo de ti-
tanio se usan para agarrar los tubos sacanúcleos.
Denominaciones y tamaños
*Medida nominal según ISO 10097. El diámetro varía según los sistemas de cada fabricante.
Figura 1 – Llave de tubos sacanúcleos
Inspección y mantenimiento
Limpie la llave para facilitar su inspección y manejo. Limpie las piezas
de inserción con una escobilla de alambre si fuera necesario.
Cada vez antes de utilizarla, inspeccione la llave para asegurar que está
bien ensamblada, no está dañada ni se le han hecho modificaciones que
pudieran afectar su funcionamiento seguro.Si le detecta algún problema,
resuélvalo antes de usarla.
Désignation Diamètre nominal ø ext. du tube intérieur
du tube carottier Pouces* mm
WLB-IT B 1,69 42,9
WLN-IT N 2,19 55,7
WLH-IT H 2,88 73,1
WLP-IT P 3,75 95,3
Segment
central
Segment
manche Ressort
Manche
Désignation
de taille
Came de manche
Insert
Segment à came
Désignation
de taille
Axe
Positionner ou retirer la clé
Engager le tube
Tube
interne
Ecart
Denominación Tamaño de los barriletes Ø exterior del tubo interno
de la llave de núcleo pulg.* mm
WLB-IT B 1,69 42,9
WLN-IT N 2,19 55,7
WLH-IT H 2,88 73,1
WLP-IT P 3,75 95,3
Segmento
del medio
Segmento
del mango
Resorte
Mango
Denominación
de la llave
Leva del mango
Inserción
Segmento de la leva
Denominación
de la llave
Pasador
Insert Vis
d’épaulement
Inserción Tornillo de
bloqueo
www. .com information@itm.com1.800.561.8187

Core BarrelWrench Instructions
Con la llave enganchada en un tubo de muestra representativo, fíjese en
el espacio que queda entre el segmento de la leva y el segmento del
mango
(Figura 2)
.Si no existe un espacio entre ellos, la llave podría res-
balar durante su uso.
Lubrique los pasadores de la llave con un aceite lubricante liviano según
sea necesario.
Para cambiar las piezas de inserción, use una llave Allen de 1/8" para
quitar el tornillo de bloqueo. Asegure que el alojamiento para la pieza
de inserción esté limpio. Instale un nuevo conjunto homologado de
piezas de inserción y tornillos RIDGID. Apriete bien cada tornillo. La
pieza de inserción podrá moverse levemente.
Preparación y funcionamiento
1. Ubique un lugar despejado, estable y nivelado para situar el equipo
y su operario.
2. Limpie la zona del tubo donde hará contacto con la llave. Quítele
cualquier aceite, grasa, lubricante o mugre que tenga.
3. Monte la llave correctamente al tubo.Asegure que la leva del mango
engrana completamente con el segmento de la leva.
4. Cuando se aplica fuerza sobre el mango de la llave en una dirección,
la llave agarra el tubo.Al aplicarse fuerza en la otra dirección, la llave
afloja el tubo lo suficiente como para ponerla en otra posición.
Figura 2 – Empleo de la Llave de tubos sacanúcleos
Karotiyer Anahtar Talimatlarý
UYARI
Bu aracı kullanmaya başlamadan önce, ciddi kişisel
yaralanma riskini azaltmak amacıyla bu talimatlar ve
uyarılar ile kullanılacak tüm ekipmanların talimatlarını
okuyup anlayın.
•ş parçasını düzgün şekilde destekleyin.Yanlýþ destek devrilmeye,
düþmeye ve ciddi yaralanmaya neden olabilir.
•Dengesiz yükleme yapmayın, düzgün desteği ve dengeyi her
zaman koruyun. Böylece beklenmeyen durumlarda daha iyi kontrol
sağlanabilir.
•Kişisel koruyucu ekipmanlar kullanın. Her zaman göz koruyucu
takın. Uygun koşullarda güvenlik ayakkabıları, koruyucu kıyafetler, ko-
ruyucu başlıklar vb.koruyucu ekipmanlar kullanılması, kişisel yaralanma
riskini azaltacaktır.
•Kol uzatıcılar, aşırı güç ya da elektrikli aletler kullanmayın. Bu
alete, iþ parçasýna ve/veya ciddi yaralanmaya neden olabilir.
•Anahtar koluna bir yan yük uygulamayın. Bir kaldırma mekaniz-
ması kullanmayın. Aksi halde anahtar bükülebilir veya hasar görebilir,
boru kayabilir veya düşebilir ve/veya ciddi yaralanmalar yaşanabilir.
•Bağlantıları gevşetmek için anahtara çekiçle vurmayın. Anahtarı
bir çekiç olarak kullanmayın. Aksi halde anahtar zarar görebilir ve
ciddi yaralanmalar yaşanabilir.
•Ateşveya yüksek ısı yakınında kullanmayın. Bu, anahtara zarar
verebilir ve anahtarı zayıflatabilir.
Açıklama
RIDGID®Karotiyer Anahtarları özellikle ISO 10097 uyarınca mızrak başı
tipli kablolu karotiyer sistemlerinin karotiyer gruplarını gevşetmek ve sık-
mak için tasarlanmıştır. Karotiyer Anahtarlarý diðer tipte boru veya tü-
pler üzerinde kullanýlmaz. Tungsten kabrit kaplamalý deðiþtirilebilir
bagalar karotiyer grubu bileþenlerini kavramak için kullanýlýr.
Anahtar Ebatları
*ISO 10097’ye göre nominal. Boyut, üreticilerin sistemlerine göre değişiklik gösterebilir.
Şekil 1 – Karotiyer Anahtarı
nceleme/Bakım
ncelemeyi kolaylaştırmak ve kontrolü iyileştirmek için anahtarı temizleyin.
Sürtünme pedlerini temiz bir havlu ya da çelik tel yumağı pedi kullanarak
emizleyin.Temizlik için sadece su kullanın;çözücüler ve yağlayıcılar kullan-
mayın. Gerekirse bagalarý tel fýrça ile temizleyin.
Her kullanım öncesinde, düzgün montaj, hasar, modifikasyonlar veya
güvenli kullanımı etkileyebilecek diğer şeyler için anahtarı teftişedin.
Eğer problemler bulunursa, bunlar düzeltilene kadar anahtarı kullan-
mayın.
Anahtar tipik bir boru parçasının etrafına takılı iken, kam bölümü ile kol
bölümü arasındaki boşluğu inceleyin
(Şekil 2)
. Eğer hiç boşluk yoksa,
kullanım sırasında kayma meydana gelebilir.
Anahtar pimlerini gerekirse hafif bir yaðlama yaðý ile yaðlayýn.
Bagalarý deðiþtirmek amacýyla, omuzlu vidalarý sökmek için 1/8" altý-
gen anahtar kullanýn.Baga ceplerinin temiz olduðundan emin olun.Yeni
uygun RIDGID baga ve vida setini takýn.Vidalarý saðlam bir þekilde
sýkýn.Bagalar hafifçe oynayacaktýr.
Hazırlık/Kullanım
1. Ekipman ve kullanıcı için temiz, düzgün ve dengeli bir yer belirleyin.
2. Eğer borunun anahtarın uygulanacağı kısmında yağ, gres, kaydırıcı
veya aşırı kir varsa temizleyin.
3. Anahtarı, borunun etrafına düzgünce yerleştirin. Kol kamının, kam
bölümüne tamamen geçtiğinden emin olun.
4. Bir yönde güç uygulamak, anahtarın kavramasına neden olur, diğer
tarafa güç uygulandığında ise anahtara yeniden pozisyon verilebile-
cek kadar gevşetme sağlanır.
Şekil 2 – Karotiyer Anahtarı ile Çalışma
3
Para poner la llave en posición
o desmontarla del tubo
Para agarrar el tubo
Tubo
interior
Espacio
Model Karotiyer Boyutu ç Boru Dış
inç* mm
WLB-IT B 1,69 42,9
WLN-IT N 2,19 55,7
WLH-IT H 2,88 73,1
WLP-IT P 3,75 95,3
Orta
Bölüm Kol
Bölümü Yay
Kol
Anahtar Ebadı
Kol Kamı
Baga
Kam Bölümü
Anahtar Ebadı
Pim
Baga Omuzlu
Vida
Anahtara Pozisyon verin ya
da Borudan Çıkarın
Boruyu Kavrayın
ç Boru Boşluk
www. .com information@itm.com1.800.561.8187

Core BarrelWrench Instructions
Рис. 1 – Колоночный трубный ключ
Осмотр / Обслуживание
Для облегчения осмотра и улучшения управления очищайте
трубный ключ. Очищайте фрикционные накладки с помощью
влажной салфетки или шайбы из стальной шерсти. Для очистки
используйте только воду, не применяйте растворители или
смазочные материалы. При необходимости очищайте вставки с
помощью проволочной щетки.
Перед каждым использованием обязательно выполняйте осмотр
трубного ключа на предмет правильности сборки, а также на
наличие повреждений, видоизменений и других проблем, которые
могут повлиять на безопасность использования. При обнаружении
каких-либо проблем устраните их, прежде чем пользоваться
инструментом.
Зацепите трубный ключ вокруг отрезка типовой трубы и проверьте
наличие зазора ме жду сегмент эксцентрика и сегментом рукоятки
(рис. 2). При отсутствии зазора может возникать проскальзывание
во время использования.
При необходимости смазывайте штифты трубного ключа
маловязким смазочным маслом.
Для замены вставок отверните винты с буртиком с помощью
шестигранного ключа 1/8". Проверьте, что пазы под вставки чистые.
Установите новый надлежаще подобранный комплект вставок и
винтов RIDGID. Плотно затяните винты. Вставки будут слегка
двигаться.
Установка / использование
1. Обеспечьте чистую, ровную и устойчивую площадку для
оборудования и оператора.
2. Удалите с трубы в зоне захвата трубного ключа масло, смазку,
противозадирный состав или грязь.
3. Должным образом установите трубный ключ вокруг трубы.
Проверьте, что эксцентрик рукоятки полностью сцепляется с
сегментом эксцентрика.
4. При прикладывании усилия в одном направлении захват
трубного ключа сжимается, в другом – разжимается настолько,
чтобы можно было переустановить трубный ключ.
Рис. 2 – Работа с колоночным трубным ключом
Инструкция по использованию колоночного
трубного ключа
ВНИМА
С целью уменьшения риска получения серьезной травмы
прочитайте и изучите эту инструкцию, а также инструкции и
предупреждения для всего используемого оборудования до
начала работы с этим инструментом.
•Надлежаще закрепляйте изделие. Ненадлежащее крепление
может привести к опрокидыванию, падению и серьезной травме.
•Не прикладывайте чрезмерное усилие и постоянно
сохраняйте надлежащую опору и балансировку. Это
обеспечит лучшее управление в непредвиденных ситуациях.
•Используйте индивидуальные средства защиты. Всегда
надевайте защитные очки. Использование в соответствующих
условиях средств защиты, таких как защитная обувь, защитная
одежда, каски и т. д., снижает травмоопасность.
•Не используйте удлинители рукояток (отрезки труб),
чрезмерное усилие или механизмы с приводом от
двигателя. Это может повредить инструмент, изделие и/или
причинить серьезную травму.
•Не прикладывайте к рукоятке трубного ключа боковую
нагрузку. Не используйте подъемное устройство.Это может
привести к скручиванию или повреждению трубного ключа,
выскальзыванию или падению трубы и/или серьезной травме.
•Для освобождения крепления не ударяйте молотком по
трубному ключу. Не используйте трубный ключ в качестве
молотка. Это может повредить трубный ключ и причинить
серьезную травму.
•Не используйте рядом с открытым пламенем и не
подвергайте воздействию высоких температур. Это может
повредить трубный ключ или ослабить его захват.
Описание
Колоночные трубные ключи RIDGID®специально предназначены для
развинчивания и свинчивания узлов керноотборных труб в системах
колонковых труб со съемным керноотборником при бурении с
закачиванием промывочной жидкости в соответствии со стандартом
ISO 10097. Колоночные трубные ключи не предназначены для
использования с другими типами труб или трубопроводов. Сменные
вставки с твердосплавным покрытием используются для захвата
компонентов узла колонковых труб.
Обозначения размеров трубных ключей
* Номинальное значение по стандарту ISO 10097. Размер может изменяться в зависимости
от отдельных систем производителей.
4
Центральный
сегмент
Сегмент
рукоятки Пружина
Рукоятка
Обозначение
размера трубного
ключа
Эксцентрик рукоятки
Вставка
Сегмент
эксцентрика
Обозначение
размера трубного
ключа
Штифт
Установка трубного ключа или снятие
его с трубы
Захват трубы
Внутренняя
керноприемная
труба
Зазор
Вставка Винт с
буртиком
Обозначение Размер колонковой Наружный
дюйм ы* mm
WLB-IT B 1,69 42,9
WLN-IT N 2,19 55,7
WLH-IT H 2,88 73,1
WLP-IT P 3,75 95,3
www. .com information@itm.com1.800.561.8187
This manual suits for next models
1
Other RIDGID Power Tools manuals

RIDGID
RIDGID RP 330-B User manual

RIDGID
RIDGID OCTANE JobMax E Series User manual

RIDGID
RIDGID 300 Power Drive User manual

RIDGID
RIDGID Compact 100-B User manual

RIDGID
RIDGID R866011 User manual

RIDGID
RIDGID End Pipe Wrench User manual

RIDGID
RIDGID R3101 User manual

RIDGID
RIDGID JOBMAX B Series User manual

RIDGID
RIDGID R8832 User manual

RIDGID
RIDGID 1224 User manual

RIDGID
RIDGID 902 Owner's manual

RIDGID
RIDGID RP 200-B User manual

RIDGID
RIDGID DP1500 User manual

RIDGID
RIDGID 600 User manual

RIDGID
RIDGID R350FCA User manual

RIDGID
RIDGID R8831 User manual

RIDGID
RIDGID R2401 User manual

RIDGID
RIDGID RE 60 User manual

RIDGID
RIDGID EB44241 Quick setup guide

RIDGID
RIDGID 1233 User manual