RMG ERZ 2000 User manual

ERZ 2000
Short Operating Instructions
RMG Messtechnik GmbH Status: Dec. 19, 2006
V 1.3
珠海司福斯特科技有限公司

珠海司福斯特科技有限公司

C:\Temp\ERZ2000_Kurzhilfe_V1_3_EN.doc 3
CONTENTS
1OVERVIEW OF FUNCTIONS...................................................................................................5
2EXPLANATION OF THE MOST IMPORTANT KEY FUNCTIONS, FAQS ..............................6
2.1 Levels and rights of access..................................................................................................................6
2.1.1 Display modes, user profiles and visibility levels.............................................................................6
2.2 Fundamentals for accessing data.......................................................................................................7
2.3 Entering the user code ........................................................................................................................9
2.4 Setting the device type.......................................................................................................................10
2.4.1 Description of the update procedure ...............................................................................................10
2.5 How to activate the device again following a software update?....................................................11
2.6 Entering texts.....................................................................................................................................12
2.7 How to parameterize the pressure sensor?.....................................................................................13
2.8 How to parameterize the temperature sensor?...............................................................................14
2.9 Where are the gas meter parameters to be found?........................................................................15
2.10 Which operating modes of the gas meter are available? ...............................................................15
2.11 Special information about parameters for volume at measurement conditions..........................16
2.12 Logic of synchronous run.................................................................................................................18
2.13 How to activate error curve linearization?.....................................................................................19
2.14 How does error curve linearization function for volume measurement?.....................................20
2.15 How to activate direction switching?...............................................................................................22
2.16 How to select a method for calculating the K coefficient?.............................................................23
2.17 How does the device process gas quality data?...............................................................................24
2.18 Changing units...................................................................................................................................25
2.18.1 How to change over totalizers to another unit? ..........................................................................25
2.18.2 How to change over measured values to another unit? ..............................................................25
2.19 Where to set the DSfG parameters?................................................................................................26
2.20 Time system .......................................................................................................................................27
2.21 Where to set base values for pressure and temperature?..............................................................28
珠海司福斯特科技有限公司

4 C:\Temp\ERZ2000_Kurzhilfe_V1_3_EN.doc
2.22 Special information about test functions........................................................................................29
2.22.1 On-the-fly calibration................................................................................................................. 29
2.22.2 Freeze......................................................................................................................................... 29
2.22.3 Calibration standard density / superior calorific value .............................................................. 29
2.22.4 Functional test............................................................................................................................ 29
2.22.5 Hardware test ............................................................................................................................. 30
2.23 Special information about analog measuring inputs..................................................................... 30
2.24 Special information about outputs.................................................................................................. 31
2.24.1 Current outputs .......................................................................................................................... 31
2.24.2 Pulse outputs.............................................................................................................................. 31
2.24.3 Contact outputs .......................................................................................................................... 32
2.25 Miscellaneous.................................................................................................................................... 33
2.25.1 Where is the revision switch to be found? ................................................................................. 33
2.25.2 Determination of correction factors to calibrate current inputs ................................................. 33
2.25.3 Display settings.......................................................................................................................... 33
2.25.4 Special information about the ID display .................................................................................. 34
2.25.5 Resetting the slave pointers ....................................................................................................... 34
2.26 Interfaces........................................................................................................................................... 35
2.26.1 Front panel Com-F..................................................................................................................... 35
2.26.2 Rear panel COM 1 to COM 5.................................................................................................... 35
2.26.3 Rear panel CAN bus .................................................................................................................. 35
2.26.4 Rear panel Ethernet.................................................................................................................... 35
3MODBUS CONCEPT OF THE ERZ 2000...............................................................................36
3.1 MODBUS registers........................................................................................................................... 38
3.2 Optional extension with a plug-in card........................................................................................... 63
3.3 Allocation of functions to unoccupied outputs............................................................................... 64
珠海司福斯特科技有限公司

C:\Temp\ERZ2000_Kurzhilfe_V1_3_EN.doc 5
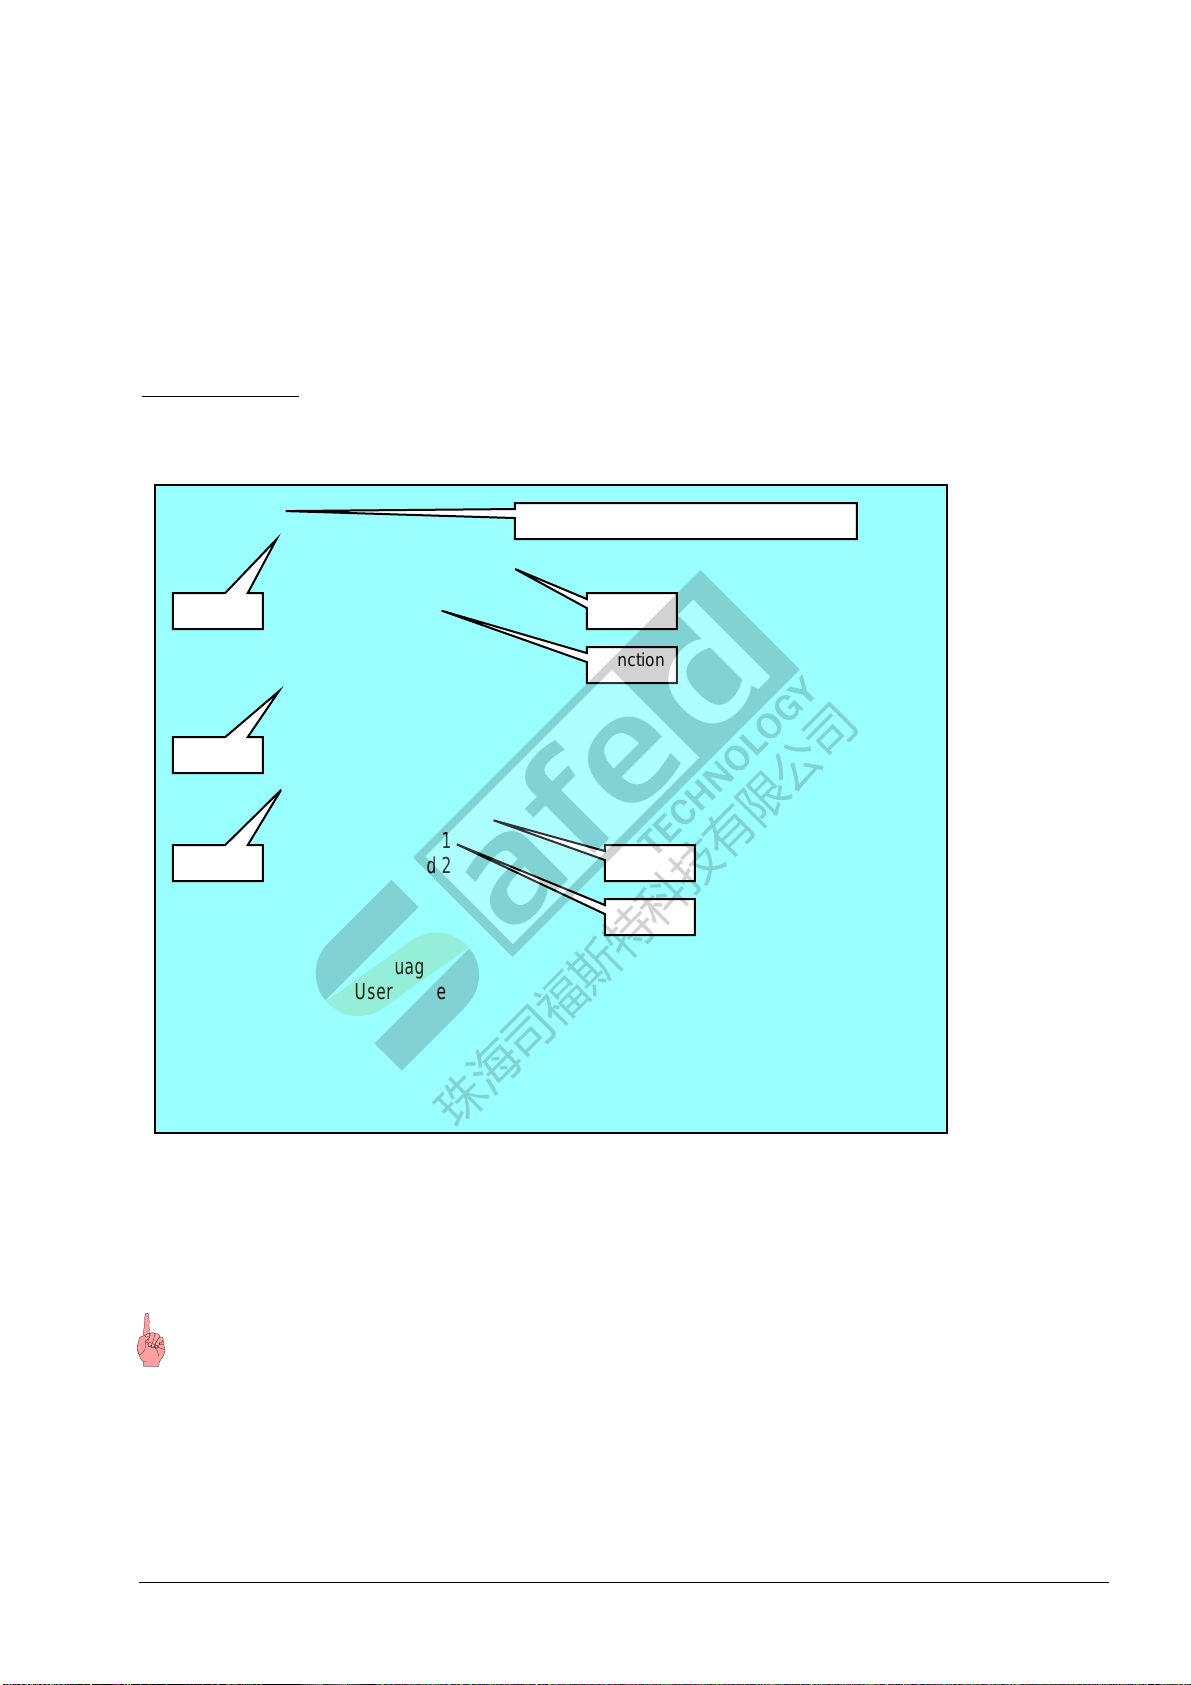
1 Overview of functions
Keys 0 to 9 have more than one function. The current function depends on the operating condition. In normal
display mode, the text below the key applies and allows measured values or chapter headings and functions
to be directly or indirectly accessed. In input mode, the text on the key itself applies. You can enter numbers
and, in extended mode, also letters. Entering letters is similar to the method used for mobile phones.
Function keys Key legend
Measured values P,T.. 1
Analysis 2
Orifice 3
I/O (inputs/outputs) 4
Archive 5
Test 6
Totalizer 7
Flowrates 8
Meter 9
Mode 0
ID ±,
Select (selects a chapter) *
Backspace function Í
Alarms (displays or clears messages)
!
Use the keys 1, 2, 7 and
8 to directly display the
most important measured
values. Use the keys 3, 4,
5, 6, 9 and 0 to access
the relevant headings
and chapter overviews.
The * key for "Select"
will always show the
current chapter. Use the
Íkey to go back to the
last 50 times you have
pressed a key.
珠海司福斯特科技有限公司

6 C:\Temp\ERZ2000_Kurzhilfe_V1_3_EN.doc
2 Explanation of the most important key functions, FAQs
2.1 Levels and rights of access
The ERZ 2000 system provides three access levels to change parameters or device settings. The lowest level
is the user level which is protected by code. It is marked B, C or P in the documentation.
The second level is protected by the official calibration lock in the form of a sealable turn switch. It is
marked E in the documentation.
The higher level is the special-purpose level (superuser) which is reserved for type changes, etc. The special-
purpose level can be reached by entering the code and by additionally opening the calibration lock. It is
marked S in the documentation.
A symbol (point, rhombus or blank) indicates whether a value displayed can be edited. The symbol is located
between the line information and the text, e.g.
Any column, line 2:
02 Input value
Blank: Value cannot be edited
Any column, line 9:
09 •Lower alarm limit
Point: Value can be edited but is locked by means of the user code or the official calibration lock
09 ♦Lower alarm limit
Rhombus: Value has been enabled for editing.
2.1.1 Display modes, user profiles and visibility levels
Dynamic hiding or showing of displays in the coordinate system depends on several factors. Firstly, the
device type set (ERZ 2004, ERZ 2104, etc.) determines which functions are relevant and only those are
shown.
Secondly, there are visibility levels which can make further restrictions. These levels have been given names
which correspond to the scope or range of displays shown.
The lowest level is the "Gas meter reader" who can access only a few useful displays or overviews via the
keyboard while the rest cannot be accessed by him/her. This level can be selected by the user.
The next level up is the standard setting and is named "User". With this setting, all measured values,
parameters, auxiliary quantities, etc. which are useful for the selected device type and the chosen operating
modes are visible and can be edited.
Above this level there is another level which is called "Service". At the service level, there is no dynamic
hiding or showing as with the "User" level and the service staff can view all values even those which are not
directly needed in the current operating mode.
The topmost level is the "Developer" user profile. In this mode, additional auxiliary quantities and
intermediate values are shown which may be useful for diagnostic purposes if a fault occurs.
You can select the visibility level with the <0> Mode key in the Display chapter.
We would recommend setting the visibility level at "Service" before you start to parameterize
the device.
珠海司福斯特科技有限公司
C:\Temp\ERZ2000_Kurzhilfe_V1_3_EN.doc 7
2.2 Fundamentals for accessing data
All variables and measured and calculated values are grouped into several tables in order to show associated
functions. Each table represents a matrix with fields from AA 01 to AZ 99, or BA 01 to BZ 99, or CA 01 to
CZ 99, etc. All tables together form the coordinate system.
Tabular structure:
Each table has a name which appears as chapter heading.
Each column has a chapter name, while the fields (coordinates) are the functions.
Example:
Mode
Basevalues
PB select
TB select
TM select
…
..
Billing mode
Current plain text
Current billing mode
…
Access
Revision mode
Codeword 1
Codeword 2
…
…
Display
Language
User profile
…
…
…
…
The <0> Mode key shown in the example above enables central access to the chapter headings. When you
press the <0> key, the ERZ 2000 will jump to table E and display the first chapter Base values and the
following chapters which can be browsed through using the Cursor Up or Down key. When you browse
through the chapters, an arrow →appearing in front of the chapter selected is used for orientation. Press
Enter to access the functions of the chapter to which the arrow points.
Starting from the central point (table E) which you access by pressing the Mode key, you can easily
browse through all tables from the beginning (A) to the end (P) using the Cursor Right or Left key.
The <*> Select key fulfils an important function as it helps you orient yourself in the coordinate system and
select the desired chapter. Using this key, you can switch back from any location in the coordinate system to
the current chapter with heading etc. If you press the <*> key once again, you are referred back to the
function (coordinate) where you came from.
Chapter heading = name of the table
Chapter Function
Chapter
Chapter
Function
Function
Function
珠海司福斯特科技有限公司

8 C:\Temp\ERZ2000_Kurzhilfe_V1_3_EN.doc
Whenever the device shows a view with a chapter heading, you can access all chapters of the entire
system by pressing the Cursor Right or Left key. When you have reached the desired chapter
heading, press the Cursor Up or Down key to access the chapter or press Enter to activate the
function.
If you are inside a chapter (i.e. in a column of the table with the functions), you can also browse through all
chapters of the complete coordinate system by pressing the Cursor Right or Left key. During the time you
are browsing, the current coordinate is displayed for approx. 2 seconds in the fourth line.
Further guidance is provided by the option of permanently showing the coordinate of the current field
together with each value displayed. To do this, press <0> Mode and browse downwards to Display. Then
press Enter and the Cursor Up or Down key to access the Coordinates function and set the parameter to
"Yes". Now all fields will be displayed together with their coordinates. Since the 4-character coordinates
will then appear, long texts exceeding 20 characters per line will be truncated on the display.
The function keys 1, 2, 7 and 8 represent a special case. When you press one of these keys, you make
a first preselection which will result in an overview of measured values and results. Then use the
Cursor Up or Down key to select the desired chapter and press Enter.
Example:
If you press <2> Analysis, the following overview will be displayed:
→AGA 8 92DC
Z 12.845
K 0.97211
Zm 0.969556
The arrow is located on the first line and can be moved
upwards or downwards using the cursor keys. In this
example, pressing Enter will select the AGA 8 92DC
chapter. A new window will open with the Compressibility
heading. The contents of this chapter can be browsed using
the cursor keys.
珠海司福斯特科技有限公司

C:\Temp\ERZ2000_Kurzhilfe_V1_3_EN.doc 9
2.3 Entering the user code
The lowest access level is protected by the user code. The code is divided into two 4-character parts and has
to be entered in two subsequent coordinates. In the operating instructions, the relevant data are marked Β(for
user lock). A special case is the marking C for the user code itself.
To enter the user code, press <0> Mode and enter the code in the Access chapter under the Codeword 1 and
Codeword 2 functions.
Mode
Base values
Billing mode
→Access
Then the following display appears:
Access
♦Codeword 1
****
If the code has been entered correctly,
the Power LED at the top left of the
front panel will start to flash.
The rhombus indicates that code entry has been enabled. The
four asterisks stand for the first part of the 8-character code.
After you have pressed Enter, the display will turn a bit
darker and the four asterisks will disappear. Now you have
to enter the first four characters of the code correctly in the
third line. Press Enter to terminate your inputs and use the
Cursor Down key to browse to codeword 2. Now press
Enter again to switch over the display to input mode (darker)
and enter the second part of the codeword.
The arrow is already located on the third line on Access. In
this example, pressing Enter will select the correct chapter.
A new window will open with the Access heading. Use the
Cursor Down key to select the first codeword.
珠海司福斯特科技有限公司

10 C:\Temp\ERZ2000_Kurzhilfe_V1_3_EN.doc
2.4 Setting the device type
If the device is not used for custody transfer applications, the ERZ 2000 which exists in the following
variants
•gas volume corrector (ERZ 2004),
•superior calorific value corrector (ERZ 2104),
•density corrector (ERZ 2002) or
•density corrector with energy (ERZ 2102)
can be switched over from one version to another after the calibration lock has been opened.
To do this, you have to be on the topmost access level (superuser). Press <0> Mode, select the Identification
chapter and then the Device type function to browse the variants. Press Enter to confirm your selection or
change over to another variant.
If the device is used for custody transfer applications, this changeover option is disabled and you can
only operate the version which has been set in the factory and corresponds to the type plate fixed to
the front panel.
The device can only be changed over from a gas volume corrector to a superior calorific value corrector if
you change the software.
Use the front interface to load the software of the other device type into the device.
2.4.1 Description of the update procedure
•Connect the front interface of the ERZ 2000 to your PC’s serial interface using a null modem cable.
•Start a terminal emulation program, e.g. under Windows Start / All Programs / Accessories /
Communications / Hyperterminal. At the first start, establish a new connection with 115200, 8, no parity,
1, no handshake and save this setting.
•Set the ERZ 2000 to superuser mode.
Enter codeword 1.
Enter codeword 2.
Open the calibration lock.
Follow the above sequence of operations.
•Now prepare the ERZ 2000 for the update. Press <0> Mode and in the Access chapter set the Software
update function to ON. The ERZ 2000 terminates the correction process and from now on it is only
waiting for the software update to start. Observe the outputs on the ERZ display. You can still cancel the
process initiated by pressing the <0> key of the ERZ. Watch the display output of the hyperterminal
program. The character C should appear at one-second intervals.
•Now transfer the new application into the ERZ 2000. The program consists of a set of files which were
packed in a ZIP archive. Select the ZIP archive under "Transfer/Send File" in Hyperterminal and send it
using the "Ymodem" transfer protocol. Watch the progress bar in Hyperterminal and the associated
display on the ERZ.
•After the transfer is complete, the ERZ 2000 checks the ZIP file for validity and consistency and reports
the result on the Hyperterminal display. If the result is negative, the ZIP file will be destroyed in the ERZ
so that the previous application is preserved. If the result is positive, the unpacking process will be
integrated into the booting-up procedure of the ERZ 2000. So the new application will be automatically
unpacked and activated with the next restart of the ERZ 2000.
•The ERZ 2000 will perform this restart automatically.
珠海司福斯特科技有限公司

C:\Temp\ERZ2000_Kurzhilfe_V1_3_EN.doc 11
2.5 How to activate the device again following a software update?
Every software package contains an activation key which has to be communicated to the
ERZ 2000 after a software update. The device verifies the key together with the new check
number of the software and the ERZ 2000 will not be ready for normal operation until it has
yielded a positive result. If the activation key is missing or is incorrect, the ERZ 2000 switches to
permanent operation under fault conditions and thus signals that there is no activation. Corrector
functions are performed normally, but only the disturbance totalizers are running.
Example:
Together with the new software, you also receive the new activation key which has to be entered as follows:
•Press <0> to select Mode and then press the Cursor Down key to browse to the Software ID chapter.
•Select the chapter with the Enter key and press the Cursor Down key until you reach the Activation
function. Here you can find the old activation key which is no longer valid for the new software.
•After you have opened the calibration lock, press Enter again (the display will turn darker and indicate
input mode). The old activation key will disappear and the ERZ 2000 will be waiting for the new key to
be entered.
•Enter the new activation key and terminate your inputs with the Enter key.
•Now the device should no longer be under fault conditions but operate without any trouble.
An important function of the activation key is the verification of the program code which represents the
official functions for custody transfer metering. The activation key is used for verifying the check number
cyclically. The program can immediately detect a change in the official kernel whether it is caused by an
unacceptable program version or a defect of the program memory which results in a modified check number.
This function is important in order to separate the program into an official part for custody transfer metering
and into an application part.
珠海司福斯特科技有限公司

12 C:\Temp\ERZ2000_Kurzhilfe_V1_3_EN.doc
2.6 Entering texts
The keyboard layout allows texts to be entered in the same way as with mobile phones. To enter digits or
capital or lowercase letters or switch over to the next position, single or double inverted commas are used.
1st example – Superior calorific value Hs:
You want to enter the company name RMG for the ID display of the PGC.
P 13.068 bar
T 8.55 °C
→Hs 11.972 kWh/m3
Rhon 0.9695 kg/m3
In the Superior calorific value chapter browse until you reach the function (coordinate) with the text
"Manufacturer".
•Open the calibration lock.
•Press Enter and the display will turn a bit darker.
•Two double inverted commas will appear side by side (" ").
•When you press the next key, the two inverted commas will be shifted apart and the value of the key
pressed will appear in the middle of the inverted commas. At the same time, the double inverted commas
will change into single inverted commas (' ').
•On key 7, there are also the letters p, q, r and s. Thus, the digit '7' will appear first.
•If you continue to press key 7 quickly, the letters p, q, r, s and then P, Q, R and S will appear
consecutively.
•If you pause for approx. 1 second between pressing the keys, the two double inverted commas will
appear again to indicate that the letter has now been accepted.
•With the next position, proceed in the same way until the whole text is complete.
•Errors which have occurred due to misentries or excessively long breaks during typing can be cleared
using the Cursor Left key of the orange cursor block.
•As soon as the text is complete, accept it by pressing Enter.
2nd example – Superior calorific value Hs:
You want to enter the serial number 12345 for the PGC's ID display.
•Open the calibration lock.
•Press Enter and the display will turn a bit darker.
•Two double inverted commas will appear side by side (" ").
•When you press the next key, the two inverted commas will be shifted apart and the value of the key
pressed will appear in the middle of the inverted commas. At the same time, the double inverted commas
will change into single inverted commas (' ').
•The letters which are also printed on the keys are of no importance here, since a number is to be entered.
In this example, the first digit is '1'.
•After you have pressed 1, wait until the two double inverted commas appear, then enter the next digit (2)
and proceed in this way until the whole number is complete.
•Errors which have occurred due to misentries or excessively long breaks during typing can be cleared
using the Cursor Left key of the orange cursor block.
•As soon as the number is complete, accept it by pressing Enter.
Use the Cursor Down key to locate the arrow on the third
line. In this example, pressing Enter will select the Superior
calorific value chapter. A new window will open with the
Superior calorific value heading. The contents of this
chapter can be browsed using the cursor keys.
珠海司福斯特科技有限公司

C:\Temp\ERZ2000_Kurzhilfe_V1_3_EN.doc 13
2.7 How to parameterize the pressure sensor?
The data of the pressure sensor used have to be communicated to the corrector as transmitter data. Apart
from the parameters for measurement, the type, manufacturer, serial number, etc., have to be entered in the
Absolute pressure chapter as well. Then these data will appear automatically in the ID display.
Example for data entry:
Press <1> Meas. P,T... The arrow (→) is already located on P. Press Enter and then the Cursor Down key to
access the relevant values and enter the data.
→P 13.068 bar
T 8.55 °C
Hs 11.972 kWh/m3
Rhon 0.9695 kg/m3
There are the following operating modes for transmitting measured values:
OFF No measurement, input is switched off.
0-20mA limit The min. and max. limits define the assignment of mA to pressure.
4-20mA limit The min. and max. limits define the assignment of mA to pressure.
0-20mA coefficient Coefficient 0 defines the min. range, coefficient 1 defines the max. range.
4-20mA coefficient Coefficient 0 defines the min. range, coefficient 1 defines the max. range.
Polynomial 3rd order Coefficients 0, 1 and 2 define the polynomial.
Polynomial 2nd order Coefficients 0, 1 and 2 define the polynomial.
Polynomial 1st order Coefficients 0, 1 and 2 define the polynomial.
Measured value = source value HART on 4-20 mA loop in combination with a current input
from gauge pressure The value is derived from the connected gauge pressure sensor.
Default No measurement, fixed value.
Use the cursor key to browse to the Operating mode function. Set the desired operating mode there after
having opened the calibration lock.
The arrow is located on the first line and can be moved
upwards or downwards using the cursor keys. In this
example, pressing Enter will select the Absolute pressure
chapter. A new window will open with the Absolute
pressure heading. The contents of this chapter can be
b
rowsed usin
g
the cursor ke
y
s.
珠海司福斯特科技有限公司

14 C:\Temp\ERZ2000_Kurzhilfe_V1_3_EN.doc
2.8 How to parameterize the temperature sensor?
The data of the temperature sensor used have to be communicated to the corrector as transmitter data. Apart
from the parameters for measurement, the type, manufacturer, serial number, etc., have to be entered in the
Gas temperature chapter as well. Then these data will appear automatically in the ID display.
Example for data entry:
Press <1> Meas. P,T.. and set the arrow (→) to T. Press Enter and then the Cursor Down key to access the
relevant values and enter the data.
P 13.068 bar
→T 8.55 °C
Hs 11.972 kWh/m3
Rhon 0.9695 kg/m3
Transmitting measured values
There are the following operating modes:
OFF No measurement, input is switched off.
0-20mA limit The min. and max. limits define the assignment of mA to temperature.
4-20mA limit The min. and max. limits define the assignment of mA to temperature.
0-20mA coefficient Coefficient 0 defines the min. range, coefficient 1 defines the max. range.
4-20mA coefficient Coefficient 0 defines the min. range, coefficient 1 defines the max. range.
PT100, 500, 1000 Polynomial according to Callendar van Dusen
Polynomial 3rd order Coefficients 0, 1 and 2 define the polynomial.
Polynomial 2nd order Coefficients 0, 1 and 2 define the polynomial.
Polynomial 1st order Coefficients 0, 1 and 2 define the polynomial.
Measured value = source value HART on 4-20 mA loop in combination with a current input
From RHMtemp. Calculated from the density transducer temperature.
From VOStemp. Calculated from the velocity of sound transducer temperature.
PT100 RMG Calculation according to RMG polynomial.
Default Fixed value, no measurement.
Use the cursor key to browse to the Operating mode function. Set the desired operating mode there after
having opened the calibration lock.
The arrow is located on the first line and can be moved
upwards or downwards using the cursor keys. In this
example, pressing Enter will select the Temperature
chapter. A new window will open with the Gas temperature
heading. The contents of this chapter can be browsed using
the cursor keys.
珠海司福斯特科技有限公司

C:\Temp\ERZ2000_Kurzhilfe_V1_3_EN.doc 15
2.9 Where are the gas meter parameters to be found?
The data of the gas meter used have to be communicated to the corrector as transmitter data. Apart from the
parameters for measurement, the type, manufacturer, serial number, etc., have to be entered in the Meter
chapter as well. Then these data will appear automatically in the ID display.
Example for data entry:
Press <9> Meter and set the arrow (→) to Flow rate parameters. Press Enter and then the Cursor Down key
to access the relevant values and enter the data.
Meter
→Flow rate parameters
kv factor
Characteristic
2.10 Which operating modes of the gas meter are available?
The Volume transmitter mode function in the Flow rate parameters chapter defines the operating mode
for calculating the volume at measurement conditions.
The following operating modes are available:
1. Vo Vm is calculated from Vo, ENCO1totalizer provides data via protocol.
2. Vo, LF1-chan. Vm is calculated from Vo, LF input is used for comparison.
3. Vo, HF1-chan. Vm is calculated from Vo, HF input is used for comparison.
4. Vo, HF2-chan. 1/1 Vm is calculated from Vo, HF inputs are used for comparison.
5. Vo, HF2-chan. X/Y Vm is calculated from Vo, HF inputs are used for comparison.
6. LF1-chan., Vo Vm is calculated from the input signal, Vo is only used for comparison.
7. HF1-chan., Vo Vm is calculated from the input signal, Vo is only used for comparison.
8. HF2-chan. 1/1, Vo Vm is calculated from the input signal, Vo is only used for comparison.
9. HF2-chan. X/Y, Vo Vm is calculated from the input signal, Vo is only used for comparison.
10. LF1-chan. 1-channel operation with LF input (only metering, no flow rate)
11. HF1-chan. 1-channel operation with HF input
12. HF2-chan. 1/1 2-channel operation with HF inputs of the same value
13. HF2-chan. X/Y 2-channel operation with HF inputs of different value
14. HF LF 2-channel operation with HF input (meas.) and LF input (comp.)
15. DMT Vm is supplied via DMT protocol.
16. IGM Activates the integrated ultrasonic controller (sensor data are supplied by the
ultrasonic measuring head).
1ENCO = ENCODER / Electronic totalizer with digital interface
The arrow is located on the second line and can be moved
upwards or downwards using the cursor keys. In this
example, pressing Enter will select the Flow rate
parameters chapter. A new window will open with the Flow
rate parameters heading. The contents of this chapter can
be browsed using the cursor keys.
珠海司福斯特科技有限公司

16 C:\Temp\ERZ2000_Kurzhilfe_V1_3_EN.doc
Operating mode:
As to the modes 1 to 9, the notation means: The first parameter applies to billing and the second
parameter to comparison. If Vo stands at the beginning, for example, Vm increments are calculated
from the telegram contents of the digital totalizer, i.e. the Vm totalizer is calculated from Vo
information. However, if Vo stands at the end, Vm is calculated normally from HF or LF signals and Vo is
displayed and archived only additionally. Note also the following with regard to signalling alarms or
warnings: If Vo stands at the beginning of a 2-channel operating mode (operating mode 4 or 5), then as far as
the HF measuring inputs stand at the end and if there is a missing pulse or a pulse comparison fault, no alarm
will be outputted but a warning with a separate message number.
The Vo totalizers will become visible as soon as Vo is activated in one of the operating modes (1 to 9).
2.11 Special information about parameters for volume at measurement conditions
Some of the following functional descriptions are only visible if the service or developer access level
has been activated. In order to provide a complete overview, they are listed here as well.
Missing pulses, reference pulses:
A differential connection alternately compares the counted pulses of the measuring and reference channels.
Every deviation is accumulated by the internal missing pulse counter. An alarm is generated if the set limit
(contents: missing pulses) is exceeded. If the limit is not exceeded within a settable period (contents:
reference pulses), the missing pulse counter is set to zero.
Start-up pulses:
The start-up pulses parameter combines two functions:
Suppression of fault messages of the volume input which can occur in the case of 2-channel
volume measurement (1:1) when the gas meter is started up from standstill with signals which are
not mechanically coupled with each other (e.g. vortex meter). Monitoring will not be activated
until the start-up pulses have run out.
Resetting fault messages of the volume input when the device has returned to untroubled operation
after the start-up pulses have run out.
Starting up and shutting down a plant:
Start-up is troublefree if qm passes the range from the creeping quantity limit to the lower alarm limit during
start-up and slow-down. An alarm is generated if qm is still below the alarm limit and above the creeping
quantity limit after the start-up or slow-down time has been exceeded. The alarm is defined as going when
the lower alarm limit is passed (when the plant is started up) or when the creeping quantity limit is passed
(when the plant is shut down).
Start-up/slow-down time:
There is a separate Start-up/Slow-down chapter to be found under the <9> Meter key. Here you can see the
momentary state, the current start-up and slow-down times and the parameters for the start-up and slow-
down times.
Start-up and slow-down times are parameters for the time monitoring of the lower flow rate limit qmmin. The
qmmin alarm is not triggered until one of these times has elapsed. These parameters are important for the
start-up and slow-down phases. See also Starting up and shutting down a plant.
珠海司福斯特科技有限公司

C:\Temp\ERZ2000_Kurzhilfe_V1_3_EN.doc 17
Creeping quantity limit:
The Vm and Vb totalizer readings are not increased as long as the flow rate at measurement conditions is
below the creeping quantity limit.
The creeping quantity cut-off function prevents uncontrolled counting of pulses e.g. in the case of swinging
movements when a turbine meter is at standstill or of pulses at zero drift in the case of other gas meters.
Creeping quantity mode:
There are the two following options:
Do not use the creeping quantities occurred ("discard").
Use the creeping quantities occurred and add them to normal quantities ("accumulate").
Volume frequency source:
Display of the connected or active input.
Channel Qm determination:
It is shown whether Qm (flow rate) is formed from the measuring channel or the reference channel.
Channel Vm determination
It is shown from which channel Vm is calculated (measuring channel, reference channel, Vo).
Hardware pulse comparison:
It is shown whether the hardware comparison is active.
Vo effect of fault:
It is shown whether Vo protocol errors are signalled as alarm or warning or whether they are not signalled.
This depends on the selected operating mode.
Reference quality:
It is shown how the corrector calculated the quality of the reference channel during software comparison.
The result is calculated from the permanent monitoring of measuring and reference channels.
Main blades (X):
Display = integer ratio of Kv measuring channel to Kv reference channel, projected to approx. 200 pulses.
The calculated values are automatically transferred to the hardware pulse comparison logic.
Reference blades (Y):
Display = integer ratio of Kv reference channel to Kv measuring channel, projected to approx. 200 pulses.
The calculated values are automatically transferred to the hardware pulse comparison logic.
Better HF channel:
Display = comparison of the frequencies of the measuring and reference channels for the higher value.
Predictive reliability:
This parameter indicates how often the comparison from the Better HF channel function must provide the
better value until a changeover is made.
Decision change:
It is shown how often the device has made a decision in favour of the other channel.
USZ effect of fault:
It is shown whether USZ protocol errors (DMT protocol) are signalled as alarm or warning or whether they
are not signalled. This depends on the selected operating mode.
Some functions
and parameters
described here
are visible only
at the "Service"
or "Developer"
level.
珠海司福斯特科技有限公司

18 C:\Temp\ERZ2000_Kurzhilfe_V1_3_EN.doc
Monitoring of synchronous run (coordinates JK...)
There is a chapter Synchronous run monitoring to be found under the <0> Mode key. Here you can find
the parameters for monitoring synchronous run, such as the maximum deviation, termination short and
termination quantity and information displayed about the current state of the ongoing comparison.
Monitoring of synchronous run deals with the software comparison between the possible inputs for volume
formation. Comparisons are always possible if 2 or 3 inputs are used.
Maximum deviation:
The permissible deviation in percent between the two comparative values is to be entered here. The
termination quantity parameter defines the query limit.
Termination quantity:
Here a relative quantity is parameterized (in m³) for the comparison to which a totalizer deviation between
the two channels to be compared is related. After this quantity has been reached, the verification is
performed and then the volume meter is reset and a new comparative cycle started.
Termination short:
If the last comparison has resulted in an alarm, synchronous run can be tested with shorter cycles to observe
the fault situation. This enables the alarm to be cleared more quickly. Note: Do not select too small a value,
otherwise the quantity is too small to detect troublefree operation with the tolerance set (maximum
deviation).
2.12 Logic of synchronous run
Monitoring of synchronous run is not only restricted to the comparison between Vo and HF input, but
verifies all combinations with more than one input signal. The following table provides an overview of the
functions in troublefree operation. In the case of a fault, the corrector uses the undisturbed signal or, if there
are three input signals, it switches over to the relevant signal.
Operating
mode Fault
Vo Fault
DMT HW
comp. SW
comp. Qm
calculation Vm
calculation kv
use
Vo Alarm OFF OFF OFF Metering Vo Vo
Vo, LF1-chan. Alarm OFF OFF Vo -- LF1-chan. Metering Vo Vo
LF1-chan., Vo Warning OFF OFF LF1-chan. -- Vo Metering LF Meas. channel
Vo, HF-1chan. Alarm OFF OFF Vo -- HF-1chan. HF signal Vo Vo
HF1-chan., Vo Warning OFF OFF HF1-chan. -- Vo HF signal HF signal Meas. channel
Vo, HF2-chan. 1/1 Alarm OFF 1:1 Vo – HF meas. HF meas. signal Vo Vo
HF2-chan. 1/1, Vo Warning OFF 1:1 HF meas. -- Vo HF meas. signal HF meas. signal Meas. channel
Vo, HF2-chan. X/Y Alarm OFF X :Y Vo – HF meas. HF meas. signal Vo Vo
HF2-chan. X/Y, Vo Warning OFF X :Y HF meas. -- Vo HF meas. signal HF meas. signal Meas. channel
HF2-chan. 1/1 OFF OFF 1 :1 Meas. --- Comp. HF meas. signal HF meas. signal Meas. channel
HF2-chan. X/Y OFF OFF X:Y Meas. --- Comp. HF meas. signal HF meas. signal Meas. channel
HF LF OFF OFF OFF HF -- LF HF signal HF meas. signal Meas. channel
HF1-chan. OFF OFF OFF OFF HF signal HF signal Meas. channel
LF1-chan. OFF OFF OFF OFF Metering LF signal Meas. channel
USZ OFF Alarm OFF OFF DMT DMT DMT
珠海司福斯特科技有限公司

C:\Temp\ERZ2000_Kurzhilfe_V1_3_EN.doc 19
2.13 How to activate error curve linearization?
Press <9> Meter. The arrow (→) is located on "kv factor". Use the Cursor Down key until the arrow is
located on the Characteristic chapter. Press Enter and use the Cursor Down key to access the relevant
values and enter the data.
Meter
→Flow rate parameters
kv factor
Characteristic
Characteristic
•kv mode
Polynomial Q RMG
There are the following options:
Kv=constant No error curve linearization
Polynomial Q RMG Correction with polynomial applied over the flow rate
Polynomial Re RMG Correction with polynomial applied over the Reynolds number
Interpolation point RMG Interpolation points as value pairs flow rate / deviation (max. 16)
The arrow is located on the second line and can be moved
upwards or downwards using the cursor keys. In this
example, use the Cursor Down key to select the
Characteristic chapter and press Enter. A new window will
open with the Characteristic heading. The contents of this
chapter can be browsed using the cursor keys, in this case up
to the kv mode function.
The current kv mode is shown. In this example, a polynomial
defined by RMG is calculated via the flow rate. The point
before the kv mode indicates that the value can be edited
(note the access level). If the calibration lock is opened, the
point will turn into a rhombus ♦and the value will be
enabled.
珠海司福斯特科技有限公司

20 C:\Temp\ERZ2000_Kurzhilfe_V1_3_EN.doc
2.14 How does error curve linearization function for volume measurement?
Error curve linearization:
The error curve linearization of the gas meter can optionally be performed using two different methods.
a) Error curve linearization with polynomial related to the flow rate
Correction is made using a quartic polynomial which reproduces the error curve of the gas meter as a
function of the flow rate.
Error equation: F = A-2*QVm
-2+A-1*QVm
-1+A0+A1*QVm+A2*QVm
2
F = Deviation of the error curve [%]
QVm = Volumetric flow rate at measurement conditions [m3/h]
An = Constants
KV= Constant meter factor
The polynomial coefficients An(n = -2 to n = 2) are calculated from the measured value pairs error
Fi and flow rate Qvmi . Instead of the constant meter factor KV , the corrected meter factor KVc is used
for further calculation or correction.
)
100
F
(1*KK VVc +=
The polynomial coefficients An are supplied by the manufacturer of the turbine gas meter.
b) Error curve linearization with polynomial related to the Reynolds number
Correction is made using a quartic polynomial which reproduces the error curve of the gas meter as a
function of the Reynolds number.
Error equation: FRe = A-2*Re-2+A-1*Re-1+A0+A1*Re+A2*Re2
Reynolds number equation: Re = 0.353677 * (Qm/ DN) * (ρ/η)
where ρ= ρb* ((P * Tb)/(Pb * T)) * (1/K)
FRe = Deviation of the error curve [%]
Re = Reynolds number
An = Constants
KV= Constant meter factor
The polynomial coefficients An(n = -2 to n = 2) are calculated from the measured value pairs error
Fi and flow rate Rei. Instead of the constant meter factor KV , the corrected meter factor KVc is used
for further calculation or correction.
Further entries are: η= V * 10-6 m²/s (V = constant, for natural gas V = 12)
)
100
F
(1*KK VVc +=
The polynomial coefficients An are supplied by the manufacturer of the turbine gas meter.
珠海司福斯特科技有限公司
Table of contents
Other RMG Measuring Instrument manuals


