8
●Drilling position of the aluminum foil exhaust pipe (public flues do not require drilling)
a. Aluminum foil exhaust pipe and hob facing the window: Remove one of the glasses and install a plywood with ventilation
holes or punch directly on the glass.
b. Hob away from the window: Install the aluminum foil exhaust pipe through the window that is close to the hob and
connected outside; or install it by punching on the wall that is close to the hob and connected outside.
c. Drill hole through the wall: Determine the location of the aluminum foil exhaust pipe against the wall and draw the drilling
range (i.e. a circle slightly larger than the pipe OD). Then use a long drill bit to drill through the wall. Pay attention to the wall
structure and material, so as not to destroy other parts of the wall.
●Link the aluminum foil exhaust pipe
Insert the end of aluminum foil exhaust pipe without fixed strip to the pipe connection and stick with tapes. Straighten the
aluminum foil exhaust pipe and then connect the pipe to the connection of public flue outlet (straighten the pipe directly to
the outdoor if there is no public flue). This can be done directly when the public flue connection or wall hole is larger than the
pipe. Otherwise, there are four types of pipe connection small ends (OD: 140, 150, 160, 170and 180 respectively) to be
chosen from according to the hole size. Then cut the excess part with scissors.
Then insert the end of the aluminum foil exhaust pipe with fixed strip in the outer ring of the check valve connection and seal
with exhaust pipe tapes. At last, put four snaps of the check valve connection in corresponding slots, and rotate them
clockwise to fix the exhaust pipe to the check valve.
Install the aluminum foil exhaust pipe
●Adjust drawing panel
Pull the two brackets of the drawing panel upwards to an appropriate height and then pull out the drawing panel by holding
both sides. Remove the protective film (excluding cold plate materials) on the drawing panel and insert it along the gap
between the main hood panel and the housing. Then adjust it to the proper height.
●Install hood body
Fix the check valve as shown in Figure 5. Then align the hanging holes in the back of hood with the hooks of hitching feet
according to Figure 2 and press them together. Shake the body to check if it’s hung securely. After the body is ,
mounted, install the hitching foot stopper and gaskets to the M6 metal expansion pipe, and then tighten the nuts (to prevent
accidental decoupling of the body under external force).
●Install drawing panel
As shown in Figure 1-1, there is certain gap between the drawing panel and the top plate. Push the panel against the top
plate and then fix it to the top plate with ST4.2 × 18 screws.
(If installation method in Figure 1-2 is adopted there’s no need to adjust and install the drawing panel),
Note: If there is no host attached panel, no adjustment and installation is required.
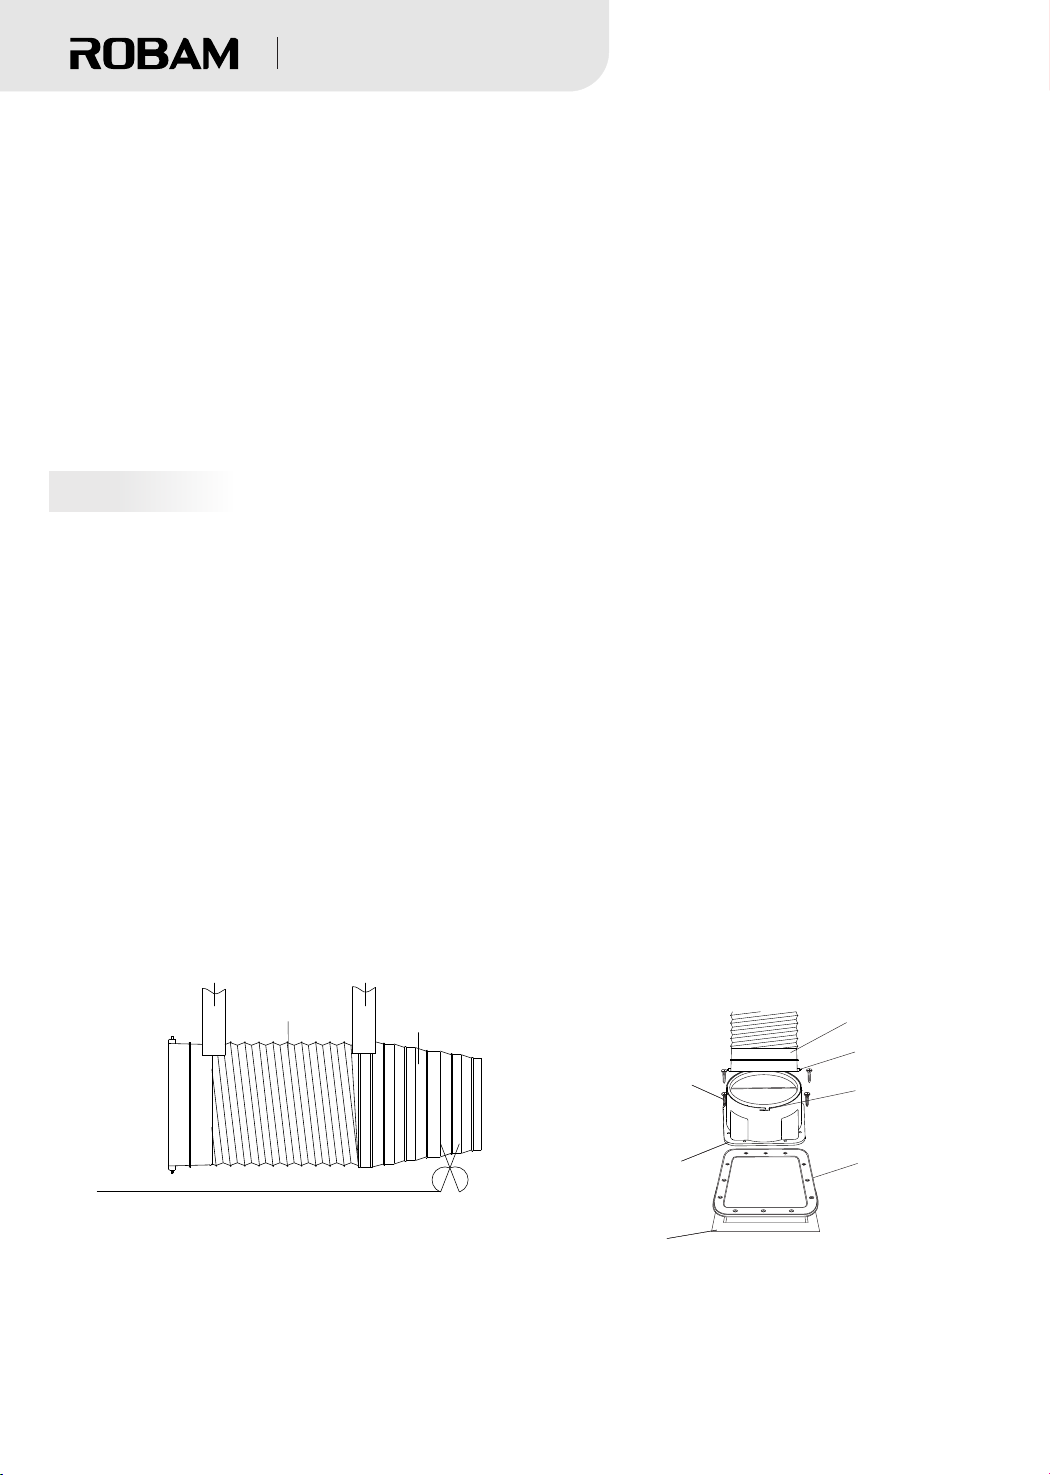
Figure 5
The exhaust wall hole diameter shall be close to that of the exhaust pipe, which shall not be too small. Otherwise, it
will cause poor exhaust efficiency, more noises and lower airflow, etc. The connection between the pipe and the
hole or the public flue must be sealed tightly to ensure that, the pipe and the check valve or public flue are
connected securely. The blades at the check valve connection or public flue connection must be
flexible.Suggestion: When the range hood is matched with the Boss anti-smoke back check valve, there is no need
to install the check valve blade.
Body
Check valve
Check valve connector
S T4.2×18 screw
Check valve seal
Buckle
Slot
Figure 4
Note: During installation, straighten the aluminum exhaust pipe to avoid
noises in semi-stretched state.Excess part may be cut with a wire cutter.
Ø185 aluminum
exhaust pipe
Exhaust pipe tape
Exhaust pipe
connection
Cut the excess part smaller than the hole
Ø190
Ø180
Ø170
Ø160
Ø150
Exhaust pipe tape
Ø140
Range Hood


