Roberts R9969 User manual

R9969
PLL Synthesised World Radio
Pleasereadthismanualbeforeuse
ROBERTS
SoundforGenerations

2
Contents ............................................................................2
Controls ..........................................................................3-6
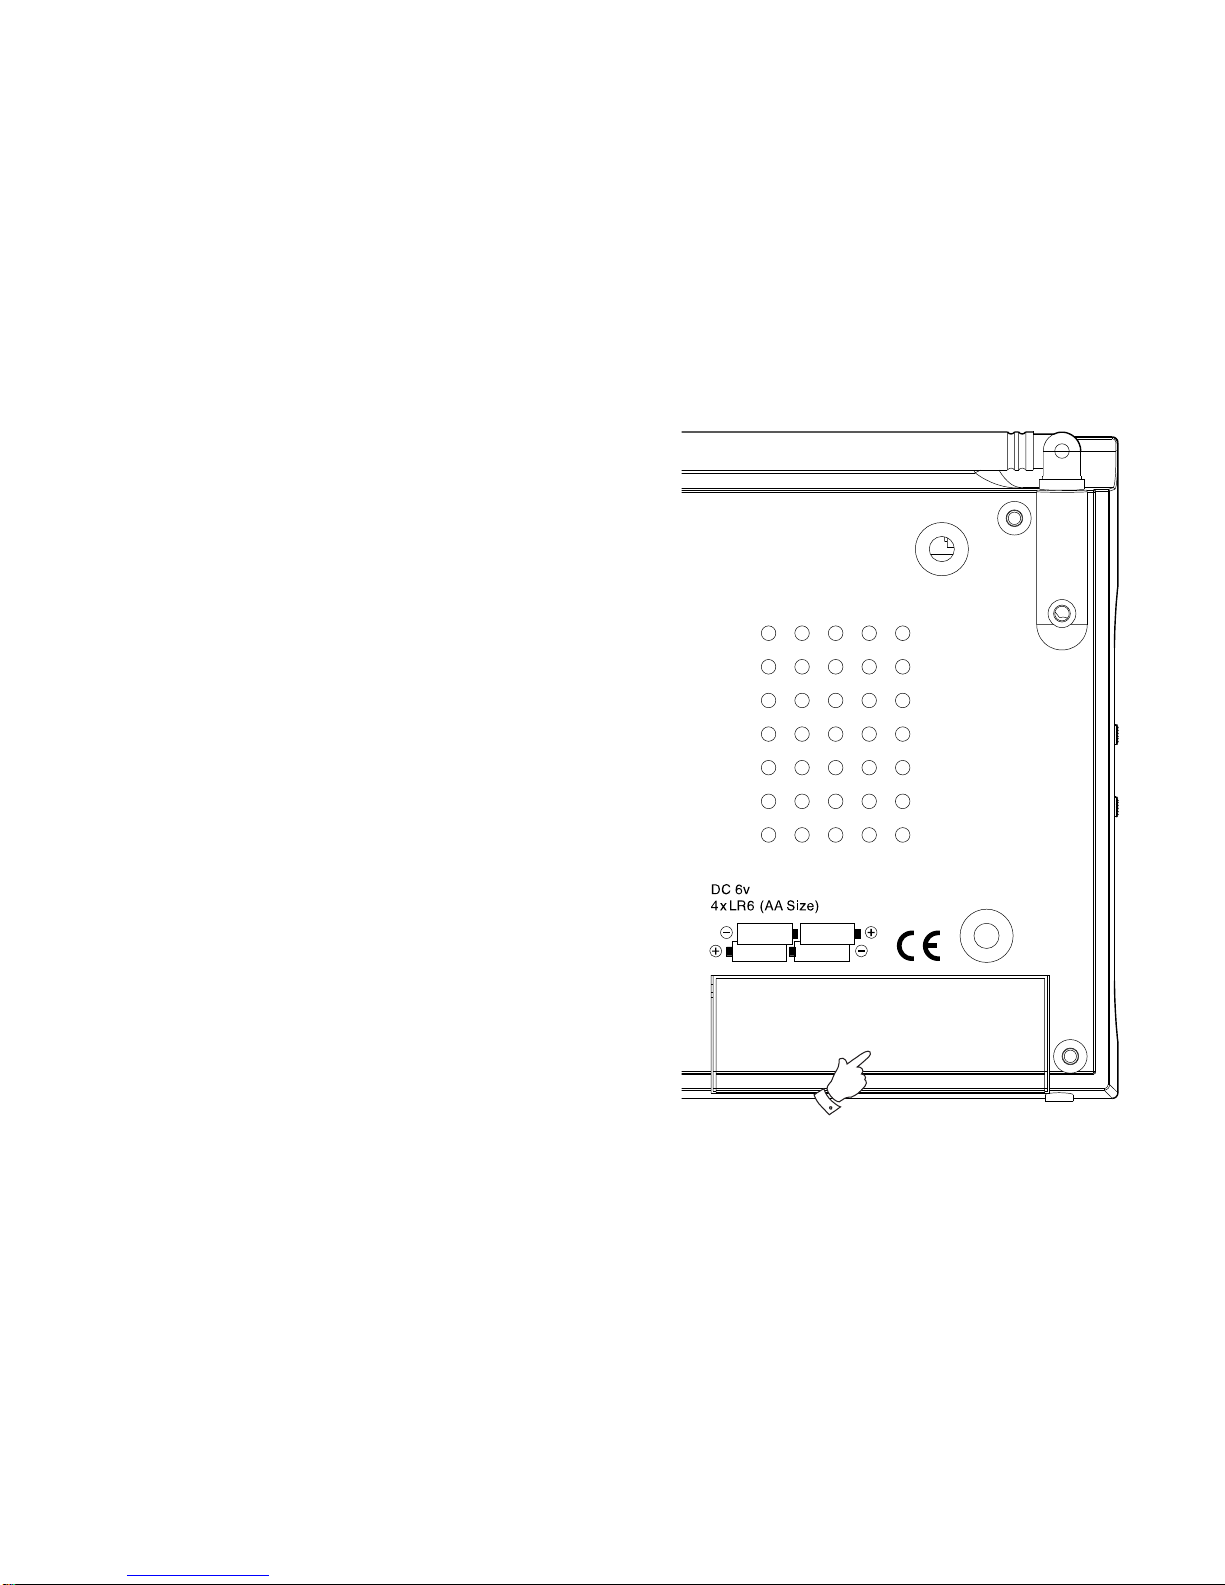
Installing the batteries ......................................................7
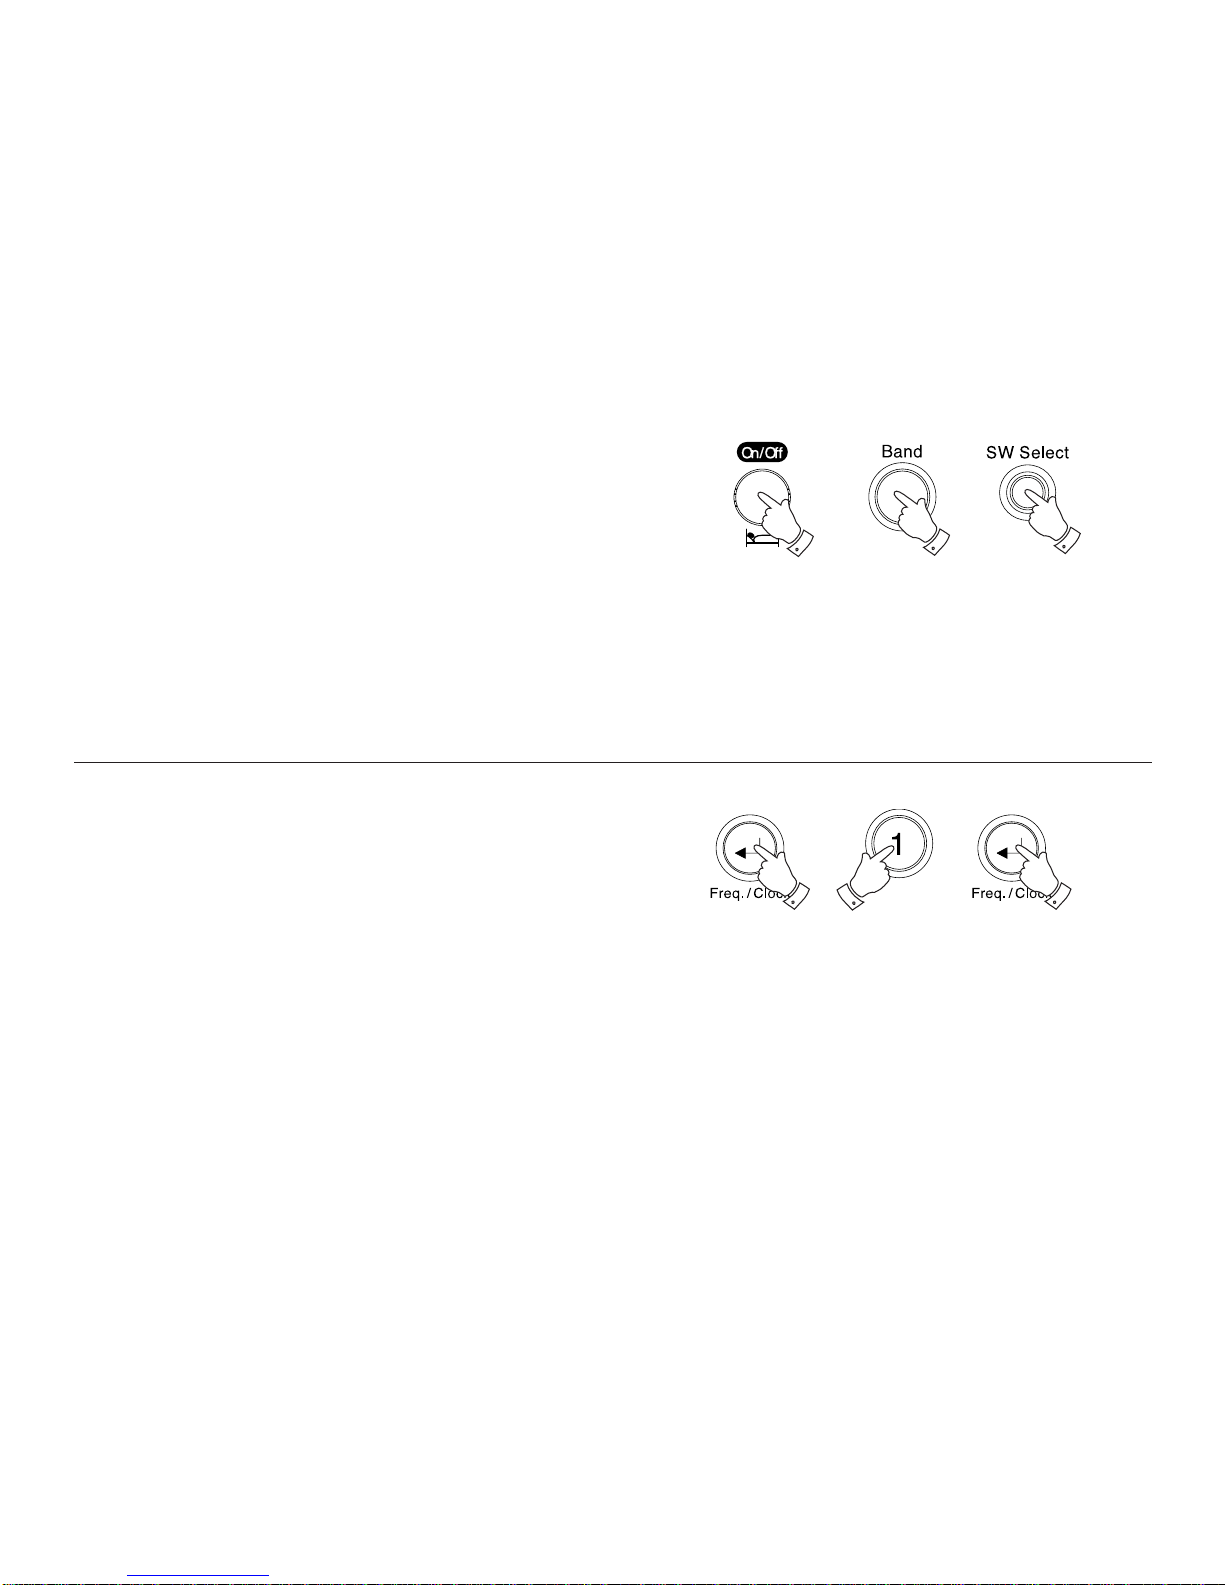
Switching on and setting the clock ..................................8
Setting local time 1 ...........................................................8
Setting local time 2 ...........................................................9
Setting and storing radio stations ..................................10
Tuning radio stations directly..........................................10
Tuning radio stations manually (1) .................................10
Tuning radio stations manually (2) .................................11
Saving radio stations at preset positions.......................11
Storing shortwave (SW) stations ....................................12
Automatic station search................................................12
Deleting preset stations..................................................13
Calling up stored radio stations ......................................14
Checking stored radio stations ......................................14
Changing preset positions ..............................................15
Adjusting the volume.......................................................15
Adjusting the tone ...........................................................15
Listening with headphones..............................................16
Switch between stereo and mono reception .................. 16
Contents
Setting the reception sensitivity ..................................... 16
Special features of SW reception .................................. 17
Connecting the external SW antenna ............................17
SSB reception .................................................................18
Alarm mode - displaying the alarm time ........................ 19
Alarm with signal tone..................................................... 19
Alarm with radio station ..................................................20
Cancelling the alarm for the day..................................... 21
Cancelling alarm stand-by .............................................. 21
Sleep timer mode ............................................................ 21
Setting the sleep timer ................................................... 21
Deactivating the sleep timer ...........................................22
Additional functions - displaying local time 1 or 2.........22
Setting various function modes......................................23
Switching on the back lighting for the display............... 24
Disabling and enabling the buttons ...............................24
Disabling and enabling the fine tuning dial....................24
Deleting all settings ........................................................25
Specifications..................................................................26
Guarantee........................................................................27

If you need any further advice, please call our Technical Helpline on :-
02087580338(Mon-Fri) 3
1
8
10
9
11
12
CONTROLS
Controls-Front
1. Light
2. Tune/SSBLED
3. 1 to 9Numerical buttons
4. Display
5. Band selection
6. MemoAM/PM
7. Mode
8. On/Off Sleep
9. Display button
10. SW Page Clock 1/2 button
11. Signal Alarm button
12. Radio Alarm button
13. SW Select button
14. Lock switch
15. Fine tuning dial
16. Tuning lock switch
3 42 5 6 7
13
14
15
16
171819 17. Freq./Clock button
18. Memo Scan button
19. Memo Del button

4
Controls
Right side
20. SSB Fine Tuning
21. SSB On/Off
22. Tone (low/high)
23. Volume
Left side
24. SW External Antenna
25. FM/SWDX./Local
26. FMSt./FM
27. Headphone socket
28. DC6Vsocketformainsadapter(notsupplied)
20
21
22
23
24
25
26
27
28

If you need any further advice, please call our Technical Helpline on :-
02087580338(Mon-Fri) 5
30
29
Controls
Top
Bottom
29. Antenna
30. Reset button

6
Controls
Back
31. Map of world time zones
32. Frequency scale
33. Battery compartment
33
32
31

If you need any further advice, please call our Technical Helpline on :-
02087580338(Mon-Fri) 7
Installing the batteries
4 x 1.5V, LR6 (AA size) type batteries are required.
1. Open the battery compartment on the back of your receiver by
pressing the marking and opening the lid.
2. Insert the batteries into the compartment. Make sure the (+) and
(-) ends of the batteries are positioned as shown on the rear of the
receiver.
3. Close the battery compartment cover.
Note: When the batteries are low, the battery level icon flashes in the
display. Each time the radio is switched off the battery charge indicator
appears for seven seconds. If the charge level falls below 2 the batteries
must be changed. If the batteries are not replaced within 3 minutes all
stored settings will be lost.
Remove the batteries if the reciever is not going to be used for an
extended period of time. The manufacturer accepts no liability for
damage resulting from used batteries.
Environmental note: Batteries, including those which contain no
heavy metal, may not be disposed of with household waste. Please
dispose of used batteries in an environmentally sound manner.
1

Switching on and setting the clock
Before setting the clock make sure that the local time zone is known.
There are 24 time zones based on a standard time zone called the UTC
(Universal Time Co-ordinated), previously known as GMT (Greenwich
Mean Time), as shown in the diagram on the back of the receiver.
Two different local times can be set, local time '1' and local time '2'.
Setting local time 1
Whenthereceiverisfirstswitchedonthedisplayindicatesthattheclock
has to be set. The digital display will show '0:00' and the local time '1'
symbol will be shown.
Note: If you are operating the receiver in the 12-hour format, AM and
PM can be set by pressing the Memo AM/PM button.
1. Place the receiver on a flat surface. Make sure that the batteries
havebeeninserted correctly,or ifusingmains power,plug themains
lead into a wall socket and switch on at the wall socket.
2. Press down and hold the Freq./Clock button until the display
indicates the time can be set. The digital display will show '-:--'
and the local time '1' symbol will flash.
Note: If the radio is switched on, press the Display button to switch
the display to the clock.
3. Enter the time using the numerical buttons '1 ..... 0' in the correct
sequence.
Note: If the digits are entered incorrectly, a signal sounds and 'Err'
flashes briefly in the display. The time will have to be entered again.
4. Press the Freq./Clock button to confirm the entry.
22
3
4

Setting local time 2
1. Press the SW Page Clock 1/2 button. The display flashes for local
time '2'.
2. To set the display to local time '2' press the Freq./Clock button.
3. Press down and hold the Freq./Clock button until the display
indicates the time can be set. The digital display will show '-:--'
and the local time '2' symbol will flash.
4. Enter the time using the numerical buttons '1 ..... 0' in the correct
sequence.
2
4
1
3

10
Setting and storing radio stations
1. Switch on the radio by pressing the On/Off Sleep button.
2. Press the Band button to select the required waveband (FM, SW,
MW or LW).
There are various ways to set radio stations and store them at preset
positions.
3. If short wave is selected, the frequency band can be selected by
pressing the SW select button.
Tuning radio stations directly
1. Press the Freq./Clock button.
2. Enter the frequency using the numerical buttons.
3. Press the Freq./Clock button to confirm the entry.
2
2
1
1 3
3

If you need any further advice, please call our Technical Helpline on :-
02087580338(Mon-Fri) 11
Tuning radio stations manually (1)
1. Tune in to the desired station by turning the Fine tuning dial. The
display will show the frequency in 100 or 200 kHz increments (FM),
in9or10kHzincrements(MW),in3kHz increments(LW)or in5kHz
increments (SW).
2. To fine tune to the station, briefly push in and turn the Fine tuning
dial. The display will show frequency changes in 50 kHz increments
(FM) or 1 kHz increments (MW, LW and SW).
Note: The word STEP is displayed whilst in fine tune mode.
3. To return to the original mode, push the Fine tuning dial again.
Note: The word STEP is removed from the display.
Tuning radio stations manually (2)
1. Press the arrow buttons until you reach the desired station
or
Hold down one of the arrow buttons until the frequency changes
to a rapid run-through.
The automatic search stops at the next station with a strong signal.
1
1

12
Saving radio stations at preset positions
You can store up to 45 radio stations; 18 on two memory levels for short
wave frequencies, and nine each on FM, MW and LW frequencies.
1. Select the frequency band and the radio station.
2. Press the Memo AM/PM button.
3. Press the Freq./Clock button to store the radio station. The station
is then stored on preset position 1.
Repeat the process for additional stations.
Storing short wave (SW) stations
The short wave band is divided into frequency bands of different
lengths. Therefore up to 18 SW stations can be stored on two memory
levels.
1. Save short wave stations as previously described.
2. Once nine stations are stored on one memory level M1, press SW
Page Clock 1/2 button to switch to the second memory level.
3. Store the remaining nine stations as described above.
Note: If you try to store more than 18 stations and press Memo AM/
PM button, 'FULL' appears in the display.
2
3
1
2
3

If you need any further advice, please call our Technical Helpline on :-
02087580338(Mon-Fri) 13
Automaticstationsearch
This function allows an automatic search and store of nine stations in
each of the FM, MW and LW bands (not SW). The search starts at the
lowest frequency in the selected wave band, and stores the nine
stations with the strongest signals. After the search has finished, a
signal sounds.
1. To start the search, press both Arrow buttons at the same time and
hold them down until a signal is heard. The display indicates the
stored number.
Note: When you start the search, all the previously stored stations are
deleted. During the search, the display shows the progress, but not the
stations found.
2. The search can be stopped by pressing the On/Off button.
You can reorganise the preset stations using 'MODE 50 or 51'
(see page 23).
Deletingpresetstations
1. Enter the preset station using the numerical buttons '1 to 0'. The
frequency and the preset number will be displayed.
2. Press the Memo AM/PM button.The selected preset station
flashes.
3. Press the C Memo Del button to delete the station.
2
1
12
3

14
1
Calling up stored radio stations
1. Select the station using the numerical buttons '1...0' for the preset
number.
2. To call up preset numbers 10 to 18 in the SW band, press the SW
Page Clock 1/2 button to switch to the second memory level.
Note: ForFMreception, pullout thetelescopic antennaand tiltituntilthe
best signal is recieved. For short wave reception (SW), the antenna
should be upright. For medium wave and long wave reception, align the
internal antenna by turning the receiver.
Checkingstoredradiostations
Allthestoredradiostationsinawavebandcanbecalledupautomatically
for seven seconds (memory scan).
1. With the radio playing, press the Memo Scan button. The device
starts with the current preset station and then changes to the next
one. When you reach the desired station, press the Memo Scan
button to stop the function.
1
2

If you need any further advice, please call our Technical Helpline on :-
02087580338(Mon-Fri) 15
Changingpresetpositions
1. Enter the preset station you want to change using the numerical
buttons '1...0'.
2. Press the Memo AM/PM button and the selected preset position
flashes.
3. Enter the new preset position using the numerical buttons '1...0'. A
signal sounds and the preset positions are changed.
Adjusting the volume
1. Adjust the volume using the Volume control on the right hand side
of the receiver.
Adjusting the tone
1. Adjust the tone using the Tone low/high switch on the right hand
side of the receiver.
1 2
3
1
1

16
Listening with Headphones
1. A Headphone Socket (3.5mm) located on left side of the receiver
is provided for use with either headphones or an earpiece. Inserting
a plug automatically mutes the internal loudspeaker.
Switching between stereo and mono reception
FM stereo reception is only available with headphones.
1. Connect the headphones and select an FM station.
2. Set the FM St./FM switch on the left side of the device to stereo.
The display indicates stereo has been selected.
3. If the reception of the station is weak in FM stereo, move the FM St./
FM switch to mono. The stereo symbol disappears from the display.
Setting the reception sensitivity
1. Ifthesensitivity istoohigh,setthe DX./Local switch(on thelefthand
of the receiver) to DX.
2. If the signal is too strong, and is causing distortion, move the DX./
Local switch to Local (low sensitivity).
1
2
3
1
2

If you need any further advice, please call our Technical Helpline on :-
02087580338(Mon-Fri) 17
Special features of SW reception
Short wave reception
Yourradio can receivesignals in anumber of frequencybands. It iseasy
toget usedtotuning tostations in theFM, MW andLW bands, sincethey
are always on the same frequencies.
Unfortunately, this is not always the case with short wave stations. Due
toatmosphericconditions,shortwavestationsmustfrequentlybroadcast
on different wavelengths. Most short wave bands are available all over
the world and can be used by international broadcasters. At present
these are the only wavelengths which provide listeners with direct
reception over long distances.
If you want to listen to a particular SW station, the precise frequency
and wavelength need to be known. Many short wave stations will send
broadcasting schedules which give the information required. This
information is also available on the Internet.
Connecting the external SW antenna
To improve short wave reception the external SW antenna supplied can
be connected.
1. Insert the plug of the antenna cable into the SW External Antenna
socket on the left hand side of the receiver.
Note: Unrolland align the antenna to achievethebest reception. If there
is interference, move the DX./Local switch to Local.
11

18
SSBreception(forexampleforradiohamsandshipping)
Some short wave stations broadcast Morse code for shipping using
continuous waves (CW). Voice signals, for example amateur radio, is
normally broadcast on the single side band (SSB).
1. Select the SW waveband using the Band button.
2. Select the frequency band using the SW Select button.
3. Set the SSB On/Off switch on the right hand side of the receiver to
'ON'. The Tune/SSB LED changes to light up red.
4. Slowly turn the 'SSB Fine Tuning' dial on the right hand of the
receiver until you achieve a clear reception. If an SSB station is
received, the 'Tune/SSB' LED lights up orange.
Note: For fine tuning, the Fine Tuning Dial can also be pressed.
1
2
3
4
4
3
4

If you need any further advice, please call our Technical Helpline on :-
02087580338(Mon-Fri) 19
Alarm mode
Displaying the alarm time
1. Press the appropriate Alarm button (signal tone or radio). The last
setting will be displayed or the radio symbol will flash.
Note: The display will return to the current time after 7 seconds.
Alarm with signal tone
1. With the radio switched off, press the Alarm button (signal tone).
The last alarm set flashes.
2. Enter the alarm time using the numerical buttons '1...0'.
3. Press the Freq./Clock button to confirm the entry. The alarm time
entered stays lit.
The receiver switches on with the signal tone at the set time (alarm
duration 1 hour). The signal tone increases in volume for one minute,
stops for a minute and starts again.
4. Press the On/Off Stop button to switch off the alarm.
1
1
2
3

20
Alarm with radio station
1. Press the On/Off Sleep button to switch on the receiver.
2. Select the frequency band and the radio station.
3. Adjust the alarm volume using the Volume dial.
4. Press the Display button to switch the display to the clock.
5. Press the Alarm button (radio station). The last alarm time set
flashes.
6. Enter the alarm time using the numerical buttons '1....0'.
7. Press the Freq./Clock button to confirm the entry. The alarm time
entered stays lit.
8. Press the On/Off Sleep button to switch off the alarm.
- The device switches the radio on at the set time (alarm duration
1 hour).
12
34
5 6
78
Table of contents
Other Roberts Radio manuals

Roberts
Roberts R979 User manual

Roberts
Roberts RD-18 User manual

Roberts
Roberts Vintage User manual

Roberts
Roberts Sports DAB Dimensions

Roberts
Roberts RD-10 User manual

Roberts
Roberts Stream 94L User manual

Roberts
Roberts SOUND 48 User manual

Roberts
Roberts Sports DAB User manual

Roberts
Roberts SportsDAB 4 User manual

Roberts
Roberts ecologic 4 User manual

Roberts
Roberts Sports 995 User manual

Roberts
Roberts classic blutune User manual

Roberts
Roberts SOUND66 User manual

Roberts
Roberts R9904 User manual

Roberts
Roberts Gemini 7 User manual

Roberts
Roberts Revival mini User manual

Roberts
Roberts R9958 Manual

Roberts
Roberts Duet 2 User manual

Roberts
Roberts RecordR User manual

Roberts
Roberts Classic 2000 User manual