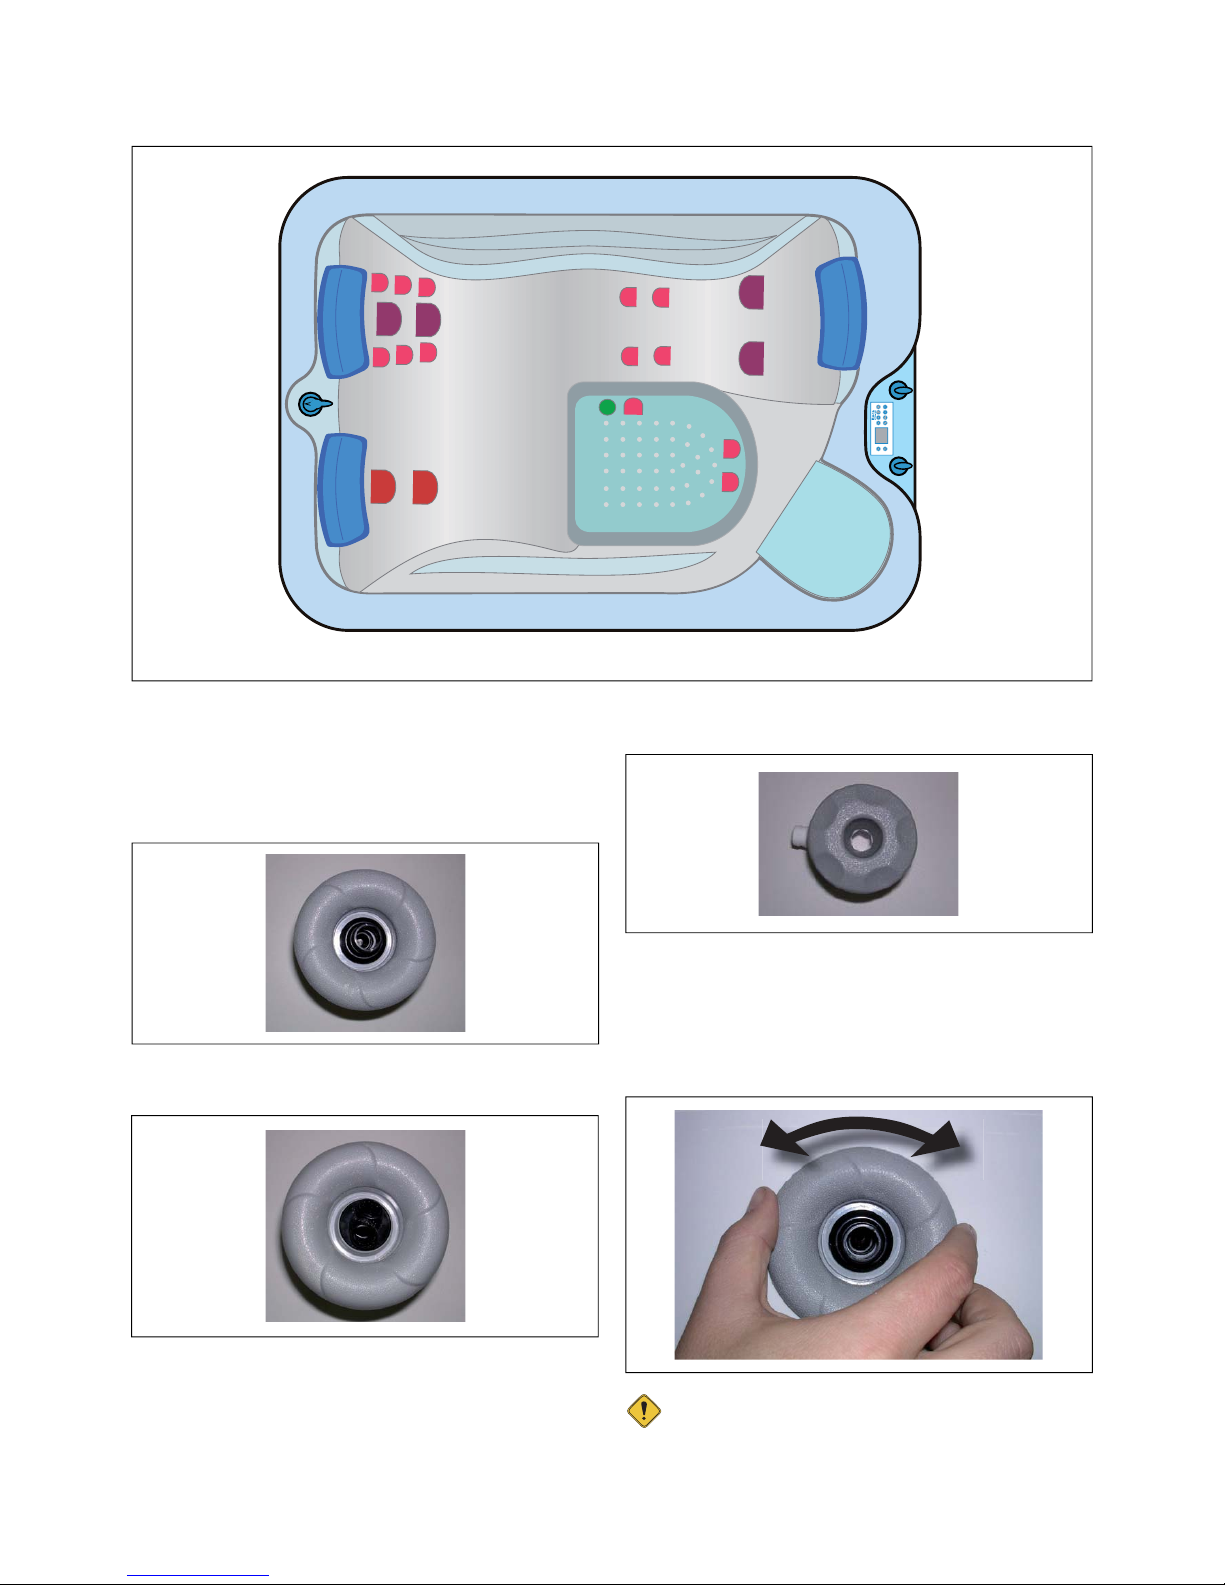
Roca BROADWAY COMPACT Instruction Manual

1
User’s Handbook
BROADWAY COMPACT

2
Congratulations!
and thank you
for buying
this ROCA
product
In keeping with its creative and innovative spirit, ROCA SANITARIO, S.A. has taken one step further in its com-
mitment to quality, design and the incorporation of new technologies. Our efforts have been rewarded by the
loyalty of our customers and the National Prize for Design awarded by the Ministry of Science and Technology
and Fundación BCD.
This recognition confirms our professional career and enables us to continue working and creating the most ad-
vanced, practical and modern products on the market.
In keeping with its policy of offering maximum comfort, ROCA has developed a product for offering the consumer
health and pleasure, a place for recovering from days filled with stress. Modern technology, combined with age-
old treatment, has resulted in a new ROCA spa.
This manual includes the instructions required for the use of your spa. Before using the hydromassage, please read
all the sections in this manual carefully.
This spa has been designed for private use.

3
CONTENTS
1. HYDROMASSAGE SYSTEM .............................................................................................................................................. 4
2. MAIN FUNCTIONS ACCESSIBLE FROM THE ELECTRONIC CONTROL PANEL................................................ 5
2.1. SWITCHING ON/OFF THE PUMP .......................................................................................................................... 5
2.2. EXTRA EQUIPMENT AIRMASSAGE ON/OFF ................................................................................................. 5
2.3. SWITCHING ON/OFF THE LIGHTING .................................................................................................................... 5
2.4. SETTING THE RIGHT TIME ........................................................................................................................................ 5
2.5. ECONOMY MODE ........................................................................................................................................................ 6
2.6. FILTRATION .................................................................................................................................................................... 6
2.7. FAST FILTRATION BOOST ...................................................................................................................................... 7
2.8. SETTING THE WATER TEMPERATURE.................................................................................................................... 7
2.9. INCREASING THE MAXIMUM TEMPERATURE.................................................................................................... 7
2.10. “STANDBY”FUNCTION ........................................................................................................................................... 7
2.11. CONTROL PANEL KEYBOARD LOCKING............................................................................................................ 7
2.12. OZONE ........................................................................................................................................................................... 8
2.13. HEATING ELEMENT ................................................................................................................................................... 8
2.14. LAMP .............................................................................................................................................................................. 8
3. MAINTENANCE...................................................................................................................................................................... 8
3.1. WATER MAINTENANCE .............................................................................................................................................. 8
3.2. WATER FILTER MAINTENANCE................................................................................................................................8
3.3. THERMAL COVER.......................................................................................................................................................... 8
3.4. FROST PROTECTION ANTIFROST SYSTEM / SMART WINTER MODE............................................................................ 9
3.5. WALLS............................................................................................................................................................................... 9
3.6. ACRYLIC PLATE.............................................................................................................................................................. 9
4. WOOD PANEL ASSEMBLY/REMOVAL VERSION WITH PANEL ONLY ............................................................................. 9
5. TROUBLESHOOTING .........................................................................................................................................................10

4
1. HYDROMASSAGE SYSTEM
FILTER
LIGHTJETS2JETS3 JETS1
DOWNUP
AIR
CLOCK ECONO
213
B
A
B
D
D
P
R
C
C
C
C
O
X
F
L
R
R
O.- Ozone minijet: A small jet that adds ozone to disinfect
the water.
The hydromassage can be intensified by turning the jets in a
clockwise direction (about 90o), and an anti-clockwise decrea-
ses hydromassage intensity and eventually closes the jets.
The exchange should be performed while the bath is
not operating.
Hydro jets: Jets that aim water and/or a combination of air
and water:
A.- Adjustable superjet: An adjustable, large-capacity jets
B.- Rotating superjet: A large-capacity revolving jet with a
whirlpool effect.
C.- Minijet: A small jet that gives an enveloping massage.

5
CLIK
Airmassage (pearl bath): In airmassage, heated air is pumped
into the water by a blower. Millions of bubbles come from
the perforated bath bottom, actively relaxing the body. The
bubbles stimulate the circulatory system, relax muscles and
joints. Their activity may be compared to a normal hand
massage. It soothes the nervous and respiratory systems, and
improves metabolism.
D.- Venturi: A water vent regulator to adjust the quantity of air
to be mixed with the water, thereby changing the sensation
of the massage.
X.- Deviator: A two-way valve that permits the water flow to
be transferred from one side to the other in the SPA:
FILTER
LIGHTJETS2JETS3 JETS1
DOWNUP
AIR
CLOCK ECONO
213
FILTER
LIGHTJETS2JETS3 JETS1
DOWNUP
AIR
CLOCK ECONO
213
Both sections Left sections Right sections
F.- Skimmer: A device that filters and collects impurities from
the water. It has a built - in filter with replaceable cartridges.
L.- Spotlight: A halogen light for underwater illumination.
P.- Control panel: The SPA control panel for controlling, acti-
vating and programming the available functions.
R.- Head rest: A soft pillow for added comfort.
2. MAIN FUNCTIONS ACCESSIBLE FROM
THE ELECTRONIC CONTROL PANEL
FILTER
LIGHTJETS 2JETS 3 JETS 1
DOWNUP
AIR/AUX
CLOCK ECONO
213
2.1. SWITCHING ON/OFF THE PUMP
JETS 1
1
Thehydromassagepumpcanbeswitchedon/offdirectlyfromthe
electronic control panel. After starting the pump, this icon
1
, appears on the display and after switching it off, the icon
disappears.
With the two-gear pump, pressing the button for the first time
switches the pump over to a low gear (filtration; this icon
1
blinks on the display). Pressing the button once again switches
the pump over to a top gear (massage; this icon
1
appears
on the display). Pressing the same button again switches the
pump off and the icon disappears from the display.
In some cases, the pump automatically switches over to a low
gear after connecting it to the power supply. This happens
during the filtration or the water heating process in the SPA
bath.
The pump working in massage mode have automatic time
out (20 minutes) from the last button start.
JETS 2
2
JETS 3
3- unavailable
2.2. EXTRA EQUIPMENT
AIR
AIRMASSAGE ON/OFF
2.3. SWITCHING ON/OFF THE LIGHTING
LIGHT
Press this button to switch on the lighting. This icon
appears on the display. Press the same button again to swit-
ch off the lighting, and the icon disappears from the display.
The lighting switches off automatically after 2 hours from the
last pressing of the lighting on/off button.
Press and hold this button LIGHT for more than 5 seconds to
view from inside the spa the water temperature and time
display projection, to read these data.

6
2.4. SETTING THE RIGHT TIME
CLOCK
The controller is fitted with the RTC system (real-time clock),
which works permanently even after disconnecting the main
power. The RTC system makes it easier to use the SPA, since
the controller memorize the clock, filtration and the economy
mode setting even after the main power is off. It is not neces-
sary to set the filtration start time and its duration again. RTC
settings are available from big panel only.
To change the RTC system setting:
●Press and hold the clock button for about 5 seconds until
the clock icon starts blinking and appears permanently
on the display.
●Set the hour by using the up/down arrow buttons
UP
DOWN
●Press the clock button once again to set minutes by using
the up/down arrow buttons
UP
DOWN
●Press the clock button once again to save the current setting
after the time modification. If no button is pressed for longer
than 5 seconds, the controller returns to its normal mode
without saving the setting.
2.5. ECONOMY MODE
ECONO
After switching on the economy mode (energy saving mode),
the controller keeps the temperature 10°C (50°F) lower than
that previously set.
When this mode is working, this icon appears on the dis-
play. The economy mode can be activated (the icon is displa-
yed permanently) or suspended for 40 minutes from the
moment of switching off the last pump, when at least one
pump is switched on during this mode. Regardless of the
temperature previously set, the controller maintains the water
temperature not lower than 15°C (59°F).
To enter the economy mode:
●Press this button
ECONO
●The display will then show „Edx”, where x stands for the
economy mode duration (from 1 to 24 hours)
Ed0 – the economy mode is switched off,
Ed24 – the economy mode is working continuously.
●To change the hour, use the up/down arrows
UP
DOWN
and use this button
ECONO
on the control panel to confirm the
setting.
●After confirming the settings, the display will show the time
when the economy mode is to start.
●Set the hour and minutes using the arrows
UP
DOWN
and
confirm the setting with this button
ECONO
.
●Confirming the minutes with this button
ECONO
the economy
mode is set. The display returns to its normal status.
The setting of the economy mode is remembered even after
the power cut-off.
2.6. FILTRATION
FILTER
In this system, filtration process is based on water ozoniza-
tion. Water is sucked by the skimmer filter and then mixed
with ozone by the injector. After that, water returns to the
SPA bath through the ozone jet. Filtration process consists
on two steps. The first step lasts 1 minute, all three water
pumps work at the highest speed, while the heater is on.
Second step of filtration procedure starts with low speed of
double speed pump activation and ozonizing device activa-
tion. The duration of filtration depends on the time setting.
Filtration mode is indicated by this special icon on the
display. Filtration process can be suspended (the filtration
icon is blinking on the display) by switching on any of mas-
sage pumps. Filtration will return to its normal mode after 40
minutes after user last operations. Switching the lighting on
does not suspend the filtration process.
Setting filtration parameters:
●Press the filtration button
FILTER
●The display will show Fdxx, where xx stands for the filtration
duration from 0 to 12 hours.
●If xx is set on 0, the filtration does not work
●Filtration duration can be changed with these arrows
UP
DOWN
and the selected value is confirmed by pressing the
filtration button
FILTER
●The blinking filtration start time will appear on the dis-
play
●Changes are made with these arrows
UP
DOWN
and
confirmed by using the filtration button
FILTER
●After confirming the selected minutes by pressing the

7
filtration button, the controller memorizes the setting and
returns to its normal work. If no button is pressed for longer
than 5 seconds during the setting procedure, the controller
will quit the filtration setting menu and will not remember
any changes.
2.7. FAST FILTRATION BOOST
The “boo” function enables to make faster water filtration.
During this function, all the pumps work for 1 minute. Addi-
tionally, pump 1 works in a fast gear for 45 minutes along
with the ozonator. The heater works normally during the fast
filtration process. After switching this function on, the „boo”
sign appears on the display and is present until this function
is finished. Fast filtration process is triggered by pressing and
holding the pump 1 button for 10 seconds. This function can
be switched off earlier by starting any other pumps.
2.8. SETTING THE WATER TEMPERATURE
To set the water temperature, press the arrow buttons
UP
DOWN
on the control panel.
The selected temperature does not have to be confirmed, but
only set. The display, after 5 seconds from the last pressing,
will return to the previous status and start showing the current
water temperature. The controller maintains the set tempe-
rature with an accuracy of ± 0,5°C (1°F). If the water tempe-
rature is lower than that previously set, the controller will start
the heater and low gear pump1 (filtration circuit) and keep it
on until the water reaches its required temperature. If the
economy mode is on
ECONO
the controller keeps the water
temperature lower by 10 degrees than that previously set.
After the economy mode is off, the controller returns to
maintaining the previous temperature set.
2.9. INCREASING THE MAXIMUM TEMPERATURE
This function allows the user to increase the water tempera-
ture by two degrees centigrade above 40°C (104°F). To set
the temperature above 40°C, set the maximum temperature
and next press and hold the up arrow button
UP
for
5 seconds until the Orx.x sign apears on the display, where
x.x signifies how much the temperature value is to be increa-
sed above the maximum temperature. This value can be in-
creased half a degree, and the maximum value is two grades,
so the maximum water temperature is 42° C. To return to a
normal mode of setting the water temperature, press the
down arrow button
DOWN
a few times until the normal
temperature, ranging from 15 to 40°C, appears on the dis-
play.
2.10. “STANDBY” FUNCTION
This function blocks access to all devices connected to the
controller for 60 minutes. This function stop all functions
without need of disconnecting the power supply. To switch
on this function, press this button
FILTER
5 seconds.
After switching this function on, the “Sby” sign will
appear together with the time left to the end of this func-
tion.
There are three methods to stop this function automaticaly:
●Wait 60 minutes until this function stops.
●Press this button
FILTER
for longer than 5 seconds when the
function works.
●Disconnect the controller from the power supply.
The “Stand-By” function blocks the filtration function. If 40
minutes after going out from “Stand-By” mode SPA still will
be in filtration period, filtration mode will start again.
2.11. CONTROL PANEL KEYBOARD LOCKING
Partial keyboard locking:
●Press and hold this button
ECONO
. During this operation, the
key-shaped icon blinks.
●The LocP sign will appear on the display after pressing this
button on the control panel for 3 seconds. Once this sign has
appeared, the function becomes active and the key icon is
on permanently. The main and optional control panel are
locked.
●Release the button.
●Following keys are blocked now: jets, light air/aux and all
the keys in optional panel.
To unlock the panel, press and hold this button
ECONO
for not
less than 5 seconds.
The LocP sign will appear on the display if any button is pres-
sed after locking the keyboard. The partial keyboard locking
function is not remembered after a power cut-off.
Total keyboard locking:
●Press and hold this button
ECONO
. The key-shaped icon blinks
during this operation.
●The “LocP” sign will appear on the display after pressing
this button on the control panel for 3 seconds. Once this sign
has appeared, the function becomes active and the key icon
is on permanently. The main and optional control panel are
locked.
●Keep this button pressed.
●After 5 seconds the LocF sign appears, and since that mo-
ment the function is active.
●Release the button.
All the buttons in both panels are locked.
To unlock the panel, press and hold this button
ECONO
for not
less than 5 seconds.
The LocF sign will appear on the display if any of the locked
buttons is pressed after locking the keyboard. The total ke-
yboard locking function is not remembered after a power
cut-off.

8
2.12. OZONE
The ozone generator works during the filter cycles for purifi-
cation purposes, keeping the water clear and hygienic.
The ozone generator produces active O3molecules from the
air. These molecules are sucked in from the ozone generator
to the water injector. The O3mixed with the water kill the
bacteria in contact with the water.
Oxygen (O )
2Ozon (O )e3
O1O3
O2
oxygen atoms
electric current
or UV light
2.13. HEATING ELEMENT
If the safety system triggers, wait until the heater cools down
completely, remove the safety contact near the thermostat
control and press the RESET button.
THE HEATING ELEMENT ONLY HEATS WHEN THE HYDRO-
MASSAGE WATER PUMPS ARE WORKING OR THE FILTER
PUMP IS ON.
The objective is to maintain the water temperature while it
is being used, thus avoiding loss due to water and air mo-
vement.
If you wish to heat the water from an ambient temperature
of approximately 240C to 320C, keep the hydromassage
function in operations for at least 3 hours, depending on the
location.
2.14. LAMP
The spa lamp is a 12 V 15 W halogen lamp. To change the bulb,
empty all the water and change the bulb from inside the spa,
unscrewing the trim. Replace the lamp with one of similar
specifications. Do not fit one of greater power or different
voltage, since the overtemperature could damage the acrylic
plate and the transformer is not prepared for consumption
over 15 watts. Make sure it is closed correctly and that the
seals are watertight.
3. MAINTENANCE
3.1. WATER MAINTENANCE
To maintain the water in perfect hygienic and aesthetic con-
ditions, we recommend the use of products for disinfecting
and treating water specially designed for spas.
Ideal values:
Chlorine (free chlorine) 0.3-0 .6 mg/l
Ph value of 7.0-7.4 pH
It is not possible to drain the entire water content inside the
bath just through the drain valve (in the right hand side). The
area that cannot be drained is marked on the figure. The water
there should be removed manually (e. g. with a small bucket).
The bath should be switched off after it has been drained.
Please check the water level before entering the bath. The
water level should be from 3 to 4 cm above the skimmer. See
the figure on the right. If the water level is not sufficient, the
filtration system will not work properly. Also heating will not
be possible. Please remember about adding water from time
to time to maintain the water level.
3.2. WATER FILTER MAINTENANCE
The bath must be not operating.
Remove the filter cover and then take out the cartridge.
Clean it with a powerful jet of water.
On the first sign of wear and tear, replace the filters with
other new original filters, which can be purchased from your
authorised ROCA dealer.
Fit the cartridge and turn on the filter pump.
3.3. THERMAL COVER
Thermal covers are a necessary accessory for spas since they
protect them from the weather and keep the water in opti-
mum conditions of hygiene.

9
Continuous exposure to strong sunlight and UV rays may
change the cover color. The cover should also be protected
against any physical damage.
3.4. FROST PROTECTION ANTIFROST SYSTEM / SMART WINTER
MODE
Most important task of SPA electronic system is holding
temperature of water within the range between 15 to 400C.
However electronic system has additional feature - winter
operation mode (Antifrost/Smart Winter mode) which pro-
tects piping against frozing.
PCB integrated temperature sensor continously controls
air temperature which surronds electronic system. If air
temperature decrease below 150C electronic system starts
winter mode. In this mode system switches on every pump
for 1 minute (one by one). Frequency of pumps operations is
connected with surrounding temperature and is presented
in the table below. Water heater works independently of air
temperature sensor, it depends only of water temperature
sensor.
Temperature 0 COperating frequency (min)
12 < t ≤ 15 120
9 < t ≤ 12 60
6 < t ≤ 9 30
t ≤ 6 15
• Operation mode ANTIFROST system is marked by ICE symbol
on the LCD screen.
• Stand by mode doesn’t affect on ANTIFROST system ope-
rations.
• All these functions are not available until ICE symbol disap-
pered. It is possible to take a bath.
• If electronic system detects temperature below 150C degrees
of the surrounding air then ANTIFROST systems starts after
15 minutes from last pump switch off.
• If during filtration mode ANTIFROST system starts, filtration
mode will be switch off.
3.5. WALLS
No special care is required since they have been designed for
outdoor use. After 3 or 4 years, you can give them a coat of
water-based varnish.
3.6. ACRYLIC PLATE
Special precautions must be taken in the cleaning and ma-
intenance of the spa.
- To clean the spa, do not use abrasive or aggressive products,
since they could damage the surface.
- If the surface of your spa shines, you can remove any sur-
face scratches. Use an emery cloth with water (No. 800) and
recover the initial shine with a solvent-free polish of the type
used for car paint.
- Do not use any other alcohol-base chemical product for cle-
aning plastics, such as the electronic panel. To remove scale,
use very diluted vinegar (acetic acid). Never use shop-bought
chemical products.
4. WOOD PANEL ASSEMBLY/REMOVAL
VERSION WITH PANEL ONLY

10
5. TROUBLESHOOTING
Symptom Possible cause Solution
The display is flashing. A power failure must have
ocurred.
Press any key to stop the flashing and reprogram the filter
cycle.
3 flashing dots are dis-
played.
A problem has been detec-
ted.
Do not enter the water! Check and open water valves. Clean filter
if necessary. Check water level. Add water if needed.
Shut power off and power your spa up again to reset the sys-
tem.
Call your dealer or service supplier if problem persists.
Water temperature is
flashing.
Water temperature in the spa
has reached 44ºC.
Do not enter the water! Remove spa cover and allow the water
to cool down. The system will reset itself when water reaches
43ºC.
Call your dealer or service supplier if problem persists.

11

12
20100406
8S0092000
Roca S.R.L.
Via Leonardo da Vinci, 24
20080 Casarile (Milano)
Italia
Tel. +39.02.900.251
Fax.+39.02.905.21.74
Roca Cerâmica e Comercio, S.A.
Serviços Comerciais
Rua José Duarte Lexim, Lote 6
2675-393 Odivelas Codex
Apartado de Correios 16
2676-901 Odivelas Codex
Portugal
Tel. +351.21.937.94.30
Fax.+351.21.937.94.31
Roca Limited
Samson Road
Hermitage Ind. Estate
Coalville, Leics. LE67 3FP
United Kingdom
Tel. +44.(0)1530.83.00.80
Fax.+44.(0)1530.83.00.10
ROCA Maroc, S.A.
Route de Marrakech, km 2.5
B. P. 571 - 26000 - Settat
Maroc
Telf : +212.(0)23.40.59.41
+212.(0)23.40.03.39
Fax : +212.(0)23.40.59.42
Roca GmbH
Feincheswiese 17
56424 Staudt
Deutschland
Tel. +49.(0)2602.93610
Fax.+49.(0)2602.936.122
Roca Polska Sp. z o. o.
ul. Wyczolkowskiego 20,
44-109 Gliwice
Polska
Tel. +48.(0)32 339 41 00
Fax.+48.(0)32 339 41 01
Roca Argentina S.A
Camino General Belgrano, 2873
1824 - Lanús Este
Buenos Aires
Argentina
Tel. +54.(0)114.230.96.39
Fax:+54.(0)114.246.95.56
Roca S.A.R.L.
BP 90422
95005 Cergy Pontoise Cedex
France
Tél. +33.(0)1.34.40.39.00
Fax.+33.(0)130.37.02.65
+33.(0)134.64.13.55
Kalevit Roca Saniter Seramik Sanayi, A.S.
Büyükdere Cad.
Kaleseramik Binasi
80620 Levent – Istanbul
Turkey
Tel. +90.212.270.70.00
Fax.+90.212.268.68.89
Roca Sanitario, S.A.
Av. Diagonal, 513
08029 Barcelona
Spain
Tel. 93.366.12.00
Fax 93.405.27.73
Other manuals for BROADWAY COMPACT
1
Table of contents
Other Roca Hot Tub manuals

Roca
Roca BROADWAY COMPACT User manual

Roca
Roca Broadway Round User manual

Roca
Roca SPA BROADWAY ROUND User manual

Roca
Roca LINEA A24T0 0 Series User manual

Roca
Roca SPA BROADWAY ROUND Instruction Manual

Roca
Roca BROADWAY FAMILY User manual

Roca
Roca Broadway Maxi User manual

Roca
Roca BROADWAY Instruction Manual

Roca
Roca BROADWAY SPA Guide

Roca
Roca Broadway Maxi Instruction Manual