Rokit Invivo User manual

USER MANUAL
ROKIT

INVIVO
Multi-Use Hybrid Bio 3D Printer
Rokit Invivo as the most innovative and up to date bio 3D printer, allows users to create versatile 3D cellular
structure with multi material and extensive designs. By covering synthetic bio polymers such as PCL, PLGA,
PLLA and various hydrogels for scaffold generation, Rokit Invivo is an optimized tool for many of biomedical
research with its modular system and sterile environment. To be concrete, Invivo users can choose two out of
three types of nozzles (extruder, mechanical dispenser, hot melt pneumatic dispenser) with additional
temperature control function to optimize Invivo for their own research purpose. Rokit not only provides medical
grade PLGA, PLLA, PCL filament for Invivo extruder, but also gelatin based photo-curable bioink called
Invivo@gel for printing wide range of soft 3D cellular structures with Invivo dispensers. Additionally, Invivo
provides uncontaminated environment by making the machine closed system with H14 grade HEPA filter for
external air filtration and 254nm UV lamps for stage sterilization. With android OS touchscreen, users can
upload/download and print the 3D file with wifi network, also monitor printing status with their smart device. As
a powerful and versatile biomedical research tool, Invivo not only gives you creative research inspiration but
also actualize it immediately in your lab to attain innovative result for human life.
ROKIT
Modular System of DualPrinting Nozzles
Biopolymer Filaments,Powders, Pallets & Various Hydrogels and Cell laden inks
Extruder Resolution: 0.2mm~0.4mm / Dispenser Resolution: 0.08mm~0.2mm
AndroidOSwith Wifi Connection Printing
Components with FDA Standard Compliance
Temperature Control System (Premium)
HotMelt Pneumatic Dispenser (Premium)

SAFE INFORMATION
SPECIFICATION
Printing System
LCD
Resolution
Hepa Filter
UV Lamp
UV LED
Extruder
Bio Dispenser
Bio Dispenser Function
Bed Plate Function
Nozzle
Pneumatic
Dispenser
Build Volume
Printing Speed
Standard
Polymer Extruder + Bio Dispenser Polymer Extruder + Bio Dispenser
+ Hot Melt Pneumatic Dispenser
LCD Touch Screen / Android OS
Extruder 0.2mm / Dispenser 0.08mm
H14 Hepa Filter
Sterilizing UV Lamp(12W/254nm)
UV LED(365nm)
Detachable Nozzle / Tube System
Screw type of Bio Dispenser to avoid Contamination
12ml Syringe
Extruder: 0.2mmØ,0.4mm Ø
Bio Dispenser: 0.08~0.2mm Ø
-
-
-
Temperature Control System(-4℃~80℃)
High Temperature
Melting System(~350℃)
PremiumUpgrade
100X100X80mm
3~20mm/sec
NOTE :
Do not operate on the deck while UV lamp on. It might cause burns or injury to eyes.
NOTE :
Above specifications can be changed without notice.
Extruder: 0.2mmØ,0.4mm Ø
Bio Dispenser: 0.08~0.2mm Ø
Pneumatic Dispenser: 0.1~0.5mm Ø
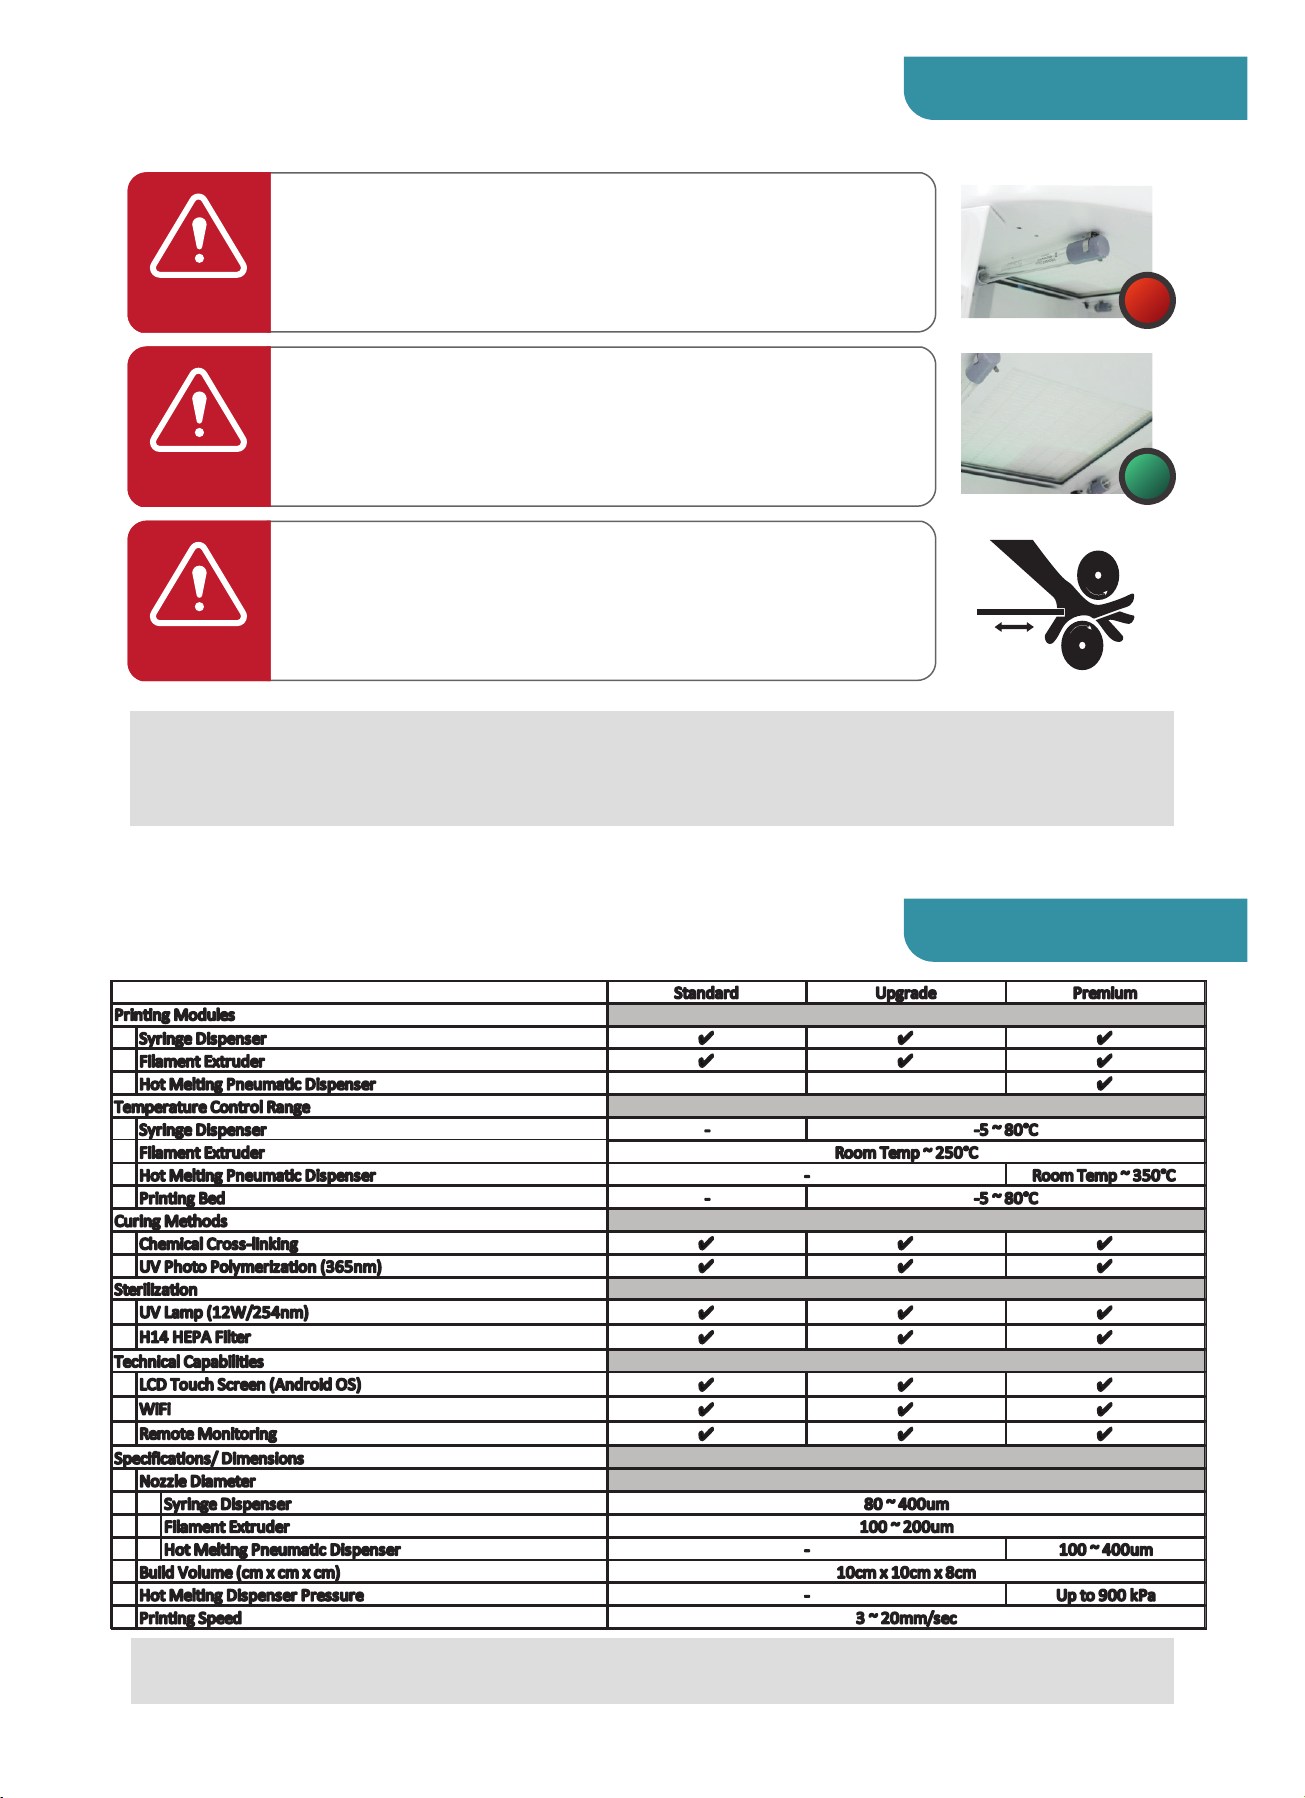
Use caution when turning on the UV lamp
- Do not use a work bench when a UV lamp is on.
- It may irritate or burn skin and eyes.
- Use a red switch on the upper right side of the machine to turn on/off the UV lamp.
- Turn off the UV lamp before opening
- It requires replacement every 14 months. (24hours a day)
NOTE :
Keep away from flammable substances. It may result in a fire.
Do not touch a power cord with wet hands. It may cause electric shock.
Do not plug in multiple devices to one consent. This may cause a fire.
For sterilization, change filter regularly.
Use caution when turning on the HEPA filter
- Use a green switch on the upper right side of the machine to turn on/off the HEPA filter.
- Turn on the HEPA filter before use the printer, and the UV lamp should be turned off.
- It requires replacement every 8 months
(It varies depending on the operating environment)
- In the clean bench, turn off the filter and print.
Hazardous moving parts
- Keep fingers and other body parts away
- Open the door carefully or insert your hands while the device is running.
ON
OFF
ON
OFF
Caution
Caution
Caution

File Print
For opening up
the file you want
to print
Camera
For Camera
Printer View
For operation
Bed Leveling
Bed leveling to set the
offset value of ax z
Filament
Loading and
unloading filament
EasyMode
For beginner
Setting
Language setting,
Identification of
Serial number
and IP
1
2
3
4
5
6
7
8
9
10
11
12
13
14
15
16
Dispenser
Filament guide
Extruder 0.2mm
INVIVO@PLA
Pin 1.8mm
Cleaning Pin
Allen Wrench
Bolt
Thickness Gage
Syringe
Syringe Tip
Petri-Dish
Dongle
USB Cable
Power Cable
Aluminum Case
1ea
1ea
1ea
1ea
1ea
2set
3set
2set
1ea
5ea
3ea
10ea
1ea
1ea
1ea
1ea
WHAT’S INCLUDED?
1
9
5
46
7
8
WHAT’S IN THE BOX
10
11
12
13
14
15
16
NEW CREATOR K APP
2
3

NEW CREATOR K APP
G-Codefor Single Printing
1
2
3
4
5
6
G-Codefor Dual Printing
Open [New Creator K] in your computer.
Click [Settings] > [Printer] >[Bio]on the top of the menu.
Enter [File] > [Open], and select two 3D modeling files.
Select a nozzle type you want to use by clicking your right mouse button.
Decide the size, arrangement and rotation of the file on the [OBJECT] menu.
Enter [SLICER] menu to adjust conditions (printing speed, temperature of the nozzle and percentage of filling) for the printing material.
Click the [Slicing] button on the top to createthe G-Code file, and save it.
1
2
3
4
5
6
7
HOW TO USE
HOW TO USE
SLICER SAVE
SLICER
SAVE
2
2
3
1
2
1
1
2
3
1
TIP : Dispenser2 (Right: Dispenser = Dispenser1 / Left: Dispenser= Dispenser2)
Open [New Creator K] in your computer
Click [Settings] > [Printer] > [Bio]on the top of the menu.
Open up a 3D modeling file such as stl, obj, 3ds and amf using [File]> [Open]
Decide the size, arrangement and rotation of the file on the [OBJECT] menu.
Enter [SLICER]menu toadjustconditions (printing speed, temperature of the nozzle and percentage of filling) for the printing material.
Click the [Slicing] button on the top to createthe G-Code file, andsave it.

A bed installation
Click [New Creator K APP] > [Printer View]on the screen.
To install a bed such as a petri-dish, adjust the bed mount position usingarrowbuttons like seen on the screen.
1
2
HOW TO USE

Preparation for bio filament printing
Enter the [New Creator K APP]> [Filament] >[EXTRUDER1]
Set up the proper temperature depending on bio filaments, andthen click [SETTEMP] to heat up the nozzle.
Infeed the filament into the lower insertion hole of the motoruntil it is grabbed by its gear.
Click [0.1MM], [1MM] or [10MM]on the [Distance]to discharge the filament.
Select the [LOAD]button on the [Loading] menu to extrude the filament until it is discharged from the nozzle.
Check out whether bio materials are discharged from the heated nozzle.
1
2
3
4
5
6
HOW TO USE
HOW TO USE
Distance
Loading
Temperature
Preparation for bio dispenser
Fill in the dispenser with bio materials, and make sure to minimize layer of air inside of the syringe.
After choosing a proper size of a needle tip for the target resolution, adjustthe height of the dispenser mount to the position of the
piston accordingly.
Move to the [New Creator K APP]> [Filament] >[DISPENSER 1(RIGHT)] on the menu.
Click [0.1MM], [1MM] or [10MM]on the [Distance] to move dispensermounter
Adjust the height of the mounter to the piston using [UNLOAD]or [LOAD]button.
Check out whether materials are discharged from the dispenser by loading the materials by 0.1mm.
1
2
3
4
5
6
7
NOTE :
Adjusting the distance of the dispenser by 1mm or 0.1mm is recommended.
(Setting up short distance of [Extrude Distance]depending on materials is recommended)
TIP :
Available to use a tip which complies with specifications other than types of basic needle tips.
TIP :
The optimized temperature is 235~245 degrees Celsius for PLA which is provided.
Distance
Loading

Leveling – Bio dispenser
Enter the [New Creator K APP]> [Bed Leveling] >[RIGHT POSITION]
Click the[HOME] button to adjust the distance from anozzle and a bed.
After clicking the [SET HOME POSITION], choose the distance to move among [0.1MM], [1MM] and [10MM]
After selecting the moving distance you want, click up and down arrows to adjust the distance between an output bed and a nozzle, up
to the properties such as viscosities of materials.
The thickness gauge provided will be helpful for this.
Click the[FINISH] button.
1
2
3
4
5
6
HOW TO USE
HOW TO USE
Leveling – Bio extruder
Enter the [New Creator K APP]> [Bed Leveling] >[LEFT POSITION]
Click the[HOME] button to adjust the distance from anozzle and a bed.
After clicking the [SET HOME POSITION], choose the distance to move among [0.1MM], [1MM] and [10MM]
After selecting the moving distance you want, click up and down arrows to adjust the distance between an output bed and a nozzle, up
to the properties such as viscosities of materials.
The thickness gauge provided will be helpful for this.
Click the [FINISH]button to finish leveling.
TIP :
Before leveling, adjust the left extruder to make the extruderis parallel to the dispenser, or adapt the height of the extruder higher
than the dispenser. If the layer is 0.2mm, using 0.1mm thickness gauge is recommended for leveling. In the following printing,
the height you have set will be the offset value of the nozzle.
1
2
3
4
5
6
TIP :
Inthe following printing, the height you have set will be the offset value ofthe nozzle.

Leveling – Dual nozzle
Complete the dispenser leveling first asthe single leveling, and then click[LEFT] to proceed to the extruder leveling.
Click the[HOME] button, and then lower the extruder nozzle on the [SETPOSITION] menu as much as the height of dispenser.
Additionally, adjust the distance of a bed and a nozzle, and then turn the upperscrew to change the height of the extruder.
1
2
3
HOW TO USE
NOTE :
For dual leveling, click the [SET POSITION] button, and then adjust height of the extruder manually to the position of the dispenser
nozzle accordingly.

Using a USB memory to print out
Insert a USB memory into the right side of INVIVO.
Choose [New Creator K APP] > [File Print] > [USB] on the screen.
Select the file to print out.
1
2
3
HOW TO USE
HOW TO USE
Using a USB cable to print out on a computer
Open the [New Creator K] appand click [CONNECT]
Insert [DEBUG NETWORK IP address: 192.168.7.2] andclick the [Connect] button on the right.
When the computer and INVIVO are connected, click the [Print] after uploading a G-code file.
1
2
3
CONNECT
USB

Using Wifi to print out
Enter [New Creator K APP] > [Setting] > [NETWORK]
Select the network tab and confirm IP address on the WiFi network.
Open the [New Creator K] app, and then click [CONNECT]
Type the [NETWORK IP address:192.168.0.XXX] and click the [Connect] button on the right.
When the computer and INVIVO are connected, click the [Print] after uploading a G-code file.
1
2
3
4
5
HOW TO USE

Removing and Cleaning Bio-filament after use
Click [New Creator K APP] > [Filament] > [EXTRUDER 1] on the display.
Raise the setting temperature of the nozzle on the [Temperature] screen to warm it up enough to melt the filamentwhich has cooled
and hardened.
After it is warmed up, press the [UNLOAD]button and remove the filamentfrom the nozzle.
Take out the inserted tube, pressing the black one-touch fitting on the topof the nozzle.
Remove remains of the material in the nozzle with a sterilized pin.
1
2
3
4
5
HOW TO USE
HOW TO USE
Detaching andKeeping the bio dispenser after use
Choose[New Creator K APP] >[Filament] > [DISPENSER 1(RIGHT)]on the screen.
Click the [UNLOAD]button.
Loosen up screws holding a bio dispenser, and detach the bio dispenser.
1
2
3
TIP :
The used filament must bedetached and kept with the bobbin in a sealedpack.
Distance
Loading
Temperature
Distance
Loading

Using Bio Warmer
Put spare bio dispensers in the warmer as seen on the screen.
Enter the [New Creator K APP] > [Printer View]
Press [TEMPERATURE] to heat up the bio ink.
Preheat spare dispensers to use.
1
2
3
4
HOW TO USE
Temperature

NOTE :
Please make sure the printer got TURNED OFF when you connect the printer with temperature control box.
Turn power of the printer on after the circulation ofcoolant.
Make sure all valves are open before you turn the temperature control box on.
How touse Temperature Control Box (Premium)
Open the lid of the control box, and pull 6 bottles of INVIVO Liquid(Coolant).
Close with silicon lid(provided) after 10 seconds of circulation of coolant.
Set the temperature ofbedand syringe, and press [SET] button.
When you are done using with temperature control box, do notimmediately turn off the power.
Lower or upper the temperature up to25-30 celcius, and let the temperature setted, then turn the machine off.
1
2
3
4
HOW TO USE
TIP :
If you skips 4th process above, the internal elements may be overloaded, which may cause malfunction.
Replacement term of INVIVO@COOLANT is 1 year.
TIP : The maximum pressure is 9bar(900kpa).
When you have ooze while your printing, Hold [VACCUM] which is on the Air Dispenser Controller.
HOW TO USE
How touse AirDispenser (Premium)
Before using the AirDispenser, press [SETTING]> [OPTION], and press [ON] on the ‘Dispenser Type(Bio INVIVO)’
After unscrewing the barrel fixture, fill the stainless barrel(10cc) with the material will be used.
After mounting the precision nozzle on the barrel, install it in the machine, and screw the barrel fixture.
Set the preferred temperature at the Air Dispenser Controller(max~350 celcius)
Wait for the material to be melted, about 20-30 minutes, and then press [SHOT] for checking whether the material comes out.
1
2
3
4
5
Current Temperature
Target Temperature
SET Button
Temperature Controller
Vacuum
Temperature Controller
Requlator
SHOT Button

HOW TO USE
How to use AirCompressor (Premium)
When the compressoris in operation, connect with [AIR IN] of AirDispenser Controller with the hose from air outletof Air Compressor.
Turn the power on of Compressor.
Set preferred pressure by controlling the pressure gauge of Compressor.
1
2
3
HOW TO USE
TIP :
Loading of the AirCompressor starts at below 9.8bar, and stops when it reaches to 11.3bar.
Factory settingof compressor is 9.5bar, which can be controlledby pressure regulating valve.
Power Switch
Drain Timer
Hour Meter
Pressure Regulating Valve
Regulator Gauge
Tank Gauge

ROKIT Inc.
+82.02.867.0182
info@rokit.co.kr
www.rokit.co.kr
www.facebook.com/rokitworld
TEL
E-Mail
WEB
SNS
USER MANUAL
ROKIT
Table of contents
Other Rokit 3D Printer manuals