Zurück Stopp Vorwärts Links Rechts
WARNUNG:
UM ERNSTHAFTE VERLETZUNGEN ZU VERMEIDEN:
1. Ständige Überwachung durch Erwachsene erforderlich, Montage nur durch Erwachsene.
2. Dieses Fahrzeug ist nicht geeignet für Kinder unter 6 Jahren aufgrund besonderer Geschick und
Übung erforderlich sind.
3. Plastiksäcke sollen nicht in der Nähe von Kindern aufbewahrt werden, um Ersticken zu verhindern.
4. Nie in der Nähe von Kraftfahrzeugen, Straßen, Fahrbahnen, Gassen, Schwimmbecken, Anhöhen,
Treppen, Auffahrten, abschüssigen Auffahrten, Autobahnen, unebenen Fahrbahnen und auf Wegen mit
Hindernissen verwenden.
5. Nur ein Kind sollte gleichzeitig Fahren.
6. Kinder sollten immer Schuhe tragen, wenn Sie fahren.
7. Benützen Sie das Fahrzeug nie draußen in der Nacht.
8. Benützen Sie es nie während nassem Wetter.
9. Das maximale Benutzergewicht beträgt 50kg.
10. Es bestehen zusätzliche Gefahren bei der Benutzung des Fahrzeugs an anderen Orten als
Privatgrundstücke.
11. Stellen Sie sicher, dass Sie einen Sicherheitshelm und Schutzausrüstung tragen, um mögliche
Verletzungen zu vermeiden. Soll nicht im Verkehr verwendet werden.
12. Fahrzeug sollte mit Vorsicht verwendet werden, da Fähigkeiten erforderlich sind, um Stürze oder
Kollisionen zu vermeiden, die zu Verletzungen bei dem Nutzer oder Drittpersonen führen könnten.
13. Überprüfen sie alle Teile periodisch und ziehen Sie falls nötig an. Ersetzen Sie abgenutzte oder
gebrochene Teile sofort.
14. Halten Sie es von Feuer fern.
15. Batterie, Ladegerät, Stecker des Elektrokabels, Gehäuse und andere Teile sollten regelmäßig auf
Schäden überprüft werden. Bei Schäden, muss vor der Nutzung eine Reparatur durchgeführt werden.
16. Da die Verwendung der Produkte selbst mit möglichen Gefahren verbunden ist, liegt es in der
verantwortung der eltern, ein dem alter des kindes entsprechendes fahrspielzeug auszuwählen bzw.
muss die elterliche aufsicht gewährleistet sein, wenn mehrere kinder unterschiedlicher altersgruppen
zugang zum gleichen fahrspielzeug haben. Nicht jedes Produkt ist für Kinder jeden Alters und jeder
Größe geeignet. Deshalb werden für dieses Produkt unterschiedliche Altersempfehlungen angegeben.
Diese richten sich nach Art der Gefahr und den erwartungsgemäßen mentalen und physischen
Fähigkeiten des Kindes mit der Gefahr umzugehen.
17. Das Fahren eines elektrischen Fahrspielzeugs ist mit Gefahren verbunden. Das Fahrspielzeug
kann, ohne Verschulden des Herstellers, unter bestimmten Bedingungen nicht funktionieren. Wie bei
anderen elektrischen Produkten, das Aufsitzfahrzeug kann sich bewegen und ist zum Fahren
vorgesehen. Weder größte Vorsicht, das Befolgen der Anwendungshinweise oder Kompetenz kann
verhindern, dass das Kind das Fahrzeug nicht mehr steuern kann oder dass das Kind vom Fahrzeug
herunterfällt bzw. in gefährliche Situationen gerät.
WARNUNG:
1. Vermischen Sie keine alten und neuen Batterien.
2. Vermischen Sie nicht Alkalin, Standard (Zink-Kohle) oder wieder aufladbare Batterien.
3. Verwenden Sie nur durch den Hersteller spezifizierte Batterien.
4. Nicht-wieder aufladbare Batterien sollen nicht nochmals aufgeladen werden.
5. Wieder aufladbare Batterien sollen nur unter der Aufsicht von Erwachsenen aufgeladen werden.
6. Stellen Sie sicher, dass Sie die Batterien korrekt einsetzen und befolgen Sie immer die Instruktionen
der Batterien- und Fahrzeug-Hersteller.
7. Schwache oder verbrauchte Batterien sollen aus dem Vehikel entfernt werden.
8. Schließen Sie die Einspeiseklemme nicht kurz.
9. Das Ladegerät ist kein Spielzeug.
10. Leere Batterien sind aus dem Fahrzeug zu entfernen
11. Erstickungsgefahr bei kleinen Teilen, eignet sich nicht für Kinder unter 6 Jahren.
12. Feuergefahr - Keine vom Benutzer zu wartenden Teile. Sie sind nicht zur Verwendung in Höhen
über 2000 m über dem Meeresspiegel vorgesehen.
13. Längere Einwirkung von UV-Strahlen, Regen und Witterungseinflüssen kann das Gehäusematerial
beschädigen.
14. In geschlossenen Räumen aufbewahren, wenn es nicht benutzt wird. Ausschließlich das Ladegerät
HK-AX-138A100-GB / HK-AX-138A100-EU verwenden.
15. Das Fahrzeug darf nur mit dem empfohlenen Ladegerät verwendet werden.
16. Das Fahrzeug muss in einer trockenen Umgebung gelagert werden.
17. Das Fahrzeug sollte auf einer ebenen Fläche benutzt werden.
18. Vermeiden Sie Straßen und Oberflächen mit Wasser, Sand, Kies, Schmutz, Laub und anderem
Schmutz.
19. Das Aufladen der Batterie und die Benutzung des Fahrzeugs sollten bei Temperaturen von 0-30°C
erfolgen.
20. Leere Batterien müssen in einem dafür vorgesehenen Auffangbereich aufbewahrt werden und
dürfen nicht achtlos entsorgt werden.
AUFLADEN IHRES FAHRZEUGES:
1. Laden Sie die Batterie für 12 Stunden auf, bevor Sie das Fahrzeug zum ersten Mal verwenden.
2. Verbinden Sie die Klemme der Batterie und das Ladegerät, stecken Sie dann das Ladegerät in die
220V AC-Netzsteckdose.
3. Nach 1-2 Stunden der Nutzung, laden Sie bitte für 8-12 Stunden auf, überschreiten Sie nicht eine
Aufladezeit von 20 Stunden.
4. Wenn das Fahrzeug langsamer als normal fährt, dann laden Sie es sofort für 8-12 Stunden auf.
5. Wenn Sie das Fahrzeug für eine längere Zeit nicht benutzt haben, dann laden Sie die Batterie bitte
voll auf und laden Sie alle 3 Monate auf, um das Leben der Batterie zu verlängern.
6. Wenn das Ladegerät während dem Aufladen heiß ist (weniger als 71℃) während dem Aufladen, ist
dies normal.
7. Der Ladegerät-Anschluss darf nicht in der Nähe von Wasser platziert werden, da es sonst zu einem
Kurzschluss kommen kann.
8. Das Auto soll nur mit dem mitgelieferten Ladegerät aufgeladen werden, sonst könnte das Auto
beschädigt werden.
9. Nur Erwachsene dürfen die Batterie aufladen.
10. Nur Batterien des gleichen oder eines ähnlichen Typs werden für die Nutzung empfohlen.
11. Batterien sollen mit der korrekten Polarität eingesteckt werden.
12. Beschädigte Batterien sollen aus dem Fahrzeug entfernt werden.
13. Die Stromversorgungsanschlüsse sind nicht kurzgeschlossen werden.
14. Vermischen Sie keine alten und neuen Batterien.
15.Halten Sie es während dem Aufladen von Kindern fern.
ADD. 1
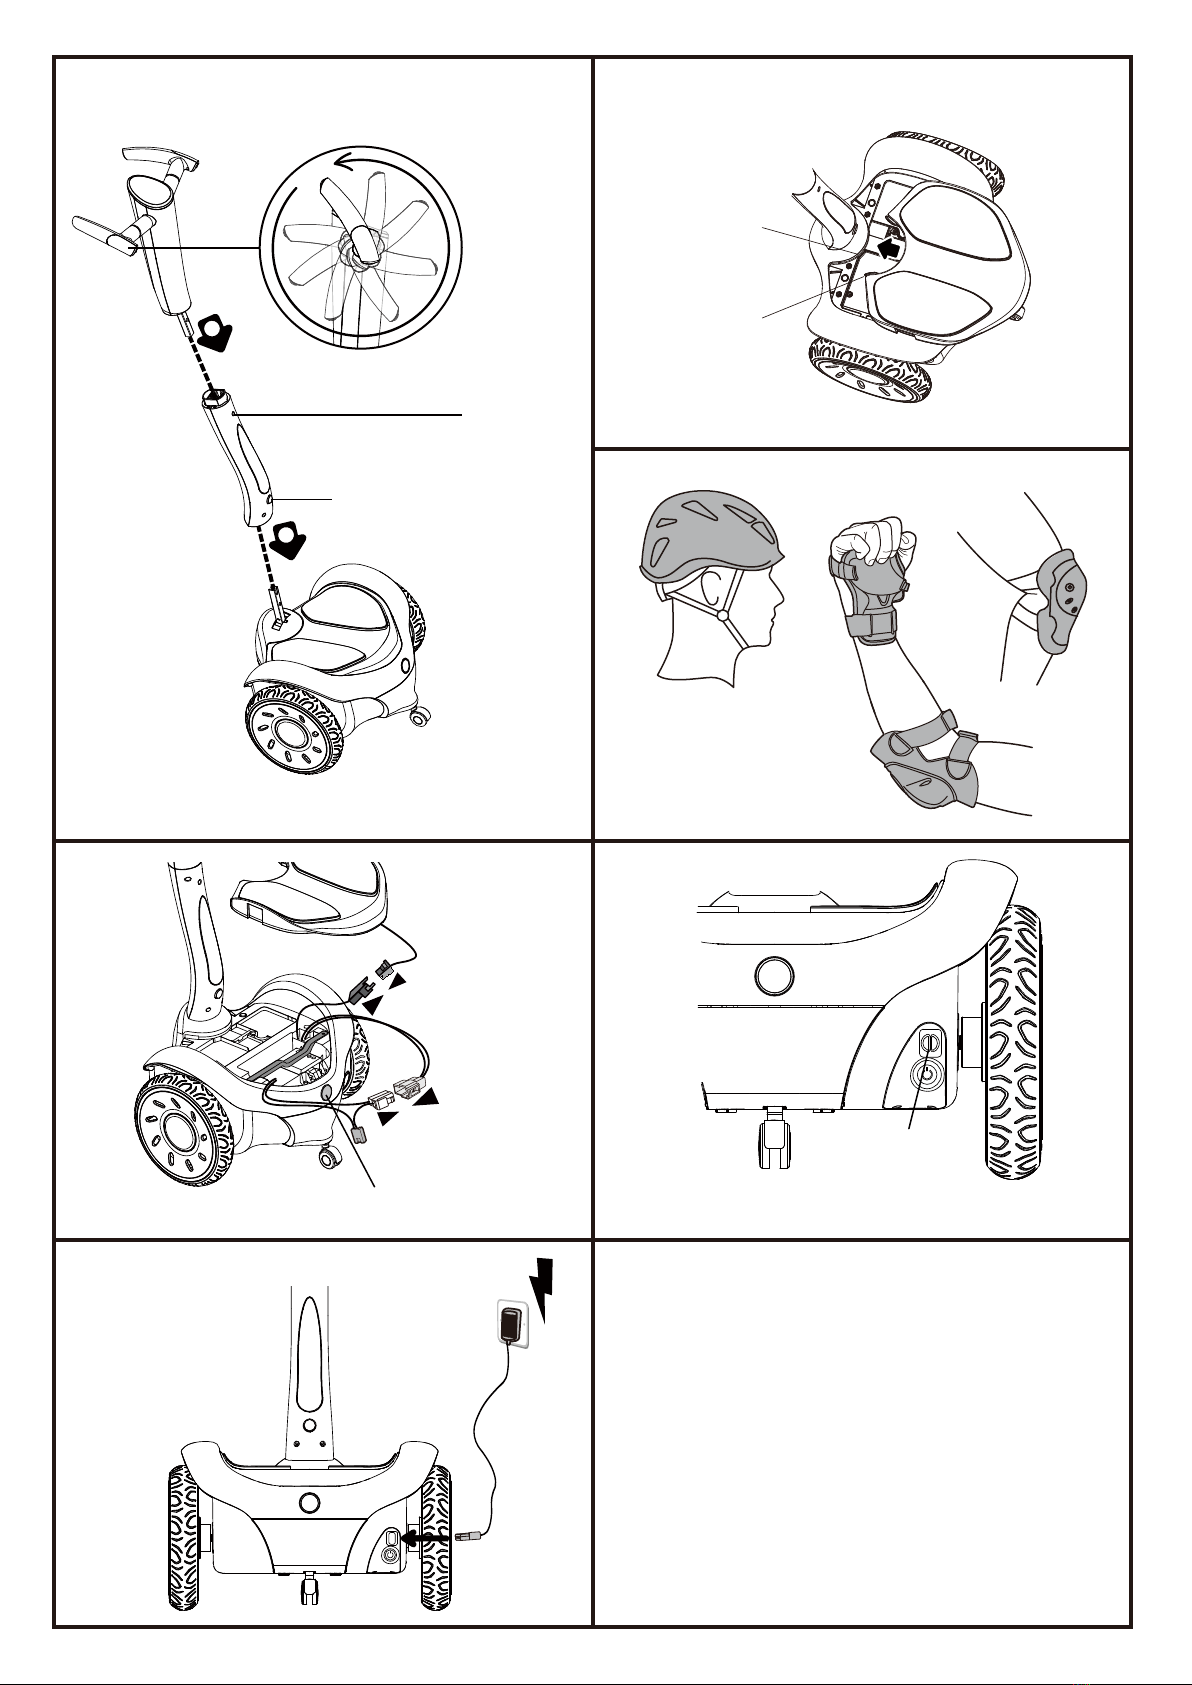
Anbringung der Lenkstange:
1. Fügen Sie die obere Lenkstangenmontage in die untere Lenkstangemontage in
Richtung des angegebenen Bildes ein. Man kann ein “Klick”-Geräusch hören, wenn Sie
am Ort eingesteckt wurde.
2. Dann setzen Sie die gesamte Lenkstagenmontage auf die Fixierstange auf dem
Hauptrahmen. Ein weiteres “Klick”-Geräusch wird andeuten, dass die Verbindung
erstellt wurde.
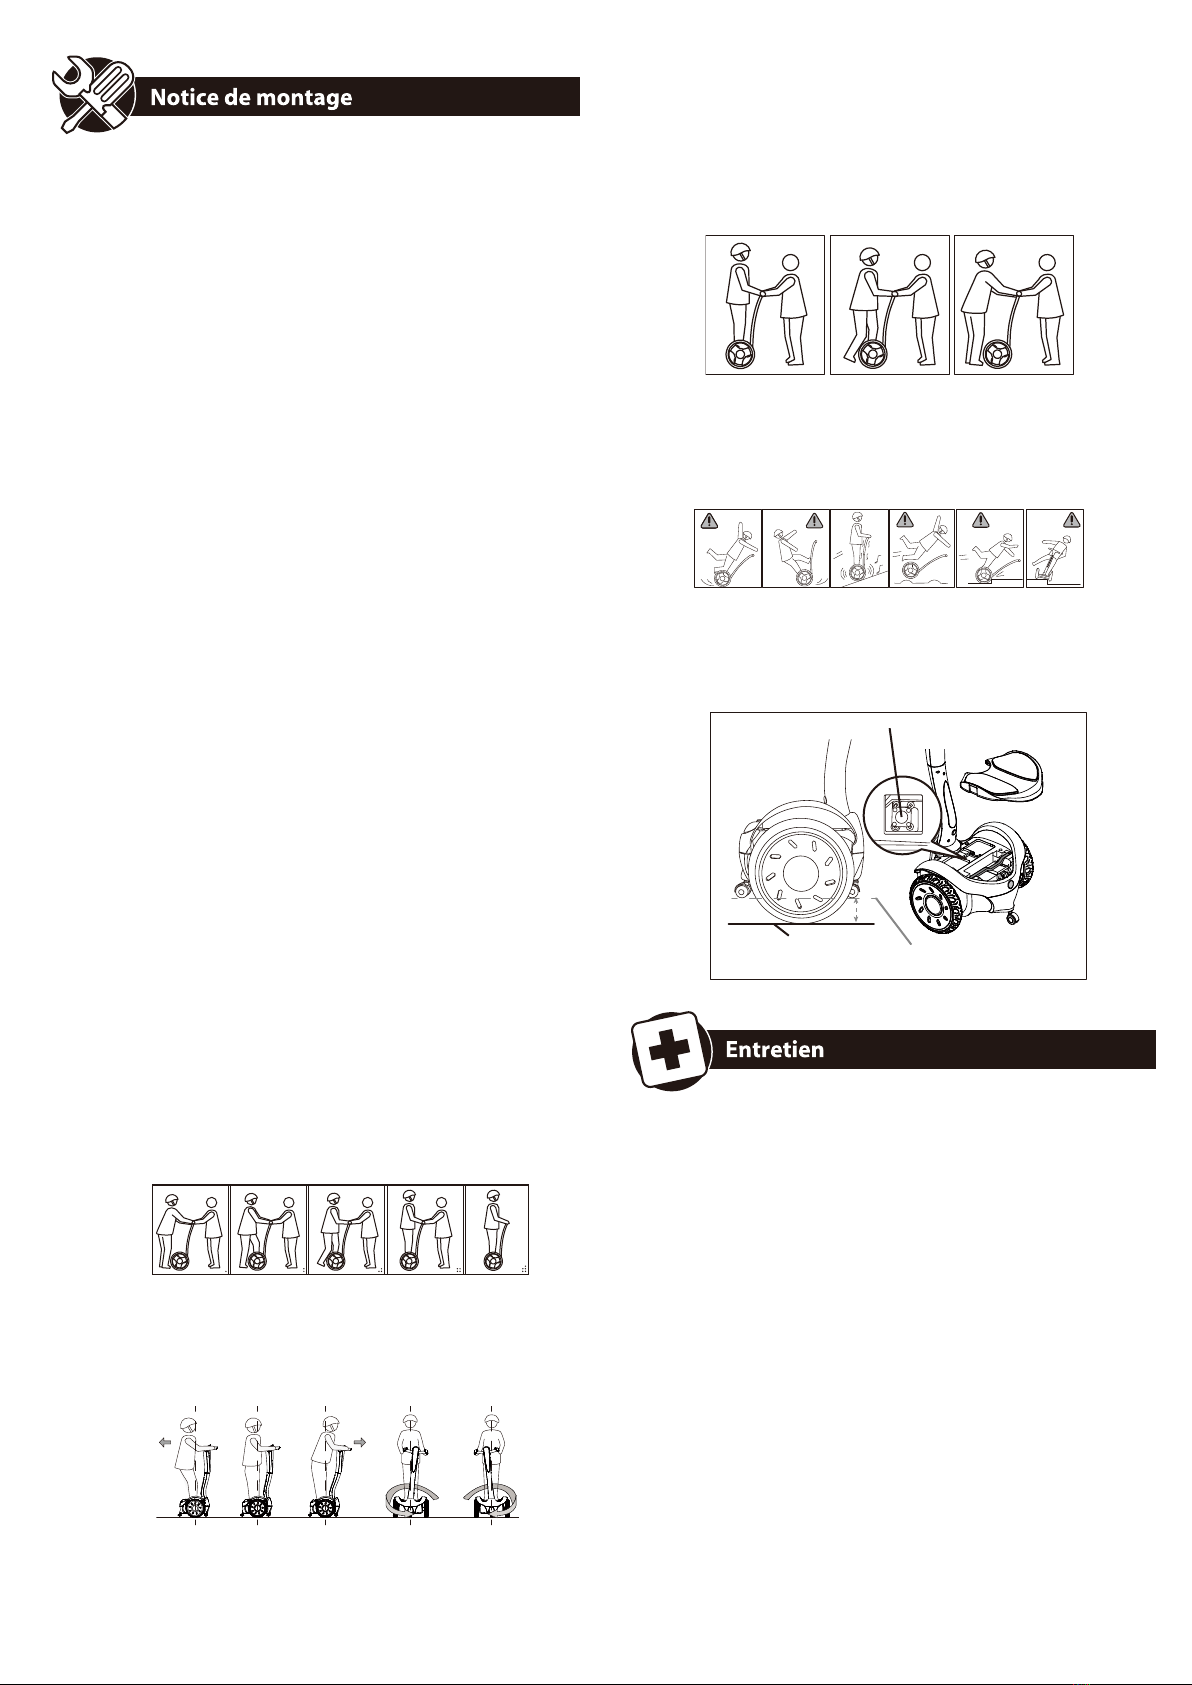
Demontage der Lenkstange:
Pressen Sie den Demontage-Knopf auf dem unteren Teil der unteren Lenkstangenmon-
tage und ziehen Sie dann die gesamte Lenkstangenmontage nach oben, um Sie von
dem Hauptkörper zu entfernen. Wählen Sie einen angemessenen Schraubenschlüssel
und stecken Sie ihn in das Demontageloch:
Verwendung der Lenkstange:
Die Höhe der Lenkstange kann an die Größe des Fahrers angepasst werden. Pressen
Sie zuerst den Knopf am vorderen Teil der Lenkstangen und drehen Sie dann die
Lenkstange. Die Lenkstange kann auf 360 Grad in acht Richtungen angepasst werden
ADD. 2
Batterieverkabelung:
Nach der Installation der Lenkstange, sollte die Stromversorgung angeschlossen
werden. Die Batterie befindet sich unter dem Fußbrett. Pressen Sie den
Fußbrett-Demontageknopf und ziehen Sie das Fußbrett nach oben, um es weg zu
nehmen. Verbinden Sie zuerst den Stecker der Batterie mit dem Stecker des
Hauptkörpers, dann verbinden Sie den Stecker des Fußbretts fest mit dem Stecker des
Hauptkörpers.
ADD. 3
Aufladen der Batterie:
Wenn die Batterie wenig Strom hat, wird das Fahrzeug Sie daran erinnern, dass die
Batterie wiederaufgeladen wird. Der Sockel für das Wiederaufladen der Batterie befindet
sich über dem Netzschalter. Vor dem Wiederaufladen, muss die Abdeckung geöffnet
werden. Stecken Sie den Stecker des Ladegeräts ein. Und dann schalten Sie den Strom
zum Wiederaufladen ein. Nach der Beendigung des Aufladens, stellen Sie die
Steckdosenabdeckung zurück in Ihre Position.
Anmerkungen:
Stellen Sie sicher, dass der Wiederaufladestecker vollständig in die Steckdose
eingesteckt wurde.Während des Wiederaufladens, soll der Netzschalter in der
AUS-Position sein. Verwenden Sie das Fahrzeug während dem Aufladen nicht!
ADD. 4
Fußteil-Montage
Gemäß der Pfeilrichtung, stecken Sie zwei Druckknöpfe in die Nut und pressen Sie die
Rückseite des Fußbretts. Die Montage ist beendet, wenn Sie ein Klickgeräusch hören.
Anmerkung: Halten Sie die Drähte während der Montage nicht herunter.
ADD. 5
Installations- und Verwendungsinstruktionen Vorbereitung:
Wählen Sie einen angemessenen Platz, bevor Sie zum ersten Mal fahren. So ein Platz
kann drinnen oder draußen sein, so lange er mindestens 4×4 m (16 m2) groß ist. Der
Boden sollte flach aber nicht nass, rutschig, glatt oder rau sein. Es darf keine Stufen,
Hindernisse, Motofahrzeuge, Fahrräder, Haustiere, Kinder oder andere störenden
Objekte auf dem Gebiet geben. Sie benötigen einen Ausbilder (Coach), der Erfahrung
im Fahren mit dem Fahrzeug gesammelt und die Instruktionen / Vorsichtsmaßnahmen in
diesem Handbuch durchgelesen hat, um Ihnen gemäß den Instruktionen zu helfen.
Schutzkleidung, einschließlich Helm, muss getragen werden, um Handgelenke, Hände,
Knie und Kopf vor möglichen Verletzungen zu schützen.
ADD. 6
1. Strom ein:
Pressen Sie den Netz- schalter (sein Indikator wird eingeschaltet), um mit der
Stromversorgung zu verbinden. Halten Sie das Fußbrett auf dem Basislevel, wenn Sie
den Strom einschalten.
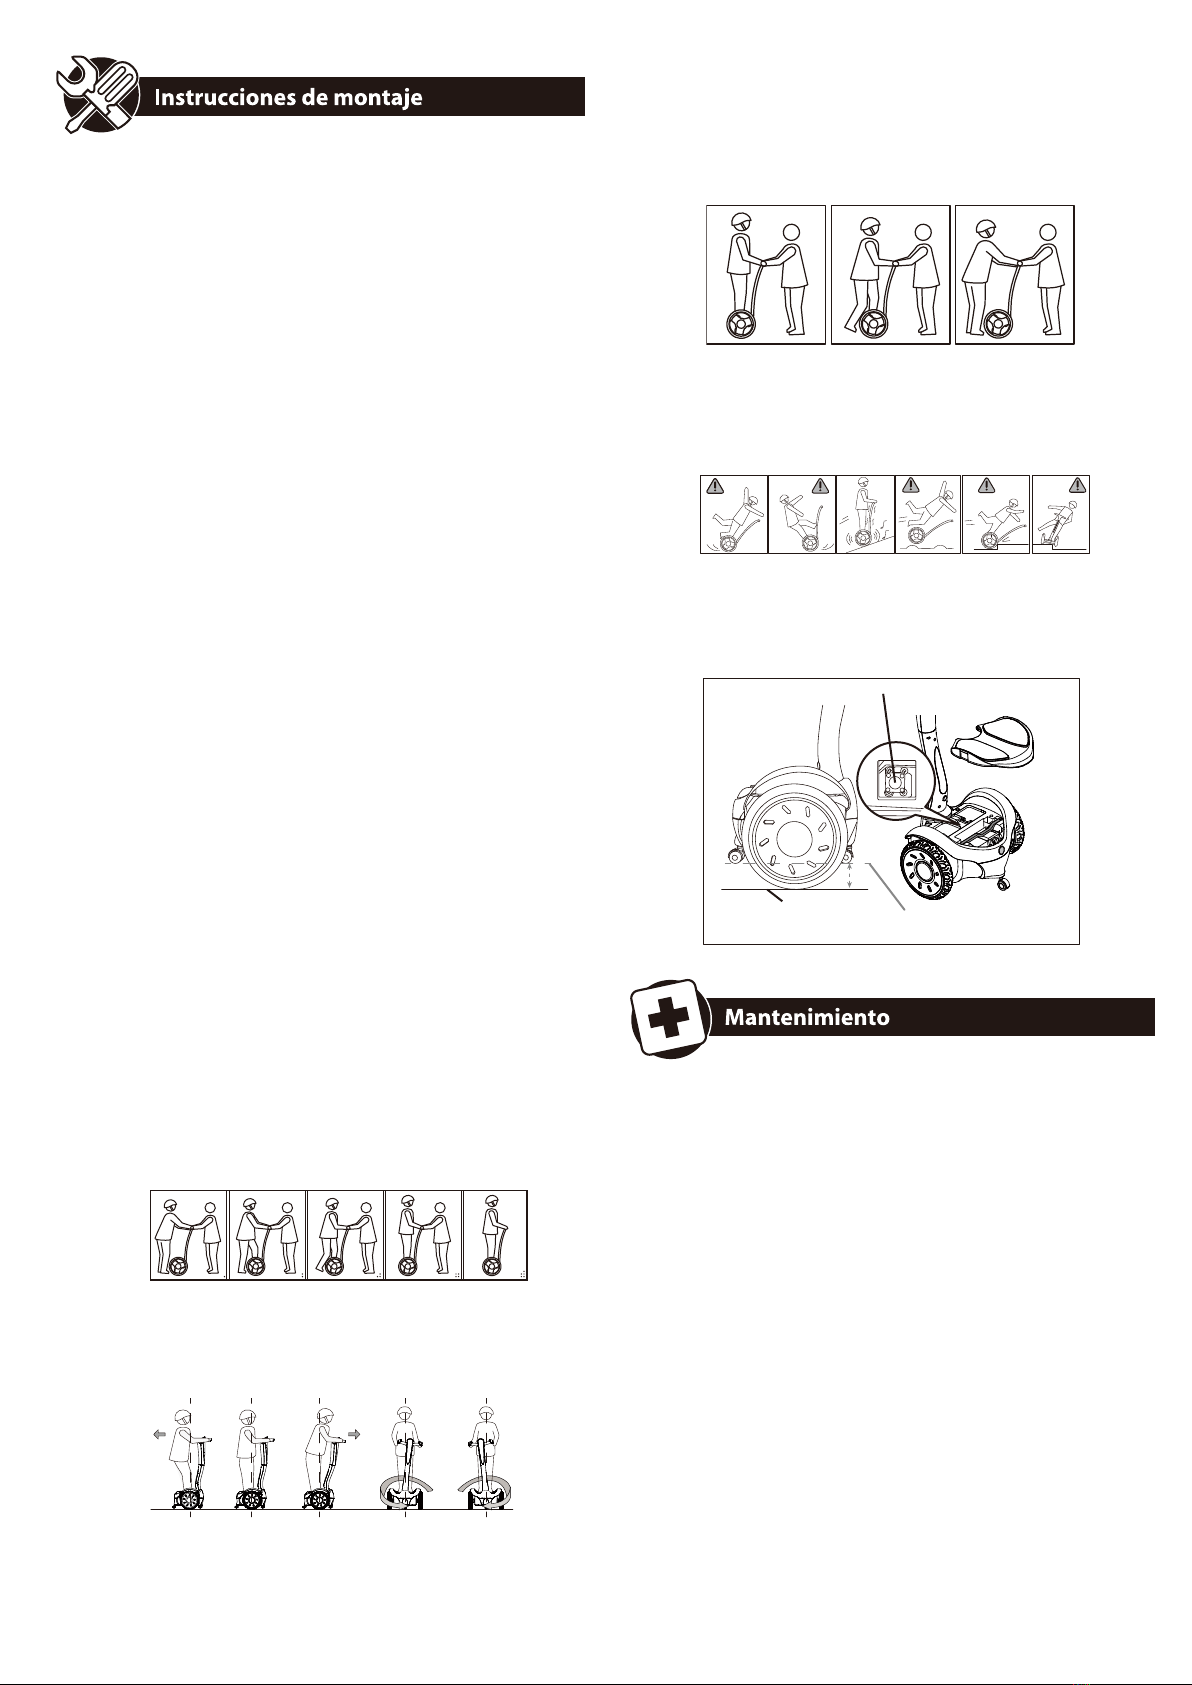
2. Wenn:
Sie das Fahrzeug zum ersten Mal verwenden, kann der Fahrer einen Betreuer bitten, es
stabil zu halten. Der Fahrer steht auf dem hinteren Teil des Fahrzeugs und hält die
Lenkstange mit beiden Händen. Stellen Sie die Schubstange gerade (in einer
grundsätzlich inaktiven Kondition) und passen Sie die Lenkstange an, bis sie eben ist.
Schauen Sie gerade nach vorne. Stellen Sie den Fuß zuerst auf das Brett. Bewegen Sie
das Gewicht des Körpers langsam auf das Fußbrett und heben Sie den anderen Fuß.
Geben Sie Ihr Bestes, um zu vermeiden, dass Sie den Lenker lateral bewegen, heben
Sie den anderen Fuß langsam vom Boden und stellen Sie ihn auf das Fußbrett. Bleiben
Sie ruhig und ausgeruht und schauen Sie nach vorne.
Die Sequenz der Körperhaltungen um aufzusteigen wird unten angezeigt:
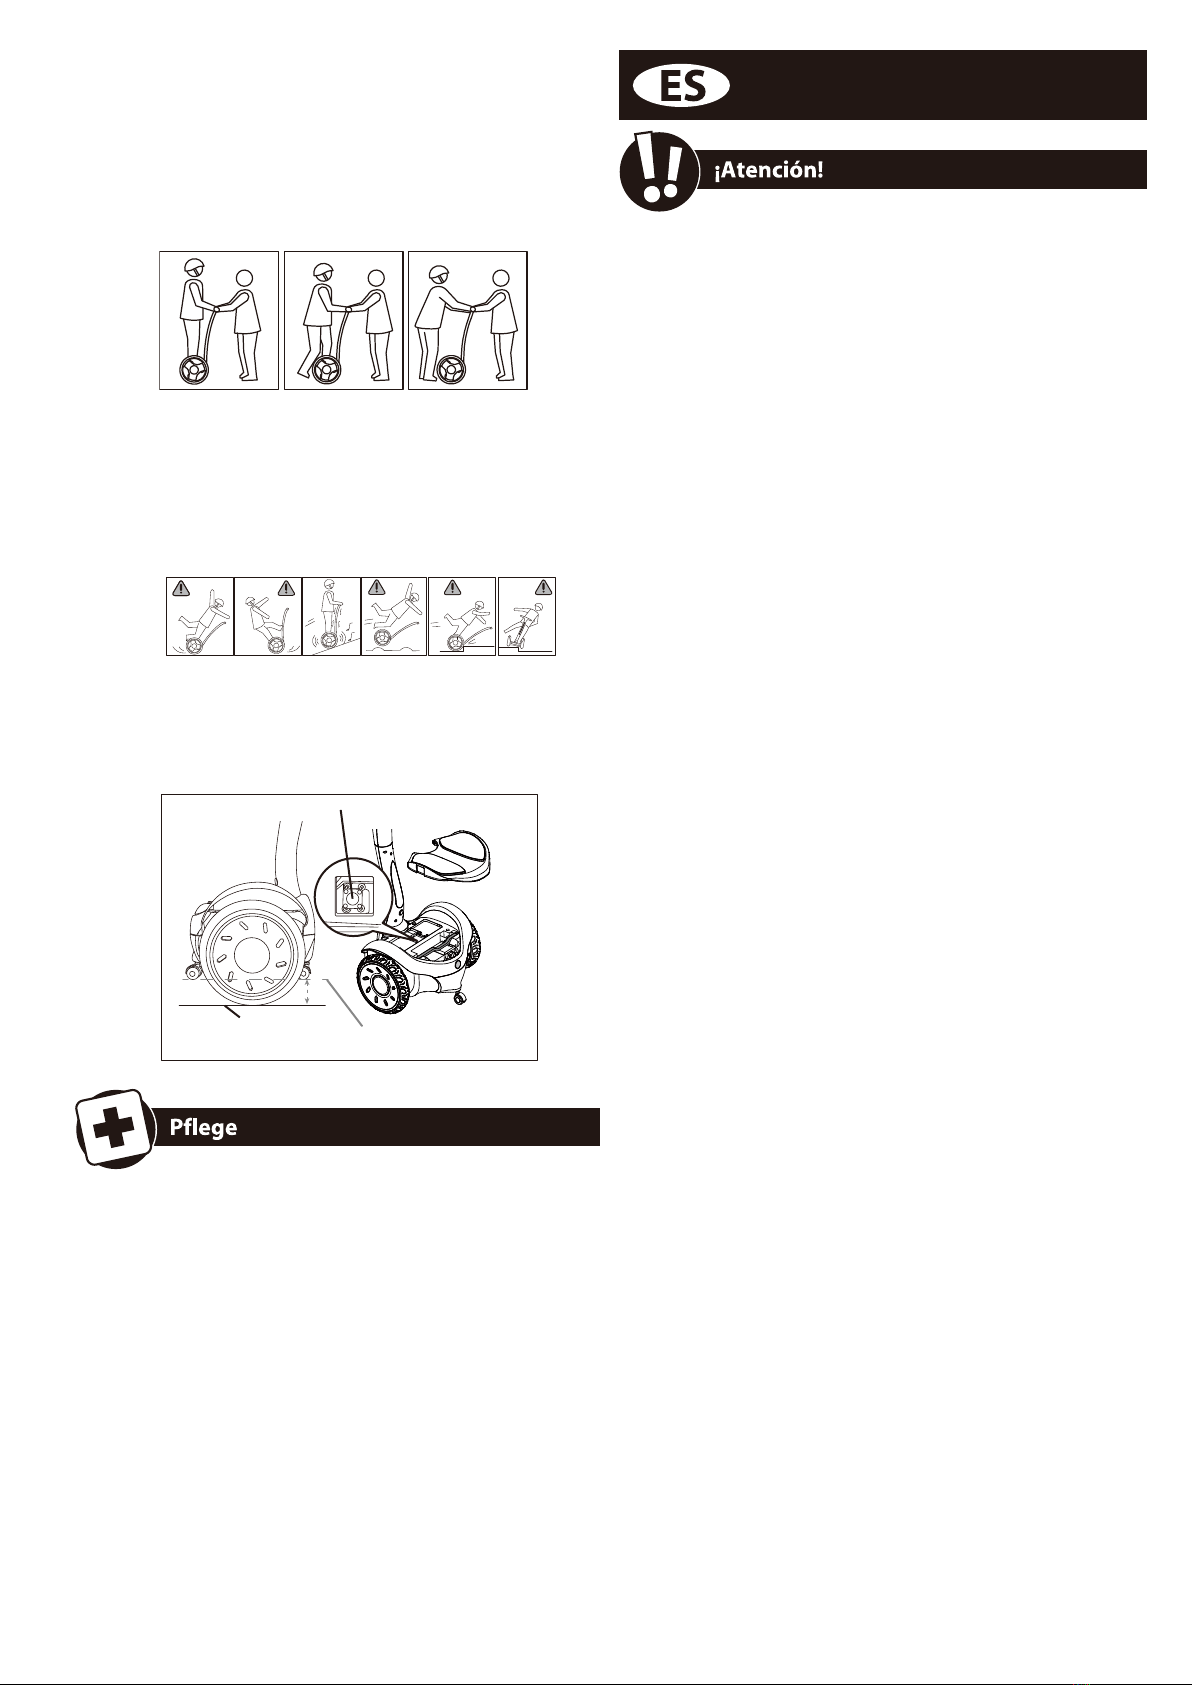
3. Fahren:
Der Fahrer sollte dieses Fahrzeug mit seiner/ihrer Körperhaltung als mit Gashebel und
Bremse manipulieren. Auf diese Art wird sie/er sich komfortabler fühlen und während
des Fahrens schneller reagieren können. Wenn der Fahrer auf dem Fahrzeug steht und
nach vorne lehnt, wird der Hauptkörper die Räder automatisch steuern, um mit dem
Fahrzeug vorwärts zu fahren; oder nach hinten zu Fahrzeug lehnt. Drehen Sie die
Lenkstange nach links/rechts, um mit dem Fahrzeug nach links/rechts zu fahren.