Ronda Mastertech User manual

M
O
N
T
U
E
W
E
D
T
H
U
F
R
I
S
A
T
S
U
N
15
60
30
45
23
30
10
20
10 1
2
3
4
5
6
7
8
9
M
O
N
T
U
E
W
E
D
T
H
U
F
R
I
S
A
T
S
U
N
15
60
30
45
23
30
10
20
10 1
2
3
4
5
6
7
8
9
M
O
N
T
U
E
W
E
D
T
H
U
F
R
I
S
A
T
S
U
N
15
60
30
45
23
30
10
20
10 1
2
3
4
5
6
7
8
9
M
O
N
T
U
E
W
E
D
T
H
U
F
R
I
S
A
T
S
U
N
15
60
30
45
23
30
10
20
10 1
2
3
4
5
6
7
8
9
M
O
N
T
U
E
W
E
D
T
H
U
F
R
I
S
A
T
S
U
N
15
60
30
45
23
30
10
20
10 1
2
3
4
5
6
7
8
9
M
O
N
T
U
E
W
E
D
T
H
U
F
R
I
S
A
T
S
U
N
15
60
30
45
23
30
10
20
10 1
2
3
4
5
6
7
8
9
M
O
N
T
U
E
W
E
D
T
H
U
F
R
I
S
A
T
S
U
N
15
60
30
45
23
30
10
20
10 1
2
3
4
5
6
7
8
9
III III
M
O
N
T
U
E
W
E
D
T
H
U
F
R
I
S
A
T
S
U
N
15
60
30
45
23
30
10
20
10 1
2
3
4
5
6
7
8
9
III III
M
O
N
T
U
E
W
E
D
T
H
U
F
R
I
S
A
T
S
U
N
15
60
30
45
23
30
10
20
10 1
2
3
4
5
6
7
8
9
III
III
M
O
N
T
U
E
W
E
D
T
H
U
F
R
I
S
A
T
S
U
N
15
60
30
45
23
30
10
20
10 1
2
3
4
5
6
7
8
9
III
65,5% = 40mm Druchmesser
III
A
65,5% = 40mm Druchmesser
III
B
65,5% = 40mm Druchmesser
III
A
65,5% = 40mm Druchmesser
III
III
65,5% = 40mm Druchmesser
III
B
65,5% = 40mm Druchmesser
III
A
M
O
N
T
U
E
W
E
D
T
H
U
F
R
I
S
A
T
S
U
N
15
60
30
45
23
30
10
20
10 1
2
3
4
5
6
7
8
9
III III
M
O
N
T
U
E
W
E
D
T
H
U
F
R
I
S
A
T
S
U
N
15
60
30
45
23
30
10
20
10 1
2
3
4
5
6
7
8
9
III III
M
O
N
T
U
E
W
E
D
T
H
U
F
R
I
S
A
T
S
U
N
15
60
30
45
17
30
10
20
10 1
2
3
4
5
6
7
8
9
II III
I
M
O
N
T
U
E
W
E
D
T
H
U
F
R
I
S
A
T
S
U
N
15
60
30
45
22
30
10
20
10 1
2
3
4
5
6
7
8
9
IIIIII
M
O
N
T
U
E
W
E
D
T
H
U
F
R
I
S
A
T
S
U
N
15
60
30
45
01
30
10
20
10 1
2
3
4
5
6
7
8
9
II
I
M
O
N
T
U
E
W
E
D
T
H
U
F
R
I
S
A
T
S
U
N
15
60
30
45
31
30
10
20
10 1
2
3
4
5
6
7
8
9
III
M
O
N
T
U
E
W
E
D
T
H
U
F
R
I
S
A
T
S
U
N
15
60
30
45
23
30
10
20
10 1
2
3
4
5
6
7
8
9
15
60
30
45
23
30
10
20
10 1
2
3
4
5
6
7
8
9
Display elements 8040.N
Minute hand
1⁄10 second counter
(running for the first 30 sec.)
Hour counter
after 30 min.
Day of the week hand
Hour hand
Minute counter
Second counter
Second hand
Date
Chronograph: Basic function
(Start / Stop / Reset)
Example:
Start: Press push-button A.
Stop: to stop the timing, press
push-button A once more and read the
chronograph counters:
4 min/ 38 sec /7⁄10 sec
Zero positioning:
Press push-button B.
(The chronograph hands will be reset to
their zero positions.)
Chronograph:
Accumulated timing
Example:
Start: (start timing)
Stop: (e.g. 15 min 5sec following
)
Restart: (timing is resumed)
*Stop: (e.g. 5min 12 sec following
)
= 20 min 17 sec
(The accumulated measured time is shown)
Reset:
The chronograph hands are returned to
their zero positions.
Please note:
* Following
, the accumulation of the
timing can be continued by pressing
push-button A
(Restart / Stop, Restart / Stop, …).
Chronograph:
Intermediate or interval timing
Example:
Start: (start timing)
Display interval:
e.g. 20 minutes 17 seconds (timing
continues in the background)
Making up the measured time:
(the chronograph hands are quickly
advanced to the ongoing measured time.)
Stop: (Final time is displayed)
Reset:
The chronograph hands are returned to
their zero position.
Please note:
* Following
, further intervals or inter-
mediates can be displayed by pressing
push-button B (display interval / make up
measured time, ...).
*
Adjusting the chronograph
hands to zero position
Example:
One or several chronograph hands are not
in their correct zero positions and have to be
adjusted (e.g. following a battery change).
Pull out the crown to position III
(all chronograph hands are in their
correct or incorrect zero position.)
Keep push-buttons A and B depressed
simultaneously for at least 2 seconds
(the second counter hand rotates by
360° corrective mode is activated.)
Adjusting the second counter hand
Single step
65,5% = 40mm Druchmesser
III
A1 x short
Continuous
65,5% = 40mm Druchmesser
III
Along
Adjusting the next hand B
65,5% = 40mm Druchmesser
III
Adjusting the
1⁄10 second counter hand (position 3h)
Single step
65,5% = 40mm Druchmesser
III
A1 x short
Continuous
65,5% = 40mm Druchmesser
III
Along
Adjusting the next hand B
65,5% = 40mm Druchmesser
III
Adjusting the minute counter hand (position 9h)
Single step
65,5% = 40mm Druchmesser
III
A1 x short
Continuous
65,5% = 40mm Druchmesser
III
Along
Returning the crown to position I
Termination of the chronograph hands
adjustment (can be carried out at any time).
Setting the time
*
Pull out the crown to position III
(the watch stops).
Turn the crown until you reach the correct
time 8:45.
*Push the crown back into position I.
Please note:
* In order to set the time to the exact second,
must be pulled out when the second
hand is in position «60».
Once the hour and minute hands have been
set,
must be pushed back into position I
at the exact second.
Setting the date (quick mode)
Pull out the crown to position II (the watch
continues to run).
Turn the crown anticlockwise until the
correct date 01 appears.
Push the crown back into position I.
Please note:
During the date changing phase between
approx. 8 PM and 12 PM; the date must be
set to the date of the following day.
An extreme acceleration in setting the date
with quick mode can induce a false date indi-
cation.The synchronization is re-established
by setting the date from 01 till 31 (crown in
position II).
Setting the date,
day of the week (8040.N), time
Example:
– Date / time on the watch: 17 / 01:25/MON
– Present date / time: 23 / 20:35 / SAT
Pull out the crown to position III
(the watch stops).
Turn the crown until yesterday’s
day of the week FRI appears.
Push the crown to position II.
Turn the crown anticlockwise until
yesterday’s date appears 22 .
* Pull out the crown to position III
(the watch stops).
Turn the crown until the correct
date 23 and day of the week
SAT appears.
**Continue to turn the crown until the
correct time 8:35 PM appears.
Push the crown back into position I.
Please note:
* To set your watch to the exact second,
please refer to the chapter entitled
«setting the time».
** Please observe the AM/PM clock rhythm.
User’s Manual English
RONDAmastertech – Movement Cal. 8040.N &8040.B
07/2017
Battery type: 395 / SR927SW
Accuracy: +20 / -10 seconds per month
Display elements 8040.B
Minute hand
1⁄10 second counter
(running for the first 30 sec.)
Hour counter
after 30 min.
Date
Hour hand
Minute counter
Second counter
Second hand
Description of the display and control buttons
Control buttons
Push-button A & B
Crown
Control buttons
Push-button A & B
Crown
B B
A A
You have decided to buy a watch, which was assembled by a watch-
maker using a Ronda movement. Please note that no watches are
produced or distributed under the Ronda brand.
In case of repairs, guarantee claims and questions concerning
the functioning of a watch, purchasers and consumers should
contact their retailer or the watch manufacturer, for which the
relevant information can be found in the sales or guarantee
documentation provided with the watch.
B
B
B
B
B
B
B
B
B
B
B
B
B
B
B
B
A
A
A
A
A
A
A
A
A
A
A
A
A
A
A
A
01
05
02
06
03
07
04
08

M
O
N
D
I
E
M
I
T
D
O
N
F
R
E
S
A
M
S
O
N
15
60
30
45
23
30
10
20
10 1
2
3
4
5
6
7
8
9
M
O
N
D
I
E
M
I
T
D
O
N
F
R
E
S
A
M
S
O
N
15
60
30
45
23
30
10
20
10 1
2
3
4
5
6
7
8
9
M
O
N
D
I
E
M
I
T
D
O
N
F
R
E
S
A
M
S
O
N
15
60
30
45
23
30
10
20
10 1
2
3
4
5
6
7
8
9
M
O
N
D
I
E
M
I
T
D
O
N
F
R
E
S
A
M
S
O
N
15
60
30
45
23
30
10
20
10 1
2
3
4
5
6
7
8
9
M
O
N
D
I
E
M
I
T
D
O
N
F
R
E
S
A
M
S
O
N
15
60
30
45
23
30
10
20
10 1
2
3
4
5
6
7
8
9
M
O
N
D
I
E
M
I
T
D
O
N
F
R
E
S
A
M
S
O
N
15
60
30
45
23
30
10
20
10 1
2
3
4
5
6
7
8
9
M
O
N
D
I
E
M
I
T
D
O
N
F
R
E
S
A
M
S
O
N
15
60
30
45
23
30
10
20
10 1
2
3
4
5
6
7
8
9
M
O
N
D
I
E
M
I
T
D
O
N
F
R
E
S
A
M
S
O
N
15
60
30
45
23
30
10
20
10 1
2
3
4
5
6
7
8
9
III III
M
O
N
D
I
E
M
I
T
D
O
N
F
R
E
S
A
M
S
O
N
15
60
30
45
23
30
10
20
10 1
2
3
4
5
6
7
8
9
III III
M
O
N
D
I
E
M
I
T
D
O
N
F
R
E
S
A
M
S
O
N
15
60
30
45
23
30
10
20
10 1
2
3
4
5
6
7
8
9
III
III
M
O
N
D
I
E
M
I
T
D
O
N
F
R
E
S
A
M
S
O
N
15
60
30
45
23
30
10
20
10 1
2
3
4
5
6
7
8
9
III
65,5% = 40mm Druchmesser
III
A
65,5% = 40mm Druchmesser
III
B
65,5% = 40mm Druchmesser
III
A
65,5% = 40mm Druchmesser
III
III
65,5% = 40mm Druchmesser
III
B
65,5% = 40mm Druchmesser
III
A
M
O
N
D
I
E
M
I
T
D
O
N
F
R
E
S
A
M
S
O
N
15
60
30
45
23
30
10
20
10 1
2
3
4
5
6
7
8
9
III III
M
O
N
D
I
E
M
I
T
D
O
N
F
R
E
S
A
M
S
O
N
15
60
30
45
23
30
10
20
10 1
2
3
4
5
6
7
8
9
III III
M
O
N
D
I
E
M
I
T
D
O
N
F
R
E
S
A
M
S
O
N
15
60
30
45
17
30
10
20
10 1
2
3
4
5
6
7
8
9
II III
I
M
O
N
D
I
E
M
I
T
D
O
N
F
R
E
S
A
M
S
O
N
15
60
30
45
22
30
10
20
10 1
2
3
4
5
6
7
8
9
IIIIII
M
O
N
D
I
E
M
I
T
D
O
N
F
R
E
S
A
M
S
O
N
15
60
30
45
01
30
10
20
10 1
2
3
4
5
6
7
8
9
II
I
M
O
N
D
I
E
M
I
T
D
O
N
F
R
E
S
A
M
S
O
N
15
60
30
45
31
30
10
20
10 1
2
3
4
5
6
7
8
9
III
15
60
30
45
23
30
10
20
10 1
2
3
4
5
6
7
8
9
Anzeigeelemente 8040.B
Minutenzeiger
1⁄10 Sekundenzähler
(erste 30 Sek. laufend)
Stundenzähler
nach 30 Min.
Datum
Stundenzeiger
Minutenzähler
Sekundenzähler
Sekundenzeiger
Bedienelemente
Drücker A & B
Krone
Bedienelemente
Drücker A & B
Krone
Anzeigeelemente 8040.N
Minutenzeiger
1⁄10 Sekundenzähler
(erste 30 Sek. laufend)
Stundenzähler
nach 30 Min.
Wochentagzeiger
Stundenzeiger
Minutenzähler
Sekundenzähler
Sekundenzeiger
Datum
Beschreibung der Anzeige- und Bedienelemente
Chronograph: Grundfunktion
(Start / Stopp / Nullstellung)
Beispiel:
Start: Drücker Adrücken
Stopp: Um die Zeitmessung abzubrechen,
Drücker A nochmals drücken und die
Chronographenzähler ablesen:
4 Min. / 38 Sek. / 7⁄10 Sekunden
Nullstellung:
Drücker Bdrücken.
(Die Chronographenzeiger werden in
ihre Nullstellungen zurückgestellt.)
Chronograph:
Aufaddierte Zeitmessung
Beispiel:
Start: (Zeitmessung starten)
Stopp: (z.B. 15 Min. 5Sek. nach
)
Restart: (Zeitmessung wieder freigeben)
*Stopp: (z.B. 5Min. 12 Sek. nach
)
= 20 Min. 17 Sek.
(Aufaddierte Messzeit wird angezeigt)
Nullstellung:
Die Chronographenzeiger werden in ihre
Nullpositionen zurückgestellt.
Hinweis
* Nach
kann die Aufaddierung der
Zeitmessung fortgesetzt werden.
Dies über Drücker A
(Restart / Stopp, Restart / Stopp, …).
Chronograph:
Zwischenzeitmessung
Beispiel:
Start: (Messzeit starten)
Zwischenzeit anzeigen:
z.B. 20 Minuten 17 Sekunden (die Zeit-
messung läuft im Hintergrund weiter)
Messzeit aufholen:
(Die Chronographenzeiger werden im
Schnelllauf auf die weitergelaufene
Messzeit nachgeführt.)
Stopp: (Endzeit wird angezeigt)
Nullstellung:
Die Chronographenzeiger werden in ihre
Nullpositionen zurückgestellt.
Hinweis
* Nach
können weitere Zwischenzeiten
angezeigt werden. Dies über Drücker B
(Zwi-
schenzeit anzeigen / Messzeit aufholen, ...).
*
Ausrichtung der Chronograph
-
zeiger auf Nullposition
Beispiel:
Einer oder mehrere Chronographzeiger sind
nicht in ihren korrekten Nullpositionen und
müssen ausgerichtet werden (z.B. nach
Batteriewechsel).
Krone in Position III herausziehen.
(Alle Chronographenzeiger stellen sich
in ihre korrekte bzw. nicht korrekte Null-
position.)
Drücker A und B gleichzeitig während
mindestens 2 Sekunden drücken.
(Der Sekundenzählerzeiger dreht
um 360° Korrekturmodus ist aktiviert.)
Ausrichtung des Sekundenzählerzeigers
Einzelschritt:
65,5% = 40mm Druchmesser
III
A1 x kurz
Kontinuierlich:
65,5% = 40mm Druchmesser
III
Alang
Nächsten Zeiger ausrichten B
65,5% = 40mm Druchmesser
III
Ausrichtung des 1⁄10 Sekundenzählerzeigers (Pos. 3h)
Einzelschritt:
65,5% = 40mm Druchmesser
III
A1 x kurz
Kontinuierlich:
65,5% = 40mm Druchmesser
III
Alang
Nächsten Zeiger ausrichten B
65,5% = 40mm Druchmesser
III
Ausrichtung des Minutenzählerzeigers (Pos. 9h)
Einzelschritt:
65,5% = 40mm Druchmesser
III
A1 x kurz
Kontinuierlich:
65,5% = 40mm Druchmesser
III
Alang
Krone in Position Izurückdrücken.
Abschluss der Chronographzeiger-Ausrichtung
(dies ist jederzeit möglich).
Einstellung Zeit
*
Krone in Position III herausziehen
(Uhr bleibt stehen).
Krone drehen bis die aktuelle Zeit 08:45
angezeigt wird.
*Krone zurück in Position Idrücken.
Hinweis
* Um die Zeit «sekundengenau» einzustellen,
muss
bei der Sekundenzeigerstellung
«60» gezogen werden.
Nach der Einstellung des Stunden- und
Minutenzeigers muss
«sekundengenau»
in Pos. Izurückgedrückt werden.
Schnellkorrektur Datum
Krone in Position II herausziehen
(Uhr läuft weiter).
Krone gegen den Uhrzeigersinn drehen
bis das aktuelle Datum 01 erscheint.
Krone zurück in Position I drücken.
Hinweis
In der Kalenderschaltphase von ca. 20:00 bis
24:00 Uhr muss das Datum des folgenden
Tages eingestellt werden.
Extreme Beschleunigung in der Schnellkor-
rektur kann zu einer falschen Datumsanzeige
führen. Durch Schalten des Datums von 01
bis 31 (Krone Position II) wird die Synchroni-
sation wieder hergestellt.
Einstellung Datum,
Wochentag
(8040.N), Uhrzeit
Beispiel:
– Datum/Uhrzeit auf der Uhr: 17 / 01:25/MON
– Aktuelles Datum/Uhrzeit 23 / 20:35 / SAM
Krone in Position III herausziehen
(Uhr bleibt stehen).
Krone drehen bis der Vortag des aktuellen
Wochentags FRE erscheint.
Krone in Position II drücken.
Krone gegen den Uhrzeigersinn drehen
bis der Vortag des aktuellen Datums 22
erscheint.
* Krone in Position III herausziehen
(Uhr bleibt stehen).
Krone drehen bis das aktuelle
Datum
23 und der aktuelle
Wochentag SAM erscheint.
**Krone weiter drehen bis die aktuelle Zeit
20:35 angezeigt wird.
Krone zurück in Position Idrücken.
Hinweis
*
«sekundengenaue» Zeiteinstellung:
Siehe Hinweis im Kapitel «Einstellung Zeit»
**24-Stundenrhythmus beachten.
Bedienungsanleitung Deutsch
RONDAmastertech – Uhrwerk Kal. 8040.N&8040.B
Sie haben sich für eine Uhr entschieden, in der durch den Uhrenher-
steller ein Uhrwerk von Ronda eingebaut wurde. Bitte beachten Sie,
dass unter der Marke Ronda weder Uhren produziert noch am Markt
vertrieben werden.
Käufer und Konsumenten können sich im Falle von Reparaturen, Garan-
tieansprüchen sowie Fragen zur Funktion der Uhr ausschliesslich an
die Verkaufsstelle oder den Uhrenhersteller wenden. Entsprechende
Informationen sind den Verkaufs- oder Garantiebestimmungen zu ent-
nehmen.
07/2017
Batterietyp: 395 / SR927SW
Ganggenauigkeit: +20 / -10 Sekunden pro Monat
BB
AA
B
B
B
B
B
B
B
B
B
B
B
B
B
B
B
B
A
A
A
A
A
A
A
A
A
A
A
A
A
A
A
A
01
05
02
06
03
07
04
08

M
O
N
D
I
E
M
I
T
D
O
N
F
R
E
S
A
M
S
O
N
15
60
30
45
23
30
10
20
10 1
2
3
4
5
6
7
8
9
15
60
30
45
23
30
10
20
10 1
2
3
4
5
6
7
8
9
L
U
N
M
A
R
M
E
R
J
E
U
V
E
N
S
A
M
D
I
M
15
60
30
45
23
30
10
20
10 1
2
3
4
5
6
7
8
9
L
U
N
M
A
R
M
E
R
J
E
U
V
E
N
S
A
M
D
I
M
15
60
30
45
23
30
10
20
10 1
2
3
4
5
6
7
8
9
L
U
N
M
A
R
M
E
R
J
E
U
V
E
N
S
A
M
D
I
M
15
60
30
45
23
30
10
20
10 1
2
3
4
5
6
7
8
9
M
O
N
D
I
E
M
I
T
D
O
N
F
R
E
S
A
M
S
O
N
15
60
30
45
23
30
10
20
10 1
2
3
4
5
6
7
8
9
L
U
N
M
A
R
M
E
R
J
E
U
V
E
N
S
A
M
D
I
M
15
60
30
45
23
30
10
20
10 1
2
3
4
5
6
7
8
9
L
U
N
M
A
R
M
E
R
J
E
U
V
E
N
S
A
M
D
I
M
15
60
30
45
23
30
10
20
10 1
2
3
4
5
6
7
8
9
L
U
N
M
A
R
M
E
R
J
E
U
V
E
N
S
A
M
D
I
M
15
60
30
45
23
30
10
20
10 1
2
3
4
5
6
7
8
9
III III
L
U
N
M
A
R
M
E
R
J
E
U
V
E
N
S
A
M
D
I
M
15
60
30
45
23
30
10
20
10 1
2
3
4
5
6
7
8
9
III III
L
U
N
M
A
R
M
E
R
J
E
U
V
E
N
S
A
M
D
I
M
15
60
30
45
23
30
10
20
10 1
2
3
4
5
6
7
8
9
III
III
L
U
N
M
A
R
M
E
R
J
E
U
V
E
N
S
A
M
D
I
M
15
60
30
45
23
30
10
20
10 1
2
3
4
5
6
7
8
9
III
65,5% = 40mm Druchmesser
III
A
65,5% = 40mm Druchmesser
III
B
65,5% = 40mm Druchmesser
III
A
65,5% = 40mm Druchmesser
III
III
65,5% = 40mm Druchmesser
III
B
65,5% = 40mm Druchmesser
III
A
L
U
N
M
A
R
M
E
R
J
E
U
V
E
N
S
A
M
D
I
M
15
60
30
45
23
30
10
20
10 1
2
3
4
5
6
7
8
9
III III
L
U
N
M
A
R
M
E
R
J
E
U
V
E
N
S
A
M
D
I
M
15
60
30
45
23
30
10
20
10 1
2
3
4
5
6
7
8
9
III III
L
U
N
M
A
R
M
E
R
J
E
U
V
E
N
S
A
M
D
I
M
15
60
30
45
17
30
10
20
10 1
2
3
4
5
6
7
8
9
II III
I
L
U
N
M
A
R
M
E
R
J
E
U
V
E
N
S
A
M
D
I
M
15
60
30
45
22
30
10
20
10 1
2
3
4
5
6
7
8
9
IIIIII
L
U
N
M
A
R
M
E
R
J
E
U
V
E
N
S
A
M
D
I
M
15
60
30
45
01
30
10
20
10 1
2
3
4
5
6
7
8
9
II
I
L
U
N
M
A
R
M
E
R
J
E
U
V
E
N
S
A
M
D
I
M
15
60
30
45
31
30
10
20
10 1
2
3
4
5
6
7
8
9
III
Organes d’affichage 8040.B
Aiguille des minutes
Compteur des 1⁄10 secondes
(premières 30 sec. sans arrêt)
Compteur des heures
après 30 min.
Date
Aiguille des heures
Compteur des minutes
Compteur des secondes
Aiguille des secondes
Organes de commande
Poussoir A & B
Couronne
Organes de commande
Poussoir A & B
Couronne
Organes d’affichage 8040.N
Aiguille des minutes
Compteur des 1⁄10 secondes
(premières 30 sec. sans arrêt)
Compteur des heures
après 30 min.
Aiguille du jour
de la semaine
Aiguille des heures
Compteur des minutes
Compteur des secondes
Aiguille des secondes
Date
Description des organes d’affichage et de commande
B B
A A
Chronographe:
fonction de base
(Start / Stop / remise à zéro)
Exemple:
Start: Appuyer sur le poussoir A.
Stop: Pour interrompre le chronométrage,
appuyer à nouveau sur le poussoir A
et lire les compteurs du chronographe:
4 mn / 38 s / 7⁄10 s
Mise à zéro:
Appuyer sur le poussoir B.
(Les aiguilles du chronographe sont
remises à zéro.)
Chronographe: Chronométrage
avec totalisation
Exemple:
Start: (Faire démarrer le chronométrage)
Stop: (P.ex. 15 mn 5s après
)
Restart: (Relancer le chronométrage)
*Stop: (P.ex. 5mn 12 s après
)
= 20 mn 17 s
(
Le temps de chronométrage total est indiqué
)
Mise à zéro:
Les aiguilles du chronographe sont
remis à zéro.
Nota
* Le chronométrage avec totalisation peut
se poursuivre après
. Appuyer pour
cela sur A
(Restart / Stop, Restart / Stop, …).
Chronographe: Chronométrage
des temps intermédiaires
Exemple:
Start: (Faire démarrer le chronométrage)
Affichage du temps intermédiaire:
P. ex. 20 minutes 17 secondes (le chrono-
métrage continue à l’arrière-plan)
Rattrapage du temps chronométré:
(Les aiguilles du chronographe
rattrapent à grande vitesse le temps
de chronométrage qui s’est écoulé.)
Stop: (Le temps final est affiché.)
Mise à zéro:
Les aiguilles du chronographe sont
remis à zéro.
Nota
* D’autres temps intermédiaires peuvent être
chronométrés après
. Appuyer pour cela
le poussoir B (affichage du temps intermédi-
aire / rattrapage du temps chronométré, …).
*
Ajustage des aiguilles du
chronographe en position zéro
Exemple:
Une ou plusieurs des aiguilles du chrono-
graphe ne sont pas en position zéro correcte
et doivent être ajustées (p. ex. après un
changement de pile).
Tirer la couronne en position III (les
aiguilles du chronographe viennent à leur
position zéro, correcte ou incorrecte.)
Appuyer simultanément pendant au
moins 2 secondes sur les poussoirs A
et B (l’aiguille du compteur des secondes
tourne de 360° le mode correction
est activé.)
Ajustage de l’aiguille du compteur des secondes
Pas à pas:
65,5% = 40mm Druchmesser
III
A1 pression brève
En continu:
65,5% = 40mm Druchmesser
III
A1 pression maintenue
Ajustage de l’aiguille suivante B
65,5% = 40mm Druchmesser
III
Ajustage de l’aiguille du compteur des 1⁄10 secondes (pos. 3 h)
Pas à pas:
65,5% = 40mm Druchmesser
III
A1 pression brève
En continu:
65,5% = 40mm Druchmesser
III
A1 pression maintenue
Ajustage de l’aiguille suivante B
65,5% = 40mm Druchmesser
III
Ajustage de l’aiguille du compteur des minutes (pos. 9 h)
Pas à pas:
65,5% = 40mm Druchmesser
III
A1 pression brève
En continu:
65,5% = 40mm Druchmesser
III
A1 pression maintenue
Repousser la couronne en position I
Fin de l’ajustage des aiguilles du chronographe
(possible à tout moment).
Réglage de l’heure
*
Tirer la couronne en position III
(l’aiguille des secondes s’immobilise).
Tourner la couronne jusqu’à ce que
l’heure actuelle 08:45 soit indiquée.
*Repousser la couronne en pos. I.
Nota
* Pour régler l’heure «à la seconde exacte»,
doit être tirée lorsque l’aiguille des
secondes est en position «60». Après
avoir réglé l’aiguille des heures et des
minutes,
doit être repoussée en pos. I
«à la seconde exacte».
Correction rapide de la date
Tirer la couronne en pos. II (la montre
continue de fonctionner).
ourner la couronnne en sens inverse
des aiguilles d’une montre jusqu’à ce que
la date actuelle 01 apparaisse.
Repousser la couronne en pos. I.
Nota
Pendant la phase d’entraînement du calen-
drier entre approx. 20h et 24h, il faut régler la
date sur le jour suivant.
L’extrême accélération dans la correction
rapide de la date peut fausser l’indication
de la date. Par le réglage de la date de
01 jusqu’à 31 (couronne en position II), la
synchronisation est rétablie.
Réglage de la date, du jour de
semaine (8040.N), de l’heure
Exemple:
– Date/heure indiquée
par la montre: 17 / 01:25/LUN
– Date/heure actuelle: 23 / 20:35 / SAM
Tirer la couronne en pos. III
(l’aiguille des secondes s’immobilise).
Tournez la couronne jusqu’à ce que la
veille du jour de semaine VEN apparaisse.
Repousser la couronne en position II.
Tourner la couronnne en sens inverse
des aiguilles d’une montrejusqu’à ce que
la veille de la date actuelle apparaisse 22 .
* Tirer la couronne en position III (l’aiguille
des secondes s’immobilise)
Tournez la couronne jusqu’à ce que
la date 23 et le jour de semaine
SAM
actuels apparaisse.
**Continuer de tourner la couronne
jusqu’à ce que l’heure actuelle 20:35 soit
affichée.
Repousser la couronne en position I.
Nota
*
Pour le réglage de l’heure «à la seconde exacte»,
voir nota au chapitre «réglage de l’heure».
**Respecter le rythme de 24 heures.
Mode d’emploi – Français
RONDA mastertech – Mouvement cal. 8040.N&8040.B
07/2017
Type de pile: 395 / SR927SW
Précision de marche: +20 / -10 secondes par mois
Vous avez choisi une montre dans laquelle le fabricant de montres a
intégré un mouvement Ronda. Nous attirons votre attention sur le fait
qu’aucune montre de la marque Ronda n’est produite ni distribuée sur
le marché.
Les acheteurs et consommateurs peuvent exclusivement s’adresser,
en cas de réparations, de prestations relatives à la garantie et pour
toutes questions se rapportant au fonctionnement de la montre, au
point de vente ou au fabricant de montres. Des informations corres-
pondantes figurent dans les dispositions relatives à la vente ou à la
garantie.
B
B
B
B
B
B
B
B
B
B
B
B
B
B
B
B
A
A
A
A
A
A
A
A
A
A
A
A
A
A
A
A
01
05
02
06
03
07
04
08

M
O
N
D
I
E
M
I
T
D
O
N
F
R
E
S
A
M
S
O
N
15
60
30
45
23
30
10
20
10 1
2
3
4
5
6
7
8
9
15
60
30
45
23
30
10
20
10 1
2
3
4
5
6
7
8
9
L
U
N
M
A
R
M
E
R
G
I
O
V
E
N
S
A
B
D
O
M
15
60
30
45
23
30
10
20
10 1
2
3
4
5
6
7
8
9
L
U
N
M
A
R
M
E
R
G
I
O
V
E
N
S
A
B
D
O
M
15
60
30
45
23
30
10
20
10 1
2
3
4
5
6
7
8
9
L
U
N
M
A
R
M
E
R
G
I
O
V
E
N
S
A
B
D
O
M
15
60
30
45
23
30
10
20
10 1
2
3
4
5
6
7
8
9
L
U
N
M
A
R
M
E
R
G
I
O
V
E
N
S
A
B
D
O
M
15
60
30
45
23
30
10
20
10 1
2
3
4
5
6
7
8
9
L
U
N
M
A
R
M
E
R
G
I
O
V
E
N
S
A
B
D
O
M
15
60
30
45
23
30
10
20
10 1
2
3
4
5
6
7
8
9
L
U
N
M
A
R
M
E
R
G
I
O
V
E
N
S
A
B
D
O
M
15
60
30
45
23
30
10
20
10 1
2
3
4
5
6
7
8
9
L
U
N
M
A
R
M
E
R
G
I
O
V
E
N
S
A
B
D
O
M
15
60
30
45
23
30
10
20
10 1
2
3
4
5
6
7
8
9
III III
L
U
N
M
A
R
M
E
R
G
I
O
V
E
N
S
A
B
D
O
M
15
60
30
45
23
30
10
20
10 1
2
3
4
5
6
7
8
9
III III
L
U
N
M
A
R
M
E
R
G
I
O
V
E
N
S
A
B
D
O
M
15
60
30
45
23
30
10
20
10 1
2
3
4
5
6
7
8
9
III
III
L
U
N
M
A
R
M
E
R
G
I
O
V
E
N
S
A
B
D
O
M
15
60
30
45
23
30
10
20
10 1
2
3
4
5
6
7
8
9
III
65,5% = 40mm Druchmesser
III
A
65,5% = 40mm Druchmesser
III
B
65,5% = 40mm Druchmesser
III
A
65,5% = 40mm Druchmesser
III
III
65,5% = 40mm Druchmesser
III
B
65,5% = 40mm Druchmesser
III
A
L
U
N
M
A
R
M
E
R
G
I
O
V
E
N
S
A
B
D
O
M
15
60
30
45
23
30
10
20
10 1
2
3
4
5
6
7
8
9
III III
L
U
N
M
A
R
M
E
R
G
I
O
V
E
N
S
A
B
D
O
M
15
60
30
45
23
30
10
20
10 1
2
3
4
5
6
7
8
9
III III
L
U
N
M
A
R
M
E
R
G
I
O
V
E
N
S
A
B
D
O
M
15
60
30
45
17
30
10
20
10 1
2
3
4
5
6
7
8
9
II III
I
L
U
N
M
A
R
M
E
R
G
I
O
V
E
N
S
A
B
D
O
M
15
60
30
45
22
30
10
20
10 1
2
3
4
5
6
7
8
9
IIIIII
L
U
N
M
A
R
M
E
R
G
I
O
V
E
N
S
A
B
D
O
M
15
60
30
45
01
30
10
20
10 1
2
3
4
5
6
7
8
9
II
I
L
U
N
M
A
R
M
E
R
G
I
O
V
E
N
S
A
B
D
O
M
15
60
30
45
31
30
10
20
10 1
2
3
4
5
6
7
8
9
III
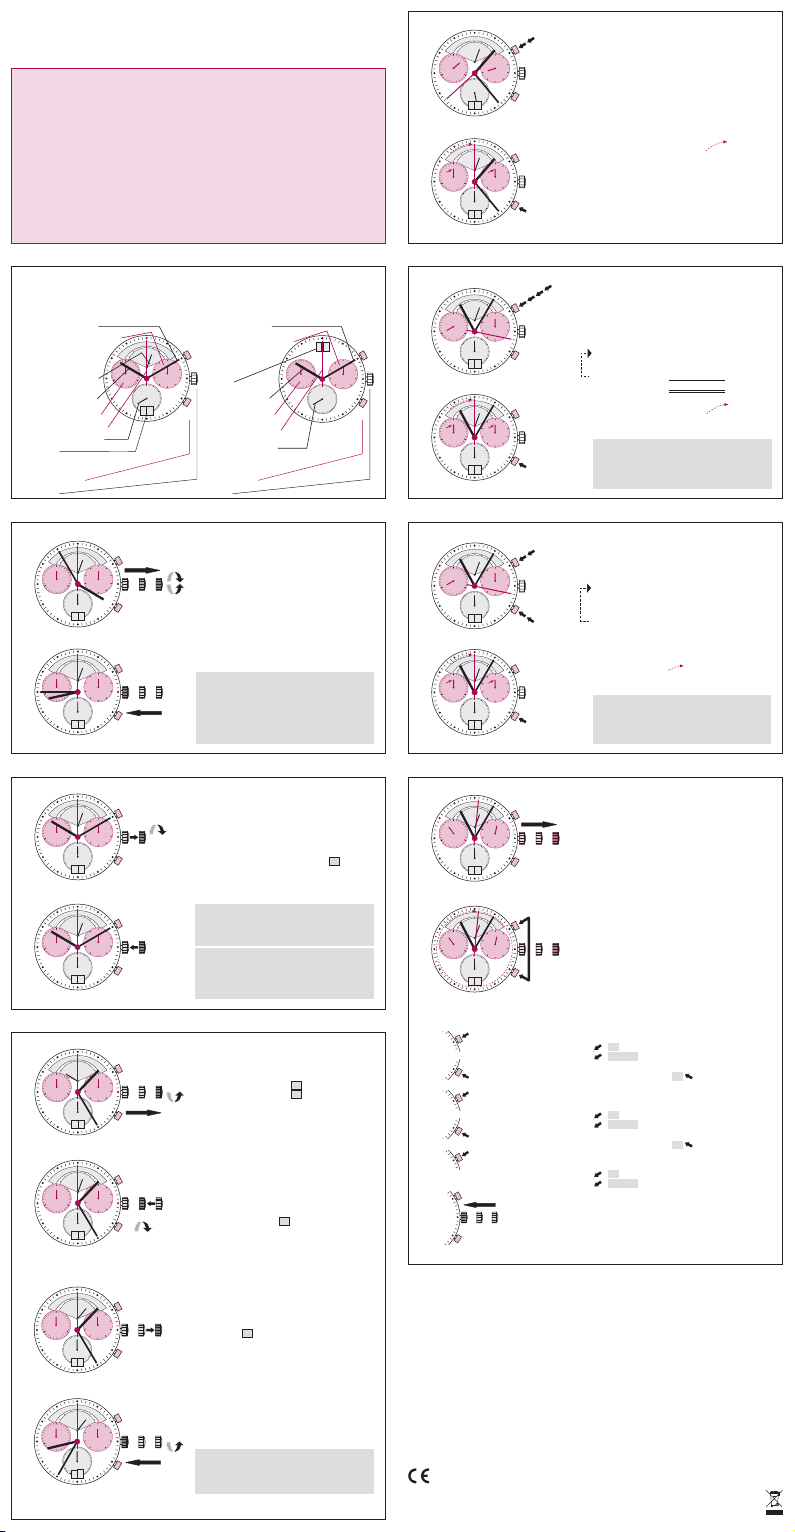
Strumenti d’indicazione 8040.N
Lancetta dei minuti
Contatore dei 1⁄10 di secondo
(primi 30 sec. scorrevoli)
Contatore delle ore
dopo 30 min.
Lancetta del giorno
settima
Lancetta delle ore
Contatore dei minuti
Contatore dei secondi
Lancetta dei secondi
Datario
Descrizione degli strumenti d’indicazione e d’uso
Strumenti d’indicazione 8040.B
Lancetta dei minuti
Contatore dei 1⁄10 di secondo
(primi 30 sec. scorrevoli)
Contatore delle ore
dopo 30 min.
Datario
Lancetta delle ore
Contatore dei minuti
Contatore dei secondi
Lancetta dei secondi
Strumenti d’uso
Pulsante A & B
Corona
Strumenti d’uso
Pulsante A & B
Corona
B B
A A
Cronografo: funzione base
(Start / Stop / Rimessa a zero)
Esempio:
Start: premere il pulsante A
Stop: per interrompere la misurazione del
tempo premere nuovamente il pulsante A
e leggere le lancette del cronografo:
4 min. / 38 sec. / 7⁄10 sec.
Posizione rimessa a zero:
Premere il pulsante B.
(Le lancette del cronografo vengono
riportate nella loro posizione a zero.)
Cronografo: Misurazione
addizionale del tempo
Esempio:
Start: (avviare misurazione del tempo)
Stop: (ad es. 15 min. 5sec. dopo
)
Restart: (abilitare di nuovo il conteggio
del tempo)
*Stop: (ad es. 5min. 12 sec. dopo
)
= 20 min. 17 sec.
(viene indicato il tempo addizionale)
Posizione rimessa a zero:
Le lancette del cronografo vengono
riportate nella loro posizione a zero.
Avvertenze
* Dopo
si può continuare con il conteggio
del tempo addizionale. Questo avviene
tramite il pulsante A
(Restart / Stop, Restart / Stop, …).
Cronografo: Misurazione
del tempo intermedio
Esempio:
Start: (avviare la misurazione del tempo)
Indicare il tempo intermedio:
ad es. 20 minuti 17 secondi (la misura-
zione del tempo prosegue nello sfondo)
Recupero del tempo di misurazione:
(le lancette del cronografo raggiungono
in movimento rapido il tempo di misura-
zione che ha continuato ad avanzare.)
Stop: (viene indicato il tempo finale)
Posizione zero:
Le lancette del cronografo vengono
riportate nelle loro posizioni a zero.
Avvertenze
* Dopo
possono essere indicati altri tempi
intermedi. Questo avviene tramite il pul-
sante B (indicazione del tempo intermedio/
recupero del tempo di misurazione,…).
*
Centratura delle lancette
del cronografo sulla posizione
a zero
Esempio:
Una o più lancette del cronografo non si
trovano nelle loro posizioni a zero corrette e
devono essere centrate (ad es. dopo il cambio
della batteria).
Portare la corona nella posizione III.
(Tutte le lancette del cronografo si
portano nelle posizioni corrette e/o
non corrette.)
Premere i pulsanti A & B contemporanea-
mente per almeno 2 secondi.
(La lancetta contatore dei secondi esegue
una rotazione di 360° (il modo di
correzione è attivato.)
Centratura della lancetta contatore dei secondi
Scatto singolo
65,5% = 40mm Druchmesser
III
A1 x breve
scatto continuo
65,5% = 40mm Druchmesser
III
Alungo
Centratura delle lancette successive B
65,5% = 40mm Druchmesser
III
Centratura della lancetta contatore dei 1⁄10 di
secondo (pos. 3 h)
Scatto singolo
65,5% = 40mm Druchmesser
III
A1 x breve
scatto continuo
65,5% = 40mm Druchmesser
III
Alungo
Centratura delle lancette successive B
65,5% = 40mm Druchmesser
III
Centratura della lancetta contatore dei minuti (pos. 9 h)
Scatto singolo
65,5% = 40mm Druchmesser
III
A1 x breve
scatto continuo
65,5% = 40mm Druchmesser
III
Alungo
Riportare la corona in posizione I
Conclusione della centratura delle lancette del cronografo
(l’operazione è possibile in qualsiasi momento).
Regolazione dell’ora
*
Portare la corona in posizione III
(la lancetta dei secondi si blocca).
Ruotare la corona fino a che viene
indicata l’ora corrente delle 8:45.
*Riportare la corona in posizione I.
Avvertenze
* Per impostare l’ora al «secondo esatto»
è necessario
agire tirando la corona
nella regolazione lancetta dei secondi «60».
Dopo, eseguire la regolazione della lancetta
delle ore e quella dei minuti, è poi premere
per il «secondo esatto» in posizione I.
Correzione veloce della data
Portare la corona nella posizione II
(l’orologio continua a funzionare).
Ruotare la corona verso il senso orario
finché appare la data corrente 01
Riportare la corona in posizione I.
Avvertenze
Dal momento nella fase d’indicazione del
calendario della ca. 20h–24h deve essere
impostata la data del giorno successivo.
Un’accelerazione estrema nella correzione
veloce può comportare l’indicazione errata
della data. Riportando la data da 01 a 31
(corona in posizione II), la sincronizzazione
viene nuovamente ripristinata.
Regolazione della data, del giorno
settimana (8040.N), dell’ora
Esempio:
– Data/ora sull’orologio 17 / 01:25/LUN
– Data/ora corrente 23 / 20:35 / SAB
Portare la corona in posizione III
(la lancetta dei secondi si blocca).
Ruotare la corona in senso inverso
fino a che il giorno settimana precedente
VEN appare.
Riportare la corona in posizione II.
Ruotare la corona verso il senso orario
fino a che appare il giorno precedente
alla data corrente 22 .
* Portare la corona in posizione III
(la lancetta dei secondi si blocca).
Ruotare la corona fino a che appare
la data 23 e il giorno settimana
SAB
corrente.
**Ruotare ancora la corona fino a che viene
indicata l’ora corrente 20:35.
Riportare la corona in posizione I.
Avvertenze
* Regolazione dell’ora al «secondo esatto»:
vedi il capitolo «regolazione dell’ora»
**fare attenzione alla posizione delle 24 ore
.
Manuale dell’Istruzione d’Uso – Italiano
RONDAmastertech – Movimento cal. 8040.N&8040.B
07/2017
Tipo di batteria: 395/SR927SW
Precisione: +20/-10 secondi al mese
Lei ha scelto un orologio che presenta un movimento Ronda montato dal
produttore d’orologi. La preghiamo di ricordare che il marchio Ronda
non produce orologi né li commercializza sul mercato.
In caso di riparazioni, rivendicazioni di garanzia e domande sul fun-
zionamento dell’orologio, gli acquirenti e gli utenti devono rivolgersi
unicamente al punto vendita o al produttore dell’orologio. Informa-
zioni a questo riguardo sono disponibili nelle condizioni di vendita e
di garanzia.
B
B
B
B
B
B
B
B
B
B
B
B
B
B
B
B
A
A
A
A
A
A
A
A
A
A
A
A
A
A
A
A
01
05
02
06
03
07
04
08
Table of contents
Languages:
Other Ronda Watch manuals

Ronda
Ronda 3540.D User manual

Ronda
Ronda 7004.N Owner's manual

Ronda
Ronda normtech 700 User manual

Ronda
Ronda Startech 5000 Owner's manual

Ronda
Ronda NORMTECH 788 User manual

Ronda
Ronda xtratech 4220.B User manual

Ronda
Ronda Mastertech 8040.N User manual

Ronda
Ronda startech 4000 User manual

Ronda
Ronda 5010.B User manual

Ronda
Ronda 3540.D User manual

Ronda
Ronda Startech 5030.D User manual

Ronda
Ronda Cal. 5130.D User manual

Ronda
Ronda Mastertech 8000 Owner's manual

Ronda
Ronda Cal. 5020.B User manual

Ronda
Ronda Normtech 788 User manual

Ronda
Ronda Christina London User manual

Ronda
Ronda 1006 Owner's manual

Ronda
Ronda 505.24D User manual

Ronda
Ronda 3520.D User manual

Ronda
Ronda startech 5040.F User manual