manuals.online logo
Brands
  1. Home
  2. •
  3. Brands
  4. •
  5. Rose electronics
  6. •
  7. Tools
  8. •
  9. Rose electronics XTREME PINPUSHER II User manual

Rose electronics XTREME PINPUSHER II User manual

A
ROSE Bikes GmbH
Schersweide 4, 46395 Bocholt, Germany
Made in Taiwan, www.rosebikes.de
XTREME PINPUSHER II
DE // BEDIENUNGSANLEITUNG PINPUSHER II // BEST.-NR.: 184632 EN // OWNER‘S MANUAL PINPUSHER II // PROD. CODE: 184632
GEFAHR
Unfallgefahr durch falsch genietete Kette!
Falsch genietete Ketten können unter Belastung plötzlich reißen.
• Das Öffnen und Schließen einer Kette darf nur von Personen mit Erfahrung im Umgang mit
Fahrradkomponenten durchgeführt werden.
• Die Angaben des Kettenherstellers müssen beachtet werden.
• Nachdem eine Kette vernietet wurde, darf die Kette nicht noch einmal an derselben Stelle
geöffnet werden.
• Eine Kette darf nur zweimal geöffnet und wieder geschlossen werden. Der Abstand der
nachträglich angebrachten Kettennietstifte muss so groß wie möglich sein.
• Ketten mit Kettenschloss dürfen nicht mit einem Kettennietstift verschlossen werden. Es muss
ein zur Kette passendes Kettenschloss angebracht werden.
• Zu lange oder zu kurze Ketten können die Funktion des Antriebs maßgeblich beeinflussen.
• Im Zweifelsfall muss die Hilfe eines Zweiradmechatronikers in Anspruch genommen werden.
Allgemeines
Diese Bedienungsanleitung muss vor der ersten Verwendung deines Kettennietdrückers gelesen und
verstanden worden sein. Bewahre diese Bedienungsanleitung für späteres Nachschlagen auf.
Verkaufst oder verschenkst du deinen Kettennietdrücker, muss diese Bedienungsanleitung dem
Kettennietdrücker beigelegt werden.
Mit dem Pinpusher II Kettennietdrücker dürfen keine Campagnolo-Ketten vernietet werden! Passend für
7- bis 12-fach Ketten.
Hinweis: Mit Hilfe einer Kettenverschleißlehre kann geprüft werden, ob sich die Kette innerhalb der
Verschleißtoleranz befindet.
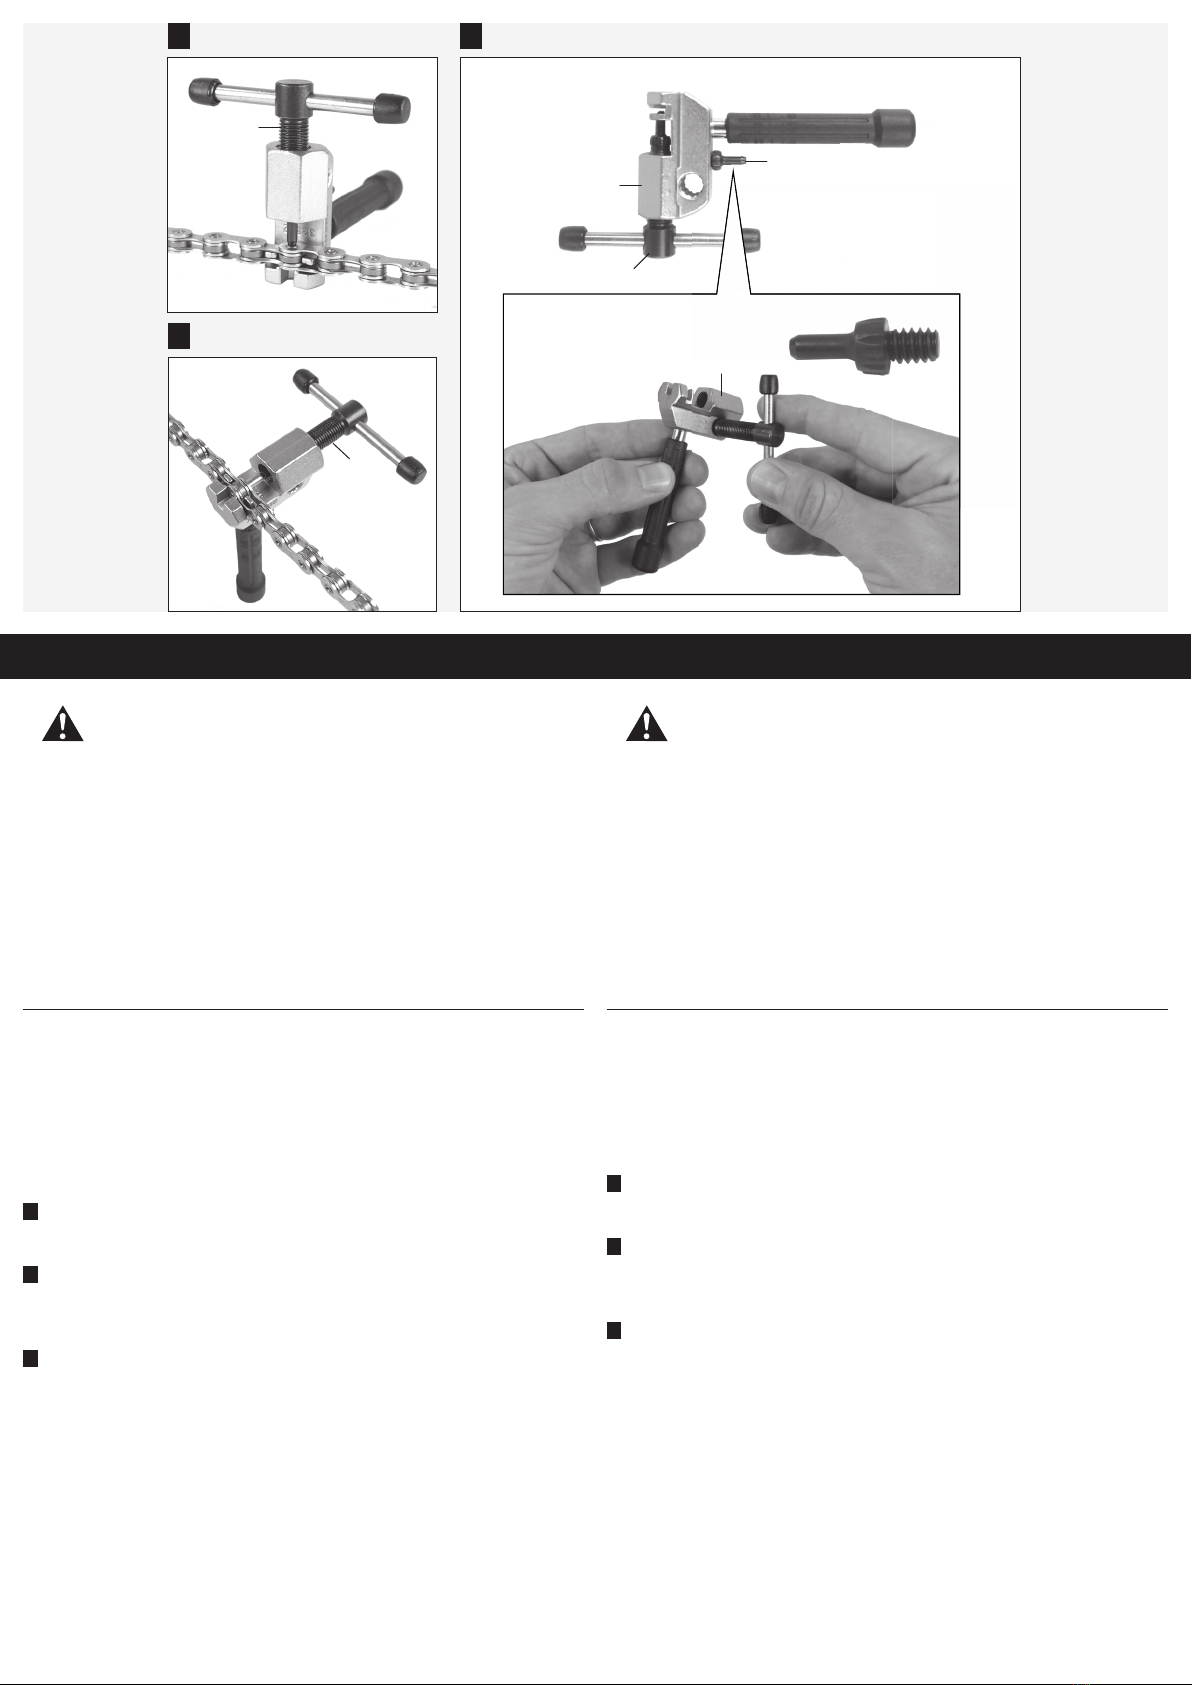
AEntfernen eines Kettennietstifts
1. Kette in den Kettennietdrücker einlegen.
2. Spindel (A-1) drehen und Kettennietstift vollständig herausdrücken.
BAnbringen eines Kettennietstifts
1. Offene Kettenenden zusammenstecken und mit Kettennietstift fixieren.
2. Kette in den Kettennietdrücker einlegen.
3. Spindel (B-1) drehen und Kettennietstift einpressen.
CAustauschen des Nietstifts
Bei Verschleiß des Nietstifts kann dieser durch den im Lieferumfang enthaltenen Ersatznietstift
getauscht werden.
1. Ersatznietstift (C-1) aus dem Grundkörper des Kettennietdrückers (C-2) herausdrehen.
2. Spindel (C-3) vollständig aus dem Kettennietdrücker herausdrehen.
3. Spindel mit Nietstift in die Vielzahn-Aufnahme am Grundkörper des Kettennietdrückers (C-4)
einstecken und Kettennietstift aus der Spindel herausdrehen.
4. Ersatznietstift in die Spindel eindrehen und mit Hilfe der Vielzahn-Aufnahme anziehen.
Wartung und Pflege
Regelmäßige Wartung und Pflege sorgen für eine lange und zuverlässige Haltbarkeit sowie eine
uneingeschränkte Funktion. ROSE Bikes empfiehlt folgende Tätigkeiten:
• Der Kettennietdrücker sollte sorgsam behandelt und so aufbewahrt werden, dass Korrosion
erschwert wird und Beschädigungen ausgeschlossen werden können. Die einwandfreie Funktion
des Kettennietdrückers hängt maßgeblich von dessen Zustand ab.
• Kettennietdrücker regelmäßig reinigen und Metallteile zum Korrosionsschutz mit einem
Universalöl einölen.
Diese Bedienungsanleitung ist zusätzlich unter rosebikes.de/Bedienungsanleitungen verfügbar. This manual is additionally available as a pdf file on rosebikes.com/manuals
A-1
B-1
C-3
C-1
C-2
B
C
C-4
DANGER
Risk of accident due to an incorrectly fitted chain!
Incorrectly assembled chains may suddenly break under load.
• A chain may only be removed and fitted by people with experience in bicycle maintenance
works.
• Please follow the chain manufacturer‘s instructions.
• Once a chain has been riveted, you should not break the same link repeatedly.
• A chain must not be opened and re-joined more than two times. The distance between the
subsequently installed chain pins should be as large as possible.
• Do not use a chain pin to join chains with a master link. You must fit an appropriate
connector link to these chains instead.
• A chain that is too long or too short may have a significant influence on the functioning of
the drivetrain.
• In case of any questions or if in doubt, seek the assistance of a qualified bicycle mechanic.
General information
Please read this manual carefully before using your chain tool for the first time and make sure you
understand everything. Keep this manual for future reference.
If you sell or give away your chain tool, please also include the owner’s manual.
The Pinpusher II chain tool is not designed to install Campagnolo chains! Suitable for 7- to 12-speed
chains.
Note: A chain wear indicator allows you to check if the chain is still within allowable wear
tolerance or if it needs to be replaced.
AHow to remove a chain pin
1. Place the chain into the chain tool.
2. Turn the handle (A-1) and push the chain pin all the way out.
BHow to insert a chain pin
1. Take the open ends of the chain and join them with a chain pin.
2. Place the chain into the chain tool.
3. Turn the handle (B-1) and push the pin into the chain.
CHow to replace a chain pin
If the chain pin is worn you can replace it with the included replacement pin.
1. Remove the replacement chain pin (C-1) from the base body of the chain tool (C-2) .
2. Completely remove the extractor bolt (C-3) from the chain tool.
3. Put the bolt together with the worn pin into the multi-tooth mount on the base body of the chain
tool (C-4) and remove the chain pin from the bolt.
4. Screw the replacement pin onto the bolt and tighten it with the multi-tooth mount.
Maintenance and Care
Regular care and maintenance ensure high durability and reliability, as well as unlimited functionality.
ROSE Bikes recommends carrying out the following tasks:
• Handle the chain tool with care and make sure to protect it from damages and corrosion during
storage. A proper functioning of the chain tool largely depends on its condition.
• Regularly clean the chain tool and grease the metal parts with universal oil to prevent corrosion.
A
FR // MANUEL D‘INSTRUCTIONS PINPUSHER II // ART.: 184632 NL // HANDLEIDING PINPUSHER II // ART.NR.: 184632
Ce manuel d’instructions est disponible en fichier pdf sur rosebikes.fr/manuels_dinstructions. Deze handleiding is ook beschikbaar als pdf-bestand op rosebikes.nl/handleidingen.
GEVAAR
Gevaar op ongevallen door foutief geponste ketting!
Verkeerd geponste kettingen kunnen plotseling knappen als ze onder spanning staan.
• Uitsluitend personen die ervaring hebben met fietsonderdelen mogen een ketting openen en
sluiten.
• De aanwijzingen van de fabrikant van de ketting dienen te worden opgevolgd.
• Een ketting die is geponst mag niet op dezelfde plaats nogmaals worden geopend.
• Een ketting mag maximaal 2 keer geopend en weer gesloten worden. De afstand tussen de
nieuwe schakels dient zo groot mogelijk te zijn.
• Kettingen met sluitschakel mogen niet met een kettingpons worden gesloten. Er dient een bij
de ketting passende sluitschakel te worden aangebracht.
• Te lange of te korte kettingen kunnen de functionaliteit van de aandrijving aanzienlijk
beïnvloeden.
• Bij twijfel dient een rijwielhersteller te worden geraadpleegd.
Algemeen
Deze handleiding moet voor het eerste gebruik van de kettingpons gelezen en begrepen worden.
Bewaar deze handleiding om later nog het een en ander na te kunnen lezen.
Indien je de kettingpons verkoopt of weggeeft, dient deze handleiding te worden meegeleverd.
Met de Pinpusher II kettingpons mogen geen Campagnolo kettingen geponst worden. Geschikt voor
7- tot 12-speed kettingen.
LET OP: Met behulp van een kettingslijtagemeter kan worden gecontroleerd of de ketting zich nog
binnen de tolerantiegrenzen van de slijtage bevindt.
AHet verwijderen van een kettingstift
1. Plaats de ketting in de kettingpons.
2. Draai aan de greep (A-1) en druk de kettingstift volledig uit de ketting.
BHet plaatsen van een kettingstift
1. Steek de open kettingeinden in elkaar en fixeer deze met de kettingstift.
2. Plaats de ketting in de kettingpons.
3. Draai aan de greep (B-1) en pers de kettingstift in de ketting.
CHet vervangen van een kettingstift
Als de kettingstift is versleten, kan deze door de meegeleverde reservestift vervangen worden.
1. Draai de reservestift (C-1) uit de body van de kettingpons (C-2).
2. Draai de greep (C-3) volledig uit de kettingpons.
3. Steek de greep met de kettingstift in de opening van de kettingpons (C-4) en draai de kettingstift
uit de greep.
4. Draai de reservestift in de greep en schroef hem vast met behulp van de opening.
Onderhoud
Regelmatig onderhoud zorgt voor een lange en betrouwbare gebruiksduur en een onbeperkte werking.
ROSE Bikes adviseert de volgende handelingen:
• Behandel de kettingpons met zorg en bewaar hem zo dat hij niet beschadigd raakt en roest.
Het goed functioneren van de kettingpons hangt voor een groot deel af van de toestand van de
kettingpons.
• Reinig de kettingpons regelmatig en smeer de metalen onderdelen om corrosie tegen te gaan.
A
A-1
B-1
C-3
C-1
C-2
B
C
C-4
DANGER
Risque d‘accident dû à la chaîne mal rivetée!
Une chaîne qui est mal rivetée et soumise à une charge, peut casser tout d‘un coup.
• Seul les personnes qui se connaissent bien en composants de vélo sont autorisées à ouvrir et
à fermer une chaîne de vélo.
• Il faut respecter les indications du fabricant de la chaîne.
• Une fois qu‘une chaîne a été ouverte et rivetée, il ne faut pas la rouvrir plus tard au même
endroit.
• Il ne faut ouvrir ou fermer la chaîne pas plus que deux fois. Si on répare la chaîne pour
la deuxième fois, il faut remplacer dans l‘idéal l‘élément opposé à l‘élément réparé
antérieurement.
• Les chaînes avec un maillon attache-rapide ne doivent pas être fermées avec un rivet de
chaîne. Il faut mettre en place un maillon qui est compatible avec la chaîne.
• Si la chaîne est trop longue ou trop courte, elle peut restreindre largement le fonctionnement
de la transmission du vélo.
• En cas de doute, il faut recourir à un mécatronicien deux-roues.
Informations générales
Veuillez lire attentivement ce manuel d‘instructions avant d’utiliser votre dérive-chaîne pour la première
fois et assurez-vous de tout comprendre. Conservez ce manuel d’instructions pour une prochaine
utilisation.
Si vous vendez ou donnez votre dérive chaîne, n’oubliez pas de joindre le présent manuel
d’instructions.
Il ne faut pas manipuler de chaîne Campagnolo avec le dérive-chaîne Pinpusher II. Compatible avec les
chaînes de 7 à 12 vitesses.
Note: Vérifiez l‘usure de la chaîne avec un indicateur d‘usure de chaîne pour vous rassurer que
l‘usure ne dépasse pas le seuil de tolérance.
ARetirer le rivet de chaîne
1. Mettez la chaîne dans le dérive-chaîne.
2. Tournez le mandrin (A-1) et chassez le rivet de chaîne.
BMettre le rivet de chaîne en place
1. Posez un bout de la chaîne dans l‘autre et attachez-les avec le rivet de chaîne.
2. Mettez la chaîne dans le dérive-chaîne.
3. Tournez le mandrin (B-1) et enfoncez alors le rivet dans la chaîne.
CRemplacer la goupille
La goupille usée peut être remplacée par la goupille de rechange qui est livrée avec le dérive chaîne.
1. Retirez du corps de base du dérive chaîne (C-2) la goupille de rechange (C-1) en la tournant.
2. Retirez complètement le mandrin (C-3) du dérive chaîne.
3. Mettez le mandrin avec la goupille dans le trou cranté du corps de base du dérive chaîne (C-4) et
tournez jusqu’à ce que la goupille sorte du mandrin.
4. Placez la nouvelle goupille dans le mandrin et serrez-la dans le trou cranté.
Entretien et soin
L’entretien et la maintenance réguliers assurent une résistance fiable et une fonctionnalité impeccable.
ROSE Bikes conseille de faire les tâches ci-dessous:
• Utilisez et rangez soigneusement le dérive chaîne de manière que tout endommagement puisse
être exclu et la corrosion empêchée au mieux. Le fonctionnement impeccable du dérive chaîne
dépend largement de son état.
• Nettoyez régulièrement le dérive chaîne et huilez les pièces en métal avec une huile universelle
pour les protéger de la corrosion.

Other Rose electronics Tools manuals

Rose electronics ALL2GETHER PRO II User manual

Rose electronics

Rose electronics ALL2GETHER PRO II User manual

Rose electronics 2317262 User manual

Rose electronics

Rose electronics 2317262 User manual

Rose electronics 2317259 User manual

Rose electronics

Rose electronics 2317259 User manual

Rose electronics PINPUSHER PRO User manual

Rose electronics

Rose electronics PINPUSHER PRO User manual

Rose electronics XTREME CE-331 User manual

Rose electronics

Rose electronics XTREME CE-331 User manual

Rose electronics XTREME SMART TOOL User manual

Rose electronics

Rose electronics XTREME SMART TOOL User manual

Rose electronics ALL2GETHER User manual

Rose electronics

Rose electronics ALL2GETHER User manual

Rose electronics PINPUSHER III User manual

Rose electronics

Rose electronics PINPUSHER III User manual

Rose electronics XTREME ALL2GETHER XL User manual

Rose electronics

Rose electronics XTREME ALL2GETHER XL User manual

Rose electronics PINPUSHER IV User manual

Rose electronics

Rose electronics PINPUSHER IV User manual

Rose electronics T-15 User manual

Rose electronics

Rose electronics T-15 User manual

Popular Tools manuals by other brands

VEVOR LD-868 user manual

VEVOR

VEVOR LD-868 user manual

Reelworks HR181 instruction manual

Reelworks

Reelworks HR181 instruction manual

FAR KJ 70 TRANSLATION OF ORIGINAL INSTRUCTIONS

FAR

FAR KJ 70 TRANSLATION OF ORIGINAL INSTRUCTIONS

Albert Roller ROLLER'S King1 1/4 operating instructions

Albert Roller

Albert Roller ROLLER'S King1 1/4 operating instructions

Sealey SJBEX200.V2 manual

Sealey

Sealey SJBEX200.V2 manual

Brownells YAVAPAI 1911 AUTO instructions

Brownells

Brownells YAVAPAI 1911 AUTO instructions

P.A. M63P Maintenance handbook

P.A.

P.A. M63P Maintenance handbook

Warn 91800 installation guide

Warn

Warn 91800 installation guide

Makita BHR262 user manual

Makita

Makita BHR262 user manual

Yost Vises DPV-4 instructions

Yost Vises

Yost Vises DPV-4 instructions

Milwaukee M12 UDEL user manual

Milwaukee

Milwaukee M12 UDEL user manual

SPX 1505B operating instructions

SPX

SPX 1505B operating instructions

Pig SpillBlocker quick guide

Pig

Pig SpillBlocker quick guide

Bostitch N66BC-1 Original instructions

Bostitch

Bostitch N66BC-1 Original instructions

BGS technic 9754 manual

BGS technic

BGS technic 9754 manual

Würth DIESEL DRAWER N.3 Translation of the original operating instructions

Würth

Würth DIESEL DRAWER N.3 Translation of the original operating instructions

Hardinge 16C Mounting instructions

Hardinge

Hardinge 16C Mounting instructions

jbc WS440 instruction manual

jbc

jbc WS440 instruction manual

manuals.online logo
manuals.online logoBrands
  • About & Mission
  • Contact us
  • Privacy Policy
  • Terms and Conditions

Copyright 2025 Manuals.Online. All Rights Reserved.