Rubbermaid 7888 Product information sheet

WALL UTILITY CABINET
ARMOIRE UTILITAIRE MURALE
GABINETE DE PARED PARA USO GENERAL
EasyAssemblyInstructions
Instructionsfacilespourlemontage
Instruccionesfácilesparaelarmado
1
Piece/Pièce/Elemento
2 YSidePanels/Panneauxlatéraux/Paneleslaterales
1 QBottomPanel/Panneauinférieur/Panelinferior
1 K*Shelf/Tablette/Estante
1 J LeftDoorPanel/Panneaudeportegauche/Paneldepuertaizquierda
1 ZRightDoorPanel/Panneaudeportedroit/Paneldepuertaderecha
1 ITopPanel/Panneausupérieur/Panelsuperior
2 M/N DoorHandles/Poignéesdeporte/Manijasdepuertas
1 BackPanel/Panneauarrière/Panelposterior
4 ShelfHangers/Crochets/Colgadoresdeestantes
4 1/2"/.05cm#8Phillips®flatheadscrews
VisàtêteplatePhillips®no8de1/2po/0,5cm
TornillosdecabezaplanaPhillips®#8de1/2"/0.5cm
8 3/4"/1.9cm#8Phillips®screws/Viscruciformesno8de3/4po/1,9cm
TornillosPhillips®#8de3/4"/1.9cm
12 1-1/2"/3.8cm#8Phillips®screws/Viscruciformesno8de11/2po/3,8cm
TornillosPhillips®#8de1-1/2"/3.8cm
2 Double-sidedTape/Rubanadhésifdoubleface/
Cintaengomadaporlas2caras
*Each shelf holds 35 lbs.
Chaque tablette peut recevoir 35 lb.
Cada repisa soporta 35 libras.
Y
YI
7888
ToolsRequired:
Outilsrequis :
Herramientasnecesarias:
Assemblecabinet sides(Y) to
cabinettop (I).
a.Placepanel(I)ongroundwithassembly
letterfacingup.
b.Withpanel(Y)assemblyletterfacing
insideofPanel(I),alignpanel(I)
recessestopanel(Y)dovetailsandslide
panel(Y)forwarduntilbothpanelfronts
areflush.Checktomakesurethespeed
bumponpanel(I)hasclearedtherecess
onpanel(Y).
c. Arubbermalletmaybeneededto
finishslidingpanel(I)toitssecure
position.
d.Repeata.-c.forothersidepanel(Y).
Fixerles panneauxlatéraux (Y)au
panneausupérieur (I)de l'armoire
murale.
a.Placerlepanneau(I)surlesol,lalettre
tournéeverslehaut.
b.Enplaçantlepanneau(Y)defaçonque
lalettresoittournéeverslepanneau(I),
alignerlesentaillessurlepanneau(I)
aveclesqueuesd'arondesurlepanneau
(Y)etglisserlepanneau(Y)versl'avant
jusqu'àcequelesdeuxpanneaux
soienteffleurés.S'assurerquelabosse
deralentissementsurlepanneau(I)ne
bloquepasl'entaillesurlepanneau(Y).
c. Ilfaudrapeut-êtreutiliserunmaillet
encaoutchoucpourfinird'enfoncer
solidementenplacelepanneau(I).
d.Répéterlesétapesa.àc. poutl'autre
côtépanneau(Y).
Ensamblelos costadospanel (Y)
delgabinete depared ala parte
superiordel mismo(panel I).
a.Coloqueelpanel(I)enelpisoconla
letradelconjuntohaciaarriba.
b.Conlaletradelpanel(Y)mirandohacia
adentrodelpanel(I),alinielascolas
demilanodelpanel(I)alosrecesos
delpanel(Y)ydesliceelpanel(Y)hacia
adelantehastaquesupartedelantera
estéalrasconelfrentepanel(Y).
Compruebequeelresaltodelpanel(I)
hayasuperadoelrecesodelpanel(Y).
c.Puedenecesitarseunmazodegoma
paraacabardedeslizarelpanel(I)a
suposiciónfinal.
d.Repitalospasosa.ac.paraelotro
ladopanel(Y).
PhillipsisaregisteredtrademarkofthePhillipsScrewCo.
PhillipsestunemarquedefabriquedéposéedelacompagniePhillipsScrew.
PhillipsesunamarcacomercialregistradadePhillipsScrewCo.
Y
K
N
J
Z
Q
I
M
Y
CAUTION: DO NOT OVERTIGHTEN SCREWS! • ATTENTION : NE PAS TROP SERRER LES VIS! • ¡ATTENCION: NO APRIETE LOS TORNILLOS EN EXCESO!

Q
2
3
5
Y
Q
Z
I
J
M
Assemblethe bottompanel (Q)
tothe sidepanels (Y).
a.Placebacksideofpanel(Y)againsta
flatsurface.
b.Alignpanel(Y)dovetailstopanel(Q)
recessesandslidepanel(Q)
approximately3/4ofthewaydown,
leavingenoughroomtoallowdoor
panelassembly.
Fixerle panneauinférieur (Q)aux
panneauxlatéraux (Y).
a.Placerl'armoiresurunesurfaceplane,
l'arrièrecontrelesol.
b.Alignerlesqueuesd'arondesituées
surlepanneau(Y)aveclesentailles
situéessurlepanneau(Q)etfaire
glisserlepanneau(Q)presque
jusqu'aufondenlaissant
suffisammentd'espacepourles
panneauxdeporte.
Ensambleel paneldel fondo(Q)
alos paneleslaterales (Y).
a.Coloqueelrespaldodelpanel(Y)
sobreunasuperficieplana.
b.Alínielascolasdemilanodelpanel
(Y)alosrecesosdelpanel(Q)y
desliceésteaproximadamentelas
3/4parteshaciaabajodejando
suficientesitiocomoparapermitirel
ensambledelpaneldelapuerta.
Assembledoor panels(J &Z) to
cabinetassembly.
a.Inserttherightdoorpanel(Z)intothe
recessonpanel(I)atananglesuch
thatthebottomhingepincanbe
tappedintotherecessonthebottom
ofpanel(Q).
b.Repeatprocedurea.forleftdoor
panel(J).
c.Oncebothdoorsareinplace,finish
slidingpanel(Q)toitssecureposition.
(Arubbermalletmayberequired.)
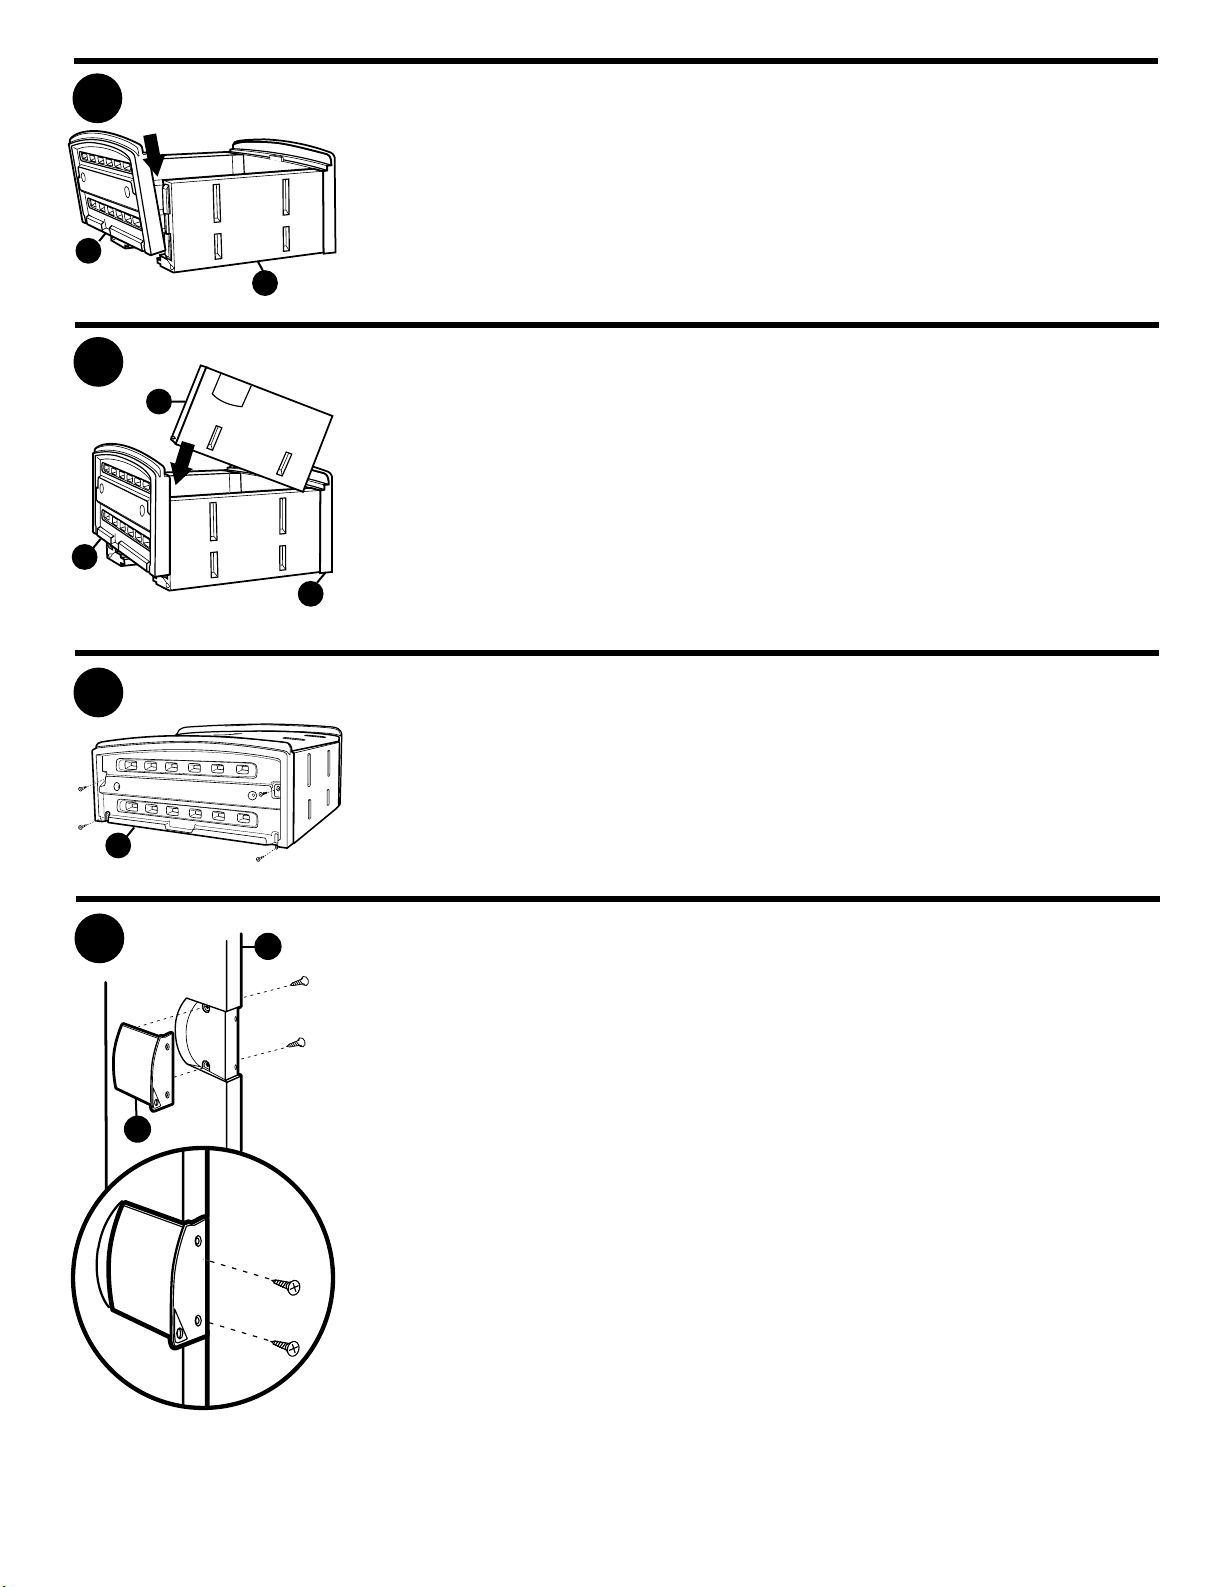
Assemblebottom panel(Q) to
cabinetassembly.
a.Using1-1/2"/3.81cmlengthscrews,
securethebottompanel(Q)tothesides
inthefourmarkedlocations.
(Suggestion:Tapscrewsintoplastic
witharubbermalletbeforetightening.)
Fixerles panneauxde porte(J etZ)
àl'armoire.
a.Insérerenbiaislepanneaudeporte
droit(Z)dansl'entaillesituéesurle
panneau(I)defaçonàpouvoirenfoncer
l'axed'articulationinférieurdans
l'entaillesituéeaubasdupanneau(Q).
b.Répéterl'étapea.pourlepanneaude
portegauche(J).
c.Unefoisquelesdeuxpanneauxde
portesontinstallés,faireglisserle
panneau(Q)jusqu'aufondpourlefixer
solidementenplace.(Ilfaudrapeut-être
utiliserunmailletencaoutchouc.)
Fixerle panneauinférieur (Q)à
l'armoire.
a. Àl'aidedevisde1-1/2po/3,81cm,fixer
lepanneauinférieur(Q)auxcôtésaux
quatreemplacementsindiqués.
(Suggestion:Enfoncerlégèrementles
visdansleplastiqueavecunmaillet
encaoutchoucavantdelesserrer.)
Ensamblelos panelesde puerta
(Jy Z)al conjuntodel gabinete.
a.Insertelapuertaderechopanel(Z)
enelrecesodelpanel(I)aunángulo
talquepermitaqueelpasadorinferior
delabisagrapuedaserencajadoen
elrecesoenlaparteinferiordelpanel
(Q).
b.Repitaelprocedimientoa.parala
puertaizquierdapanel(J).
c.Unavezqueambaspuertasesténen
susitio,terminededeslizarelpanel
(Q)hastsuposiciónfinal(puede
necesitairseunmazodogoma).
Ensambleel panelinferior (Q)
alconjunto delgabinete.
a.Usandotornillosde1-1/2"/3.81cm
delargo,asegureelpanelinferior(Q)
aloscostadosenlas4ubicaciones
marcadas.
(Sugerencia:Clavelostornillosenel
plásticoconunmazodegomaantes
deapretar.)
Assemblehandles (M& N)to door
panels(J &Z)
a.Assemblehandle(M)toleftdoorpanel
(J)byinsertinghandleintohandle
pocket.
b.Whilepressingfirmlyonthefrontof
thehandle,usetwo3/4"/1.9cmscrews
tosecureitfromthebackofdoorpanel
(J)inthetwoscrewlocationsmarked.
c.Finishsecuringthehandlewithtwo
1/2"/.5cmlengthflatheadscrewsalong
thefaceofthehandlethatisalongthe
edgeofpanel(J).
(Suggestion:Tapscrewsintoplastic
witharubbermalletbeforetightening.)
d.Repeata.-c.forassemblyofhandle(N)
torightdoorpanel(Z).
Fixerles poignées(M etN) aux
portes(J etZ).
a.Fixerlapoignée(M)aupanneaude
portegauche(panneauJ)eninsérant
lapoignéedanslacavitédelapoignée.
b.Toutenappuyantfermementsur
l'avantdelapoignée,insérerdeuxvis
de3/4po/1,9cmdanslesdeux
emplacementsindiquésàl'arrièredu
panneaudeporte(panneauJ)afinde
fixerlapoignéesolidementenplace.
c.Terminerdefixerlapoignéeeninsérant
deuxvisàtêteplatede1/2po/0,5cm
surlecôtédelapoignéesituésurle
borddupanneau(J).
(Suggestion:Enfoncerlégèrementles
visdansleplastiqueavecunmaillet
encaoutchoucavantdelesserrer.)
d.Répéterlesétapesa.àc.pourfixerla
(poignéeN)aupanneaudeportedroit
(Z).
Ensamblelas manijas(M yN)
enlas puertas(J yZ).
a.Ensamblelamanija(M)alapuerta
izquierda(panelJ)insertándolaenel
rebajoparamanija.
b.Mientraspresionsfirmementela
manijapordelante,use2tornillos
de3/4"/1.9cmparaasegurarla
desdeatrásdelapuerta(panelJ)
enlas2ubicacionesmarcadaspara
tornillos.
c. Asegurefirmementelamanijacon
2tornillosdecabezaplanaadicionales
de1/2"/0.5cmalolargodelfrentede
lamanijaqueestáalolargodelborde
delpanel(J).
(Sugerencia:Clavelostornillosenel
plásticoconunmazodegomaantes
deapretar.)
d.Repitalospasosa.ac.para
ensamblarlamanija(N)alpanelde
puerta(Z).
4
Q

7
©1997Rubbermaid Incorporated,Wooster,OH, U.S.A. 44691-6000 JH7-7888
6
Y
K
Assembleshelf panel(K) to
cabinetassembly.
a.Using3/4"/1.9cmlengthscrews,
beginassemblingthefourshelf
hangerhookstothesidepanel(Y)in
thelocationyouwishtohavetheshelf.
b.Afteralltheshelfhangerhookshave
beenscrewedtoeachsideofthe
cabinet,alignshelfpanel(K)overshelf
hooksandpressdownuntilshelf
snapsintoplace.
Fixerla tablettepanneau (K)à
l'armoire.
a.Àl'aidedesvisde3/4po/1,9cm,fixer
lesquatrecrochetssurlepanneau(Y)à
l'endroitoùl'onsouhaiteinstallerla
tablette.
b.Unefoisquel'onavissélescrochets
dechaquecôtédel'armoire,alignerla
tablette(K)aveclescrochetsetappuyer
jusqu'àcequelatablettes'enclenche
enplace.
Ensambleel panelde larepisa
panel(K) alconjunto delgabinete.
a.Usandotornillosde3/4"/1.9cmde
largo,comienceaensamblarlos4
ganchosdelcolgadordelarepisaen
elpanellateral(Y)enlaubicaciónen
quedeseatenerlarepisa.
b.Despuésquesehanatornillado
todoslosganchosdelcolgadorde
larepisaencadaladodelgabinete,
alinielarepisa(K)sobrelosganchos
derepisaypresionehastaqueésta
encajeensusitio.
Alignand mountwall cabinetto the
mountingsurface.
a.Locatethenearestwallstudinthearea
youwishtohangthecabinet.
b.Alignthebackpaneltothemounting
surfacemakingsurealledgesaresquare.
c.Oncethebackpanelissquaretothe
mountingsurface,useitasatemplateto
markthelocationsoftheeightmounting
holes.(Caution:Atleastonesideofthe
cabinetshouldaligntoawallstud.)
d.Forinstallationintodrywalluse
appropriatedrywallanchors.
(notincluded)
e.Forinstallationintomasonry,block,
orsurfacesotherthandrywall,consult
yourhardwareretailerforappropriate
fasteners.
f. Usethedouble-sidedtapeprovidedto
attachthebackpaneltothecabinet
makingsure allthemountingholesare
alignedbetweenthetwopieces.
g.Mountthecabinetassemblytothe
mountingsurfaceusingeightofthe
1-1/2"/3.81cmlengthscrews.
Aligneret installerl'armoire murale
surla surfacede montage.
a.Trouverlepoteaumuralleplusprès
del'endroitoùl'onsouhaiteinstaller
l'armoire.
b.Alignerlepanneauarrièreavecla
surfacedemontageens'assurantque
touslesrebordssontbienéquerrés.
c.Unefoislepanneauarrièreenplacesur
lasurfacedemontage,l'utilisercomme
gabaritpourindiquerl'emplacement
deshuitorificesdemontage.
(Miseengarde:aumoinsuncôtéde
l'armoiredoitêtrealignéavecunpoteau
mural.)
d.Installerl'armoireeninsérantunevis
de1,5po/3,81cmdanschacundes
sixtrousdefixationsituéssurlecôté
(panneauY)etdanschaquetroude
fixationsituésurlepanneau(I)etle
panneau(Q).
e.Utiliserlerubanadhésifdoubleface
pourfixerlepanneauarrièresur
l'armoireens'assurantquetousles
orificesdemontagesontbienalignés
entrelesdeuxpièces.
f. Installerl'armoiresurlasurfacede
montageàl'aidedeshuitvisde11/2po/
3,81cmdelongueur.
Alíniey monteel gabinetede
pareda lasuperficie demontaje.
a.Ubiqueelparantedeparedmás
cercanoeneláreaenquedesee
colgarelgabinete.
b.Alíneelpanelposteriorala
superficiedemontajecomprobando
quetodoslosbordesesténa
escuadra.
c.Unavezqueelpanelposterioresté
aescuadraconlasuperficiede
montaje,úselocomoplantillapara
marcarlasubicacionesdelos8
agujerosdemontaje.
(Precaución:Porlomenosunlado
delgabinetedebealinearseconun
parantedepared).
d.Usandotornillosde1.5"/3.81cm
delargo,nonteelgabineteenlos
6orificiosdemontajeenlospaneles
lateralesYycadaorificiodemontaje
enlospanelesdearriba(I)yde
bajo(Q).
e.Uselacintaangomadaporlas2
carasprovistaparafijarelpanel
posterioralgabinetecomprobando
quetodoslosagujerosdemontaje
esténalineadosentrelas2piezas.
f. Monteelconjuntodelgabineteala
superficiedemontajeusando8de
lostornillosde1-1/2"/3.81cmde
largo.
LookforotherCabinets
Recherchezles autresarmoires
Busueotros armarios
UV
Protecter
CONCRETE MIX
CONCRETE MIX
This manual suits for next models
1
Other Rubbermaid Tools Storage manuals
Popular Tools Storage manuals by other brands

Borroughs
Borroughs Modular Drawer Cabinets installation instructions

PROformance Hoops
PROformance Hoops PKT3609D Operator's manual

ATIKA
ATIKA T 250 - operating instructions

FOREDOM
FOREDOM Work Bench System Mounting instructions

Agilent Technologies
Agilent Technologies Agilent G3215A user guide

Sealey
Sealey AP2405 instructions

Husky
Husky HOTC5209B21M Use and care guide

Griots Garage
Griots Garage 91582 User's manual and care instructions

Rockwell
Rockwell RK9000 Safety and operation instructions

Ameriwood HOME
Ameriwood HOME systembuild EVOLUTION 3562000COM Instruction booklet

kincrome
kincrome Boss K7864BB Operation manual

Sealey
Sealey AP1205 instructions