MUZZLE DEVICE INSTALLATION
SEE THE RUGGED SUPPRESSORS’ WEBSITE FOR INSTALLATION INSTRUCTIONS.
AS SHIPPED
CONFIGURATION
TOOL REMOVAL AND FRONT CAP INSTALLATION
IS REQUIRED BEFORE USE
DUAL TAPER LOCK™
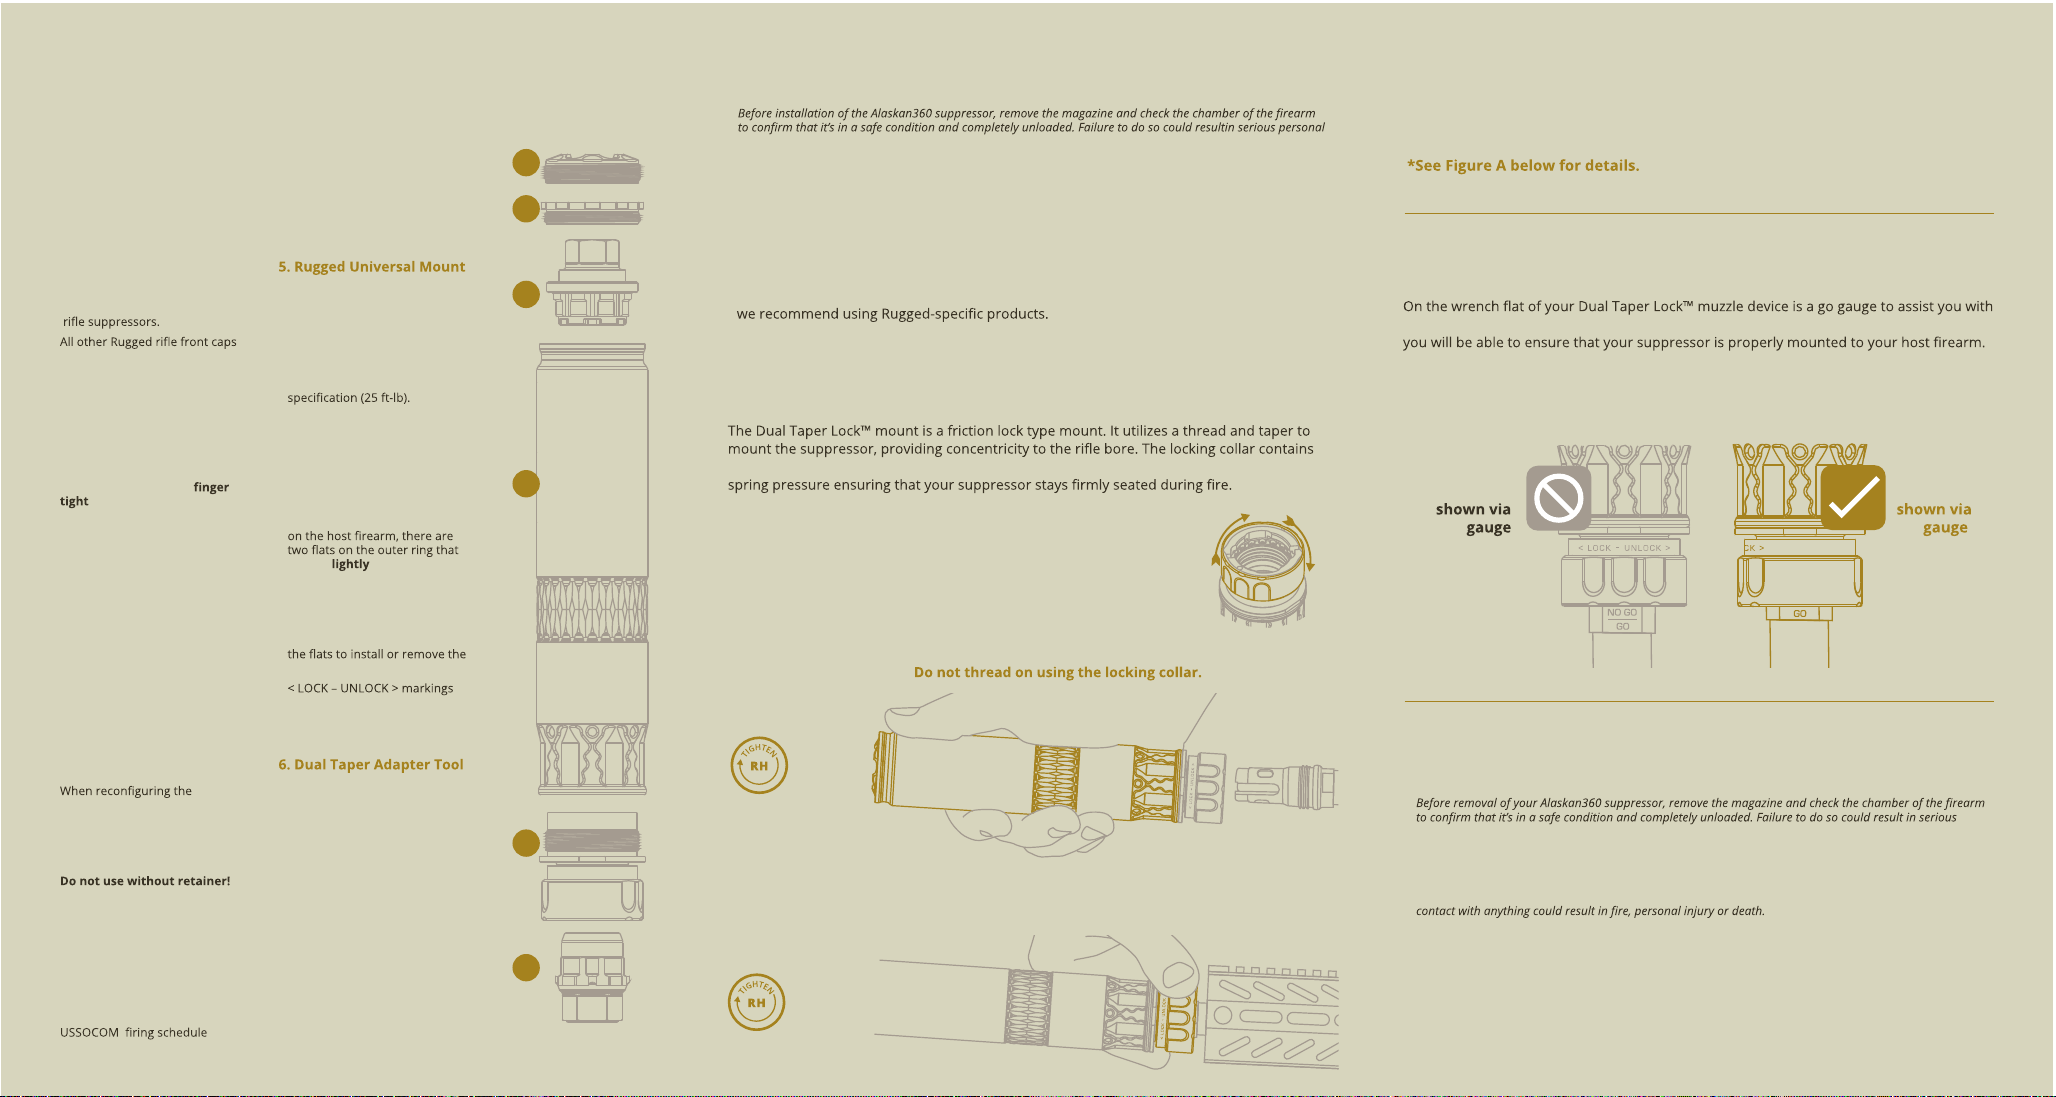
GO GAUGE INSTRUCTIONS
proper installation of your suppressor. Using the bottom of the lock collar as a visual guide,
When properly installed, you will only be able to see “GO” when looking directly at the
locking collar on the muzzle device.
• To prevent galling and seizing, the suppressor’s universal thread is lightly coated
with anti-seize. Ensure any time the mount is removed and re-installed, that the threads
are clean of debris and anti-seize is present to prevent unnecessary issues.
• The 1.375x24 thread is compatible with other manufacturers mounting options, however,
• Interior front cap threads on the suppressor are coated with white lithium grease
when shipped. Upon unboxing, the tools may be removed and the front cap installed.
It is recommended to apply additional white lithium grease to the front cap threads
throughout use as needed.
two spring arms that compress on the rear taper of the muzzle device to provide constant
ALASKAN360™INSTALLATION
WARNING!
•
injury or death.
• Before installation of the Alaskan360 suppressor, check the bore of the suppressor to make sure it’s free of any
obstructions. Failure to do so could result in serious personal injury or death.
• It is important to read the owners manual entirely and follow the following steps to ensure your suppressor is
properly mounted prior to shooting. Failure to follow instructions will result in damage to your suppressor.
Step 1/4
Open the locking collar by twisting it clockwise until it stops. Use the
engraved lock/unlock directional arrows engraved on the collar for
reference.
1. Front Cap
• Titanium
• Compatible with all Rugged
•
can be used on the Alaskan360.
2. Multi-Tool Retainer
• The Multi-Tool Retainer secures
the Multi-Tool within the
suppressor and provides a
protective surface to rest the
suppressor on while using a vise.
• The retainer is installed
which is all that is required
to perform it’s function.
• Finger grooves allow the retainer
to be quickly and easily installed/
removed.
3. Multi-Tool
• Incorporates a 11/16” Hex.
• This tool has features to tighten
and loosen:
- Front caps (hand tighten)
- Accessory options (torque spec)
- Suppressor to mounts
(torque spec)
• The Multi-tool is provided
and shipped installed on the
suppressor in the intended use
mode.
•
suppressor, place the multi-tool
inside the front cap side of the
suppressor and rotate until the
tool drops down into the fully
seated position.
•
• To adjust the mounts or
accessories, Rugged recommends
placing the suppressor side with
the multi-tool into a vise.
4. Alaskan360™ Suppressor
• The Tubeless 17-4 body
• Full-auto rated according to the
• .360 caliber
(R.U.M.) - Titanium
• Adapts Rugged’s Dual Taper
Mounting Solution to the
Alaskan360 and other universal
threaded suppressors.
• Alaskan360 comes with the
R.U.M. pre-installed to torque
• To ensure proper torque is
achieved during removal and
installation, a bench vise (on the
suppressor side) and torque
wrench with socket (on the mount
side) are recommended.
• In the event of the mount coming
lose from the suppressor while
may be clamped in a vise
or smooth jaw pliers so the collar
may be unlocked and allow the
mount to be removed from the
muzzle device.
• We do NOT recommend using
mount from the suppressor.
•
are engraved on the collar to
assist with installation/removal
procedures from the host weapon.
• Incorporates a ¾” Hex.
• Interfaces with the Rugged
Universal Mount (R.U.M.) for
installation/removal purposes
only.
• The Dual Taper Adapter tool is
secured in the mount with its
collar locked upon unboxing.
• Unlock the collar and remove the
tool before shooting.
• When not in use, store the tool
in a safe place -such as the
suppressor box.
Step 2/4
Hold the suppressor by the main body and thread suppressor onto the muzzle
device until it is fully seated.
Step 3/4
Turn the locking collar clockwise 1/2 a turn until tight. Use the engraved lock/unlock
directional arrows engraved on the collar for reference.
2.5
TURNS
0.5
TURNS
Step 4 /4
Verify suppressor is fully seated via the go gauge on the muzzle device. You should
only be able to see “GO” on the muzzle device.
6
5
4
3
2
1
FIGURE A
INCORRECT
installation
NO-GO
CORRECT
Installation
GO
ALASKAN360™REMOVAL
WARNING!
•
personal injury or death.
• Never attempt to remove a hot suppressor without the proper protective gear. Allow the suppressor to cool
before removal. Failure to do so could result in personal injury or death.
• Never allow a hot suppressor to come into contact with anything. Allowing a hot suppressor to come in
Step 1/2
Turn the locking collar counter-clockwise a 1/2 rotation; this disengages the rear
locking taper.
Step 2/2
With the rear locking collar disengaged, hold the body of the Alaskan360 and rotate the
suppressor counter clockwise 2.5 turns and slide the suppressor over the muzzle device.
L
O
O
S
E
N
T
I
G
H
T
E
N
TIGHTEN
LOOSEN
O
P
E
N


