Ryobi EHG2002LED User manual

OPERATOR’S MANUAL
HEAT GUN
MODEL NO. EHG2002 & EHG2002LED
This new heat gun has been engineered and manufactured to Ryobi's high standard for dependability, ease of operation and
operator safety. When properly cared for, the heat gun will give you years of rugged, trouble-free performance.
WARNING: To reduce the risk of injury, the user must read and understand the operator's manual before
using this product.
Thank you for buying a Ryobi product.
SAVE THIS MANUAL FOR FUTURE REFERENCE
DOUBLE
INSULATED
N197

page 1
Fig. 2
Fig. 4Fig. 3
1
2
4
5
3
Fig. 1
2
1
0
2
1
0
6

page 2
IMPORTANT: READ THESE SAFETY INSTRUCTIONS
Before using the heat gun, please read the manual carefully,
especially the safety instructions.
Keep this manual for future reference.
WARNING:
This heat gun may start a fire if appropriate precautions
are not taken.
The heat from the heat gun may reach combustible
materials which you may not be able to see.
Do not leave the heat gun unattended while it is operating.
Keep the heat gun away from rain or water to avoid risks
of fire or electric shock.
Store under cover in a dry place.
The nozzle gets extremely hot: wear gloves and eye protection.
For your own safety, please read this manual carefully.
When servicing, always use manufacture's original parts
to replace worn or damaged parts.
Do not direct the hot airflow towards people or animals.
Never use the heat gun near flammable materials or in
the presence of flammable gases.
Never reduce the hot airflow by blocking or covering
the nozzle.
Be careful not to touch the nozzle as it becomes
extremely hot.
Ensure that the nozzle does not come into contact with
materials during or just after operation.
Always wear eye protection when stripping paint
overhead.
When using the heat gun, do not wear loose fitting
clothing or jewellery, wear non-slip footwear and a hair
net to protect and retain hair.
Make sure you are always well balanced when using
the heat gun.
Ensure that the heat gun is always clean, dry and free
from oil or grease.
Never force the tool or accessories, and only use them
for the purpose for which they are designed.
Always keep the heat gun upright or suspend it with
the stand supplied.
Never use the heat gun in a damp or very wet area
(for example: bathrooms, saunas).
Never leave the heat gun out in the rain and do not use
it on very damp days.
Never push anything down inside the hot air nozzle.
Always allow the heat gun to cool down completely
before storing it.
Always store the heat gun in a safe place, out of the
reach of children. It is not a toy.
This device shall connect to such power supply network
which impedance equal to or less than 0.063 + j0.039
or the agreement of power supplier or user, any mis-
connection may cause high voltage fluctuation.
WARNING:
Always concentrate on the job and use common sense
when working with this or any other tools. Do not use
this tool when you are tired or taking medication that
may make you drowsy.
NB: Keep the nozzle at least 10 cm away from the working
surface. Heat guns have a safety cut-off which will stop
the heat gun if you are working too close to the surface
being stripped. If the cut-off operates, the heat gun must
be allowed to cool for about 30 minutes before it can
be used again.
A fire may result if the appliance is not used with care,
therefore
- be careful when using the appliance in places where
there are combustible materials;
- do not apply to the same place for a long time;
- do not use in presence of an explosive atmosphere;
- be aware that heat may be conducted to combustible
materials that are out of sight;
- place the appliance on its stand after use and allow it
to cool down before storage;
- do not leave the appliance unattended when it is
switched on.
Check the area where the heat gun is to be used. Behind
ceilings, floors and false ceilings may contain highly
flammable material. Always check these before using
the heat gun.
Keep the work area clean and uncluttered.
Keep the work area well lit.
Keep children and visitors away from the work area, heat
gun and any extension cables.
To reduce the risk of electric shock, please wear proper
shoes to avoid contact with earthed surfaces.
Never carry the heat gun by its power cable or pull on
the cord to disconnect it.
Use only suitable extension cables.
Inspect the heat gun cable regularly and if damaged,
have it repaired by authorized service centre.
When the heat gun is used outdoors, use only extension
cables that are suitable or exterior use.
When working on small or irregular shaped objects, clamp
the object in a vice or clip.
Ensure the tool switch is at OFF position before plugging in.
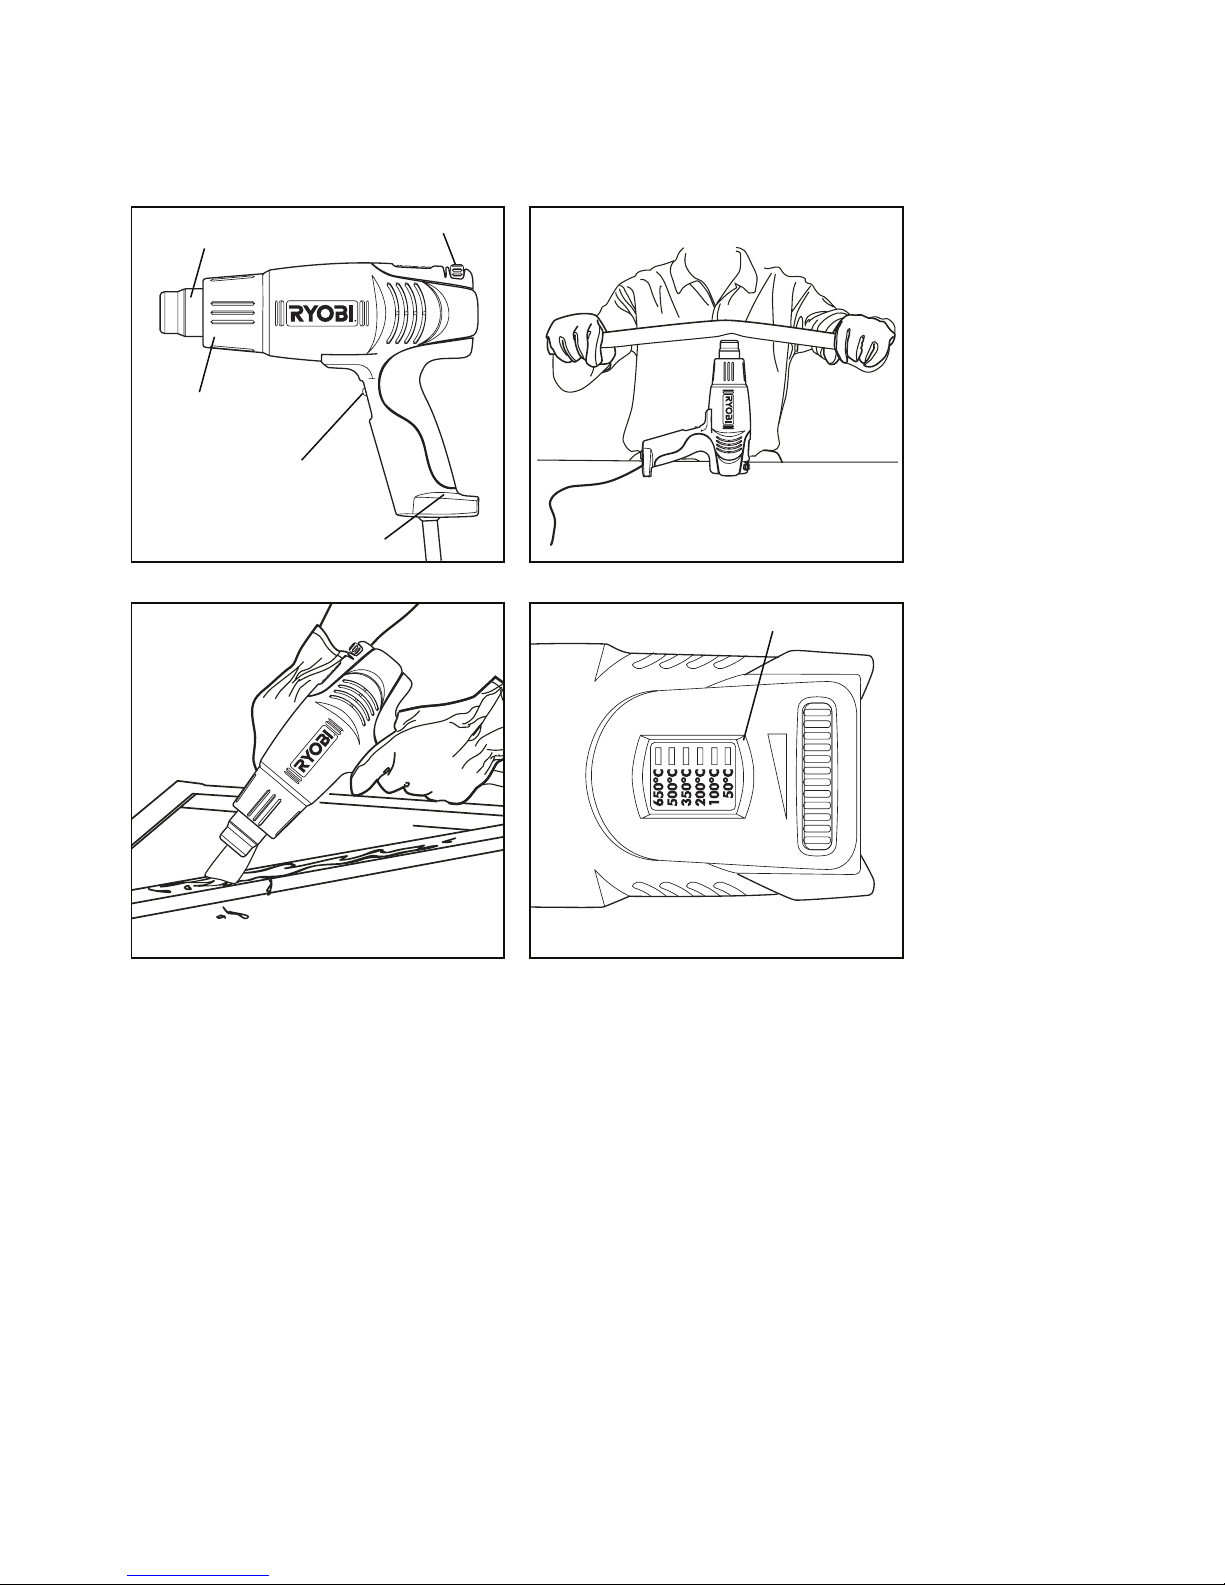
EHG2002LED Temperature Indicator and Intermittent
Flashing. The temperature indicator gives the temperature
for reference only. As the heat gun has maximum
temperature protection function, when it reaches the
maximum temperature (about 650oC), the 6 LED may
flash intermittently, this is normal and it doesn’t mean
there is a problem.
Disconnect the heat gun when it is not in use. Ensure
that the heat gun can not start accidentally. If the heat
gun stops while it is in use, disconnect it from the power
supply and have it serviced by authorised service centre.
RULES FOR SAFE OPERATION

Pape 3
USING THE HEAT GUN
The heat gun is very easy to use. Before plugging the heat gun
in, always ensure that the switch is set to 0. (OFF) When you
are ready, adjust the switch (4) to setting 1 or 2. Always allow
the heat gun to warm up for at least 1minute to reach the
operating temperature. Always wear gloves and eye protection.
The heat gun has a built-in stand to keep it upright on a flat
horizontal surface. This leaves both hands free for softening
PVC pipes or other material. Always keep your hands away
from the nozzle.
If your heat gun model has a variable temperature control (3)
you can rotate this to adjust to different temperatures. If
your heat gun model has LED temperature indicator (6) (Fig.4)
then you can take a reference on the LED indicator to
know what is the approximate working temperature.
Ensure that the power supply corresponds to the rating
plate on the heat gun. The power supply should be 240V
50HzAC (normalmains).Voltage deviation greater than
10% may cause loss of power and possible overheat.
For greater safety, the heat gun is double insulated. This
means that there are two separate insulation systems
between the user and the live elements of the heat gun.
Warning: Although the heat gun is double insulated, normal
safety precautions should be taken when using the heat
gun to avoid injury that may be caused by a failure of the
electrial installation inside the equipment.
This tool is not designed to be earthed.The heat gun
power
cable is, therefore fitted with a two pin plug for use in normal
240V power sockets.
EHG2002LED
2000W
240V
50Hz
250 to 500 l/min 250 and 500 l/min
Yes
Yes
EHG2002
2000W
240V
50Hz
50oC-650oC 60oC and 600oC
2 Temperature
No
Model No.:
Rating:
Voltage:
Frequency:
Temperature:
Air flow:
Variable temperature
adjust:
LED temperature
indicator:
STRIPPING PAINT AND VARNISH
Never use the heat gun in combination with solvents.
After use, remove any paint or varnish residue on the
nozzle and scrappers. This could catch fire.
Always work in a well ventilated area. Flakes and residues
of lead-based paints are highly toxic.
DESCRIPTION
1. Accepts accessory nozzles
2. Guard sleeve
3. Variable temperature control (For EHG2002LED only)
4. Switch
5. Hanger & support stand
6. LED temperature indicator (For EHG2002LED only)
RULES FOR SAFE OPERATION
POWER SUPPLY
SPECIFICATION

page 4
Removing paint and varnish using the hot air with a
paint scraper. (Fig. 3)
Removing labels and adhesive tape.
Loosening rusty or overtightened bolts and screws.
Thawing forzen pipes, locks etc.
Raising the grain of wood before varnishing or staining.
Drying paints and varnishes quickly. This is particularly
useful when the colour is being changed and several
coats of paint or varnish are necessary.
Drying damp and damaged wood before filling and
repainting.
Shrinking heat shrink film for packaging.
Wax modelling.
Heat shrinking.
Keep the air intake and hot air nozzle clean and free of
dust and debris.
Use only a damp cloth and ordinary household cleaners
for cleaning the heat gun.
Do not use white spirit, thinners, petrol or other similar
chemicals to clean the heat gun.
The sound pressure level in the working area may exceed
85dBA. The user should, therefore set up sound absorbing
materials and wear ear protection.
CAUTION-AUTO OFF THERMAL SWITCH
This unit is a thermostatically protected heat gun. If the unit
is operated for a prolonged period of time, the thermostat
may activate and cut off the power to protect the unit from
overheating. If this happens, turn off the switch immediately
and disconnect the unit from the power supply.
The thermostat will automatically reset after about 30 minutes,
or until the unit cools down and normal use can then be
resumed. Failure to follow this instruction may result in
damage to the machine and personal injury.
Do not use the heat gun to thaw pipes protected by a plastic
film.
STRIPPING PAINT AND VARNISH
The following procedure and techniques make it easier to
strip paint and varnish. Always test a small area of paint
before attempting to strip large areas.
Turn the heat gun on and allow it to warm up to operating
temperature. Position the nozzle 10cm from the paint to be
stripped. Soon, the paint should wrinkle and blisters start
to form. Do not overheat the paint as this may burn it and
make it more difficult to remove. Always wear eye protection
when stripping paint overhead.
Start by warming the surface just in front of the scraper
uniformly by moving the heat gun slightly from side to side.
If you heat the paint properly, you will be able to strip even
the thickest paint in one pass. The paint should come off in
strips the same width as the scraper.
Clean the scraper blade frequently to keep it clean and
sharp and to prevent a build-up of paint on the scraper.
Remove the paint while it is still soft, as it hardens rapidly.
You can strip moulded surfaces with a wire brush after
softening the paint with the hot air.
Protect surfaces that should not be heated using non-
flammable material. Avoid directing the heat from the heat
gun onto windows or other glass surfaces.
NB: The heat gun is designed to strip both oil and water
based paints and varnishes. The heat gun cannot remove
wood stains or primers impregnating the wood.
WARNING: FUMES FROM LEAD-BASED PAINT ARE
HIGHLY TOXIC. ALWAYS PROVIDE ADEQUATE
VENTILATION WHILE WORKING INDOORS.
OTHER USES FOR THE HEAT GUN
CARE OF YOUR HEAT GUN
NOISE

RYOBI TECHNOLOGIESAUSTRALIA PTY.LTD.
GUARANTEE
RYOBI TECHNOLOGIES AUSTRALIA PTY. LTD.
A.B.N. 98 002 277 509
SYDNEY: 359-361 Horsley Road, Milperra, N.S.W. 2214.
Contact during normal business hours.
RYOBI NEW ZEALAND PTY. LTD.
AUCKLAND:27 Clemow Drive, Mt Wellington, N.Z.
Contact during normal business hours.
Subject to the guarantee condition below, this Ryobi tool
(hereinafter called “the product”) is guaranteed by Ryobi
(hereinafter called “the Company”) to be free from
defects in material or workmanship for a period of 24
months from the date of original purchase covering
both parts and labour. Under the terms of this
guarantee, the repair or replacement of any part shall
be the opinion of the Company or its authorised agent.
Should service become necessary during the warranty
period,theownershouldcontacttheRYOBIHELPLINE
1300 361 505 or contact the retailer from whom the
product was purchased.
Inordertoobtain guaranteeservice,theowner must
present the sales docket and Guarantee Certificate
toconfirmdate ofpurchase.Thisproductissold bythe
dealer or agent as principal and the dealer has no
authority from the Company to give any additional
guaranteeon the Company’s behalf exceptas herein
containedorhereinreferred to.
Guarantee Conditions
ThisguaranteeonlyappliesprovidedthattheProduct
hasbeenusedinaccordancewiththemanufacturer’s
recommendationsundernormaluseandreasonable
care (in the opinion of the Company) and such
guarantee does not cover damage, malfunction or
failure resulting from misuse, neglect, abuse, or used
for a purpose forwhich it was not designed or is not
suited and no repairs, alterations or modifications
have been attempted by other than an Authorised
Service Agent.This guaranteewillnotapply if the tool is
damaged by accident or if repairs arise from normal
wear and tear.
The Company accepts no additional liability pursuant to
this guarantee for the costs of travelling or
transportation of the Product or parts to and from the
service dealer or agent - such costs are not included in
this guarantee.
Certain legislation, including the Trade Practices Act,
1974 (as amended) and other state and territorial laws
give rights to the buyer and impose liability on the seller in
certaincircumstances.Nothinghereinshallhavetheeffect
of excluding, restricting or modifying any condition,
guarantee,right or liability imposed, to the extentonly
that such exclusion, restriction or modification
would render any term herein void.
BRISBANE: All enquiries Tel : 1300 361 505
TOWNSVILLE:All enquiries Tel : 1300 361 505
MELBOURNE:
960 Stud Road, Rowville,Vic. 3178
Tel : (03) 9764 8656
HOBART: All enquiries Tel : 1300 361 505
ADELAIDE: All enquiries Tel : 1300 361 505
PERTH: 33-35SorbonneCres.Canning Vale, W.A. 6155
Purchased From
Address Of Dealer
Present This Form With Your Purchase Docket When Guarantee Service Is Required.
Tel: (02) 9792 9800 - Fax: 1800 807 993 - www.ryobi.com.au
Tel: (09) 573 0230 - Free Call: 0800 279 624 - Fax: (09) 573 0231 - www.ryobi.co.nz
This Guarantee Form Should Be Retained By The Customer At All Times
For your record and to assist in establishing date of purchase (necessary for in-guarantee service)
please keep your purchase docket and this form completed with the following particulars.
Date Model No Serial No
Tel : (08) 9455 7775
Other manuals for EHG2002LED
1
This manual suits for next models
1
Table of contents
Other Ryobi Power Tools manuals

Ryobi
Ryobi JS651L Quick setup guide

Ryobi
Ryobi EOJ550K Operation manual

Ryobi
Ryobi ONE+ R18SEC User manual

Ryobi
Ryobi ONE+ R18SOI-0 User manual

Ryobi
Ryobi HG500 User manual

Ryobi
Ryobi RA-NC1565-K User manual

Ryobi
Ryobi ERT1250VN Operation manual

Ryobi
Ryobi RJS18X User manual

Ryobi
Ryobi P591 User manual

Ryobi
Ryobi PCL28 User manual