manuals.online logo
Brands
  1. Home
  2. •
  3. Brands
  4. •
  5. Safety 1st
  6. •
  7. Thermometer
  8. •
  9. Safety 1st Fever Light 49659 User manual

Safety 1st Fever Light 49659 User manual

Fever LightTM Ear Thermometer
49659
User Guide
Thermomètre auriculaire Fever Light™
49659
Guide de l’utilisateur
1
4
Dorel Juvenile Group, Inc. warrants to the original purchaser that this
product (Fever LightTM Thermometer), is free from material and workmanship
defects when used under normal conditions for a period of one (1) year
from the date of purchase. Should the product contain defects in material or
workmanship Dorel Juvenile Group, Inc., will repair or replace the product,
at our option, free of charge. Purchaser will be responsible for all costs
associated with packaging and shipping the product to Dorel Juvenile Group
Consumer Relations Department at the address noted on the front page and
all other freight or insurance costs associated with the return. Dorel Juvenile
Group will bear the cost of shipping the repaired or replaced product to the
purchaser. Product should be returned in its original package accompanied
by a proof of purchase, either a sales receipt or other proof that the product
is within the warranty period. This warranty is void if the owner repairs or
modifies the product or the product has been damaged as a result of misuse.
This warranty excludes any liability other than that expressly stated
previously, including but not limited to, any incidental or inconsequential
damages.
SOME PROVINCES DO NOT ALLOW THE EXCLUSION OR LIMITATION OF
INCIDENTAL OR CONSEQUENTIAL DAMAGES, SO THE ABOVE LIMITATION
OR EXCLUSION MAY NOT APPLY TO YOU.
THIS WARRANTY GIVES YOU SPECIFIC LEGAL RIGHTS, AND YOU MAY
ALSO HAVE OTHER RIGHTS THAT MAY VARY FROM PROVINCE TO
PROVINCE.
One (1) Year Limited Warranty Garantie Limitée d’un (1) an
Troubleshooting Dépannage
When a malfunction or incorrect temperature measurement
occurs, an error message will appear as described below.
Dorel Juvenile Group, Inc. garantit à l’acheteur original que ce produit (Thermomètre auricu-
laire Fever Light™), est exempt de défauts de matériau et de fabrication lorsqu’il est utilisé
dans des conditions normales pour une période d’un (1) an de la date d’achat. Si le produit
présentait des défauts de matériau ou de fabrication, Dorel Juvenile Group, Inc. réparera
ou remplacera le produit, à notre discrétion, gratuitement. L’acheteur sera responsable
de tous les coûts liés à l’emballage et l’expédition du produit au Service à la clientèle de
Dorel Juvenile Group à l’adresse indiquée sur le devant de ce document et tous les autres
coûts de transport ou d’assurance liés au retour. Dorel Juvenile Group assumera les frais
d’expédition du produit réparé ou remplacé à l’acheteur. Le produit doit être retourné dans
son emballage original accompagné d’une preuve d’achat, soit un reçu de caisse ou une
autre preuve que le produit est dans la période de garantie. Cette garantie est nulle si le
propriétaire répare ou modifie le produit ou si le produit a été endommagé à la suite d’une
mauvaise utilisation. Cette garantie exclut toute responsabilité autre que celle indiquée
précédemment, y compris mais sans s’y limiter, à tout dommage direct ou indirect.
CERTAINES PROVINCES N’AUTORISENT PAS L’EXCLUSION OU LA LIMITATION
DES DOMMAGES ACCESSOIRES OU INDIRECTS, DE SORTE QUE LA LIMITATION OU
L’EXCLUSION CI-DESSUS PEUVENT NE PAS S’APPLIQUER À VOUS.
CETTE GARANTIE VOUS DONNE DES DROITS JURIDIQUES SPÉCIFIQUES, ET VOUS
POUVEZ AUSSI AVOIR D’AUTRES DROITS QUI PEUVENT VARIER D’UNE PROVINCE À
L’AUTRE.
Technical Specifications Spécifications techniques
Measurement Range: 34°C to 42.2°C (94°F to 108°F).
Measurement Accuracy: Technical: +/- 0.2°C (0.4°F)
Operation Environment: 16°C to 40°C (60.8°F to 104°F)
Storage Environment: -20°C to 50°C (-4°F to 122°F)
Lorsqu’un mauvais fonctionnement ou une mesure de température
incorrecte se produit, un message d’erreur apparaîtra tel que décrit
ci-dessous
Plage de mesure: 34°C à 42.2°C (94°F to 108°F).
Précision de la mesure: Technique: +/- 0.2°C (0.4°F)
Environnement d’exploitation: 16°C à 40°C (60.8°F à 104°F)
Environnement de rangement: -20°C à 50°C (-4°F à 122°F)
MISE EN GARDE:
• NE JAMAIS laisser un enfant jouer avec ce thermomètre. Ce n’est pas
un jouet. C’est un appareil électronique sensible et il peut être endom-
magé s’il n’est pas utilisé correctement et sous la supervision parentale.
• TOUJOURS surveiller votre enfant quand vous utilisez un thermomètre.
• Évitez les chocs soudains et la poussière.
WARNING:
• NEVER allow a child to play with this thermometer. It is not a
toy. It is a sensitive electronic device and may be damaged if
not used properly under parental supervision.
• ALWAYS supervise your child when using thermometer.
• Avoid sudden shock and dust.
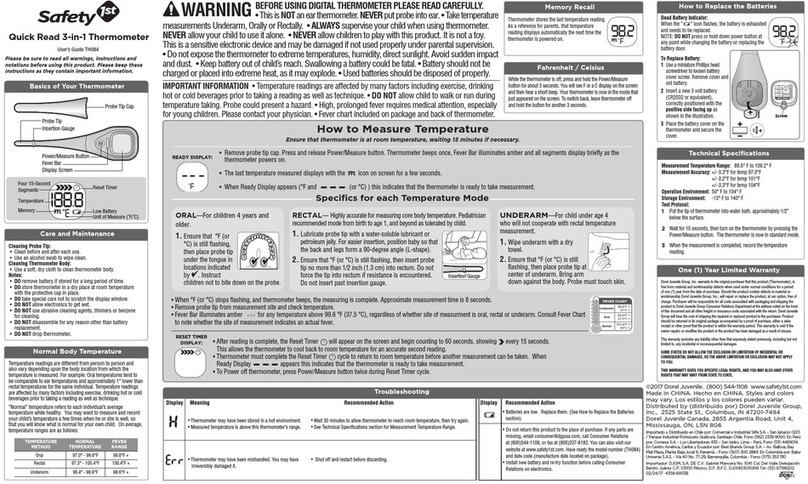
How Does it Work?
The Fever LightTM Ear Thermometer obtains
a reading in 1 second by measuring the
infrared heat given off by the eardrum and
surrounding tissues.
Temperature From The Ear
Clinical research has shown that the ear is
an ideal site for taking body temperature.
The eardrum shares the same blood supply
with the hypothalamus, the part of the
brain that controls body temperature.
Therefore, the ear is an accurate indicator
of internal body (core) temperature.
Comment fonctionne-t-il?
Le Thermomètre Auriculaire Fever Light™ obtient
une lecture en 1 seconde en mesurant la chaleur
infrarouge émise par le tympan et les tissus
environnants.
Température de l’oreille
Une recherche clinique a démontré que l’oreille est
un endroit idéal pour prendre la température du
corps. Le tympan partage le même apport sanguin
avec l’hypothalamus, la partie du cerveau qui
contrôle la température du corps. Par conséquent,
l’oreille est un indicateur précis de la température
interne du corps.
Capuchon
Afficheur ACL
avec éclairage
Bouton de mise en
marche/mesure avec
arrêt automatique
Barre Fever Light™
Cap
LCD Display
with Illumination
On/Scan Button
with Auto Shut-Off
Fever LightTM Bar
Embout de la sonde
Probe Tip
Know Your Unit Connaître votre appareil
•
Read these instructions carefully to ensure accurate temperature readings.
Temperature readings are affected by many factors, including exercise,
drinking hot or cold beverages prior to taking a reading, and technique.
•
High or prolonged fever requires medical attention, especially for
young children. Contact your physician.
•
For an infant, it is best to have the child laying flat with his head
sideways so the ear is facing upwards. For an older child or adult,
it is best to stand behind and slightly to the side of the child. It is
recommended that three temperatures in the same ear be taken
and the highest one used as the reading.
•
Keep in mind that the thermometer will automatically shut-off
after one minute.
•
If you question any of the readings you get, check to see that
the ear canal is free of excessive amounts of earwax and that the
probe tip is clean (see “Care and Cleaning”).
•
To ensure an accurate measurement, clean probe tip after each
measurement. Store the thermometer in a dry place at room
temperature.
•
Proper placement within the ear canal is essential for an accurate
reading. If the thermometer is not inserted properly and firmly
into the ear canal, a lower reading might be obtained. Remember
to always use the same ear. The temperature between the right
and the left ear may differ.
•
D
o not return this product to the place of purchase. If any parts are missing,
email [email protected], call Consumer Relations at (800) 544-1108, or
fax at (800) 207-8182. You can also visit our website at www.safety1st.ca.
Have the model number (49659) and date code (manufacture date located
on back of thermometer) ready.
• DO NOT expose thermometer to extreme temperatures, humidity, direct
sunlight or shock.
Important Information Information importante
• Lisez ces instructions attentivement pour assurer des lectures de température
précises. Les lectures de la température sont affectées par plusieurs facteurs,
incluant l’exercice, la consommation de boissons chaudes ou froides avant de
prendre une lecture, et la technique.
• Une fièvre élevée ou prolongée exige des soins médicaux, en particulier pour les
jeunes enfants. Contactez votre médecin.
• Pour un nourrisson, il est préférable de coucher l’enfant à plat, avec la tête sur le
côté, de sorte que l’oreille soit orientée vers le haut. Pour un enfant plus âgé ou
un adulte, il est préférable de se tenir derrière et légèrement à côté de l’enfant. Il
est recommandé de prendre trois températures dans la même oreille et d’utiliser
la température la plus élevée comme lecture.
• N’oubliez pas que le thermomètre s’éteindra automatiquement après une minute.
• Si vous doutez de l’une des lectures que vous obtenez, vérifiez que le conduit
auditif est libre de quantités excessives de cérumen et que l’embout de la sonde
est propre. (Voir “Soin et Entretien”).
• Pour assurer une lecture précise, nettoyez l’embout de la sonde après chaque
lecture. Rangez le thermomètre dans un endroit sec à la température ambiante.
• L’emplacement approprié dans le conduit auditif est essentiel pour une lecture
précise. Si le thermomètre n’est pas inséré correctement et fermement dans le
conduit auditif, une lecture plus basse pourrait être obtenue. N’oubliez pas de
toujours utiliser la même oreille. La température entre l’oreille droite et l’oreille
gauche peut varier.
• Ne pas retourner ce produit au magasin. Si des pièces sont manquantes, faites
parvenir un courrier électronique à consumer@djgusa.com, appelez le Service
à la Clientèle au (800) 544-1108, ou par télécopieur au (800) 207-8182. Vous
pouvez également visiter notre site web à www.safety1st.com. Ayez en main le
numéro de modèle (49659) et le code de date (date de fabrication située au
dos du thermomètre).
• NE PAS exposer le thermomètre à des températures extrêmes, à l’humidité, à la
lumière directe du soleil ou au choc.
Bouton de mémoire
Memory Button
• Measured temperature is
below 93.2°F (34°C).
Occurs when button is
pressed but themometer is
not positioned in the ear.
• Measured temperature is
above 109.4°F (43°C).
• Thermometer has been
stored in a cold or hot
environment.
• Probe may have been
inserted incorrectly. Retake
temperature measurement.
• Turn off, wait one minute,
then turn on. Listen for the
two beeps before placing
in body position. Re-take
temperature.
• Allow thermometer to
reach room temperature.
Turn on and re-take
temperature.
• La température mesurée est
inférieure à 34°C (93.2°F).
Ceci se produit lorsque le
bouton est pressé mais le
thermomètre n’est pas posi-
tionné dans l’oreille.
• La température mesurée est
supérieure à 43°C (109.4°F).
• Le thermomètre a été rangé
dans un environnement froid
ou chaud.
• La sonde peut avoir été insérée incor-
rectement. Reprendre la mesure de
température.
• Mettre hors tension, attendre une min-
ute, puis mettre en marche. Écoutez
pour les deux bips avant de placer en
position. Reprendre la température.
• Laissez le thermomètre atteindre la
température ambiante. Mettre sous
tension et reprendre la température.
Display/Affichage Meaning Action Signification Action
Manufactured by/Fabriqué par: ©2013 Dorel Juvenile Group.
A Division of/Une division de Dorel Industries, 873 Hodge, St-Laurent, QC Canada H4N 2B1
Made in CHINA. Fabriqué en CHINE. www.safety1st.ca (800) 544-1108
Styles and colors may vary. Les styles et les couleurs peuvent varier.
Distributed by (distribué par) Dorel Juvenile Group, Inc., 2525 State St., Columbus, IN 47201-7494
Dorel Distribution Canada, 873 Hodge, St. Laurent, QC H4N 2B1
09/20/12 4358-6140
3
To switch the display between °F and °C and vice-versa: While
the thermometer is off, press and hold the on/scan button for
about 5 seconds until you see the °F or °C. Release button. Unit
has been reset.
Changing from Fahrenheit to Celsius Changer de Fahrenheit à Celsius
Memory Function Fonction de Mémoire
The thermometer memory function stores the last 12 measurements.
The last measurement will appear for approximately 3 seconds after
turning the thermometer on and after it runs its built-in test. The ready
display will then show after last reading appears. This feature allows
you to compare your most recent measurement to the prior ones.
To scroll through the last 12 measurements: With the thermometer
on, press and release the memory button. The screen will display the
icon and the number of the reading along with that measurement
(see Figure 2 above). Press the memory button, screen will scroll to
reading number “0”. Press the memory button again, and it will scroll
up to number “1”, and so on. When 12 spaces are filled the oldest mea-
surement will be the next to be deleted.
The Fever LightTM occurs during temperature measurement when
the temperature is over 99.5°F (37.5°C). If your child has an elevated
temperature the red Fever LightTM bar will light up, reading will blink
and multiple beeps will sound. High or prolonged fever requires medical
attention, especially for young children. Contact your physician. Fever
chart included on package.
When the “low battery” icon appears (Figure 1), the
battery is nearly exhausted, but a few measurements
may still be taken. When the “Lo” appears (Figure 2),
the battery is exhausted and needs replacing.
1
Use a small screwdriver to loosen screw. Slide cover
off (Figure 3).
2
Press release tab with a small tool and slide battery
out (Figure 3).
3
Insert a new 3-volt battery (battery number CR2032-
3V), correctly positioned with the positive “+” side
facing up (Figure 4).
4
Slide the battery cover on and secure the screw.
To Replace Battery Pour remplacer la pile
• Clean the probe and tip with an alcohol swab before and after each
measurement.
• Use a soft, dry cloth to clean thermometer body. Never use abrasive
cleaning agents, thinners or benzene for cleaning. Do not scratch the
surface of the probe lens or the display. Do not expose the thermom-
eter to extreme temperatures, humidity, direct sunlight, or shock.
Store at room temperature.
Care and Maintenance Soin et Entretien
1
3
Vis
Screw
Taquet de dégagement
Release Tab
Pour changer l’affichage entre °F et °C et vice-versa: Alors que le
thermomètre est éteint, appuyez et maintenez le bouton de mise
en marche/mesure pendant environ 5 secondes jusqu’à ce que vous
voyez le °F ou °C. Relâchez le bouton. L’appareil a été réinitialisé.
La fonction de mémoire du thermomètre enregistre les 12 dernières
mesures. La dernière mesure s’affichera pendant environ 3 secondes après
avoir mis le thermomètre en marche et après que celui-ci est effectué son
test intégré. L’affichage s’affichera par la suite après la dernière lecture.
Cette fonctionnalité vous permet de comparer votre plus récente mesure
avec celles prises antérieurement.
Pour faire défiler les 12 dernières mesures: Mettre le thermomètre en fonction,
appuyez et relâchez le bouton de mémoire. L’écran affichera l’icône et
le numéro de lecture correspondant à cette mesure (voir la Figure
2 ci-dessus). Appuyez sur le bouton mémoire, l’écran passera à la lecture
numéro “0”. Appuyez de nouveau sur le bouton de mémoire, et
l’affichage défilera vers le haut au numéro “1”, et ainsi de suite. Lorsque les
12 espaces sont remplis, la plus ancienne mesure sera la prochaine à être
supprimée.
Le voyant Fever Light™ se produit pendant la mesure de la tempéra-
ture lorsque celle-ci est supérieure à 37.5°C (99.5°F). Si votre enfant a
une température élevée, la barre rouge Fever Light™ s’allume, la lecture
clignote et des bips multiples se font entendre. Une fièvre élevée ou pro-
longée exige des soins médicaux, en particulier chez les jeunes enfants.
Contactez votre médecin. Un tableau de température est inclus sur
l’emballage.
Lorsque l’icône “low battery/pile faible” apparaît (Figure 1), la
pile est pratiquement épuisée, mais quelques mesures peuvent
encore être prises. Lorsque “Lo” apparaît (Figure 2), la pile est
épuisée et doit être remplacée.
1
Utilisez un petit tournevis pour desserrer la vis. Faites glisser
le couvercle (Figure 3).
2
Appuyez sur le taquet de dégagement avec un petit outil et
glissez la pile vers l’extérieur (Figure 3).
3
Insérez une nouvelle pile 3V (numéro de pile CR2032-3V),
correctement positionnée avec le côté positif “+” sur le
dessus (Figure 4).
4
Glissez le couvercle pour le fermer et fixez avec la vis.
• Nettoyez la sonde et l’embout avec un tampon imbibé d’alcool avant
et après chaque mesure.
• Utilisez un chiffon doux et sec pour nettoyer le corps du ther-
momètre. Ne jamais utiliser de produits nettoyants abrasifs, de dilu-
ants ou du benzène pour nettoyer. Ne pas égratigner la surface des
lentilles de la sonde ou l’écran. Ne pas exposer le thermomètre à des
températures extrêmes, à l’humidité, à la lumière directe du soleil, ou
au choc. Rangez-le à la température ambiante.
ATTENTION: Remplacez la pile seulement par une pile
au lithium de 3V “CR2032”. L’utilisation de tout autre
type de piles peut présenter un risque d’incendie ou
d’explosion.
CAUTION: Replace only with 3V “CR2032”
lithium battery. Use of other types of batteries
may present a risk of fire or rupture.
Fever LightTM Fever Light™
Operating Thermometer Fonctionnement du thermomètre
1 Turn On: Press and release the on/scan button.
All segments are displayed for 1 second (Figure
1). A short beep will occur and the last tempera-
ture measured appears (Figure 2). Backlight
goes off after 3 seconds.
2 When the backlight goes off the thermometer is
ready to measure temperature.
3 Gently pull ear up and back to straighten the ear
canal. Insert the thermometer until the probe tip
seals the ear canal.
• For children under 1 year: Pull the ear straight
back.
• Children ages 1 year to adult: Pull the ear up
and back.
4 Press and hold the on/scan button for 1 second
once you have the thermometer in place.
During measuring the icon will appear
(Figure 3). After 1 second, release button. One
beep will sound and the temperature with
icon will appear for 1 minute, and backlight illu-
minates for 5 seconds (Figure 4).
After the “clean me” icon flashes several
times, the unit is ready to take another
measurement. Auto-shut off will occur after 1
minute. NOTE: Thermometer should be cleaned
between uses.
FEVER ALERT NOTE: If patient has an elevated
temperature 37.5°C (99.5) or above, the red
Fever LightTM bar will light up, the icon will
appear and multiple beeps will sound.
1
2
3
2
4
4
Pile
Battery
MISE EN GARDE:
• Gardez la pile hors de portée des enfants. Avaler une pile pourrait s’avérer fatal.
La pile ne doit pas être rechargée ou placée à la chaleur extrême car elle peut
exploser.
• Les piles usagées doivent être éliminées de manière appropriée. Ne pas jeter
les piles dans le feu, les recharger, les mettre à l’envers, les désassembler,
mélanger des piles neuves avec des piles usagées ou autres types de piles –
elles peuvent exploser ou couler et causer des blessures.
WARNING:
• Keep battery out of child’s reach. Swallowing battery could be fatal. Battery
should not be charged or placed into extreme heat as it may explode.
• Used batteries should be disposed of properly. Do not dispose of batteries
in fire, recharge, put in backwards, disassemble, mix with used or other
battery types – they may explode or leak and cause injury.
1 Mettre en marche: Appuyez et relâchez le bou-
ton de mise en marche/mesure. Tous les seg-
ments seront affichés pendant 1 seconde (Figure
1). Un bip court se fera entendre et la dernière
lecture apparaîtra (Figure 2). Le rétroéclairage
s’éteindra après 3 secondes.
2 Lorsque le rétroéclairage s’éteint, le ther-
momètre est prêt à mesurer la température.
3 Tirez doucement l’oreille vers le haut et l’arrière
pour redresser le conduit auditif. Insérez le ther-
momètre jusqu’à ce que l’embout de la sonde
scelle le canal auditif.
• Pour les enfants de moins de 1 an: Tirez l’oreille
vers l’arrière.
• Pour les enfants âgés de 1 an jusqu’à adulte: Tirez
l’oreille vers le haut et l’arrière.
4 Appuyez et maintenez le bouton de mise en
marche/mesure pendant 1 seconde lorsque le
thermomètre sera en place. Pendant la mesure,
l’icône apparaîtra (Figure 3). Relâchez le
bouton après 1 seconde. Un bip se fera enten-
dre et la température avec l’icône apparaîtra
pendant 1 minute, et le rétroéclairage s’illuminera
pendant 5 secondes (Figure 4).
Tous les seg-
ments
All segments
Température
antérieure
Previous Temp.
Mesure en
cours
Measuring in
progress
Température
Temperature
Après que l’icône “Clean Me” (me nettoyer) ait clignoté à plu-
sieurs reprises, l’appareil est prêt à prendre une autre mesure. L’arrêt
automatique aura lieu après 1 minute. NOTE: Le thermomètre doit
être nettoyé entre chaque utilisation.
NOTE D’ALERTE DE FIÈVRE: Si le patient a une température élevée
de 37.5°C (99.5°F) ou plus, la barre Fever Light™ s’illuminera l’icône
apparaîtra et des bips multiples se feront entendre.
2

Other Safety 1st Thermometer manuals

Safety 1st TH051 User manual

Safety 1st

Safety 1st TH051 User manual

Safety 1st TH043 User manual

Safety 1st

Safety 1st TH043 User manual

Safety 1st TH059 User manual

Safety 1st

Safety 1st TH059 User manual

Safety 1st 49512A User manual

Safety 1st

Safety 1st 49512A User manual

Safety 1st TH095 User manual

Safety 1st

Safety 1st TH095 User manual

Safety 1st 49545 User manual

Safety 1st

Safety 1st 49545 User manual

Safety 1st Comfort Check Pacifier Thermometer User manual

Safety 1st

Safety 1st Comfort Check Pacifier Thermometer User manual

Safety 1st TH094 User manual

Safety 1st

Safety 1st TH094 User manual

Safety 1st 49514B User manual

Safety 1st

Safety 1st 49514B User manual

Safety 1st TH068 User manual

Safety 1st

Safety 1st TH068 User manual

Safety 1st 49659 User manual

Safety 1st

Safety 1st 49659 User manual

Safety 1st Swift Read 49500 User manual

Safety 1st

Safety 1st Swift Read 49500 User manual

Safety 1st 49514B User manual

Safety 1st

Safety 1st 49514B User manual

Safety 1st 49512A User manual

Safety 1st

Safety 1st 49512A User manual

Safety 1st TH084 User manual

Safety 1st

Safety 1st TH084 User manual

Safety 1st TADVANCED SOLUTIONS H060 User manual

Safety 1st

Safety 1st TADVANCED SOLUTIONS H060 User manual

Safety 1st TH104 User manual

Safety 1st

Safety 1st TH104 User manual

Safety 1st 49545 User manual

Safety 1st

Safety 1st 49545 User manual

Safety 1st Hospital's Choise 49531 User manual

Safety 1st

Safety 1st Hospital's Choise 49531 User manual

Safety 1st Accu-Touch 49529 User manual

Safety 1st

Safety 1st Accu-Touch 49529 User manual

Safety 1st Hospital's Choice 49533 User manual

Safety 1st

Safety 1st Hospital's Choice 49533 User manual

Safety 1st 12346B User manual

Safety 1st

Safety 1st 12346B User manual

Safety 1st TH097 User manual

Safety 1st

Safety 1st TH097 User manual

Safety 1st 49501B User manual

Safety 1st

Safety 1st 49501B User manual

Popular Thermometer manuals by other brands

Benetech GM900 instruction manual

Benetech

Benetech GM900 instruction manual

Parton PTD-400 manual

Parton

Parton PTD-400 manual

GAME 15900 owner's manual

GAME

GAME 15900 owner's manual

scigiene FP-180 instruction manual

scigiene

scigiene FP-180 instruction manual

Ametek Land UNO U1 600/1600C-L user guide

Ametek Land

Ametek Land UNO U1 600/1600C-L user guide

Delton 981A instruction manual

Delton

Delton 981A instruction manual

Taylor 5286498 instruction manual

Taylor

Taylor 5286498 instruction manual

Baker MM2P instruction manual

Baker

Baker MM2P instruction manual

Chino IR-FA Series instructions

Chino

Chino IR-FA Series instructions

Vive DMD1010 user manual

Vive

Vive DMD1010 user manual

Tarmo 320281 manual

Tarmo

Tarmo 320281 manual

Citizen CTD 504 instruction manual

Citizen

Citizen CTD 504 instruction manual

TFA 14.1500 instruction manual

TFA

TFA 14.1500 instruction manual

Gotemp THB4002 user guide

Gotemp

Gotemp THB4002 user guide

GREISINGER G 1202 Quick reference guide

GREISINGER

GREISINGER G 1202 Quick reference guide

Amprobe TMD-53W user manual

Amprobe

Amprobe TMD-53W user manual

Trotec BP10 operating manual

Trotec

Trotec BP10 operating manual

Radiance instruments RT616 Series product manual

Radiance instruments

Radiance instruments RT616 Series product manual

manuals.online logo
manuals.online logoBrands
  • About & Mission
  • Contact us
  • Privacy Policy
  • Terms and Conditions

Copyright 2025 Manuals.Online. All Rights Reserved.