Safety Link TempLink 3000 User manual

DO NOT OVER TENSION SCREWS AS THIS WILL RESULT IN THREAD STRIPPING, TAB / STRUCTURAL
DAMAGE, CRACKING OR BURRING.
Maximum user per TempLink is one (1).
TempLink 3000 anchors must not be used for rope access (abseiling).
TempLink 3000 anchors must not be used as part of any static line system.
SafetyLink’s TempLink 3000 should only be used in a 0- 30 degrees roof pitch range as live loading may trigger the
energy absorbing capabilities.
If any doubt exists as to the strength of the structure or roof sheets an engineer should make the assessment.
All safety procedures must be complied with in accordance with the current legislation and regulations. Ensure safety
at all times by being attached to anchor point approved safety equipment, using a scaffold or a secured ladder.
Inspect your TempLink is safe before each use (see Maintenance).
Use log inside these instructions for six monthly inspection records (download available from website).
Inspect the “Remove from service” date on product, the shelf life of this product does not exceed 10 years.
The TEMPLINK 3000 is designed as a temporary anchor only and should not be left unattended or exposed to
the elements for prolonged periods of time.
It is recommended that the TempLink 3000 be uninstalled when not in use and stored in its bag in a safe, clean and dry
environment free from chemicals and UV light.
Installation must be carried out by, or under the supervision of a competent person.
Users of fall arrest equipment and all people undertaking tasks associated with harness based work at heights shall be
trained and assessed in accordance with the requirements set out in AS/NZS 1891.4:2009:2.2.11 Training and
competency.
SafetyLink Pty Ltd
1300 789 545 | +61 249 641 068
www.safetylink.com
Complies with Australian and New Zealand Standards
SafetyLink’s patented TempLink 3000 is designed to absorb energy when a fall is arrested,
minimising damage to the structure and reducing the risk of personal injury.
READ ENTIRE INSTRUCTIONS BEFORE INSTALLING ANY SAFETYLINK PRODUCT.
ALL PRODUCTS MUST BE INSTALLED IN ACCORDANCE WITH SAFETYLINK’S INSTALLATION HANDBOOK.
FAILURE TO FOLLOW ALL WARNINGS AND INSTRUCTIONS MAY RESULT IN A SERIOUS INJURY OR DEATH.
IF YOU ARE UNCERTAIN AND NEED HELP PLEASE CONTACT SAFETYLINK.
WARNING: READ CAREFULLY SOMEONES’ LIFE DEPENDS ON IT.
®
METAL ROOF TILED ROOF
Version: 10.17 TEMPLINK Installation Manual Rev 1 30.10.2020

TEMPLINK 3000 INSPECTION RECORD –every six months
ID NUMBER (See stainless steel ring):
Date of manufacture:
Remove from service date:
Date of purchase:
User name:
Company name:
Company phone number:
Date of
Inspection Defects found at time of inspection Action Taken Signature of Inspector Next inspection due
MAINTENANCE – PERIODIC & BEFORE EACH USE
All items of safety equipment which are in use shall be subjected to periodic inspection and servicing.
These regular scheduled inspections and servicing must be carried out by a competent person.
Procedures to be carried out before each use:
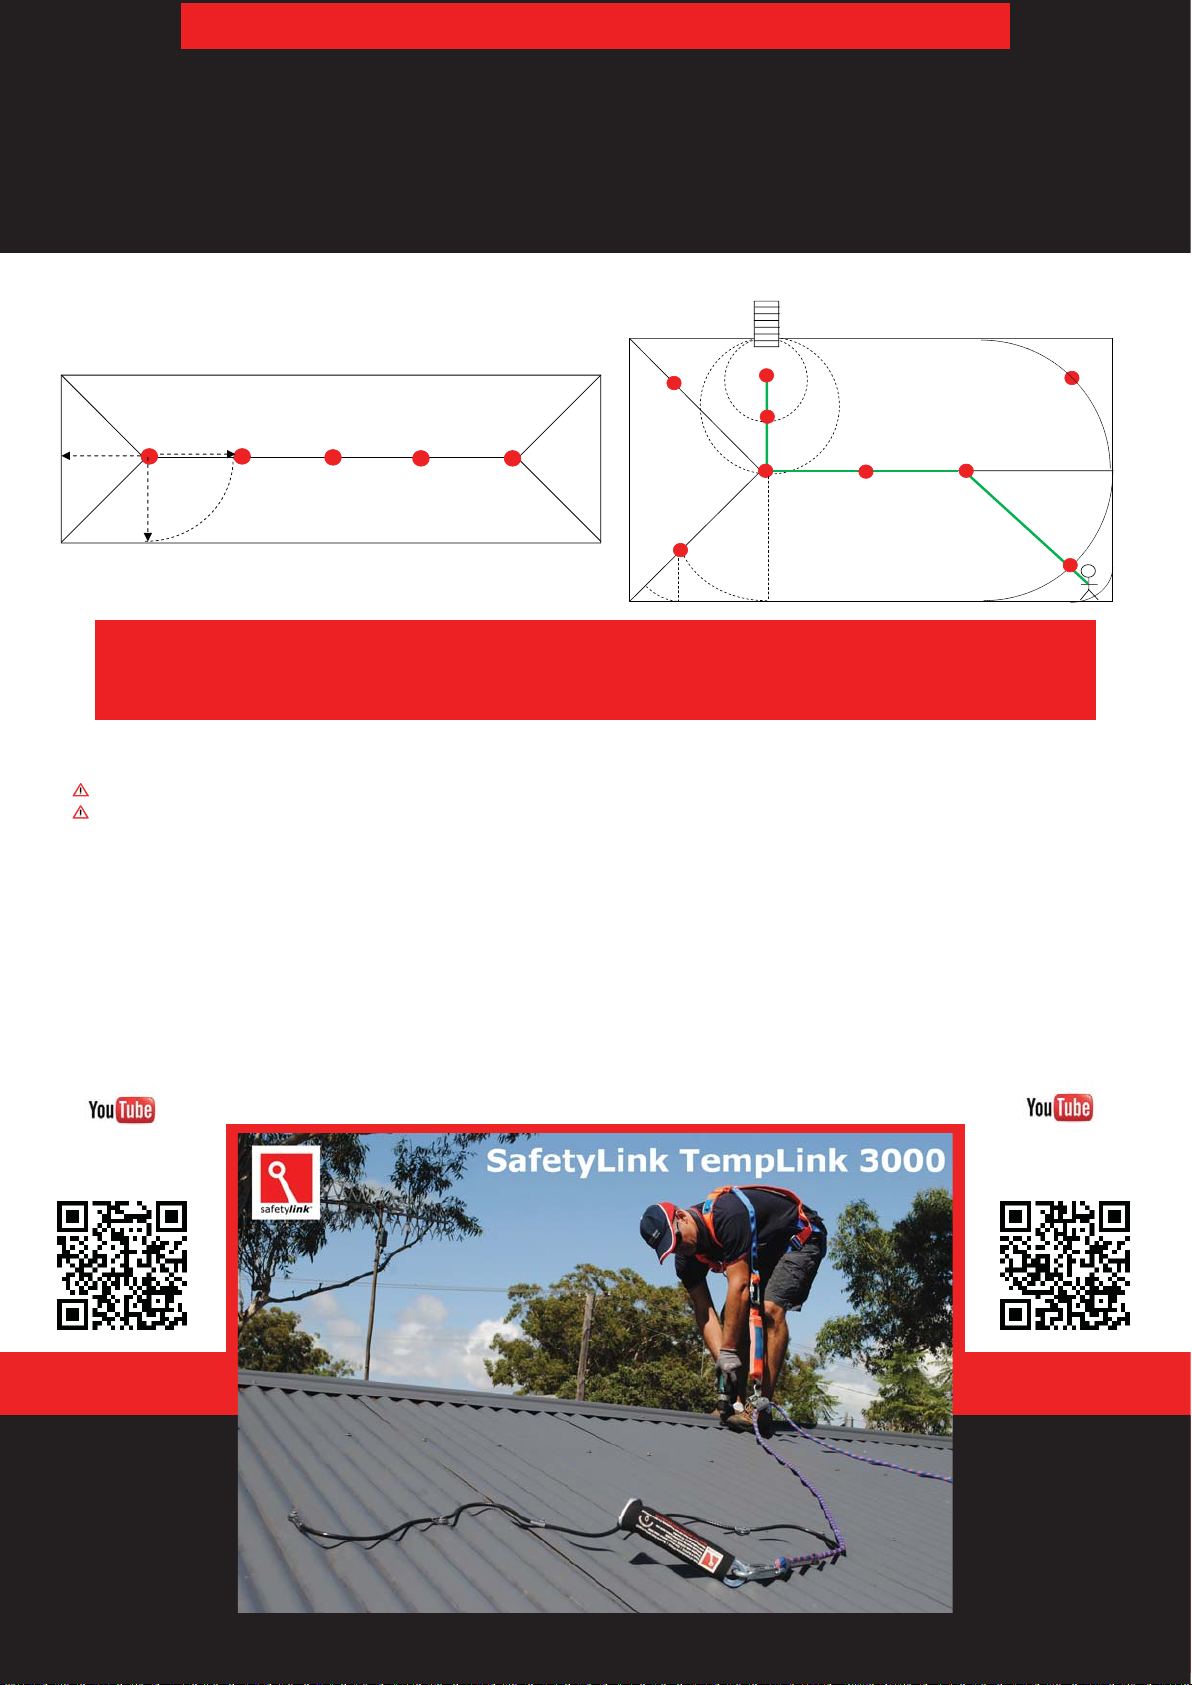
Feel and visually inspect anchors in the following ways for signs of deterioration.
- Inspect the cable for:
a) Cuts, distortion, excessive stretching.
b) Damage due to contact with chemicals, heat, corrosives or solvents.
c) Deterioration due to moisture, mildew or ultraviolet exposure.
d) Abrasions and excessive wear, especially where contact with hardware has occurred.
e) Discolouration from exposure to chemicals or prolonged exposure to ultraviolet light.
f) Rigidity resulting from overloading or the TempLink sustaining a fall.
- Inspect the tabs for:
a) Distortion as a result of a fall.
b) Missing tab, excessive wear, burring of the tabs.
c) Distortion around the tab which could indicate the TempLink has sustained a fall.
d) Free from dirt or other obstructions.
- Inspect the cable and tabs joining position for signs of wear.
- Inspect the “remove from service” date on product, the shelf life of this product does not exceed 10 years.
- The TEMPLINK 3000 anchor point has one energy absorbing stainless steel component. If this energy absorbing region is
expanded/distorted this will indicate the anchor point has arrested a fall and should be removed from service.
- Inspect the components of the anchor for corrosion, superficial surface marking is permitted while deeper corrosion or pitting
will require attention.
- Consult TempLink 3000 user/s for any additional situations that may have caused damage to the TempLink 3000.
- If the TempLink 3000 has sustained any of the above issues or any doubt exists remove the TempLink 3000 from service.
Cleaning Instructions:
If you do need to clean the TempLink 3000 use only warm water and no soap/detergent products. Thoroughly dry before storage.
Care/Maintenance:
Ensure the TempLink 3000 is stored in the following manner, away from direct UV/sunlight, in a dry environment, away from
exposure from chemicals, heat, corrosives or solvents.
Regular inspection and care of your equipment is of the utmost importance. SafetyLink recommends the TempLink 3000 should
be removed from service and destroyed after 5 years from the date of first use. The product has a shelf life of 10 years from the
date of manufacture.
THE TEMPLINK 3000 MUST BE INSPECTED EVERYTIME BEFORE USE, SIX MONTHLY LOGGED SAFETY INSPECTIONS
ARE TO BE COMPLETED BYA COMPETENT PERSON.

INSTALLATION INSTRUCTIONS
The first TempLink 3000 must be positioned in a location safely reached by a secured ladder or a manhole access point.
Access to inside the roof space is not required for installation purpose’s.
The building structure must be inspected for integrity and compliance in relation to relevant building codes.
The building construction must meet all requirements in regard to correct fitting and use of materials set by manufacturers.
Inspections must be undertaken of timber and metal structural components for signs of structural damage such as splits, water
damage, pest erosion and fixing issues.
Roof spaces to be accessed must not be over 30 degrees in pitch.
Metal Roof Sheeting with Metal Battens or Timber Battens
It is recommended the TempLink 3000 be installed to the crest of the roof sheeting profile, where this is not practical the
TempLink 3000 may be installed into the pan away from debris.
Metal roof sheet size must be a minimum of 0.42mm.
1. Remove six (6) of the existing roof screws along the batten line at the appropriate location for the TempLink 3000.
2. Place the cable section out along the roof sheeting, adjust the tabs to fit the roof profile and to line up with the existing
roofing screw holes.
3. Replace the six existing roofing screws with six (6) screws Size 14(g) -10(TPI) x 65 Hex Head Screws. Screw through each
tab and existing hole, securing to the batten under the roof sheeting.
DO NOT OVER TENSION SCREWS AS THIS WILL RESULT IN THREAD STRIPPING, TAB / STRUCTURAL DAMAGE.
4. Ensure the screws are the correct length to engage the batten to eliminate over passing the thread into the blank part of
the screw. Screws must penetrate timber batten by at least 35mm.
Tile Roof with Timber Rafters
1. Remove existing roof tiles at the appropriate location for the TempLink 3000.
2. Place the cable section down the rafter and drill a 4.5mm pilot hole, (never attach to battens on tile roofs, always only attach
to suitable rafters).
3. Screw tabs to the rafter through the tab holes no less than 100mm apart using six (6) x Size 14(g) -10(TPI) x 65, Hex Head
Screws.
DO NOT OVER TENSION SCREWS AS THIS WILL RESULT IN THREAD STRIPPING, TAB / STRUCTURAL DAMAGE.
4. Screws must penetrate timber batten by at least 35mm.
The SafetyLink TempLink 3000 anchor point is now ready for use, giving you an anchor point to attach to while installing the next
SafetyLink anchor point.
Removal of TempLink 3000
During removal you must ensure you are safe at all times.
1. Remove screws from the TempLink 3000 and remove TempLink 3000.
2. On tiled roofs replace the tiles and ensure a water tight seal is achieved.
3. On metal roofs replace the six (6) x Size 14(g) -10(TPI) x 65, Hex Head Screws to secure roof sheet and ensure a water
tight seal is achieved.
TIMBER / METAL
TIMBER / TILE

IN CASE OF ACCIDENT
A FALL RESCUE PLAN SHOULD BE DEVELOPED PRIOR TO USING SAFETYLINK EQUIPMENT.
Persons working at heights should not work alone.
It is critical that before using any SafetyLink Systems a fall rescue plan is in place for any persons suspended mid-air following
a fall. Serious injury or death can occur in a matter of minutes, particularly if a person’s movement or breathing is restricted or
loss of consciousness has occurred. In accordance with your fall rescue plan and appropriate first aid procedures it is essential
to remove the person from the suspended position as quickly as possible.
In accordance with AS/NZS 1891.4:2009 clause 9.5 - EQUIPMENT WHICH HAS ARRESTED A FALL OR SHOWS A DEFECT
Any piece of equipment including both personal and permanently installed items, which has been used to arrest a fall or which
shows any defect during operator or periodic inspection shall be withdrawn from service immediately and a replacement
obtained if necessary. A label indicating the condition or defect should be attached to the equipment, and it should be examined
by a competent person who will decide whether the equipment is to be destroyed or repaired if necessary and returned to
service. In the latter case, details of any repair shall be documented and a copy given to the operator.
ONE PERSON ANCHOR
POSITIONING LAYOUT : THIS IS A GUIDE ONLY
All working at heights safety procedures must be complied with when installing
SafetyLink anchor points. For more information refer to your state or territories current
legislation, regulations, policies and codes of practices.
(The pendulum effect applies to all roof surfaces)
SafetyLink height safety systems must only be installed as per our installation guides, to
structures as specified in the installation guide for each product. Should any doubt
exist in regards to the structures integrity an engineer should be consulted.
A
B
Use of Rope Line from point A to point B
Entry Point
INSTALL
METAL INSTALL
TIMBER
Table of contents
Other Safety Link Safety Equipment manuals

Safety Link
Safety Link Classic Tuff-Post Concrete Lifeline System manual

Safety Link
Safety Link Frogline Horizontal Lifeline System manual

Safety Link
Safety Link TileLink System manual

Safety Link
Safety Link X-Rail Quick start guide

Safety Link
Safety Link TempLink 5000 Installation instructions

Safety Link
Safety Link V-Line VLINESHUT001 User manual