Sagem OT 4X8 RF User manual

252918356_LU_ME2006a_OT4x8 RF_US_en.book Page 1 Mercredi, 28. février 2007 9:02 09

252918356_LU_ME2006a_OT4x8 RF_US_en.book Page 2 Mercredi, 28. février 2007 9:02 09

3
You have just purchased a SAGEM phone. We congratulate you! In order to use your phone efficiently and safely, we
recommend that you read this handbook carefully.
Your phone can be used internationally in the various networks: OT4X8 RF (ME2006a version): GSM-GPRS-EDGE
850 MHz/900 MHz/1800 MHz/1900 MHz depending on the roaming arrangements with your operator.
Some services described in this guide may not be available from the network or when roaming, or may require a specific
subscription.
Remember to back up your data and programs frequently, and before sending the mobile phone for repair.
This phone, like any other wireless phone, operates using radio signals and networks. Connection in all locations and
conditions cannot be guaranteed. Therefore you should never rely solely on any wireless phone for essential communications
(for example, medical emergencies).
In some jurisdictions it may be unlawful to take a picture without notice to or the consent of all participants.
SAGEM is a trademark of Sagem Communication, SAFRAN group.
T9® Text Input is a trademark of ©Tegic Communications Inc.
Java™ and all Java™ based trademarks and logos are trademarks or registered trademarks of Sun Microsystems, Inc. in the
U.S. and other countries.
The WAP navigator and some message softwares (i-mode™) are under licence Openwave.
The WAP navigator and the softwares included are the exclusive property of Openwave. For this reason, it is forbidden to
modify, translate, disassemble or even decompile all or part of these softwares.
Wellphone™ and SmartCom™ are registered trademarks owned by SmartCom SARL France.
The Bluetooth® word mark and logos are owned by the Bluetooth SIG, Inc.
miniSD™ is a trade mark of SD Card Association.
Windows is a trade mark of Microsoft Corporation.
Arkamys is a trade mark of Arkamys SA.
252918356_LU_ME2006a_OT4x8 RF_US_en.book Page 3 Mercredi, 28. février 2007 9:02 09

4
First use: installing the SIM card and the battery .... 7
Removing the back cover ....................................... 8
Inserting the memory card ...................................... 8
Network................................................................... 9
First call................................................................... 9
Receiving a call ..................................................... 10
Increase the battery life of your phone.................. 10
Charging the battery ............................................. 10
Using the phonebook ............................................ 11
Storing a new contact ........................................... 11
Calling a contact ................................................... 11
Contact options ..................................................... 12
Mailing lists ........................................................... 12
Creating a text message (SMS or MMS) .............. 13
Saving the message ............................................. 14
Sending the message ........................................... 14
Receiving messages ............................................. 14
Messages menu.................................................... 14
!"#
%"
Photo..................................................................... 16
Video..................................................................... 17
#" &
%' (
Bluetooth............................................................... 18
Car kit or headset.................................................. 18
USB mode............................................................. 18
SyncML................................................................. 19
#
)* +
,- +
The WAP Menu..................................................... 20
WAP Logging on................................................... 21
Downloading objects............................................. 21
WAP Logging off ................................................... 21
GPRS/EDGE......................................................... 21
" +
-# ++
Applications........................................................... 22
Calendar ............................................................... 22
Alarm - Timer ........................................................ 22
Calculator.............................................................. 22
ToDo ..................................................................... 22
Services ................................................................ 23
252918356_LU_ME2006a_OT4x8 RF_US_en.book Page 4 Mercredi, 28. février 2007 9:02 09

5
. +
Phone settings.......................................................23
Display...................................................................24
Calls.......................................................................24
Networks................................................................25
Security..................................................................26
Player settings.......................................................27
Browser settings ....................................................27
Camera..................................................................27
Video settings ........................................................27
Shortcuts ...............................................................27
Storage..................................................................27
Keys checking .......................................................27
Help .......................................................................27
/#0 +(
1## +(
%000"0
. )%%
+
FCC Part 15 statement..........................................29
FCC SAR information............................................29
Safety Information .................................................29
Distance of operation.............................................30
FDA consumer information on wireless phones ....30
Driving safety tips ..................................................33
%0 0 0" 0
2
%2 3
CE conformance statement...................................34
CE SAR information ..............................................35
Safety information .................................................35
Distance of operation ............................................36
CE Environment ....................................................36
)%".
Limited Warranty ...................................................37
)".
Warranty ................................................................39
2 4 -" 524-67 0
08 3+
9': 3
/# 3
1;
252918356_LU_ME2006a_OT4x8 RF_US_en.book Page 5 Mercredi, 28. février 2007 9:02 09

6
: Long press: Switch on/off.
Reject a call - hang up
Return to idle screen
:
Call/Receiving a call/Hands-free mode
do not use the phone in hands-free mode near to your ear, or
you may suffer hearing loss (at least 3.9 inches (10 cm).
(Function available depending on model)
Access to certain functions (shortcuts)
Access to the selection shown on screen in the tab (*)
! ""#
"
(Function available depending on model)
Access to certain functions (shortcuts)
Access to the selection shown on screen in the tab (*)
The navigator allows you:
-to navigate in the various functions pressing the relevant part (up, down,
right, left)
-to confirm your selection pressing the central part
In idle screen, pressing the navigator displays the main menus icons
Pressing the navigator followed by one of the twelve keys of the keypad, you
can display a menu directly.
Short press: switches from one input mode
to another (upper case/lower case, 123 mode). Long press:
activate/deactivate T9 mode
Long press: modifies the T9 mode language.
Short press: displays the symbol table.
Long press: Silent mode.
Short press: stops ring tone.
Short press: Activate/deactivate ring tone
Long press: Stops sound in video or message playing, or in a game
A long press on the keys
to
!
directly displays the phonebook
252918356_LU_ME2006a_OT4x8 RF_US_en.book Page 6 Mercredi, 28. février 2007 9:02 09
7
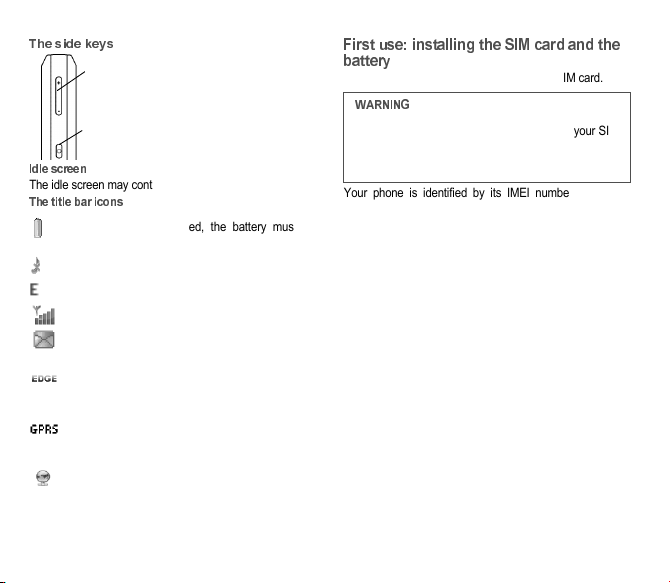
The idle screen may contain the following information:
"
Battery (if it flashes red, the battery must be
charged immediately)
Silent mode (the ringtone is off)
Only emergency call is possible
Signal strength level (between 0 and 5 bars)
Message received (read your message), flashing:
memory full (delete some messages)
Grey: EDGE network unavailable
Black: EDGE connection
Flashing: Connection on hand
Grey: GPRS unavailable
Black: GPRS connection
Flashing: GPRS connection on hand
WAP connection
To use your phone, you need a card called SIM card.
Your phone is identified by its IMEI number. Write this
number down, and do not keep it with your phone, because
you may be asked for it in the event of your phone being
stolen, in order to prevent it from being used, even with a
different SIM card. In order to display the IMEI on your
phone’s screen, type: *#06#.
-Set the volume (short press)
-Change to the next or last piece of music
(long press)
-Access music player mode (long press)
-Play or pause music (short press)
This card must be handled and stored with care in
order not to be damaged. If you should lose your SIM
card, contact your network provider immediately.
Please keep your SIM card out of reach of young
children.
252918356_LU_ME2006a_OT4x8 RF_US_en.book Page 7 Mercredi, 28. février 2007 9:02 09
8
The SIM card is inserted under the phone’s battery. Ensure
that the phone is switched off and the charger
disconnected.
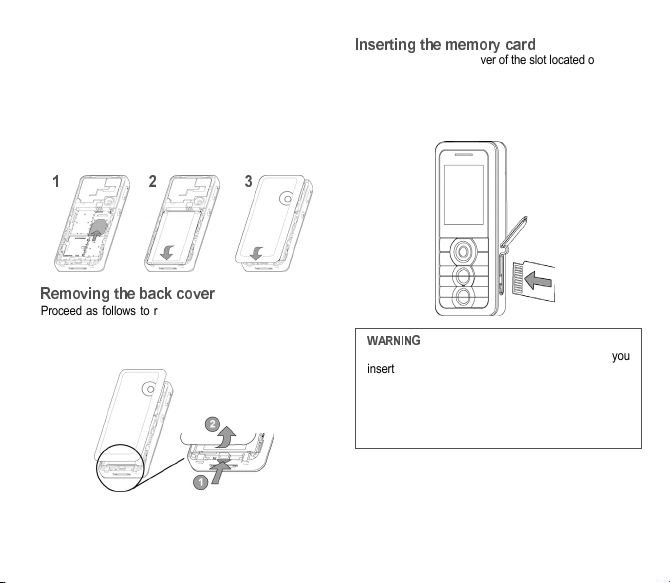
1Slide the SIM card, with cut corner as shown on the
phone, into the card holder with fold face down.
2Place the battery by positioning first the top of it, as
shown on the battery.
3Place the back cover, clicking in first the upper part
then the lower part.
Proceed as follows to remove the back cover (in case of
replacement of the battery or the SIM card, for instance):
Turn the phone back. Use the notch (1) as a lever to lift the
cover (2).
-Open the protective cover of the slot located on the side
of the phone and insert the memory card pushing it until
it clicks into place.
-To remove the card, first make sure that no application is
accessing the card, then slightly push the top edge of the
card to release it and pull it out of the slot..
The memory card is very fragile. Take care when you
insert or remove the memory card.
The memory card may suffer damage if withdrawn
during a read or write operation. Ensure that no
application accesses the card during its withdrawal.
Some memory cards must be formatted with a PC
before first use with the phone.
252918356_LU_ME2006a_OT4x8 RF_US_en.book Page 8 Mercredi, 28. février 2007 9:02 09
9
When you switch on your phone for the first time, follow
instructions displayed on the screen.
If access to the SIM card is protected, the device prompts
you to enter the PIN number:
Enter the code
between 4 and 8 digits given to you when the
SIM card was issued. These digits do not appear on the
screen for security reasons.
After pressing [
#
], the phone activates the SIM card
settings and switches on again ; enter your PIN code again
then the date and time, make your choice for the following
settings: time zone, daylight savings, skin, wallpaper,
screensaver, ring tone, volume, vibrate and voicemail
number.
If there are contacts saved in your SIM card, you are invited,
if you wish, to copy them in the phone contacts memory.
If the network’s name appears, calls are possible on your
operator's network.
If the letter R and a network name are displayed, calls are
possible on a roaming network provider.
If the letter E is displayed without any network name, only
the emergency services are accessible (ambulance,
police, fire brigade).
If the network icon flashes, the phone is in permanent
search mode. There is no network available. The signal
strength indicator received allows you to display the quality
of reception. If it indicates less than three bars, search for
better reception in order to call in good conditions.
Dial the number you want to ring. Press the green key.
During the call, the call in progress icon flashes on screen
and tones may indicate the establishment of the call.
While a call is connecting, the phone icon is flashing.
You can adjust the sound level (volume) using the navigator
or the side keys.
At the end of the conversation press the red key to hang up.
If a wrong PIN number is entered three times in
succession, your SIM card is blocked. You must then:
-Enter the PUK (Personal Unblocking Key) code
provided by your operator, and validate.
-Enter your PIN number and validate.
-Enter your PIN number again and validate.
After 5 or 10 failed attempts (depending on the type of
SIM card), the SIM card is definitely locked. You must
then contact your operator to obtain a new card.
Press 0 (hold down) to display « + », then dial the
country code without waiting for the dial tone, then the
number of the called party.
%&
Depending on the network you can obtain the
emergency service with or without SIM card or when
the keypad is locked. It is enough to be in an area
served by a network.
To obtain the international emergency service, dial
''
then press the green key.
252918356_LU_ME2006a_OT4x8 RF_US_en.book Page 9 Mercredi, 28. février 2007 9:02 09

10
When you receive a call, the number of your caller is
displayed when it is presented by the network.
Press the green key to answer, and speak.
To refuse the call, press the red key.
To stop the ring tone or the vibrate, without refusing the call,
press
.
%
"
When on a call, pressing [
#
] allows you to have
access to different functions.
Pressing [
()
] allows you to switch off the microphone
temporarily when you want that your correspondent does
not listen.
!
-Don’t press the keys when not necessary: each keypress
activates the backlight, and uses much power.
-Activation Bluetooth function reduces the phone battery
life. We advise you to deactivate it when not in use.
"
Your phone is powered by a rechargeable battery. A new
battery must be charged for 4 hours at least before being
used for the first time.
When your battery has been discharged, the empty battery
icon flashes. In this case recharge your battery for at least
15 minutes before making any calls in order not to be cut off
quickly.
"
Connect the charger to a socket.
Plug the end of the cable into the bottom connector of the
phone.
*+
To change to hands-free mode during a call, make a
short press on the green key then press [
,
] to
confirm activation of the amplified mode.
in this mode do not bring the phone up to
your ear.
252918356_LU_ME2006a_OT4x8 RF_US_en.book Page 10 Mercredi, 28. février 2007 9:02 09

11
The phone is then charging up. The battery icon scrolls up
and down to indicate that it is charging. When the battery is
fully charged, the charging stops on its own. Disconnect the
cable.
When charging, the battery may warm up, this is normal.
#!
According to the selection made in the
/
/
menu, the phonebook displays:
-the list of the SIM card contacts (icon when a contact
is selected)
or
-the list of the phone contacts (icon when a contact is
selected))
or
-all the contacts.
You can search for a contact quiclky by typing the first
letters (up to three). You can display it by pressing OK.
By default, the contact is stored in the list of the phonebook
which is displayed (SIM or phone). When there are both
lists, you must select the list to store it.
-Press
.
-Enter the last name and press
#
.
-Enter the number and press
#
.
you can fill other fields if you store the contact in the
phone memory (email, address, ringtone, photo, etc.).
-Press [
-&
] to store it.
"
Several ways:
-Select a contact. Press
the green key to start the call.
-Select a contact, press
#
, his number is displayed,
press [
.
] to start the call.
-Direct call from the idle screen (only for the contacts
stored in the SIM card memory): type the number with
which the contact was saved then
(example : 21
) or
the number then
/
, the number is displayed, confirm.
If the battery has entirely discharged, the phone
cannot start. Plug the phone to the charger. The phone
will switch on after a few minutes of charge. You can
use the phone again when the
-
option is
displayed on the screen.
There is danger of explosion if the battery is placed in
an incorrectly way or if it is exposed to fire.
Do not short circuit it.
The battery does not have any part that you can
change.
Do not try to open the battery casing.
Use only the appropriate chargers and batteries as
shown in the phone manufacturer’s catalogue.
The use of other types of chargers or batteries may be
dangerous or invalidate the warranty.
Used batteries must be disposed of in the appropriate
places.
We advise you to take the battery out if you plan not to
use the phone for extended periods.
You are strongly advised not to connect your phone to
the charger if it doesn’t contain a battery.
The charger is a safety step-down transformer, it is
forbidden to modify, alter or replace it by another
component (power supply plug, etc).
252918356_LU_ME2006a_OT4x8 RF_US_en.book Page 11 Mercredi, 28. février 2007 9:02 09

12
"!
To display the various options, select a contact and press
[
#
].
Modify what you want and validate then select
-&
once
the modifications completed.
To send a SMS or a MMS to a contact (see chapter
(
).
To send a contact details by SMS, MMS or Bluetooth (see
chapters
(
and
.&
).
This allows you to copy your phonebook contacts from one
memory to the other. Only the name and the first phone
number will be copied.
The contact details are copied as a visit card in a
Multimedia directory.
Select
-(
or
0
and validate.
-
0
: the screen displays the amount of memory used.
The memory capacity is shared between the phonebook
and various other features. If you lack memory, check if
you can free some space.
-
-(
: available memory only for contacts.
This allows you to delete the contact selected or all the
contacts.
!"
The details of a contact stored in the phone memory can be
saved in a business card.
-Select a contact and press [
#
].
-Select
-
and [
#
]. The details are saved
as
1)
. Then you can read it, modify it or
send it by SMS or MMS.
Æ
Æ
This allows you to copy all the SIM card contacts to the
phone memory and vice versa.
#
This allows you to add a contact to a mailing list.
-
: This menu allows you to select the default
phonebook (SIM, Phone, SIM and Phone) displayed
when the phone switches on.
-
-
: This menu allows you to select the way to sort
contacts in the phonebook (by name or first name).
A mailing list allows you to group contacts: this list can be
used to send messages easily to all the list contacts.
-In the phonebook, select the
(
tab pressing
the navigator rightwards.
-Press [
#
].
-Select
.
-Select the list type (SMS or MMS).
-Enter a name and press the navigator.
-Then, on a list press [
#
]. Select
each time you want to add a contact in the list.
252918356_LU_ME2006a_OT4x8 RF_US_en.book Page 12 Mercredi, 28. février 2007 9:02 09

13
& '(' (('
"(('((')
*)
)"((''('"
+ )
))"
" %&
-Select
(2.
then
-(-
or
((-
.
-Type your text. The T9 mode is applied by default.
3"!(
The Easy Message T9® mode helps you to
easily write your messages
"
The language used is the one selected on
the display of the phone (if the language
selected is not compatible with the Easy
Message T9®, the English language will be
automatically selected).
Press once the key corresponding to the letter chosen and
compose the word by continuing to press the keys
corresponding to the various letters without paying attention
to the display: the word is highlighted.
The same sequence of keys pressed can correspond to
several words, existing on the dictionary. If the word that
appears is not the word you expected, press the navigator
upwards to scroll through the words corresponding to this
key sequence.
Once you agree on the word proposed on the screen, press
the navigator rightwards to validate it or on the
4
key (which
validates and inserts a space after the word), and go on
writing the next word.
If the word you are expected is not proposed, please add
characters until you get the message
5
? Press
[
,
] and validate if the word displayed suits you or modify
this word before adding it in the dictionary.
-You may change to capital letter, small letter or 123
(digit) mode at any time by pressing and releasing the
key.
-You may also obtain the digits by pressing and holding
the key you want.
-Changing the language in T9 mode: press and hold the
key.
3
To deactivate T9 mode press and hold the key. The
ABC mode then applies: each time you press a key this
corresponds to the letters indicated on the key (for example,
press 2 twice to display B).
As in T9 mode, you may change to capital letter, small letter
or 123 (digit) mode at any time by pressing and releasing
the key.
: you may change mode by pressing [
#
].
0))
Punctuation characters are obtained by pressing the
'
key
(except in
' 6
mode), or with the help of
mode (fast
access by briefly pressing
/
).
Accented characters are generated automatically in T9
mode.
252918356_LU_ME2006a_OT4x8 RF_US_en.book Page 13 Mercredi, 28. février 2007 9:02 09
14
In ABC mode accented characters are available by
pressing the key supporting the non-accented character
repeatedly.
-Select
-&
if you do not want to send the message
immediately or if you want to send it several times. It is
saved in the
7
menu.
or
-Select
-&
to use it again as a template. It
is saved in the
"
menu.
-Once the text entered, press the navigator or press
[
#
].
-Enter the receiver’s number or take it in your phonebook
pressing [
#
],
.
. You can also select a
contacts list in your phonebook.
-Select
-
.
When you receive a message, the phone plays the ring tone
that you selected, and a message icon comes on the screen
of your phone.
If you do not read the messages, this icon remains
displayed on the screen. When it flashes, the memory is full.
Note that you have two different possibilities for receiving
MMS: automatically or manually; if « manual mode » is
activated, then you will receive only a notification in your
Inbox, meaning that a MMS is available on the MMS Server;
select Retrieve in the options when you want to retrieve the
MMS from the network.
Messages are listed in chronological order, the latest one
being displayed first.
The quantity of Not Read and Not Retrieved messages is
shown. Not Retrieved and Not Read messages are shown
in bold.
"
This menu displays the messages that have not been sent.
You can therefore send them again.
The
-8
menu is used to store all your sent messages
if you activated the option
-
in the
#
menu.
Too many messages saved will quickly fill up the available
memory and no further messages will be received.
This menu contains all the messages saved.
If you select a message and press the navigator, you can
modify it.
If you want to send it, select
(
then press [
#
]
and select
-
.
When composing a message, if you selected the
-&
option, the template is saved in this menu.
%
This menu contains the e-mails received, sent, not sent, the
drafts and a personal directory to sort them.
252918356_LU_ME2006a_OT4x8 RF_US_en.book Page 14 Mercredi, 28. février 2007 9:02 09

15
This menu allows you to select various sending and
receiving options.
-(-
: displays the memory available in the SIM card and in
the phone for saving SMS.
((-
: displays how much memory is used by the
MMS and emails saved.
&'
This menu is used to activate reception of information
broadcast by the network.
You can choose whether you want to receive this
information or not (please contact your network provider).
(
This function allows you to call your voicemail.
This number depends on the operator.
This menu displays the mailing lists created in the
phonebook.
To display the different options, press [
#
].
-
: allows you to create a new mailing list.
-
(
: allows you to modify the mailing list
name.
-
: allows you to add a contact to the mailing
list.
-
0
: allows you to see the type of mailing list and
the number of contacts.
-
7
: allows you to delete the mailing list.
Before you can use the e-mail function you must create an
account and, depending on the operator, a connection
profile.
Ask your operator for the conditions of use for the e-mail
service.
You can consult other e-mailboxes from your phone.
0)59&
The procedure to follow to open an account may vary
according to the operator and country. Ask your operator.
0)5)
The first time you use it, your phone automatically suggests
creating one.
Enter a name and press
#
.
Press [
#
] then select
(
to access the list of
parameters to be filled in for the account:
-
(example: [email protected]y)
-
(examples: authentication: yes, domain:
operator, server: smtp.operator.country, port number: 25)
-
)
: POP3
-
: choice to receive e-mails
-
+,+-)
: (examples: login: 0612345678, password
(information provided by the access provider),
authentication: yes, server: POP3, port number: 110)
Save once all the parameters have been entered.
+)
To write and send an e-mail:
(
/
.
then
.
To access your accounts:
(
/
#
/
/
)
.
To access your sent, received or draft e-mail folders:
(
/
.
252918356_LU_ME2006a_OT4x8 RF_US_en.book Page 15 Mercredi, 28. février 2007 9:02 09

16
. + /"
0)+"+
) /"&/
) +"
'
.
" &
)"
(
-
:
:
To activate zoom, use the navigator upwards or downwards
or the side keys (
;
and
+
).
Note: if the zoom selected does not match with the storing
format, the photo is automatically saved in an appropriate
format
#
(pressing [
#
]):
-
&
: to take a photo with a 5, 10 or 15 second
time delay.
-
(
(normal or burst): in burst mode, the photo will be
taken in four shots (useful for taking pictures of moving
subjects, for example).
-
%
: to select an effect.
-
%8)
: to select luminosity.
-
-&5)
: used to select the location where
the photo will be saved (phone or memory card).
-
. )
: to select the sound you will hear when
taking a photo.
-
0<)
: to select the photo quality.
-
0
: to select the format in which your photo
will be saved
-
&
: to take a video.
"
-Select the
.
menu. The camera is now on. Look
into your phone display and position your subject. Move
your phone to position your photo.
-Press the navigator or on the side key, the photo is taken
and stays on the phone display.
#
))1 "
-Press the navigator if you want to send the photo
immediately by MMS.
-Press
-&
to save your photo, a progress bar animates
then different options are displayed.
#
-
-1
allows you to send the photo by MMS, e-mail
or Bluetooth.
-
: allows you to modify the name of a photo.
-
: allows you to assign a photo to a
contact saved in the phonebook.
-
3
: allows you to select the photo as a wallpaper or
screensaver.
-
%
: various options to modify a photo.
•
2
: allows you to magnify certain parts of your
photo.
•
%1
: allows you to improve contrast.
•
3
: allows you to modify a photo with an
embossed grey tint.
•
4)
: allows you to change a photo into negative.
•
: allows you to change color into black and white.
•
0
: allows you to increase or decrease the
contrast of your photo.
•
'
: allows you to sharpen a photo.
•
5
: allows you to add blur to a photo.
•
'
: allows you to change colors into sepia.
•
'
: allows you to shape a photo.
•
5
: allows you to increase or decrease the
brightness of a photo.
252918356_LU_ME2006a_OT4x8 RF_US_en.book Page 16 Mercredi, 28. février 2007 9:02 09
17
•
'6
: allows you to increase or decrease the
solarize of a photo.
•
'
: allows you to increase or decrease the
color saturation.
If there is not enough memory to save the photo, a warning
message appears, prompting you to confirm whether you
want to go on.
using the camera during a call may disturb the call
quality.
(
(
-Select the
=
menu.
-If necessary, select the following settings pressing
[
#
]:
•
=)
: allows you to record wether not the
sound when recording a video.
•
=
: allows you to choose a video size.
•
-&5&>>>
: allows you to select where the
video is saved (phone or memory card).
•
: to take a photo.
Press the navigator to record then press [
-
] when you
want to stop recording.
the phone automatically stops recording when the
maximum size available is reached.
Press [
#
] to display the options:
•
&
: allows you to take a new video.
•
0
: allows you to play the video.
•
-1
: allows you to send a video by MMS, e-mail
or Bluetooth.
•
: allows you to modify a video name.
•
7
: allows you to delete a video.
the videos are saved in the phone with a .3gp format.
The
()
menu contains the directories of all the
multimedia objects recorded in your phone and the
downloaded objects (photos, videos, ringtones,
musics, etc.).
There are two tabs that you can select pressing the
navigator rightwards or leftwards:
-
0
tab (phone memory)
-
( -7?
tab (available if you have inserted a
memory card in your phone).
You can copy the multimedia objects from the card to your
phone.
To display the various options of each directory, press
[
#
].
-
15
: displays the list of the objects.
-
: modifies the directory name.
-
7
: deletes the directory (only the directories created
by the user).
-
5
: create a new directory.
-
5
: allows you to take a new photo or video or to record
a sound.
-
@
: this option deletes all the internal memory of the
phone.
: all the multimedia objects saved in this
memory will be deleted.
-
(
: displays the memory used and available for
the multimedia objects.
For each object a list of options is available (view, send,
delete, etc.).
252918356_LU_ME2006a_OT4x8 RF_US_en.book Page 17 Mercredi, 28. février 2007 9:02 09

18
You can exchange with other devices (PC, mobile phones,
personal assistants, printers, etc.) various data: pictures,
sounds, photos, videos, ToDo tasks, organiser events,
contacts, etc.
Data exchange can be done through:
-a USB cable,
-a Bluetooth connection.
: see chapter
" )
to know the
compatibilities of the accessories with your phone.
If you have inserted a memory card in your phone, it is
considered as an additional memory in the Windows
explorer files directory; you can copy/paste.
If you want to exchange objects between the phone’s
memory and a PC, you simply need to connect the phone
to the PC with a USB cable. A removable disc appears in
the Windows Explorer tree structure; you may copy/and
paste into it.
: If a call comes in during an exchange of data with
your PC, the link will be interrupted and will have to be
manually re-started.
)
This menu allows you to set your phone Bluetooth
connection in order to communicate with other devices
equipped with Bluetooth: for example, an audio connection
with a headset, a stereo headset, a car kit or a data
connection with a PC.
Bluetooth is a free wireless connection, with a 10 metre
maximum range.
-
0&
: allows you to search for devices which
may connect with Bluetooth link with your phone (for
instance: headset).
-
(
: allows you to activate the phone Bluetooth
connection.
•Off: Bluetooth connection impossible.
•On and hidden: your phone is not detected by the
other devices but the phone detects the other
devices.
•On and visible: your phone can be detected by
another device.
•On and always: your phone can be detected by
another device and remains detected as soon as the
Bluetooth connection is activated.
-
(1)
: allows you to assign a name to
your phone for the Bluetooth connection. This name is
displayed on the devices connected.
"
This menu allows you to configure the options of the phone
with a pedestrian kit or a car kit (Automatic response,
Switch off, Kit volume).
#)
This menu allows you to select a mode to connect the
phone to a peripheral with the USB cable available as an
accessory.
-
)+
: if you select this option, when
connecting a USB cable, the phone asks you to select
the mode you want.
-
(
: to exchange data between the phone memory
and a PC.
-
0
: to connect the phone to a printer (printing
photos) without using a PC.
-
(0.
: to exchange data between the
phone (memory card inserted in the phone or phone
internal memory) and a PC.
252918356_LU_ME2006a_OT4x8 RF_US_en.book Page 18 Mercredi, 28. février 2007 9:02 09

19
*
You can synchronize your phonebook, your organizer or
your ToDos with your archives stored in your operator’s
network depending on the options offered by your operator.
The local synchronisation with your computer is only
computer originated, from Wellphone software (available
from http://www.wellphone.com); you have only to activate
Bluetooth, or configure your USB connection in your phone.
The 3D sound is under licence Arkamys.
In this menu, you can listen to music and access all the
functions associated with it..
If you haven’t yet stored any music, the phone will ask if you
want to download some music. If you answer Yes, it
connects to the WAP.
You may also download music by connecting your phone to
a PC using a USB cable or Bluetooth.
()
You can listen to music either through the
()0
menu or by pressing the side key.
When you listen to music its title is displayed on the idle
screen.
You may use the side keys for the following functions:
#()
[
1
]: used to exit music player mode while continuing to
listen to music.
=))
-
0
: used to select a play order for listening to
music.
-
: used to choose whether or not to
replay a list.
-
%<)A
: used to modify the high and low settings.
-
=5
: used to view the music as a bar chart.
-
: used to choose various sound effects.
-used to create playlists.
-used to sort music by album, artist or genre.
-contains various music directories. The
75
,
,
(
and
directories are filled automatically by the phone.
You may also listen to music using a hands-free kit or
Bluetooth stereo headset (AADP profile).
You can still use your phone’s other functions while
you are listening to music.
-set the volume (short press)
-change to the next or last piece of music
(long press)
-access the music player (long press)
-play or pause music (short press)
'
'
6'+
next/last piece (short press)
+
fast forward/rewind (long press)
6+
play/pause
252918356_LU_ME2006a_OT4x8 RF_US_en.book Page 19 Mercredi, 28. février 2007 9:02 09
20
: you must connect the hands-free kit to operate
the FM radio. The radio antenna is contained in the
hands-free kit wire.
: frequency range available: 87.5 MHz to 108 MHz (in
steps of 100 KHz).
()
Once you have connected the hands-free kit, select the
Music player menu then Radio FM.
[
#
] is used to access the different radio functions:
select a frequency, save several stations in a list (3 lists of
10 stations), mono or stereo mode.
When you listen to the radio, the station number is
displayed on the idle screen.
The side key functions are identical to those used to listen
to music.
Operation of the keys while listening to FM radio:
[
1
]: used to exit the menu while continuing to listen to
the radio.
!"
7%+ 7 % +
7(8 9.(8
".7%+
":
);)<)
"
+,-'
The WAP navigator is under licence:
The WAP navigator and the softwares included are the
exclusive property of Openwave. For this reason, it is
forbidden to modify, translate, disassemble or even
decompile all or part of these softwares.
-
3
: this menu allows you to input an Internet
address directly.
-
1
: allows to store bookmarks (addresses of
Internet sites). You can receive bookmarks and add
them to this list.
-
*
: backward and forward navigation of the pages
displayed are kept in memory.
15
:
-
0
: allows you to select or modify your provider’s
configuration settings or to configure others
providers’settings.
-
.)
:
is used to choose the time after
which the call is automatically disconnected if you have
forgotten to log off from a service.
'
'
6'+
next/last station (short press)
+
change in steps of 0.1 MHz (short
press) - find stations (long press)
6+
play/pause
252918356_LU_ME2006a_OT4x8 RF_US_en.book Page 20 Mercredi, 28. février 2007 9:02 09
Table of contents
Other Sagem Cell Phone manuals


Sagem
Sagem SG343I User manual

Sagem
Sagem MYC3-2 User manual

Sagem
Sagem MYZ-55 User manual

Sagem
Sagem MW 302 Series User manual

Sagem
Sagem VS4 Vodafone User manual

Sagem
Sagem MY721X User manual

Sagem
Sagem MY X3-2 User manual

Sagem
Sagem MY3078 User manual

Sagem
Sagem PW 302X User manual

Sagem
Sagem my500x User manual


