Sagem My X-5 User manual

DEUTSCH
Couv MYX5 finale-GE.qxd 12/2/02 10:33 AM Page 2

1
Conformance Document
SAGEM SA declare under its sole responsibility that the product Dual Band GSM/DCS Type M2002
conforms to the requirements of the following EEC directives:
EEC Directive 1999/5/CE
Safety EN 60950
EMC EN 301 489-1
EN 301 489-7
Low voltage directive 73/23/CEE
Network Requirements GT01 v 4.7.0
TBR 19 Edition 5
TBR 20 Edition 3
TBR 31 Edition 2
TBR 32 Edition 2
EN 301 419-1
Health EN 50360
EN 50361
72 pages MYX5-eng 11/8/02 5:57 PM Page 1
Services
Phonebook
Messages
WAP
Games
Sounds
Background
Settings
Calls
Accessories
Colours
Wallpapers
Screensavers
Greeting msg
Ring tones
Vibrate
Silent mode
Beeps
Date / time
My objects
Languages
Networks
Contrast
Energy saving
Shortcuts
Reset settings
Calls forwarded
View last calls
Counters
Display numbers
Call waiting
Auto redial
Answer phone number
Calculator
Converter
Alarm
Timer
Car kit
Data
Compose
Inbox
Outbox
Drafts
Options
Memory
Local info
Phonebook Menu
MegaBox Conquest
Downloaded games
Picture Puzzle
Security
Keypad locking
PIN number
PIN number 2
Phone code
Confidentiality
Operator
Call barring
Fixed dialling
2
Menus
72 pages MYX5-eng 11/8/02 5:57 PM Page 2

3
Contents
Page 2 MENUS
Page 6 YOUR PHONE PACKAGE - ACCESSORIES
Page 7 DESCRIPTION
Programmable and shortcut keys
Page 8 PRINCIPLES OF NAVIGATION
Page 9 HOME PAGE
Page 10 to 11 ACTIVATING YOUR TELEPHONE
Information on SIM card
Installing the SIM card and battery
Charging the battery
Page 12 to 13 USING YOUR TELEPHONE
Don't obstruct the antenna with your fingers
Increase the efficiency of your phone
Page 14 to 21 PHONEBOOK
Using the phonebook
Phonebook menu
Sending a vCard
Receiving a vCard
Call groups
Page 22 to 31 MESSAGES
Compose SMS
Compose MMS
Using Mode T9
Inbox
Outbox
Messages
Drafts
Sending options
Memory
72 pages MYX5-eng 11/8/02 5:57 PM Page 3

4
Contents
Page 32 to 36 WAP
WAP Menus
Configuring parameters
Logging on
Downloading objects
Logging off
GPRS
Page 37 GAMES
MegaBox Conquest
Picture Puzzle
Downloaded games
Page 38 to 39 SOUNDS
Ring tones
Vibrate
Silent mode
Beeps
Page 40 to 41 BACKGROUND
Colours
Wallpapers
Screensavers
Greeting msg
Page 42 to 45 SETTINGS
Date and time
My objects
Languages
Networks
Contrast
Energy saving
Shortcuts
Reset settings
72 pages MYX5-eng 11/8/02 5:57 PM Page 4

5
Contents
Page 46 to 50 CALLS
Calls forwarded
View last calls
Counters
Display numbers
Call waiting
Automatic redial
Voicemail number
Local info
Page 51 to 54 SECURITY
Keypad locking
PIN number
PIN number 2
Phone code
Confidentiality
Operator code
Call barring
Fixed dialling
Page 55 to 58 ACCESSORIES
Calculator
Converter
Alarm
Timer
Car kit
Data
Page 59 SERVICES
Page 60 to 61 TECHNICAL FEATURES
Page 62 to 64 WARRANTIES
Page 65 to 69 TROUBLESHOOTING
Page 70 to 72 INDEX
72 pages MYX5-eng 11/8/02 5:57 PM Page 5

6
Your phone package - Accessories
When you open the box, check that all the items are present:
1 - Telephone
2 - Mains charger
3 - Battery
4 - User manual
Accessories
You can also find (as an option) or order the following accessories:
Pedestrian kit (*)
Extra battery
Extra charger (*)
Office support (*)
Cable to connect your to a PC USB or serial port (*)
CD driver (PC or Mac) to synchronise your telephone with your PC
Cigar lighter adapter (*)
Coloured cover
Hands-free kit (*)
(*) These accessories are identical to the ones provided for the earlier 900 and 3000 series.
1
2
3
4
72 pages MYX5-eng 11/8/02 5:57 PM Page 6
7
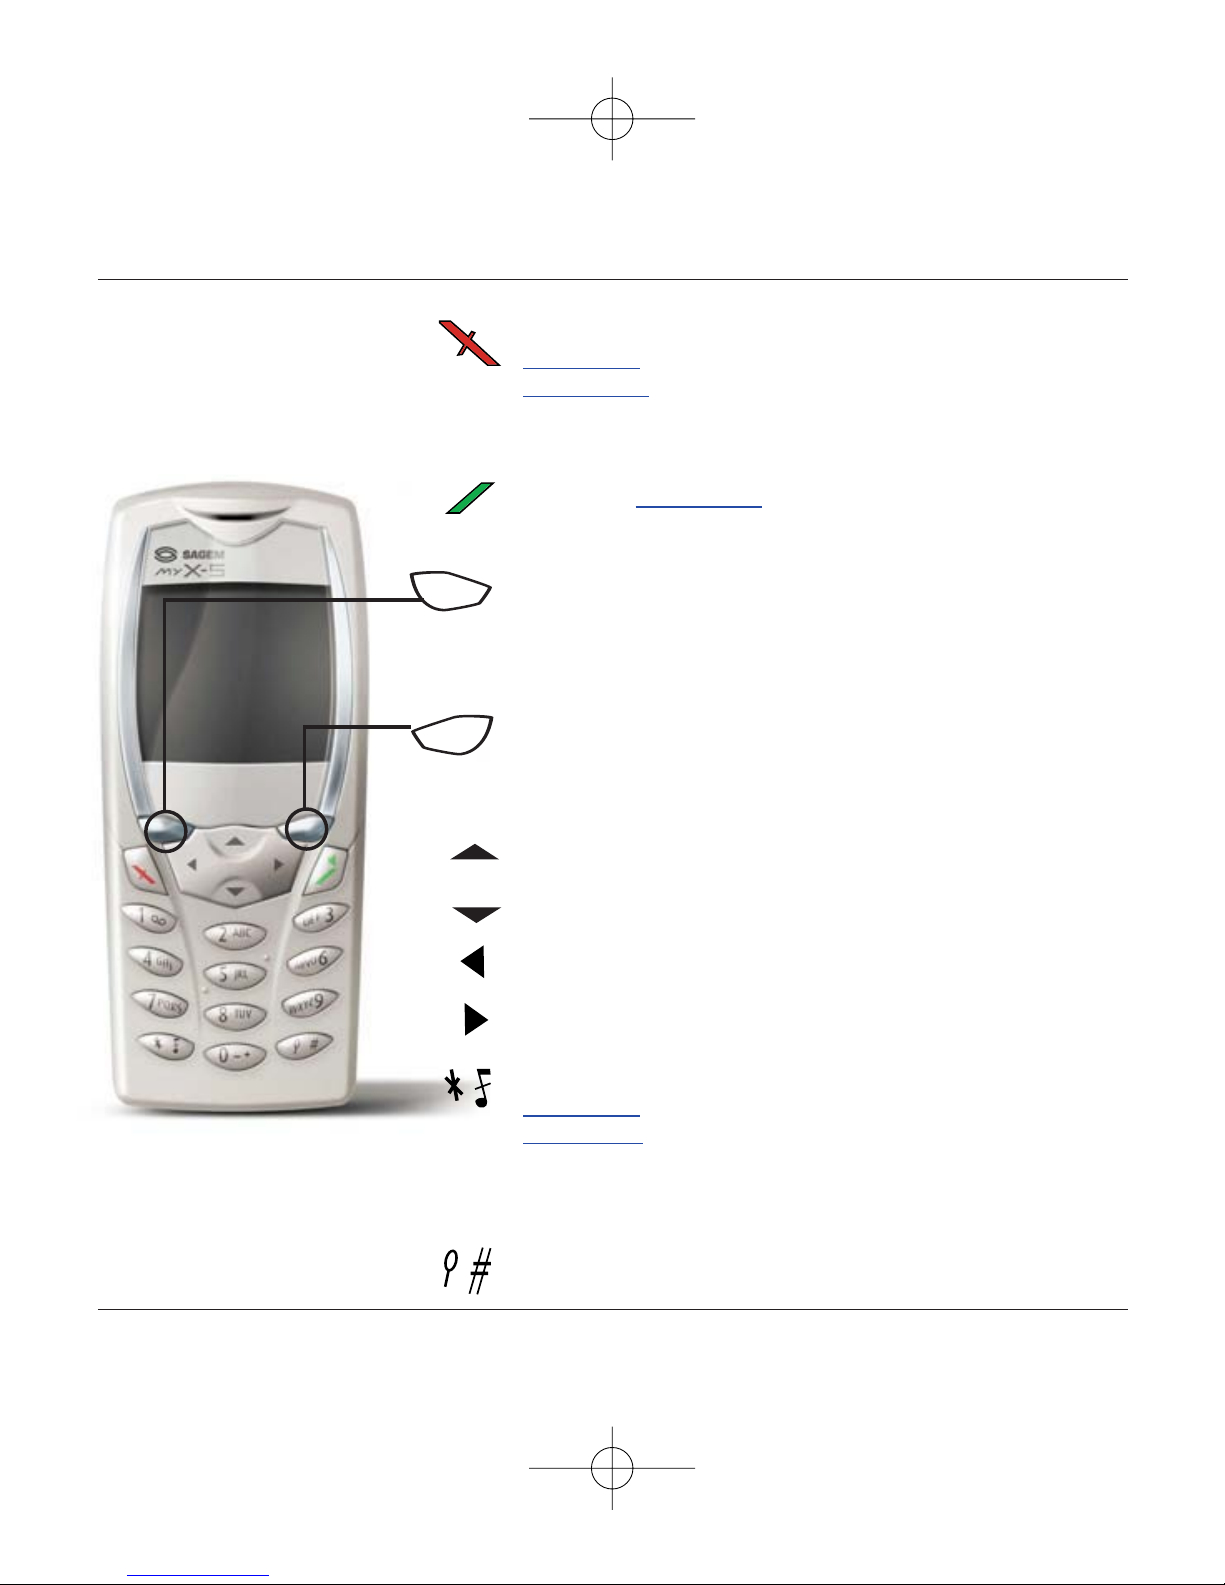
Description
Stop key:
Hold down: Stop
Press briefly:
In a call context: Rejects a call - hang up
In menus: Return to home page.
Start key: Press briefly:Starts phone
In call context: Call - reception of a call - hands-free mode
Left programmable key:
In home page: Access to certain functions (shortcuts)
In menus: Cancel (or return) as indicated on screen
During call: Reduces volume
Right programmable key:
In home page: Access to certain functions (shortcuts)
In menus: Accept, choose as shown on screen
During call: Increases volume
Top key: Previous choice / reduce value / top
Down key: Next choice / increase value / down
Left key: Up input field / move left
Right key: Down input field / move right
* Key :
Hold down: In home page: Silent mode
Press briefly + OK (right programmable key) activates or
deactivates keypad locking
In call reception mode: Short press stops ring tone
In ring tone setting mode: Activates/deactivates ring tone
# Key: Zoom mode (see message and WAP menus)
Programmable keys and
Shortcut keys
72 pages MYX5-eng 11/8/02 5:57 PM Page 7
8
Principles of navigation
These basic principles bring a great deal of intuitiveness to your
telephone
All the active areas on a white background (icon selector,
programmable keys, menu selector, choice list)
Accept by pressing the right programmable key 4.
Cancel by pressing the left programmable key 3.
The tabs on the sides at the bottom of the screen refer to the
Programmable keys (and not to the left/right keys)
In the menus a title bar recalls the higher level.
The down / up 65 navigation keys are used to navigate
from one menu to another within the same menu structure.
The right programmable key 4is used to go from a menu
to a sub-menu.
The left programmable key 3is used to go from a sub-
menu to a menu.
The first menu level can be identified by a large animated icon
in the centre of the screen.
The second menu level can be identified by a large static icon
in the centre of the screen.
The lowest sub-menus are lists.
The Stop 1key (press briefly) is used to return to the home
page (current function is abandoned).
Menu
Back Select
Sounds
Back Select
Sounds
Ring tones
Volume and ring tone
Back OK
Alarm
Calls
Messages
Fax
1st level
2nd level
3rd level
72 pages MYX5-eng 11/8/02 5:57 PM Page 8

9
Home page
The home page contains the following
1 - The title bar icons:
Battery
Calls forwarded
Call (establishing the call)
Call (hands free)
SMS (reception of an SMS, full SMS)
FAX
DATA
Silent mode
Message in answer phonebox
WAP (@)
GPRS
Home zone
HPLMN / roaming
Keypad locking + WTLS (exclusive functions)
Protected WAP logon
Protected WAP logon icon with certificate
Signal strength level (5 bars).
2 - Date and time,in digital or analogue mode
3 - Network name
4 - Tab centred on bottom line:
the main "menu" tab shows that the menu can be
accessed via the down / up65keys.
The following information may also be displayed:
"1 message received"; or "1 call".
They can be deleted by pressing Stop
1
key briefly.
Menu
Fri 3 May
72 pages MYX5-eng 11/8/02 5:57 PM Page 9
10
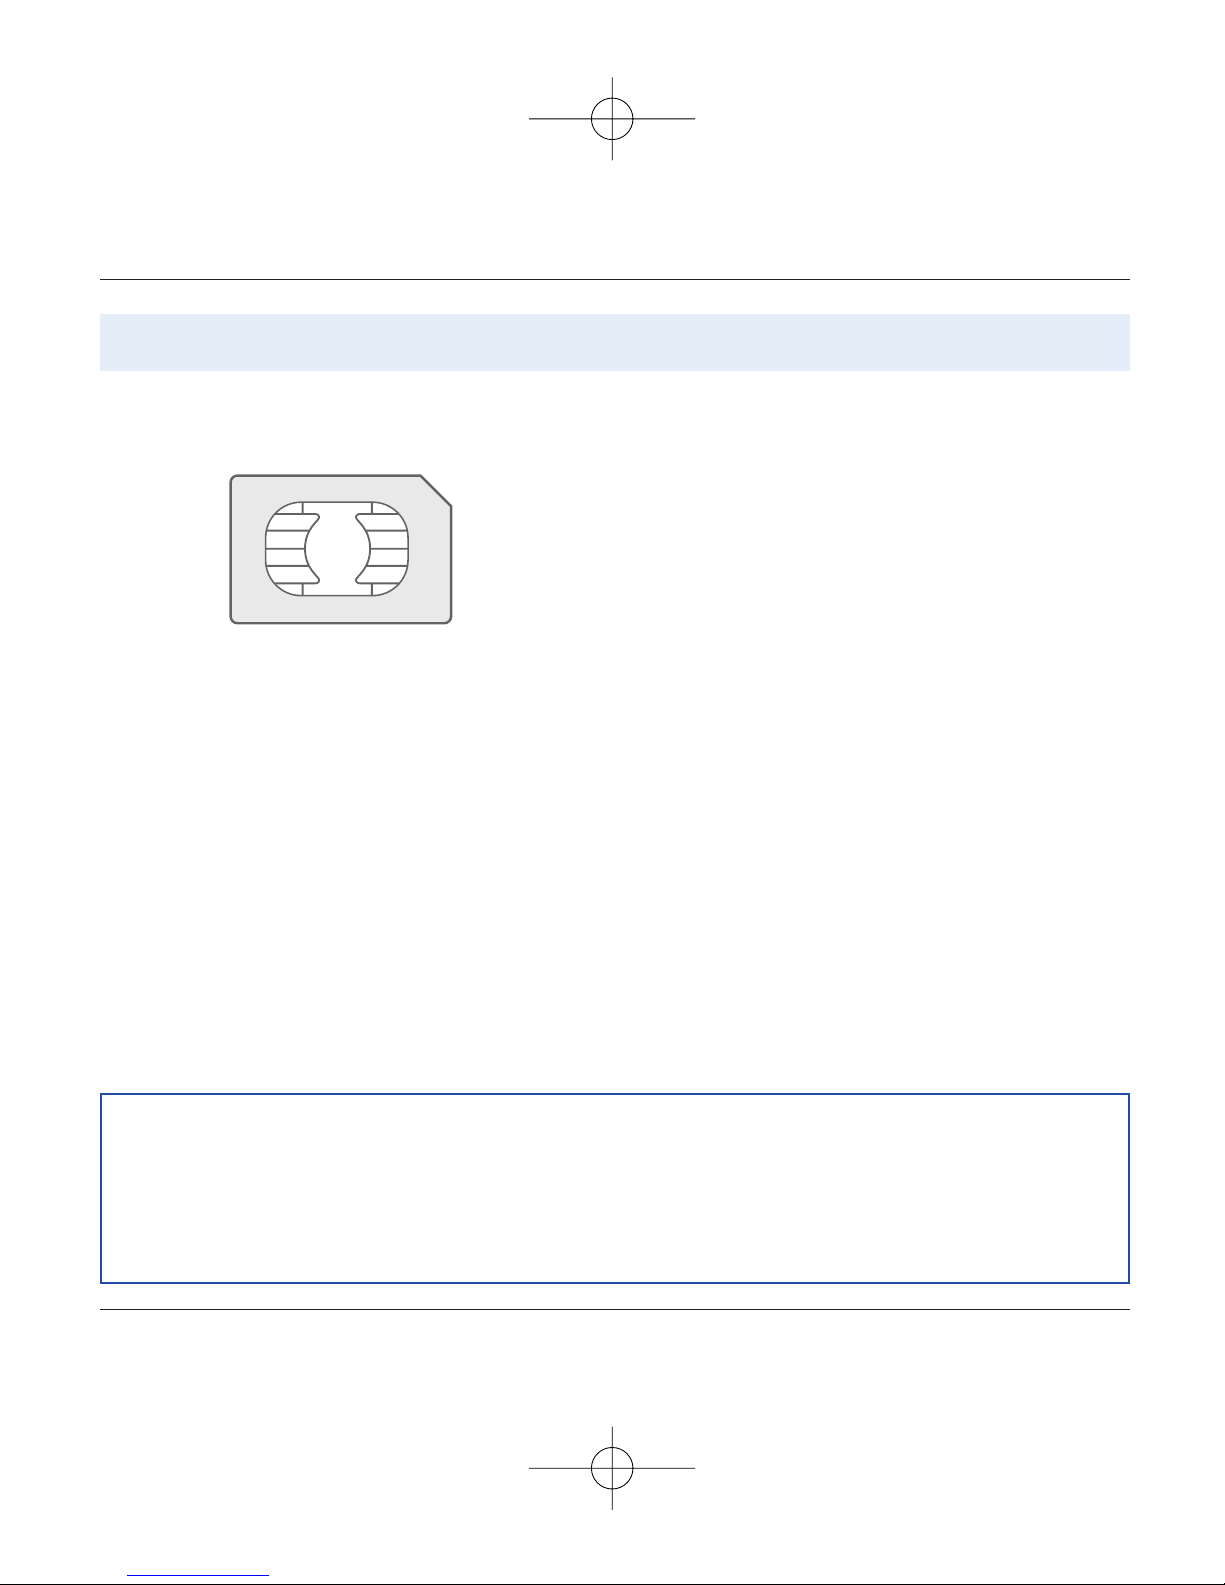
Activating your telephone
To use your telephone, you have a smart card called a
SIM card. It contains all the information needed by the
network as well as other information unique to you
and that you can modify:
Secret codes (PIN(s): Personal Identification Numbers),
these codes allow you to restrict access to your SIM
card.
Phonebook,
Messages,
How special services work.
Your telephone is compatible with the different SIM
cards offered by operators.
It is also compatible with the SIM/WIM cards (cards
containing the WIM module in addition (WIM =
Wireless Identity Module) that is used for secure WAP
communications.
ATTENTION
This card must be handled and stored with care to avoid damaging it by scratching or bending it.
If you should lose your SIM card, contact your operator or your SMC (Services Marketing Company)
immediately.
Comment: do not leave your SIM card within the reach of young children.
Information on the SIM card
72 pages MYX5-eng 11/8/02 5:57 PM Page 10

11
Activating your telephone
The SIM card is inserted under the telephone's battery.
Ensure that the telephone is switched off and the char-
ger disconnected.
Turn telephone over and push lock button upwards.
Remove rear cover by lifting bottom end first.
Take out battery if already installed.
Slide card fully under retaining plate with gold-plated
contacts facing telephone and bevelled corner pointing
as shown on drawing on telephone.
Insert battery into position by first positioning top
section with connectors.
Replace cover by engaging top hook first, then push
down back of rear cover and push button back into
locked position.
12
3
4
5
6
Installing the SIM card and installing the battery
1
2
3
4
5
6
72 pages MYX5-eng 11/8/02 5:57 PM Page 11
12
Using your telephone
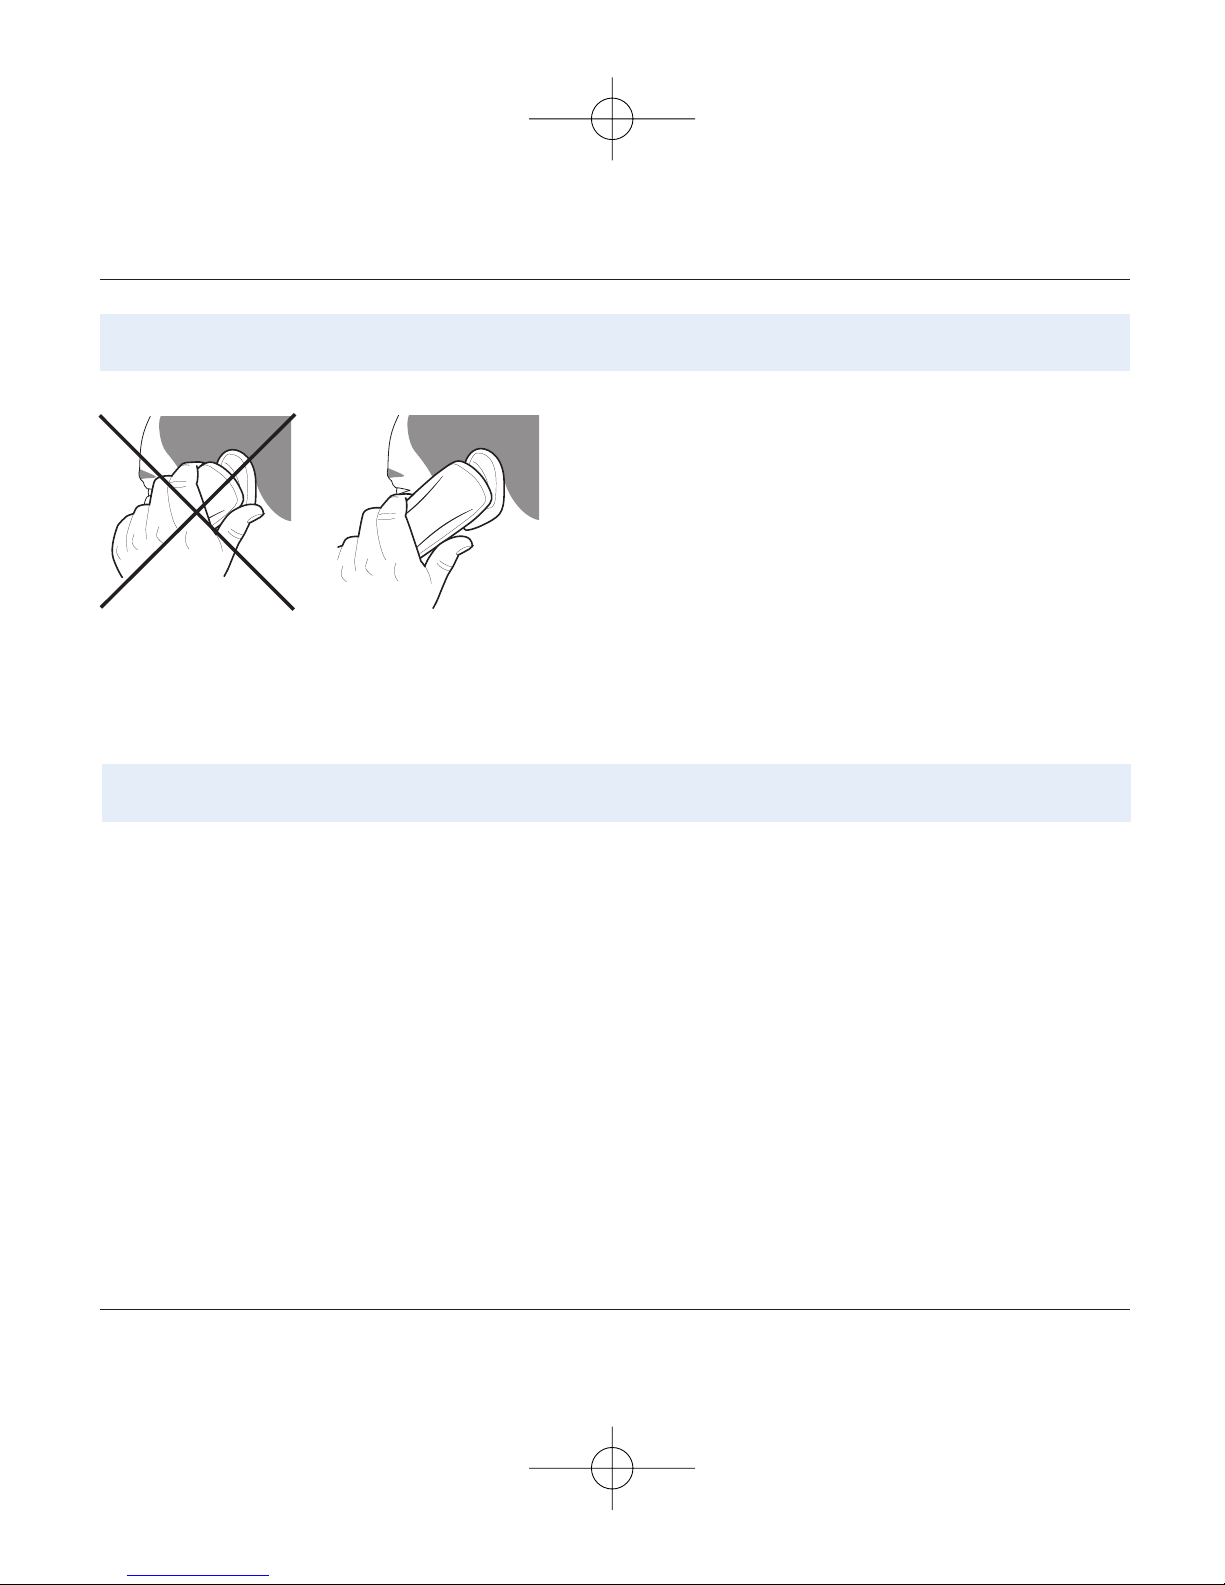
The antenna is embedded in your telephone, under the
back cover at the top.
Avoid putting your fingers on this area when the
telephone is switched ON.
If your fingers obstruct the antenna, the telephone may
have to operate with a higher power level than usual;
decreasing its efficiency quickly. It could also affect the
quality of your communications.
Don't obstruct the antenna with your fingers
-Don't press the keys when not necessary: each
keypress activates the backlight, and uses much
power;
- Don't activate too often the screensaver: a starting
time every 200s or less will require much processing
power;
- Don't obstruct the antenna with your fingers.
Increase the efficiency of your phone
72 pages MYX5-eng 11/8/02 5:57 PM Page 12
Your telephone is powered by a rechargeable battery. A
new battery must be charged for 4 hours at least before
being used for the first time. It reaches its optimum
capacity after a few cycles of use.
When your battery has been discharged, the telephone
displays the state (empty battery icon flashes). In this
case recharge your battery for at least 15 minutes
before making any more calls so as to avoid being cut
off mid-call.
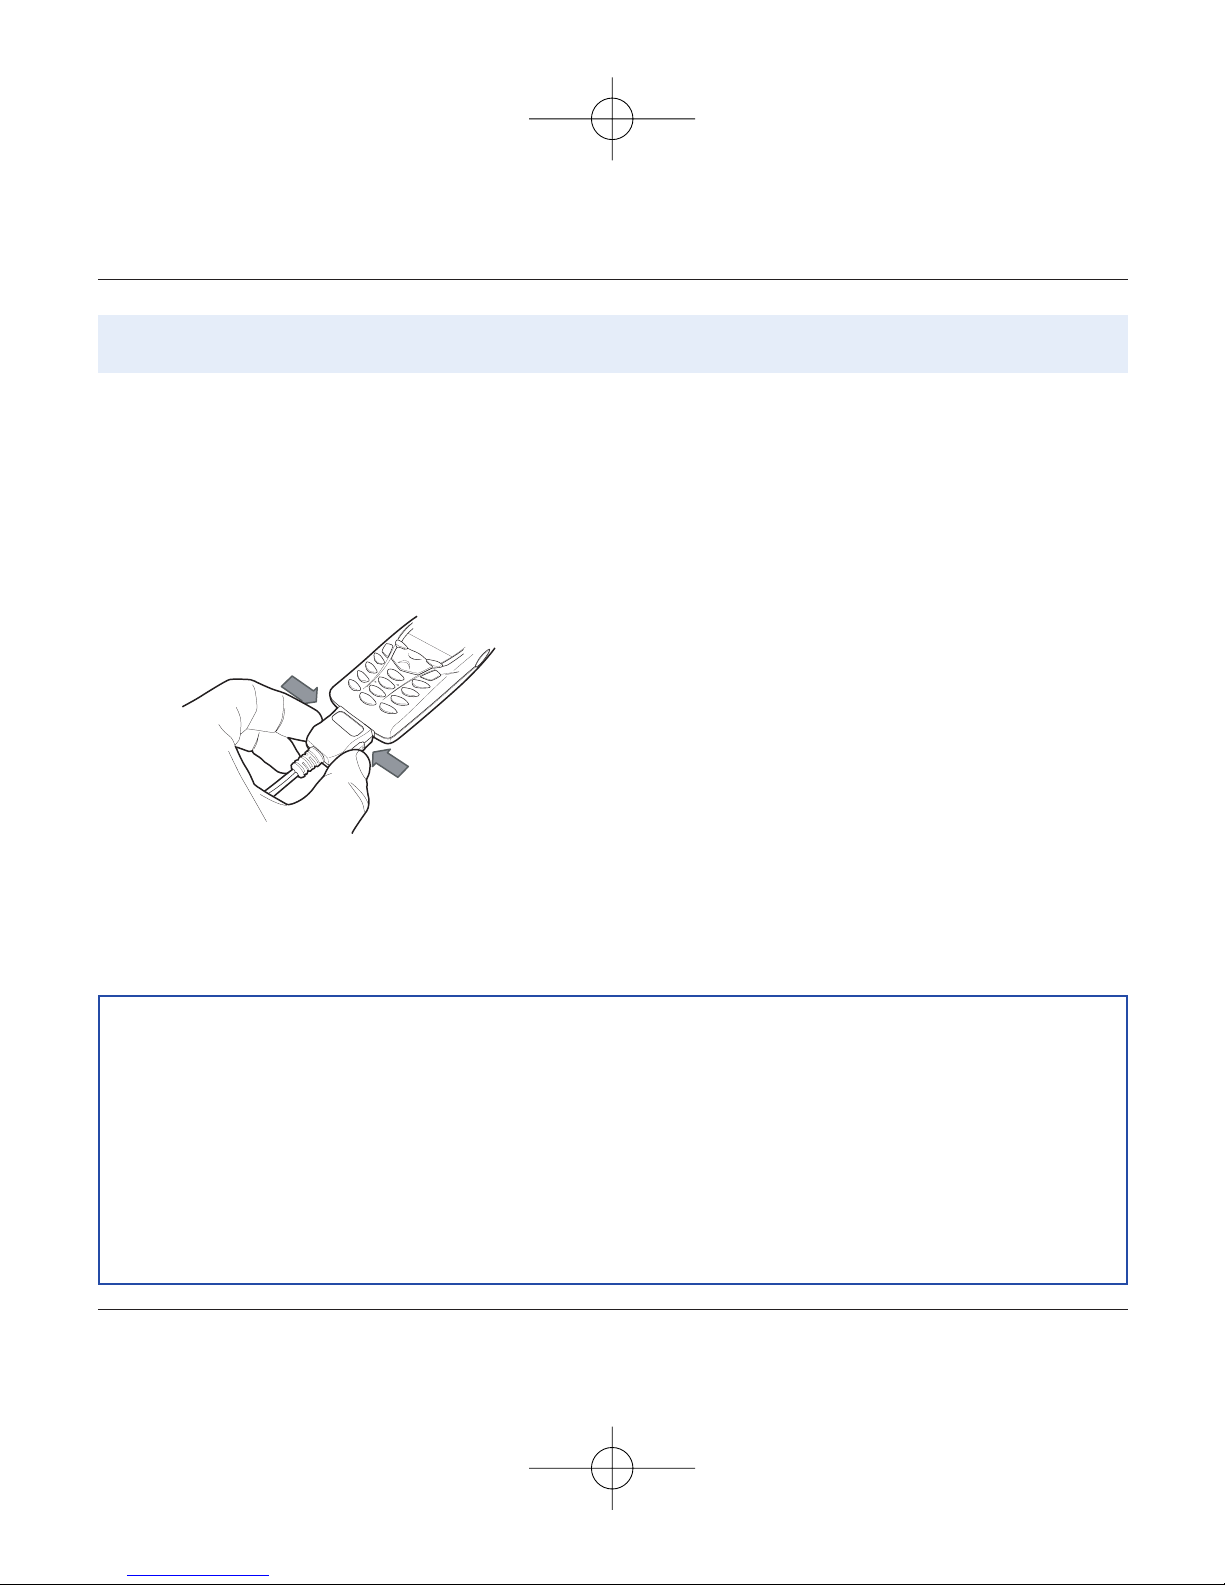
To recharge the battery:
Connect the charger to a mains socket.
Plug the end of the cable into the connector at the base
of the telephone.
The telephone starts to charge up, the battery charging
light flashes to indicate charging. Charging stops by
itself. Disconnect the cable.
It is possible that the battery may heat up slightly du-
ring charging; this phenomenon is normal.
Charging the battery
13
Using your telephone
ATTENTION
There is danger of explosion if the battery is replaced incorrectly or if it is exposed to fire.
Do not short circuit it.
The battery does not have any part that you can change.
Do not try to open the battery casing.
Use only the appropriate chargers and batteries shown in the manufacturer's catalogue.
Used batteries must be disposed of in the appropriate places.
It is advisable to remove the battery if your telephone is not used for extended periods.
72 pages MYX5-eng 11/8/02 5:57 PM Page 13
14
Phonebook
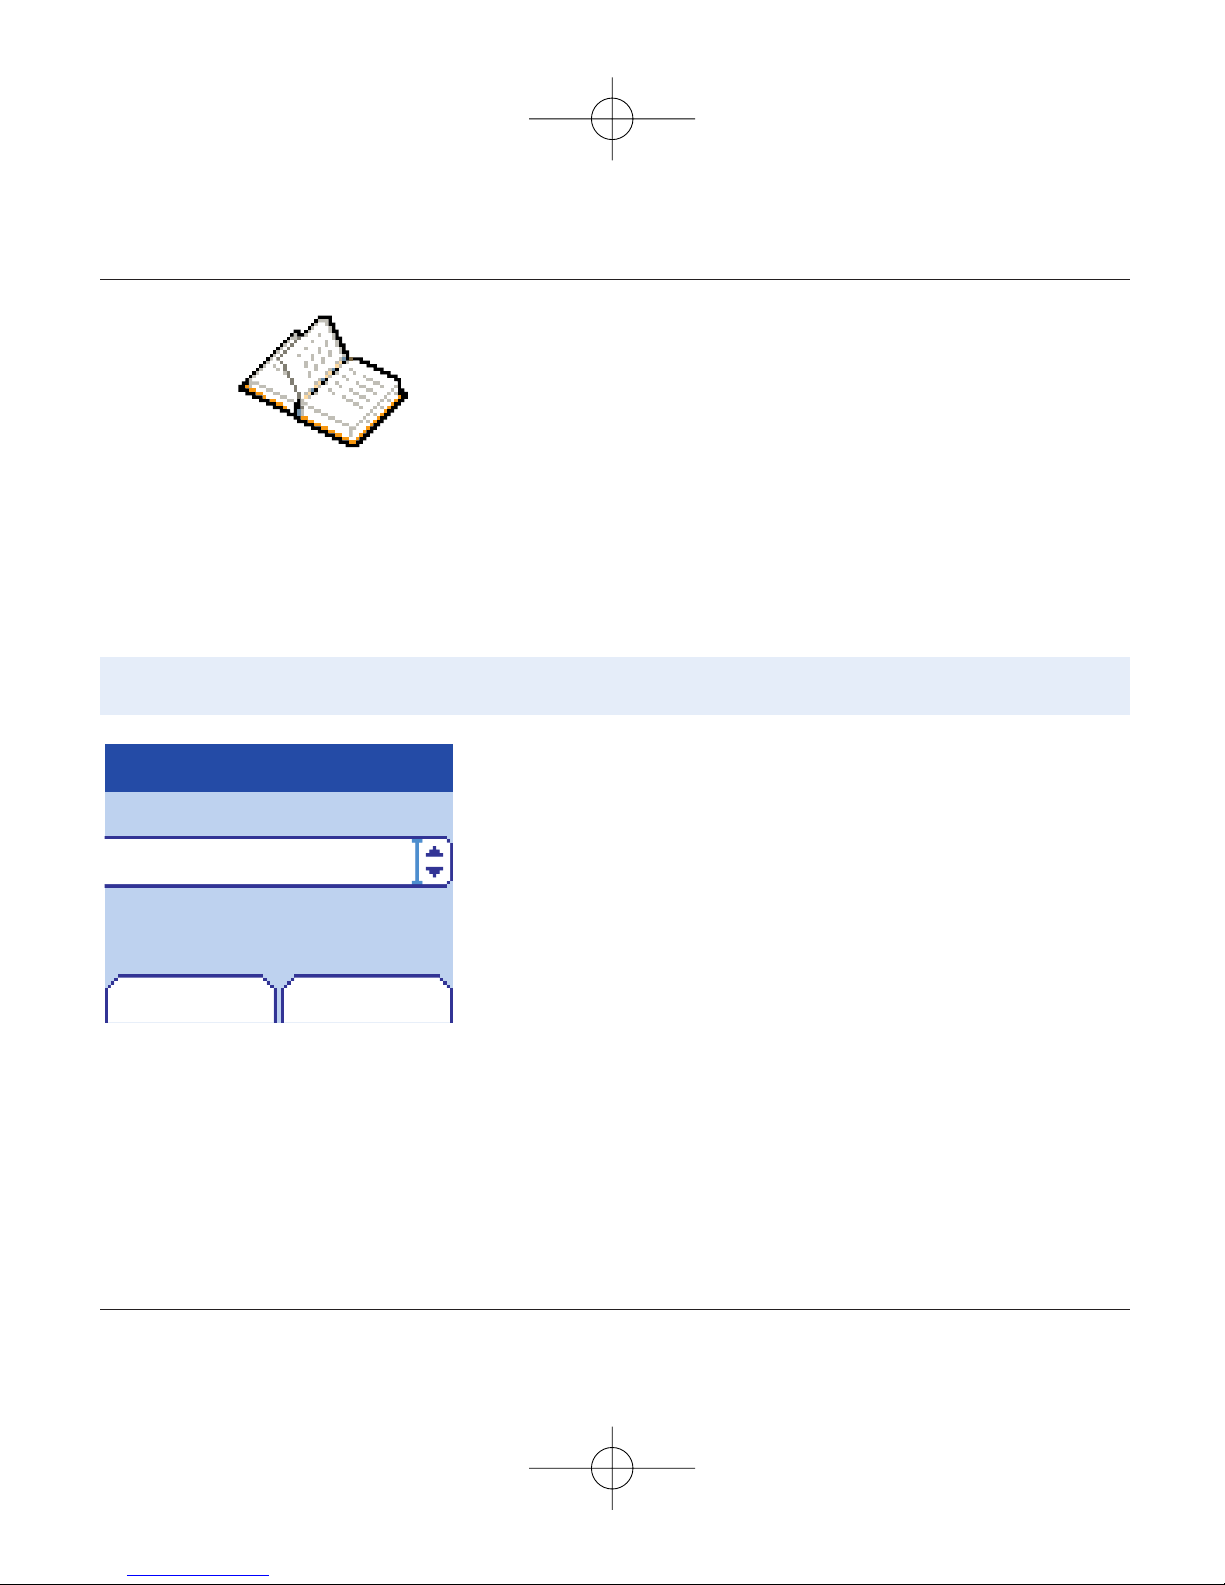
Using the phonebook
In the home page press the down 6key to access the main
menus.The first menu proposed is phonebook.
Press the right programmable key 4corresponding to the
accept tab to enter the menu.
The list of your correspondents appears,by default,the cursor is
positioned on the first name in alphabetical order.
If you are using your telephone and SIM card for the first time,
the phonebook list will be empty, only the Phonebook Menu
function will be available.
The phonebook allows you to store numbers that you call regularly.
These numbers can be stored in the SIM card or in the telephone.
If your telephone has a vCard phonebook (available in myX-5m),
the following fields can be stored in the telephone for each contact:
first name,last name,number 1,number 2,number 3,email,call group,
company,comment,photo, preferred numbers (voice, EMS,SMS).
The list of numbers in the phonebook of the SIM card varies in
relation to the capacity of the card: the supplier company will tell
you what this is.
Phonebook
Back OK
Phonebook Menu
72 pages MYX5-eng 11/8/02 5:57 PM Page 14

15
Phonebook
Back OK
Zoé
Phonebook menu
Emma
Peter
Phonebook
Phonebook menu
OK
Phonebook
Back
My numbers
Add contact
Call groups
Memory
Add contact
Select Add contact and accept and press the right
programmable key 4to enter the menu.
Choose the place where you wish to enter the contact (SIM card
or telephone) using the down / up65keys, and accept.
If the telephone isn’t vCard standard enter the name, number
and call group, select the location (SIM card or telephone
memory) and Accept after each entry. The minimum
information needed to store a contact in the SIM card is a name
or telephone number.
If the telephone is vCard standard and the contact is to be stored
in the telephone memory, select the location (SIM card,
telephone or FDN memory – FDN is available depending on PIN
number 2 options of your SIM card) and enter the contact
information and Accept after each entry. The minimum
information needed to store a contact in the telephone is first
name or last name or one phone number or an email address.All
other fields are not mandatory. If you want to stop the entry of
the following fields,and save the information already entered for
this contact, press the red key and Accept to save.
72 pages MYX5-eng 11/8/02 5:57 PM Page 15

16
Phonebook
Phonebook
OK
You can also enter a letter in the phonebook list screen,to directly access the first
contact starting with this letter.
If you know the memory number of this contact on the SIM card (say 21 for
example),you can enter 21* directly from the idle screen.
Select a contact from the list using the down / up65keys.
Then press the right programmable key 4.
Choose from the options offered:
See contact
The first menu proposed is See contact.Enter.
Press the right programmable key 4to view this contact.
Details of the store appears (name,phone number,call group,and
some other details if your Phonebook is VCard).
Further screens display the other details of the contact:
Press right programmable key 4to view the 3 phone numbers
the email address, company and comment for this contact.
Press the Start key
2
from any of these screens to call this
contact.Press the left programmable key 3to return to the
phonebook.
Copy to sim
See contact
Modify contact
Delete
Back
Different icons inform you of the position in the phonebook where
the contact is stored:
contact stored in the SIM card
contact stored in the phone
contact stored in the phone, with a VCard format
your SIM card’s forbidden calls: if the FDN option is activated , then
you will be able to read those contacts,but you won’t be allowed to
call them. See PIN number 2 and Fixed Dialling in Security Menu for
more details about this activation.
Phonebook
Back Options
Phonebook Menu
Emma
Peter
Steve
72 pages MYX5-eng 11/8/02 5:57 PM Page 16

17
Phonebook
Phonebook menu
Modify contact
Modify contact.Enter.Using the down6key.
If the contact stored on the Sim or the telephone is not vCard
standard you can modify the name, number and call group if
required, and Accept.
If your phone is vCard standard and the contact is stored in
memory, you can modify the first name, last name, number 1,
number 2, number 3, email, call group, company, comment, photo,
preferred numbers (voice, SMS, MMS) if required, and Accept.
Copy to SIM / Copy to phone
This allows you to copy your phonebook entries from one memory
to the other. Only the name,first phone number and the call group
will be copied.
Select Copy to SIM or Copy to phone.Enter.
Delete
Select Delete.Enter.
Confirm deletion of entry with Yes.
Call
Select Call.Press the right programmable key 4to start the call.
You can also select the party to be called from the phonebook, and
press the Start
2
key to make the call.
The phonebook menu allows you to create new contacts, to create call groups and
to check the memory available to store new contacts.
Phonebook
OK
Copy to sim
Modify contact
Delete
Back
Phonebook
Back
Prefered Postcard
Last name
First name
Number1
OK
72 pages MYX5-eng 11/8/02 5:57 PM Page 17

18
Phonebook
Phonebook menu
Send message
Select Send message.Accept.
Text editor opens automatically.
In the Phonebook screen,press the right programmable key
4to enter the menu.
Press the up5key to position the cursor on the Phonebook
menu and accept.
Choose from the options offered (add contact,call group,memory,
my numbers).
Call groups
(See page 19)
Memory
Select memory and accept.
The screen displays the locations used on the SIM Card and
in the telephone itself ; if the telephone is vCard, the screen
displays the amount of memory used.
My numbers
You can create the entries corresponding to your own numbers
in order to consult them when necessary.
Select My numbers and accept.
Enter the different details and accept.
Phonebook
OK
Copy to sim
Send Message
Modify contact
Delete
Back
Phonebook
Available memory
Back
95,1 %
72 pages MYX5-eng 11/8/02 5:57 PM Page 18

19
Phonebook
Call groups
Phonebook
Back OK
Creating new groups:
Do same as above to obtain the phonebook menu and accept.
Press down6key to position the cursor on Call groups and
enter.
By default, the cursor is placed on Call groups menu,accept.
Choose one of the options offered (Create group or memory
available).
Creating a group
By default, the cursor is placed on Create group, enter.
Enter group name and accept.
Choose the icon,ring tone and vibrate mode that you want to
allocate to this group (accept after each step).
Memory
Select memory and OK.
The screen displays the number of locations available for new
groups.
You have the facility to group your contacts into call groups.
It is possible to allocate characteristics to each group (icon, ring
tone, vibrate).
6 default call groups have already been created.You can create others.
Add contact
Call groups
Memory
My numbers
Call groups
Back Options
VIP
Call groups menu
Colleagues
Customers
72 pages MYX5-eng 11/8/02 5:57 PM Page 19
Other manuals for My X-5
3
Table of contents
Other Sagem Cell Phone manuals


