Sagola 3000 ZEUS User manual

www.sagola.com
an Elcometer company
instruction manual
使用說明書
www.sagola.comwww.sagola.com
SAGOLA 3000 ZEUS
an Elcometer company
Spray gun • 噴槍

an Elcometer company

www.sagola.com
an Elcometer company
EN 03
Index
Original version in Spanish
OPERATING AND MAINTENANCE INSTRUCTIONS
FOR SPRAYING EQUIPMENT
01 Warning page 04
02 Meaning of the pictograms page 04
03 Introduction page 04
04 Technical details page 04
05 Components page 06
06 Warnings page 06
07 Useful tips page 07
08 Functional description of the unit page 09
09 Tips and Needles Kits page 09
10 Kits air nozzle page 09
11 Start up page 10
12 Maintenance page 12
13 Parts list page 15
14 Cleaning page 18
15 Lubrication page 19
16 Health and Safety page 19
17 Observations page 21
18 Warranty Conditions page 21
19 Disposal page 21
20 Troubleshooting Table page 22
21 Conformity declaration page 24

www.sagola.com
an Elcometer company
ES 04
01. Warning
Before starting the unit you must read, take into consideration and comply with all the
indications described in this Manual.
This manual must be kept in a safe place, accessible to all users of the unit.
The unit must be started and handled exclusively by personnel instructed in its use and must be
employed only for the purpose for which it was designed.
Likewise, accident prevention standards, regulations, work centre directives and current legislation and
restrictions must be taken into consideration at all times.
The logotypes of SAGOLA and other SAGOLA products mentioned in this manual, are registered
trademarks or brand names of the company SAGOLA S.A.U.
02. Meaning of the pictograms
03. Introduction
This unit belongs a the family of devices designed to spray products
with compressed air with a spray gun, providing a high level of product
transfer (T > 65%) and excellent quality finish, as well as low levels of
contamination.
The equipment consists of the following:
• Spray gun • Accessory wrench
• Cleaning brush • Instruction manual Web
• Case
04. Technical details
Spraygun with product-feed by gravity withTip and Air Nozzle of the type described in the packaging.
Product cups:
Refer to the manual/
instruction leaflet
Important
information Danger (user) Safety glasses
is mandatory
Hearing protection Mandatory respiratory
protection Gloves required Sprayed product
Metal
cup
with lid
SAGOLA DPC disposable
paint cups
Plastic
cup with
non-drip
cap
1 litro
100 ml
200 ml
400 ml
600 ml
800 ml
650 ml

www.sagola.com
an Elcometer company
EN 05
SAGOLA 3000 ZEUS Technical details
SAGOLA 3000 ZEUS
Weight (without cup) 474,8 g.
1.05 lb.
Weight (with cup) 662,4 g.
1.46 lb.
Dimensions 182 x 19 x 178 mm.
7.16 x 0.75 x 7.05 "
Air inlet BSP 1/4“ M
Temperature range from 0 to 60 C
from 32 to 140 F
Product inlet M12 x 1,5” F
Maximum Air pressure 8bar
116 psi
Recommended
air pressure
from 1.4 to 2.2 bar
from 20.3 to 31.9 psi
Recommended
air pressure HVLP
1. 8 bar
26 psi
Materials in contact
with product
Anodized aluminum, STAINLESS steel, PTFE, POM and Nylon
Recommended
EPA aircaps
application distance
from 15 to 20 cm.
from 5.9 to 7. 9 inches
Recommended
HVLP aircaps
application distance
from 12 to 15 cm.
from 4.7 to 6inches
ATEX Normative
Community Directive 2014/34/UE
NON Electric equipments II 2G T4 x (*)
(*) Non electric gun in explosion hazard areas (ATEX) must have the earthing connections
and/or static-free feed hoses.

www.sagola.com
an Elcometer company
EN 06
05. Components
1 Air nozzle
2 Head packing gland
3 Trigger
4 Valve packing gland
5 Air inlet
6 Air valve
7 Product regulator
8 Spray width regulator
9 Product filter
10 Non drip plug
11 Air flow regulator
12 Product Cup
06. Warnings
Before putting the unit into operation, and especially after each cleaning and/or repair operation, a
check must be made that the gun components are securely tightened and that the air and/or product
hoses are airtight (no air leaks). Faulty parts must be replaced or repaired as appropriate.
The gun is easy to handle thanks to its design and the simplicity of its mechanisms. No special
training is required for handling the gun. Use the gun according to the operating, maintenance and
safety instructions indicated in this manual and follow the application methods indicated to obtain
the required quality of finish.
Before putting the unit into operation, we recommend you to clean the gun as this has been
subjected to functional tests and before packaging it is treated internally with a protective coating, some
of which may still remain. Apply thinner to eliminate this. Remove any residual grease applied during
assembly.
Ensure that the products to be applied are chemically compatible with the components these
come into contact with (Anodised Aluminium, stainless steel, PTFE, POM and Nylon).
Do not use corrosive or abrasive products.
The gun has been designed for long service and can be used with the majority of the products
available on the market. Its use with highly aggressive products will quickly increase the need for
maintenance and spares. If you need to apply special products, please contact SAGOLA S.A.U.
Read and apply all the information, instructions and safety measures indicated by the manufacturer
of the products to be applied (thinners, etc.) as these may provoke chemical reactions, fires and/
or explosions, or be toxic, irritant or harmful and in all cases dangerous for the health and
personal safety of the user and of other persons nearby (see chapter on Safety and Health).
5
23
1
9
11
12
10
6
4
7
8

www.sagola.com
an Elcometer company
EN 07
Mix, prepare and filter the product to be applied in accordance with
the manufacturer’s instructions, ensuring that any foreign bodies are
prevented from spoiling the quality of finish and application. Should
there be any doubt relating to the purity of the product, its composition,
etc., please contact your supplier.
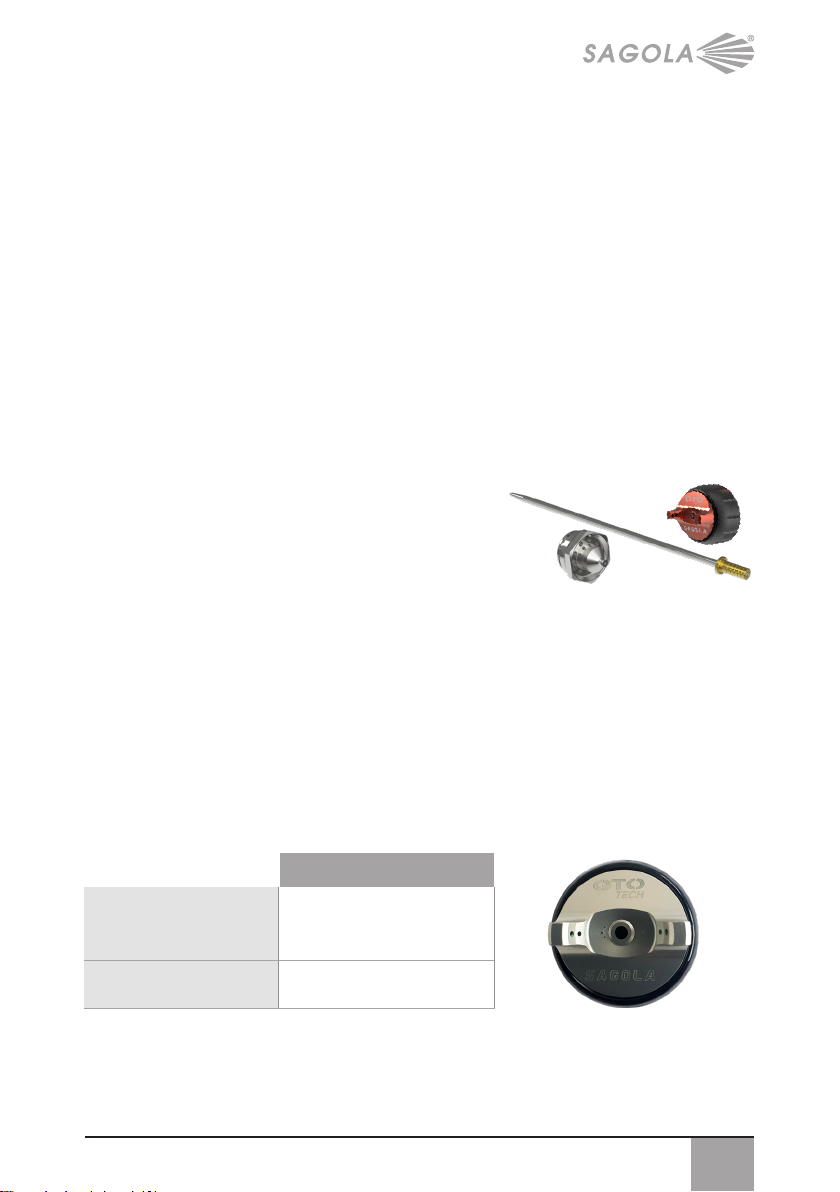
Control the viscosity of the product to be applied with the SAGOLA
Viscosimeter - Código 56418001
07. Useful tips
07.1.- General advice
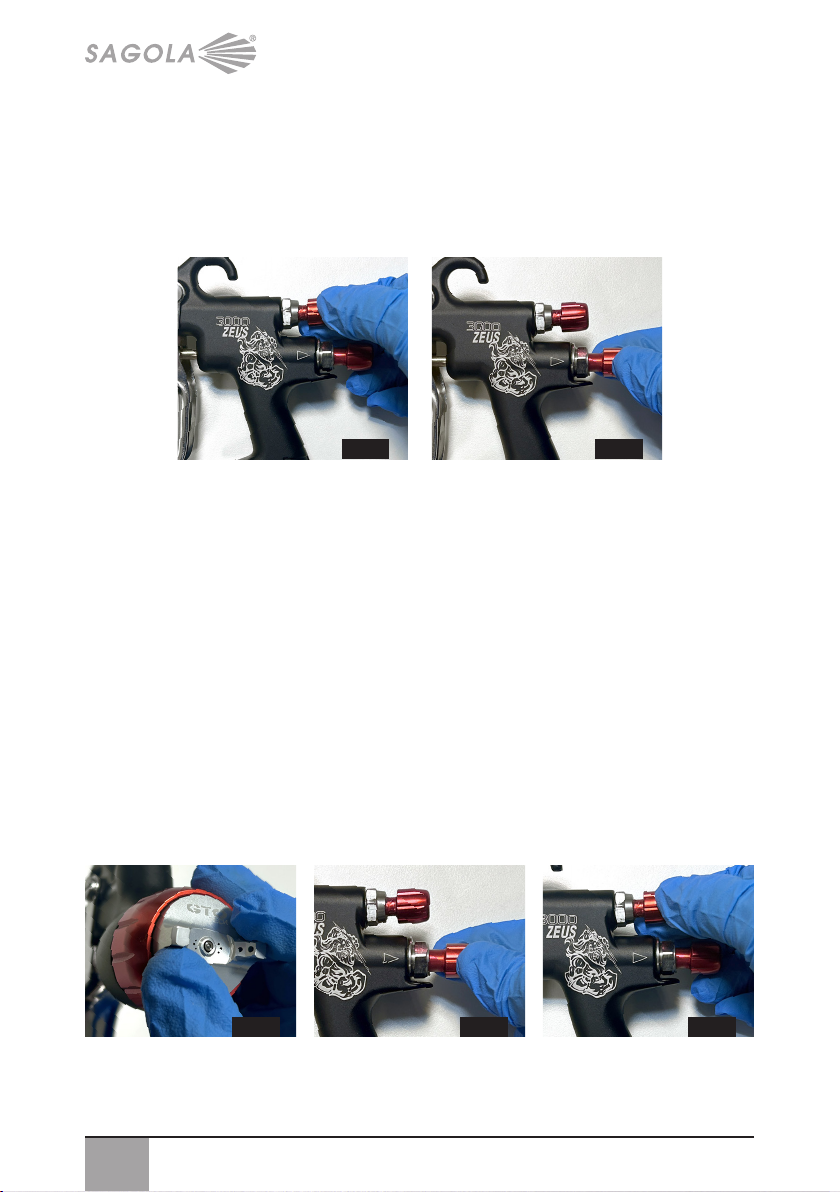
You are recommended to use the gun with the product regulator open (without removing it
completely from its housing) in order to minimise wear to the fluid tip and needle and to ensure
maximum amplitude.
Use the lowest spray pressure in the nozzle that allows you to obtain
the required finish. Not all products require the maximum pressure
for correct spraying.With a lower pressure, less air is consumed and
there is an additional increase in product transfer.
The gun leaves the factory ready to spray products correctly with
the air nozzle corresponding to each application. It is adjusted to an
air inlet pressure of 2 bar to ensure maximum performance.
Pay special attention to the application speed. The thickness of the film deposited may be greater
than planned if the application speed is low, and the opposite is also true..
If the thickness of the layer is very thin, this is due to the fact that the air pressure is excessive
for the amount of product being applied. Reduce the air pressure in the gun in order to ensure that
the solvent in the paint does not evaporate during spraying and that this is not dry when it reaches the
surface to be painted. Increase the amount of product, correct its viscosity or use a larger fluid
tip in the gun.
If the film is thick, this is due to the fact that the air pressure is excessive for the amount of product to
be applied. Decrease the amount of product, reduce its viscosity or use a smaller fluid tip in the gun.
If sagging occurs, this is due to the fact that the amount
of product to be applied is excessive for the air pressure
used, that the viscosity is not correct or the application
speed is not adequate. Decrease the amount of
product, adjust its viscosity or increase the
application speed until the required finish is obtained.
The spraying width (spraying pattern) obtained will
depend on the air nozzle used. If nozzles are required
for other applications, contact the Technical Service
of SAGOLA S.A.U.
The size or amplitude of the spraying pattern can be
modified with the spray width regulator, by turning
the control anticlockwise to increase this or clockwise to
reduce this.
Ford No.4

www.sagola.com
an Elcometer company
EN 08
07.2.- Tips for application in different climatic zones
Paint application, especially waterbone paints.
• Extreme climate conditions: The use of additives in the paint may be
required (see paint manufacturer specifications).
• Recommendations:
- Increase the peak size from 0.1 to 0.2 mm. compared to the one used in
normal conditions.
- Reduce the size of the fan by making it more rounded and with a central
core more loaded with product.
• Critical climate conditions: The use of additives in the paint may be
required (see paint manufacturer specifications). Reduction of the fan and
increase of the spray core in a critical climate.
• Recommendations:
- Reduce the dynamic pressure between 0.2 and 0.5 bar compared to that
used in normal conditions.
- Increase the size of the peak from 0.1 to 0.2 compared to that used in
normal conditions.
- Increase the product load in the central core of the fan.
• Non-critical climate conditions: The use of additives in the paint may be
required (see paint manufacturer specifications).
• Recommendations: Standard fan pattern.
• Optimum climate conditions:
• Recommendations: Optimum fan pattern.
Standard
fan
pattern
Critical
climate
fan pattern
Extreme climate
fan pattern
Optimum
fan
pattern
10
20
30
40
50
10 20 30 40 50 60 70 80 90 100
Temperature (oC)
RH (%)
Do not apply paint in these conditions

www.sagola.com
an Elcometer company
EN 09
08. Functional Description of the Equipment
The SAGOLA gun model 3000 ZEUS can be used for applying appropriately diluted products (paints,
lacquers, varnishes, adhesives, etc.), used widely in the automotive industry, timber industry,
plastics, etc.
Compressed air for spraying is connected to the air input connector under the gun grip.
The product to be applied is placed in the cup provided for this purpose, from which it flows by gravity
to the fluid tip and is then mixed with spraying air in a way that can be controlled from outside the air
nozzle.
When the trigger is pulled back to the first position, it engages the air valve stem, opening this and
allowing air to flow through.
When the trigger is pulled back fully, the product needle is retracted, allowing the product to flow
out. This is then sprayed in the form of a fan.
When the trigger is released, the needle returns to its initial position, first closing off the product
outlet and then the air valve and application stops.
09. Tips and Needles Kits
SAGOLA supplies Nozzle Kits and Tip and Needle Kits of
different sizes for a variety of different applications. In order to
replace these, proceed as follows:
With the gun fully depressurised, remove the air nozzle.
Remove the Product Regulator with the spring and the spring stop and extract the needle to be
replaced. Remove the tip with the wrench supplied.
Fit the new tip and tighten. Now fit, in this order, the new needle, the spring and spring stop and
the product regulator. Lastly, fit the appropriate air nozzle.
There are Tip + needle Kits for this model of Ø 1.20, 1.30 and 1.40.
10. Air Nozzle Kits
Air Nozzle Kits:
GTO TECH.
GTO TECH
Air
consumption
L/min 285 L/min
Pressure
Bar 2 Bar

www.sagola.com
an Elcometer company
EN 10
11. Start-up
Before each start-up and especially after cleaning or repairing the unit, a check must be made that all
its elements are securely tightened.
If maintenance or repair work is to be carried out, the gun must be depressurised before work
begins (without air pressure). Should this safety measure not be observed, this may lead to
malfunctions, personal injury and accidents, which may prove to be fatal. SAGOLA S.A.U. does
not accept any responsibility for the consequences of any non-compliance with these safety regulations.
Open the spray width and product regulators completely (without removing these from their housing)
by turning these anticlockwise. (See Fig.01 and Fig.02)
Place the pistol on a support so that the axis of the tank is vertical. Pour the product to apply into the
tank. Until the level is a maximum of 20-25 mm below the edge of the tank.
Tighten the filler cap firmly. In the version with the non-drip cap, tip it forward (paint up) or back (paint
down) as necessary.
Connect the gun to the compressed air network.
Adjust the air pressure in hte network regulator in order to compensate for any pressure drop in the
network (estimated at 0.6 bar for each 10 m. of hose).
Adjust the air pressure in the air nozzle by operating the flow regulator until the required quality
of finish is obtained (better finishes are not obtained with higher spraying pressures and these lead to
lower performance and worse product transfer).
Position the air nozzle spraying orifices appropriately (when an imaginary line is drawn through
the 2 lugs, this must beparallel or perpendicular to the floor) (Fig.04). Fully close the product regulator
by turning it clockwise; and perform the desired application test, adjusting the product regulators and
range as follows:
Open the product regulator until the appropriate amount of product comes out. Now you have the
maximum spraying width (spraying pattern). You can reduce this according to your needs by closing the
spray width regulator. (see Fig.05 and 06)
Fig.01 Fig.02
Fig.04 Fig.05 Fig.06

www.sagola.com
an Elcometer company
EN 11
Please be sure that you put the spray gun properly by keeping its perpendicularity to the piece
to be painted in order to achieve the maximum transfer of the sprayed product and obtain the
best finishing quality
11.1.- Clean Air
The air used for spraying must reach the gun free of impurities, aerosols, oil, silicone and solid
particles. To do this you must eliminate these with coalescent filter units.
The use of air treatment equipment with built-in pressure regulators is recommended
(SAGOLA 5200X, 5300X or 5300X Plus models).
11.2. Sufcient volume of air
A sufficient volume of air can be supplied to the gun by means of an air compressor of adequate
power (1HP equals 110 L/min approximately), a good compressed air network and by avoiding pressure
drops through the use of antistatic, silicon-free air hoses with a minimum inside diameter of 8 mm.
and resistant to the spraying air pressure (minimum 20 bar) and to the aggressive effects of paint
solvents. Before assembling the air network, you must check on the air tightness of the hose.
Use antistatic air hoses. Should an antistatic air hose not be
available, you must attach the unit to a ground connection in order
to eliminate any static electricity.
The total derivative resistance must be <1 million Ohms.
11.3. Adjusting Air Pressure
The gun leaves the factory with the internal flow regulator fully
open. In order to adjust this to the required pressure, turn the
regulator clockwise to reduce the inlet pressure and anticlockwise
to increase this.

www.sagola.com
an Elcometer company
EN 12
11.4. Amount of Product to be applied
Once the product to be applied has been adequately diluted, turn
the Product Regulator clockwise to reduce the amount of product
and anticlockwise to increase this.
During application, the amount of product applicable in areas that
are small or difficult to access can be reduced by reducing the
pressure applied with one’s finger.
11.5. Application distance
Adjust the distance between the air nozzle and the object to
cover to between 10 and 20 cm., depending on the application,
in accordance with this, the product to be applied and working
conditions, in order to increase transfer and obtain a reduction in
the amount of mist in accordance with the air nozzle used in each
case.
12. Maintenance
In order to carry out maintenance, repairs or cleaning, first disconnect the unit from the compressed
air distribution network.
Do not apply excessive force or inadequate tools for maintaining and cleaning the unit. Some
repairs must be done with special tools on some occasions.
In these cases, you must contact the Customer Service of SAGOLA. Any handling of this product by
non-authorised personnel would render the warranty null and void.
The unit must be overhauled on a periodic basis to check the status of its components and replace
these when they are not in perfect condition.
In order to obtain the best possible results, always use ORIGINAL
SPARES. ensure total interchangeability, safety and operation.
12.1. Changing the self-adjusting Packing gland
The needle gaskets (packing gland) that form part of the packing gland are gun components that
should be replaced when malfunctions occur or when there is a loss of air tightness.
• Gun head packing gland: In order to replace the packing gland, remove the product regulator (No.20)
(see Fig.01), and extract the product needle and spring fitted with its stop (see Fig.02). With a 13 mm.
fixed wrench, remove the packing gland to be replaced. Replace the packing gland and reassemble in
the reverse order (see Fig.03).

www.sagola.com
an Elcometer company
EN 13
• Changing seat valve: For removal of the valve seat; remove the product regulator and extract the
product needle and spring fitted with its stop. (See Fig.01 and 02). With a 9 mm Allen wrench, remove
the guide box, extracting the valve spring and the valve (see Fig.04 , 05 and Fig.06).
After take the key assembly supplied with the gun and proceed to remove the valve seat with hook key.
(See Fig.07 and 08)
For assembly, follow the reserve procedure. (see Fig.08)
• Packing gland of the air valve: Remove the product regulator and extract the product needle
and spring fitted with its stop (see Fig.01 and 02). With a 9 mm. Allen wrench, remove the guide box,
extracting the valve spring and the valve (see Fig.03, 04, 05 and 06).
Them with a 6 mm.Allen wrench, remove the packing gland and extract the gasket (see Fig.09 and 10).
Replace the packing gland and the washing support gasket (supplied in the specific kit) and follow the
reverse procedure.
Fig.01
Fig.04
Fig.03
Fig.06
Fig.02
Fig.05
Fig.07 Fig.08
Fig.09 Fig.10

www.sagola.com
an Elcometer company
EN 14
12.2. Cleaning or replacement of the product lter
If there is any cleaning liquid or product remaining in the tank, return it to its corresponding containers.
To avoid any spillage, keep the pistol in a vertical position and clean as thoroughly as possible.
Holding the pistol firmly by the handle, disassemble the tank by
unscrewing it from the body of the pistol.
Extract the product filter and if there is any cleaning liquid or product
remaining in the body of the pistol, return it to its corresponding container.
Clean or replace the product filter as needed, taking into account that
the impurities will cause defects in the finish and/or obstructions.
Assemble the product filter again, inserting it all the way into the hole in the input connector.
Fit the tank by screwing it firmly onto the body of the pistol, to avoid product leaks.
Tighten the filler cap firmly.
In the version with the non-drip cap, tip it forward (paint up) or back (paint down) as necessary.
Check there are no leaks.

www.sagola.com
an Elcometer company
EN 15
13. Parts list
This drawing is not the bill of materials.

www.sagola.com
an Elcometer company
EN 16
14. Cleaning
When work has been completed, both the gun and the product cup must be cleaned with the
appropriate thinner, in order to remove any remaining product.
Empty the product cup and pour in the thinner, fit and close the cup cover.
Operate the mechanisms and spray the thinner until the application is clean. Repeat the operation as
many times as may be necessary. Remove any remains of product from the gun and cup with a cloth
soaked in thinner.
Keep air gasket areas free of accretions and foreign bodies.
The air nozzle is a precision component. Any deformation,
especially in the air outlet orifices, may cause malfunctions
in its operation and incorrect or deficient quality spraying. If
necessary, dip the air nozzle in thinner in order to soften the
remains of product or dirt. Once softened, blow the nozzle with
compressed air until any remains of product and thinner are
eliminated.
Should it be necessary to remove the air nozzle, do this with
an appropriate, soft object, with great care and avoiding any
marking or scratching.
Release the elastic ring that holds its components together.
Once disassembled, clean with thinner, using the cleaning brush supplied.
DO NOT USE any hard or metallic object. The blocked orifices of the
nozzle must not be cleaned with a sharp or hard object under any
circumstances.
Assemble the nozzle.
For automatic cleaning of the gun, tools and accessories used in the mixing and preparation of the
product to be applied, we recommend the use of SAGOLA washing machines.
The gun can be cleaned with thinners or detergents in a gun washing machine. If you opt for this
cleaning system, we advise you to remember the following considerations, which, if not applied, may
damage the gun and render the warranty null and void:
- Do not submerge the gun in solvent or detergents longer than the
time required for cleaning.
- Do not use the gun immediately after cleaning has been completed.
- Ensure that there is no thinner or detergent inside and that it is
completely free of these substances. Other cleaning systems can
be used (ultrasound).

www.sagola.com
an Elcometer company
EN 17
15. Lubrication
The original lubrication of the gun is eliminated through
use and cleaning. In order to guarantee perfect operation,
it is necessary to grease the regulating or fastening
threads, friction areas, etc., on a periodic basis, especially
after each cleaning session and with greater care if the gun
has been cleaned in a machine. Moving parts must be
lubricated lightly after cleaning has been completed.
We recommend you to use a light SAE 10 oil or natural
grease or vasoline.
It is important to check that the lubricant used does not
contain components that might impair the spraying
quality (Silicones, etc.).
16. Health and Safety
In order to carry out maintenance, repairs or cleaning, first disconnect the unit from the compressed
air distribution network.
• Safe disconnection from the compressed air network:
If there is any cleaning liquid or product remaining in the tank, return it to its corresponding container.
If the pneumatic connector is fitted in the air inlet, disconnect the hose from the pistol. If it is not,
depressurise the air hose properly and, using a spanner, unscrew the end of the hose from the air inlet
connector, holding the pistol firmly.
• Safe connection to the compressed air network:
If the pneumatic connector is fitted in the air inlet, connect the hose to the pistol. If it is not, hold the
pistol firmly and, using a spanner, screw the end of the hose into the air inlet connector. Check there
are no leaks.
• Safe disconnection of the product tank:
Carry out the cleaning according to point 15. Disconnect the tank by unscrewing the product inlet
connector, holding the body of the pistol firmly.
• Safe connection of the product tank:
Connect the tank by screwing on the product inlet connector, holding the body of the pistol firmly. Check
there are no leaks.
Never point the unit towards yourself, others or animals. The thinners and dilution
media used can cause serious injury.
We recommend using this unit in premises with forced ventilation and in accordance with the
current standards and provisions on the matter.
Near the unit, only keep the amount of product and thinner required for the work being done at that
time. After work has been completed, thinners and the product to be applied must be returned to their
corresponding storage location.
Keep the working area clean and free of potentially dangerous waste (thinners, rags, etc...).
While work is in progress, there must not be any source of ignition (naked
flames, lighted cigarettes, etc.) in the working area as these might generate
easily flammable gases. Likewise, the approved protective means must be used
(breathing, hearing, etc.) in accordance with the regulations established in this
regard.
If the unit is used in an inadequate manner or its components are altered in any way severe
material damage may occur and bodily harm may be caused to the operator,
other personnel and/
or animals and may even cause death. SAGOLA S.A.U. accepts no responsibility in for any damage
caused through the incorrect use of the unit.

www.sagola.com
an Elcometer company
EN 18
The battery must not be replaced in hazardous areas. See Atex regulations about explosion risk
areas.
The battery housing and the pressure measurements sight glass must not be opened in a
location where there is any danger of explosion. (UNE EN 60079-11:2013 standard. Do not change
batteries in a dangerous location Ex).
Always use approved breathing units in accordance with current Standards and
Regulations in order to protect yourself from emissions produced during application.
Never exceed the maximum air inlet pressure (8 bar). Excessive pressure will cause greater
environmental contamination. To provide the hose with compressed air for the pistol, fit a pressure
regulator and a safety valve.
As a general, preventive measure we advise you to wear goggles in accordance with the
specific environmental regulations and characteristics for the work centre.
Wear gloves when handling the product (see the manufacturer’s recommendations) and
clean the gun.
If, when the gun is in use, the ambient noise level exceeds 85 dB (A) the use of approved
ear protectors is required.
The gun in itself does not propitiate any mechanical risk of perforations, impact or pinching,
except those deriving from incorrect installations and handling.
While work is in progress, no vibrations are transmitted from the gun to any part of the body of the
operator and reaction forces are minimal.
Use SAGOLA ANTISTATIC HOSES to eliminate possible electrical
discharges that might create the risk of fire or explosion.
Pay adequate attention when handling the gun in order to prevent any damage that might lead to
dangerous situations for the user or personnel standing near the unit, as a consequence of leaks,
breakages, etc. Do not use it if your mental capacity, perceptions and reactions are altered due to
substances such as alcohol, drugs, medicines, etc., or by tiredness or for any other reason.
The gun has been designed for use at ambient temperature. Its maximum service temperature is
60°C.Although the air temperature of the compressed air or product is higher, this must not exceed the
maximum average temperature in the body of the gun. If the temperature exceeds 43°C, it is necessary
to use personal protective equipment, such as gloves to thermally insulate your hands from the unit.
The use of solvents and/or detergents that contain halogenated
hydrocarbons (trichloroethane, methyl chloride, etc.), may
cause chemical reactions in the unit as well as in its zinc-coated
components (trichloroethane mixed with small amounts of water
produces hydrochloric acid). For this reason, these components
may rust and in extreme cases the chemical reaction caused may be
explosive. We recommend you to use products that do not contain
the aforementioned components. Do not use acids, soda (alkalis or
pickling substances, etc.) for cleaning under any circumstances.
In general, tprecautions must be taken whenever the gun is handled, in order to prevent any damage
to this.

www.sagola.com
an Elcometer company
EN 19
Connectors must be securely tightened and in good condition. If pneumatic connectors are
fitted, they must comply with the standard ISO 4414:2010.
Safety standards must be understood and applied.
Any non-compliance with the indications set out in this manual may lead to incidents affecting the
physical integrity of the user or other personnel or animals.
Respect and comply with indications relating to the conservation of the environment.
Always keep the safety sheets for the products to apply and the cleaning liquids to hand in case you
need to consult them.
17. Observations
By following the instructions set out in this manual you will ensure good spraying and quality of finish.
Should you have any doubt, please contact the Technical Service of SAGOLA.
18. Warranty Conditions
This device has been manufactured with great precision and has been subjected to a large number of
controls before leaving the factory.
The WARRANTY is valid for 3 years, counted as of the date of purchase, which will be indicated by the
seller in the place provided for this purpose, together with his stamp. Once the unit has been received,
please complete the warranty and send this to the manufacturer for validation
This WARRANTY covers any manufacturing defect, which will be repaired without charge. However,
any malfunction resulting from the incorrect use of the unit, such as inadequate connections, breakage
due to dropping, or similar, the normal wear of components and in general any deficiency not
attributable to the manufacturer of the device, are expressly excluded. Likewise, the WARRANTY shall
be rendered null and void when it is evident that the unit has been handled by persons other
than our Technical Assistance Service.
This WARRANTY does not support any undertaking made by anyone outside our Technical
Service.
In the case of any breakdown during the guarantee period, please attach the completed warranty
certificate to the unit and deliver this to the nearest Technical Assistance Service or get in touch with
the factory.
Any demand of greater importance against the supplier, in particular compensation for damages, is
excluded. This is also applicable to any damages that might arise during counselling, while acquiring
practice and during demonstration.
Consequently, the services rendered under guarantee do not involve an extension of the warranty
period.
The manufacturer reserves the right to make technical modifications.
19. Disposal
For complete and correct disposal of the gun, when it has reached the end of its
useful life, it must be completely dismantled so it can be recycled, separating the metal
and the plastic components.

www.sagola.com
an Elcometer company
EN 20
20. Troubleshooting
ANOMALIES CAUSES REMEDY
Bubbles
in the
product cup
Loose fluid tip Tighten
Tip-gun body seat and dirty or
damaged Clean or replace
Spray width
regulator does
not operate
Tip-gun body seat and dirty or
damaged Clean or replace
Loose spray nozzle Tighten the nozzle
Damaged spray
width regulator Replace
Tip-Nozzle joint dirty
or damaged Clean or replace
The unit
does not spray
No product Check and correct
No air pressure or insufficient Check and correct
Product too dense Dilute
Product regulator closed Adjust
Clogged
fluid conductor Clean
Intermittent
spraying
Insufficient amount
of product Fill adequately
Product not filtrated (impurities) Filter
Loose fluid tip Tighten
Cracked fluid tip Replace
Worn packing gland
in head Replace
Faulty spray width
Loose spray nozzle Tighten nozzle
Worn spray width
regulator Replace
Dirty or damaged
Tip - Nozzle joint Clean or replace
Blockages or dents in the air
nozzle or fluid tip Turn the nozzle. If it
turns check the nozzle.
If not, check the fluid tip
Table of contents
Other Sagola Paint Sprayer manuals

Sagola
Sagola 4100 Xtreme Series User manual

Sagola
Sagola Adhesivos User manual

Sagola
Sagola turbo 1000 User manual

Sagola
Sagola PSAM 107 User manual

Sagola
Sagola X4100 Series User manual

Sagola
Sagola V Series User manual

Sagola
Sagola 6110 User manual

Sagola
Sagola 4600 Xtreme User manual

Sagola
Sagola V2 User manual

Sagola
Sagola Junior Start User manual

Sagola
Sagola Premium777 User manual

Sagola
Sagola 4100 Xtreme Gravity User manual

Sagola
Sagola Mini V User manual

Sagola
Sagola 472 PRO User manual

Sagola
Sagola 4600 Xtreme User manual

Sagola
Sagola 4120 PLUS User manual

Sagola
Sagola Classic S1 User manual

Sagola
Sagola PSAM 104 User manual

Sagola
Sagola 3900 PLUS User manual

Sagola
Sagola 610 User manual