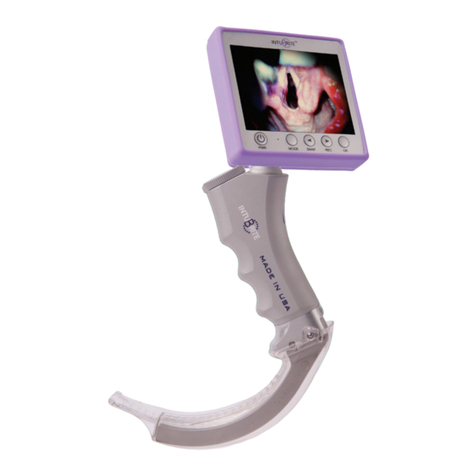
Salter Labs IntuBrite VLS 8800 User manual

2
Index
I. Device Assembly and Disassembly 3
II. Operating the VLS 8800 Monitor 4
III. VLS 8800 System Operation 5
IV. Cleaning Instructions 8
V. Batteries and Battery Maintenance 11
VI. Troubleshooting 13
VII. Warranty Information and Registration 14

3
IntuBrite VLS 8800 Video Laryngoscope Operating Instructions
Intended Use: The rigid laryngoscope is intended for use in
laryngoscopy to examine and visualize the upper airway and glottis.
Please read the instructions carefully before attempting to operate the
VLS 8800.
I. Device Assembly and Disassembly
1. Select the appropriate VLS video blade or wand for the patient.
Position the blade or wand connection point to the video handle
mounting block and snap into position by pushing down on the tip
of the blade or wand. If using the wand, after attaching the wand
to the handle, slide the sheath over wand until it clicks into place.
2. For wand only after attaching video wand to handle, slide the
sheath over wand until it clicks into place. To remove, unhook from
locking tabs and slide off.
3. Orient the connector of the VLS 8800 video cable to the video
connection on the top of the VLS handle. Position the red marks
on the connector to align with the opposing red mark on the
handle.
4. Gently push the cable connector into the handle connection
until a positive “click” is felt. The cable is now locked into place.
5. Orient the other connector of the VLS 8800 video cable to the
receptor on the side of the VLS 8800 monitor, align with the
corresponding red markings on each piece, and push into place. A
locking sleeve on the connector will secure it into position.
6. To disconnect cable, grasp the movable locking sleeve on the
cable connector in Step 4 and pull it up and away from the handle.
This action releases the connector and separates the handle and
cable.
7. Disconnect the cable from the monitor.
8. If using a video wand, unlock sheath from tabs, slide off wand
and discard the sheath.

4
9. To remove the video blade or wand from the handle pull the tip
of the blade or wand and separate the blade/block connection.
II. Operating the VLS 8800 Monitor Connecting Power to the Monitor
The VLS 8800 monitor can be powered directly by AC power, or
through an internal high capacity lithium battery source.
To operate with 100-240v DC converter charger, utilize the long
power cord included in the accessory package and attach the small
plug to the receptacle in the monitor labeled 12V DC. The larger
wall plug is then plugged into a standard 100-240v power source.
With the On/Off toggle switch on the side of the unit in the “On”
position, power to the monitor would be verified by the illuminated
display of the monitor.
This setup also charges the battery. The unit will automatically
switch to battery power when power cord is disconnected.
Startup
1.Assemble blade and wand to handle and connect to monitor.
2.Turn the ON/OFF switch to the ON position.
3.In a few seconds, an image from the camera will appear on
display. If a video signal is not detected by the monitor, the
screen will remain blue.
III. VLS 8800 System Operation
The VLS 8800 is designed to be used with standard laryngoscopy
technique similar to that of direct laryngoscopy.
Video Blades and Wands
1.Cleaning: The blade, wand and handle should be appropriately
cleaned and/or sterilized before use (see cleaning instructions in
PART IV).
2.Anti-Fog: The camera lens on the VLS blade and wand has an
integrated heating element designed to reduce or eliminate lens

5
fogging. Resistance to lens fogging should be achieved within 30
to 60 seconds of attaching the blade or wand to the powered
handle.
Monitor
1.Controls and Adjustments: A number of video adjustments
have been fine-tuned on each monitor for optimal display
performance so further adjustment is not required.
2.Panel control buttons:
- The Review button toggles between live video and access
to still/video recorded images on the SD card
- The middle “Picture” button initiates still image recording in
“Live” video mode, and advances through still and video
images recorded on the SD card when the unit is in
“Review” mode
- The right hand Red Record button starts and stops video
recording
A. Recording, saving and viewing images and video
Still images and video of the airway and intubation procedures
can be recorded and automatically saved to the monitor’s
removable SD card.
Recording still images:
Press the “Picture” icon button on the front of the display.
Images are automatically saved to the SD card under a “.JPG”
file format. NOTE: Still images cannot be recorded and saved
while the device is recording video.
Recording Video loops:
- Press the Red video “Record” button once to initiate
recording. The action is noted by an ongoing blinking Red
REC on the display. A recording time counter will also be
displayed.

6
- Press the same button a second time to end the recording.
The video file will automatically be saved to the SD card
under an “.AVI” format.
Accessing images and videos:
Both still images and video loops recorded on the SD card can
be accessed by pressing the “arrow” button on the display, and
advancing through the images in chronological order by
pressing the “Picture” icon button.
-Each file is individually identified by a date/time stamp.
-Video files can be played on the display through
communication with the attachable video/DVR remote
control (See Directions for Remote Control DVR
Functions in next section).
B. Managing SD card files with the Remote Control
The remote control for the VLS 8800 is designed to allow access
and management of data on the 8800’s SD card by connection
to/through the display, and enable simplification of common
video recording functions and controls on the display itself.
The remote control features the following control buttons:
1. “Menu” (upper left hand corner of remote): Allows setting
Clock and Still/Video Quality, and controls file deletion and
SD card formatting

7
2. “Access” (upper right hand corner): Changes display from
live video feed to access stored files on SD card
3. “Arrow” Up, Down, Left and Right: Enables specific
selection of files for viewing on screen, and selects DVR
function
4. “Enter” (in center of arrow buttons): Actuates selected
DVR function
Directions for Remote Control DVR Functions
To access and manage still image files and video files:
Press “Access” button
Press Right or Left arrow button to advance through
images/files
To Play a selected video file
Press “Down Arrow” button to start
Press “Down Arrow” button again to pause/stop
To Delete a selected still images or video files
Press “Menu” button
Press Right or Left arrow buttons to select “Delete Single”
Press “Enter” button
To Exit to live video
Press “Menu” button
Deletion of additional single files, all files or to
reformat/erase the SD card can be accomplished through
this “Menu” button sequence in similar fashion.
Adjusting DVR Setting
Set Current Time and Date

8
• In live video mode, Press “Menu” button
• Press Right or Left Hand arrow button to highlight
“Time”
• Press “Enter” button
• Press Right or Left arrow buttons to advance to desired
portion of date and time to set
• Press Up or Down arrow buttons to adjust values
• Press “Enter” button to return to prior menu
Photo and Movie quality can be adjusted between standard
and high quality images using similar actions in this menu.
•Press “Menu” to exit to live video
IV. Cleaning Instructions
Video Handle, Blades and Wands
Reusable laryngoscope video blades must undergo high level
disinfection or sterilization between uses. Laryngoscope video handles
and wands should be cleaned with low level disinfectant between
patients; high level disinfection is optional. Always follow hospital
protocol for cleaning reusable laryngoscope components.
•Detach the video blade or wand from the laryngoscope handle.
If applicable, detach video display from handle prior to cleaning.
•Remove batteries from the handle and replace the cap of
handle.
•Clean external surfaces of the blade, wand and handle with a
damp cloth or soft brush using warm water and soap, isopropyl
alcohol solution or other anti-microbial disinfectant to remove
any deposits. A pH neutral cleaning solutions recommended.
•For high-level disinfection use Cidex® 2.4% glutaraldehyde
solution or similar disinfectant. Follow manufacturer’s usage
instructions. To avoid damage, do not soak handles in
disinfectant or washing solutions for ≥20 minutes.

9
•For sterilization, use Steris® or STERRAD® low temperature
sterilization by processing. Temperatures should not exceed
140°F (53°C) and/or 28 minute cycles. Refer to Table 1.
NOTE:
•Given the electrical componentry, the video blade should not be
exposed to extreme temperatures during cleaning.
•DO NOT AUTOCLAVE THE VIDEO HANDLE, BLADE OR WAND.
•Do not use abrasive cleaning techniques or ultrasonically clean.
•Ensure the handle, blade and wand are dry & fully checked prior
to storage
Handles, blades and wands should always be tested after cleaning
and prior to use.
Disposable Sheath
The sheath is disposable and intended for single patient use. Do not
reuse or sterilize. Dispose of after each use.
Video Accessories
All cables and other ancillary devices should be cleaned by wiping with a
70% isopropyl alcohol solution, or a mild detergent and water.
Do not immerse these items in fluids. Care should be taken to prevent
excessive moisture from penetrating transmitter and display housings
VLS 8800 Monitor
The display is not waterproof. The face of the unit, including the front
control buttons, can be cleaned with anti-microbial solution wipes.
Cleaning of the unit should be done carefully to avoid introducing
liquids into the interior of the monitor.

10
Table 1
The above listed cleaning guidelines are intended as suggestions only. They are
based on procedures compatible with specific materials. Disinfection must be
performed to approved hospital protocol. Salter Labs cannot warrant that any of
the recommended methods will guarantee sterility. This must be validated by the
hospital and/or sterilization equipment manufacturer.

11
V. Batteries and Battery Maintenance
The VLS 8800 system is equipped with rechargeable lithium ion
batteries. These batteries are designed to independently provide
optimal power to the monitor and the video blades or wands. The
batteries can be fully recharged many times with minimal loss in
performance.
1.Monitor battery
The internal rechargeable battery for the VLS 8800 monitor
powers the unit independently.
-Life of one full charge in continuous use: 2 hours (average)
- Time to recharge: approx. 4 hours from fully discharged state
Working life: up to 3 years (average)
In addition, the monitor displays a battery level symbol in the
lower left hand corner:
- 3 bars = fully charged
- 2 bars - 1/2 charged
A blinking symbol indicates unit will shut down in several
seconds. The power source should be plugged into monitor on
the upper left hand side labeled 120V DC.
It is recommended that the monitor be continuously
connected to the charger while in storage or during long
periods of time between uses. Lithium ion batteries also do
not exhibit “memory” characteristics, and do not require deep
cycle depletion and recharging regimens to maintain peak
functionality.
Note: Allowing rechargeable lithium batteries to fully
discharge can damage the battery and reduce performance
significantly. Full discharge of the batteries should be
avoided.

12
2. Handle battery
The rechargeable AA-size 3.7 volt rechargeable lithium ion battery in the
video handle powers the camera, and the lens heating element and light
source in video blade or wand. When the VLS handle is attached via the
cable to the VLS 8800 monitor, the monitor battery and handle battery
are linked, and operate as one.
There are two ways to charge the VLS handle battery:
1) When the 8800 monitor is being charged with the handle
connected to the monitor via cable, the VLS handle battery will be
charged as well.
2) The handle battery can be removed from the handle and
charged independently with the separate AA-size 4.2 volt charger.
The battery is accessible by removing the cap on the top of the
handle.
When connected to a monitor via the cable, the VLS handle will operate
the VLS blade or wand without a 3.7 volt AA size lithium battery
installed. However, for longer overall battery charge life for the system,
it is recommended that the handle battery be installed.
- Battery characteristics: 3.7 volt rechargeable lithium ion, AA size
- Orientation in handle: Positive terminal end inserted first
- Time to recharge: approx. 4-5 hours from full discharge state in
separate charger, 30 minutes if charging through monitor cable
and monitor system plugged into AC power.
- Working life: up to 3 years (average)
All VLS batteries (monitor and handle) can be continuously attached to
their charger for long periods of time. These batteries also do not
exhibit “memory” characteristics, and do not require deep cycle
depletion and recharging regimens to maintain peak functionality.

13
VI. Troubleshooting
Salter Labs VLS systems are generally reliable and simple to operate,
requiring minimal maintenance for extended periods. However, the
following is offered to help deal with unexpected device conditions:
1) Monitor is non-functional, shows no sign of power
- Check for proper connections with power system and/or
battery setup. See Section II.
- For battery operation, ensure that monitor battery is
charged, the battery switch on the left side of the case is in
the “ON” position and the LED illuminates Green.
2) Monitor is powered, but shows blue screen
- Check connection of video blade or wand to handle
- Ensure blade or wand is properly fit to the handle
mount
- LEDs on video blade or wand are illuminated
- Check that cable connections are solid, with connectors
fully inserted and engaged: no loose connections
3) Image appears on screen, but is grainy or dim
- Ensure that all batteries are adequately charged
- Check all blade or wand and cable connections
- Ensure that lenses on camera and LEDs on blade or
wand are clean, and not contaminated

14
IntuBrite VLS Limited Warranty
Salter warrants its IntuBrite VLS Products to be free of defects in
materials and workmanship under normal use and service of the
instruments for twelve (12) months from date of purchase.
What is covered: Replacement of Parts and associated Labor.
What is not covered: Transportation charges to and from Salter
warehouse, damage caused by abuse, misuse, accident or negligence.
To Obtain Warranty Service: Please contact
Customercare@salterlabs.com. The Customer Care representative
will need the part number(s) and serial number(s) of the items for
which repair is being requested under the warranty. The Customer
Care Representative will review the situation, and if appropriate,
issue a Repair Order Number. This Repair Order Number should be
provided with the item(s) being returned for repair.
A Repair Order Number is valid for thirty (30) days after issuance.
Any returns after the thirty (30) day period has expired are not
authorized and will not be accepted.
At the date of original order, you may opt to purchase an Extended
Warranty for IntuBrite VLS Products which extends your warranty
for either one (1) year or three (3) years beyond expiration of the
original one (1) year warranty.

15
Salter Extended Warranty for IntuBrite VLS Products
Salter’s Extended Warranty covers all VLS products against defects in
material and workmanship for a period of up to six (6) years from
date of original purchase. This extended warranty is available only to
the original purchaser of the VLS system or components, and is not
transferable. A one (1) year extended warranty or a three (3) year
extended warranty may be purchased in advance and may also be
extended for up to three (3) additional years after the completion of
the initial Extended Warranty period, accumulating a maximum of six
(6) years of coverage.
If additional equipment is added to the original VLS system, an
extended warranty package can be purchased separately and
independently for each item under the above terms.
If a VLS system fails for any reason during the extended warranty
period, Salter will repair or replace the failed component of the VLS
system. If requested, Salter can provide a loaner unit. The customer
agrees to return the damaged VLS product to IntuBrite upon receipt
of the loaner unit and agrees to return the loaner unit within three
(3) business days after return receipt of the repaired unit.
This extended warranty does not apply to product that has been
damaged due to obvious mishandling or as a result of modification
by an unauthorized repair station or person.
Salter Labs
30 Spur Drive
El Paso, TX 79906 USA
www.salterlabs.com
MT Promedt Consulting GmbH
Altenhofstraße 80
D-66386 St. Ingbert
Germany
Other Salter Labs Medical Equipment manuals