Sanus SLT3-B8 User manual

SLT
3-B8
MANUAL DE INSTRUCCIONES
INSTRUCTION MANUAL
Our US-based
install experts are
standing by to help.
Get it right the first time.
HeightFinder™ shows
you where to drill.
Want to watch a
video that shows
how easy this DIY
project will be?
Nuestros expertos
en instalación
están listos para
ayudar.
Acierte a la primera.
HeightFinder™ le
indica el lugar donde
debe taladrar.
¿Desea ver un video
para comprobar lo
fácil que es hacerlo
usted mismo?
Recommended placement
¡ESTAMOS AQUÍ PARA AYUDARLE!
WE’RE HERE TO HELP
Visualícelo ahora en:
Watch it now at:
SANUS.com/2753
Descúbralo en:
Check it out at:
SANUS.com/2726
Llámenos al:
Call us at:
1-888-333-1376
O contacte con
nosotros por chat en:
Or, chat at:
SANUS.com/chatSS

INSTRUCCIONES IMPORTANTES DE SEGURIDAD –LEA TODO ESTE MANUAL ANTES DE UTILIZAR ESTE PRODUCTO –GUARDE ESTAS INSTRUCCIONES
IMPORTANT SAFETY INSTRUCTIONS – PLEASE READ MANUAL PRIOR TO USE – SAVE THESE INSTRUCTIONS
CAUTION: Avoid potential personal injuries and property damage!
●This product is designed ONLY to be installed into wood studs, solid concrete or concrete block, or steel studs*
* For information on how to use this product with steel stud walls contact Customer Service and ask about the steel stud mounting kit
—DO NOT INSTALL INTO DRYWALL ALONE — DRYWALL ALONE WILL NOT HOLD THE WEIGHT OF YOUR TV.
●This product is designed for INDOOR USE ONLY.
●The wall must be capable of supporting five times the weight of the TV and mount combined.
●Do not use this product for any purpose not explicitly specified by manufacturer.
●Manufacturer is not responsible for damage or injury caused by incorrect assembly or use.
PRECAUCIÓN: Evite posibles lesiones personales y daños materiales.
●Este producto está diseñado para usarse únicamente en aplicaciones con montantes de madera, hormigón y bloques de hormigón, o con
montantes de acera*.
*Para obtener información sobre cómo usar este producto en paredes con montantes de acero, póngase en contacto con el servicio de
atención al cliente y pregunte por el kit de montaje en montantes de acero
– NO lo instale en tabiques únicamente de yeso.
●Este producto está diseñado SOLAMENTE PARA USO EN INTERIORES.
●La pared debe ser capaz de soportar hasta cinco veces el peso combinado del televisor y la montura
●No utilice este producto para ningún otro propósito que no sea el explícitamente especificado por el fabricante
●El fabricante no se responsabiliza de ningún daño o lesión resultante del montaje incorrecto o el uso indebido
2

68 kg
(150 lb) 49.8 kg
(110 lb)
For walls with
wood studs, solid
concrete, and
concrete block walls:
For walls with
steel studs:
Paredes con
montantes de madera,
de hormigón o de
bloques de hormigón:
Paredes con
montantes de acero:
Please read through these instructions completely to be sure you’re comfortable with this easy install process.
Check your TV owner’s manual to see if there are any special requirements for mounting your TV.
If you do not understand these instructions or have doubts about the safety of the installation, assembly or use of this product, contact
Customer Service.
TV Weight Limit
(including accessories)
DO NOT EXCEED
If your TV (plus accessories)
weighs MORE,
Visit Simplicity.SANUS.com or
call customer service to find a
compatible mount. 1-888-333-1376
Lea atentamente estas instrucciones en su totalidad para asegurarse de que está familiarizado con el sencillo proceso de instalación.
Consulte igualmente el manual de su televisor para conocer si existen requisitos especiales para el montaje de su aparato.
Si no entiende las instrucciones o si tiene dudas acerca de la seguridad de la instalación, el montaje o el uso del producto,
póngase en contacto con el Servicio de Atención al Cliente o llame a nuestro servicio técnico al número 1-888-333-1376 .
Si su TV (incluidos los
accesorios) pesa MÁS,
Visite Simplicity.SANUS.com o
llame al número 1-888-333-1376 para
encontrar una montura compatible.
Peso máximo
(incluidos los accesorios)
NO EXCEDAS
3

4
Steel Stud Kit required [NOT
INCLUDED]
Call Customer Service:
1-888-333-1376
Tools Needed
Wall
Construction
ONLY install on these
acceptable wall types.
Drywall alone will NOT
hold the weight of your TV.
Wood studs Steel studs
Solid concrete or
concrete block
ACCEPTABLE
ACCEPTABLE
ACCEPTABLE
Wood Stud Install
Steel Stud Install
Concrete Install
Awl Awl
Pencil Level Tape
Stud Finder Stud Finder
Screwdriver
Tape Measure
5.5 mm
(7/32 in.)
Drill Bit
Electric Drill
Hammer
13 mm
(1/2 in.)
Socket Wrench
Drill Bit Drill Bit
10 mm
(3/8 in.)
CAUTION:
DO NOT
install in
drywall alone
La construcción
de su pared
SOLAMENTE instalar en estos
tipos aceptables de la pared.
Instalación en panels de
yeso solo NO soportará
el peso de su TV.
Montantes de
madera Montantes de
acero
Hormigón macizo o
bloque de hormigón
ACEPTABLE
ACEPTABLE
ACEPTABLE
PRECAUCIÓN:
NO instalar
en panel de
yeso solo
herramientas
necesarias
Montantes
de Madera
Montantes
de Cemento
Lápiz Nivel Cinta Adhesiva Destornillador
Cinta Métrica Taladro Eléctrico Llave de Vaso
Punzón
Localizador de
Montantes
Localizador de
Montantes
Broca Martillo
Broca
Call Customer Service
1-888-333-1376
Unsure
Llame al Servicio de Atención al Cliente
¿No está seguro? Se requiere el kit para montantes
de acero [NO INCLUIDO]
Llame al servicio de atención
alcliente: 1-888-333-1376
Montantes
de Acero
Punzón
13 mm
(1/2'')
Broca

5
200.0
mm
600.0
mm
430.0
mm
8.8
mm
8.4
mm
180.4
mm
685.9
mm
72.9
mm
580.7
mm
609.6
mm
406.4
mm
460.0
mm
124.8
mm
196.2
mm
25.4
mm
TOTAL
HEIGHT
ADJUST
59.9
mm
147
mm
12°
5°
100.0
mm
KNOBS ONLY TO FACE EACH OTHER IF THE TV MOUNTING PATTERN
IS 100mm x 100mm
KNOBS
DESCRIPCIÓN FEATURES
100x100 VESA PATTERN
3-D
INTERFAZ DE TV TV INTERFACE
PLACA DE PARED WALL PLATE
VISTA LATERAL PROFUNDIDAD
SIDE VIEW - DEPTH
COMPLETAMENTE ENSAMBLADO
FULLY ASSEMBLED MOUNT
Dimensions
Dimensiones

6
WARNING: This product contains small items that could be a choking hazard if swallowed. Before starting assembly, verify all parts are included and undamaged. If any parts
are missing or damaged, do not return the damaged item to your dealer; contact Customer Service.
Never use damaged parts!
Supplied Parts and Hardware
M8 x 25mm M8 x 50mm
M8 x 35mm
M8 x 16mm 2.5mm
22mm
M6 x 20mmM6 x 12mm
M4 x 12mm
M6 x 35mm
M4 x 35mm
M8 x 45mm
5/16 x 2 ¾ in.
5/16 in.
Fischer UX 10 x 60R
M8 x 20mm
M4
M5 x 25mm
PASO 1 / STEP 1
TV Brackets
Los Soportes del Televisor
TV Screws (qty. 4 each)
[Only one size fits your TV]
Tornillos (4 cada uno)
[Solo un tamaño de tornillo
es compatible con su TV] Washers
(qty. 4 each)
Arandelas
(4 cada uno)
Spacers
(qty. 4 each)
[If necessary]
Espaciadors
(4 cada uno)
[Si necesario]
03
02
01
M4
M4
M6/M8
M4/M6/M8
M4/M6/M8
M6
M8
ADVERTENCIA: Este producto contiene piezas pequeñas que, si fuesen tragadas, podrían producir asfixia. Antes de iniciar el ensamblaje, compruebe que todas las piezas
estén incluidas y en buenas condiciones. Si faltan piezas o alguna está dañada, no devuelva el artículo al distribuidor; póngase en contacto con el servicio de atención al cliente.
Nunca utilice piezas deterioradas.
Piezas y accesorios suministrados
1 PIEZA
(qty. 1) 1 PIEZA
(qty. 1)
05
04

PASO 2C (no incluido) / STEP 2C (not included)
M8 x 25mm M8 x 50mm
M8 x 35mm
M8 x 16mm 2.5mm
22mm
M6 x 20mmM6 x 12mm
M4 x 12mm
M6 x 35mm
M4 x 35mm
M8 x 45mm
5/16 x 2 ¾ in.
5/16 in.
Fischer UX 10 x 60R
M8 x 20mm
M4
M5 x 25mm
PASO 3 / STEP 3
Steel Stud Anchor Kit #SSMK1 (not included) - contact Customer
Service at 1-888-333-1376 t
o inquire about the SSMK1 kit.
Kit de anclaje para paredes con montantes de acero #SSMK1
(no incluido) - Póngase en contacto con el Servicio de Atención
al Cliente en el 1-888-333-1376 p
ara que le envíen estas
herramientas adicionales directamente a su hogar.
7
1/4-20 x 1¾ in.
1/4 in.
1/4-20 SnapToggle BB
M8 x 25mm M8 x 50mm
M8 x 35mm
M8 x 16mm 2.5mm
22mm
M6 x 20mmM6 x 12mm
M4 x 12mm
M6 x 35mm
M4 x 35mm
M8 x 45mm
5/16 x 2 ¾ in.
5/16 in.
Fischer UX 10 x 60R
M8 x 20mm
M4
M5 x 25mm
PASO 2 / STEP 2
La Plantilla de
Placa Mural
La Placa Mural
Lag Bolt
Washer
Tornillos Tirafondo
Arandela
Concrete Anchor
Drilling Template
Wall Plate
SOLO para instalaciones en hormigón
For concrete installations ONLY
CAUTION: Do not use in drywall or wood.
PRECAUCIÓN: No se debe utilizar en paredes de yeso ni de madera.
Los Anclajes para Cemento
(8mm x 70 mm)
(8mm)
(6mm)(45mm)
1 PIEZA
(qty. 1)
1 PIEZA
(qty. 1)
4 PIEZAS
(qty. 4)
4 PIEZAS
(qty. 4)
4 PIEZAS
(qty. 4)
4 PIEZAS
(qty. 4)
4 PIEZAS
(qty. 4)
4 PIEZAS
(qty. 4)
2 PIEZAS
(qty. 2)
1 PIEZA
(qty. 1)
11 12
10
09
08
06
07
S1
S2 S3
Hex Key
Securement Screw Hex Key
Securement Screw

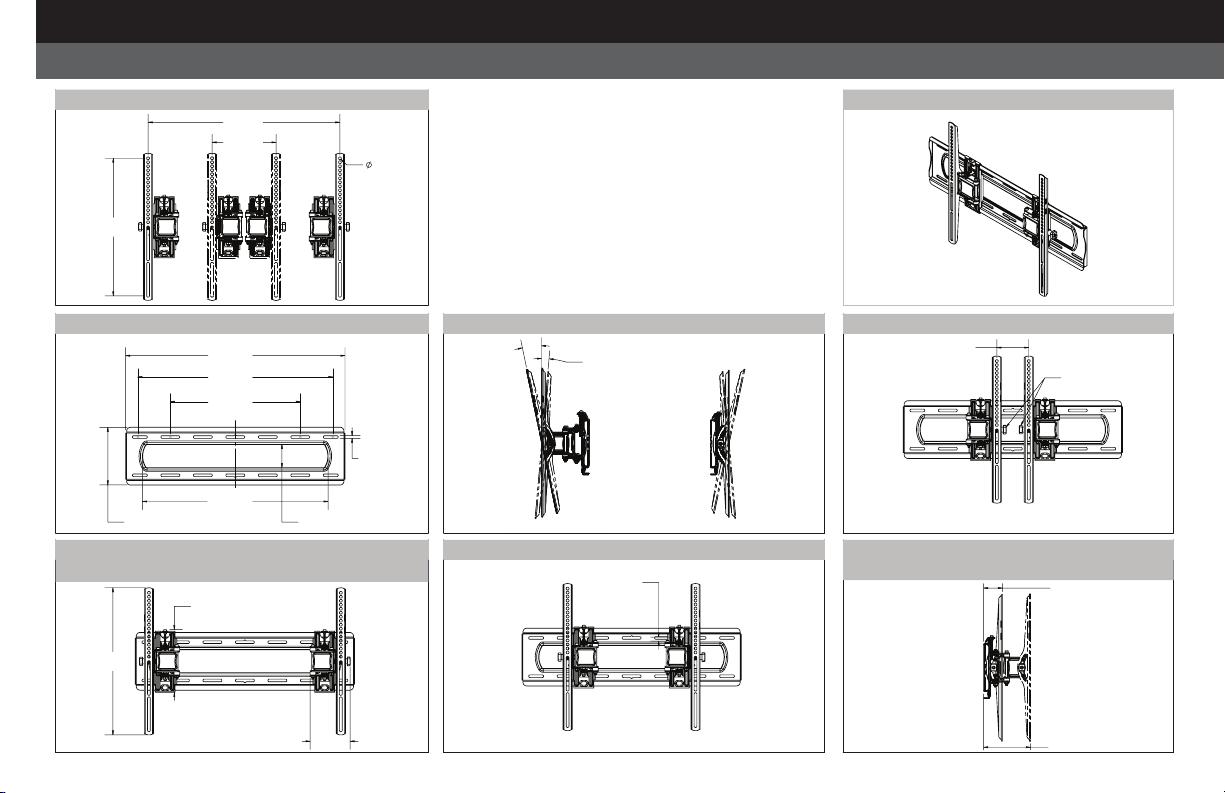
1.2 Select TV Screw Length and Spacers
1,2 Seleccione la longitud de los tornillos para el televisor
• Televisor con dorso plano
[Los soportes del televisor 04 /05 se
apoyan de manera plana en él]
• Flat Back TV
[TV brackets lay flat on your TV]
SIN ESPACIADOR
NO SPACER CON ESPACIADOR
SPACER NEEDED
A B
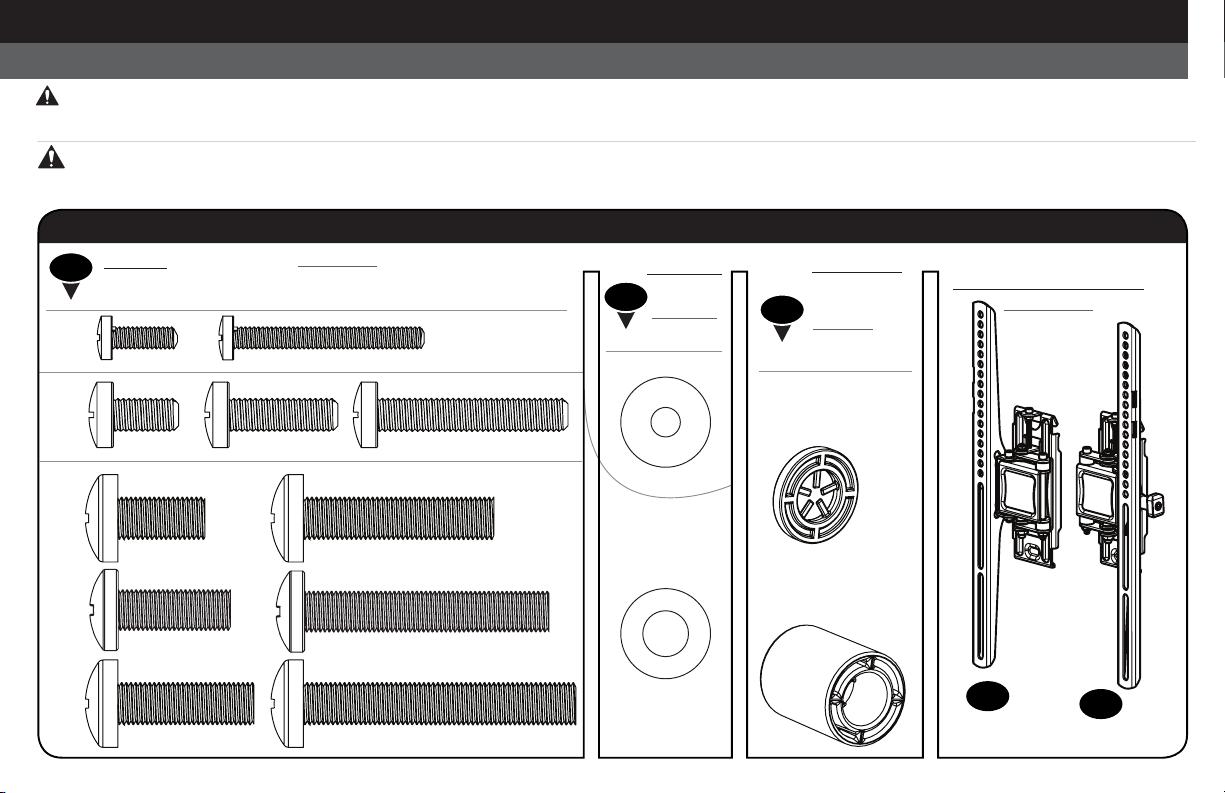
CAUTION: Verify adequate thread engagement with your screw 01 , washer 02 , spacer 03 combination AND TV bracket 04 /05 .
—Too short will not hold your TV. —Too long will damage your TV.
1.1 Select TV Screw Diameter
1,1 Seleccione el diámetro de los
tornillos para el televisor
Only one screw size fits your TV.
M4 M6 M8
01
Use short TV screws 01 .
Spacers 03 not needed.
PRECAUCIÓN: Verifique que el tornillo o la combinación de tornillo 01 , arandelas 02 , espaciador 03 y placas de sujeción del televisor
04 enrosquen correctamente. —Si el tornillo es demasiado corto no sostendrá el televisor. —Si es demasiado largo dañará el televisor.
Use los tornillos del televisor
cortos 01 . No hacen falta
espaciadores 03 .
• Televisor con dorso plano
con necesidad de espacio adicional
[para orificios empotrados o interfe-
rencia de cables]
• Televisores con dorso plano o
irregular [Los soportes del televisor
04 /05 NO se apoyan de manera
plana en él]
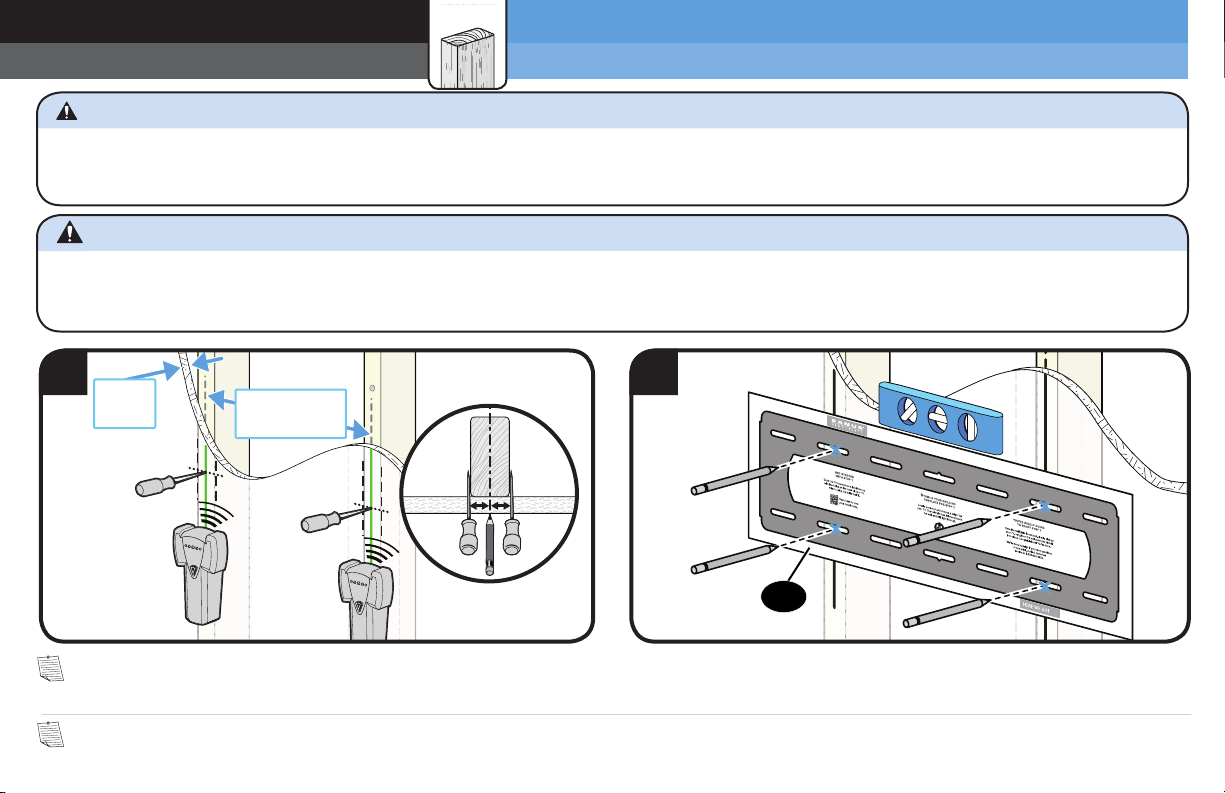
STEP 1 Attach TV Bracket to TV
PASO 1
Fijar el soporte del televisor al televisor
Solo un tamaño de tornillo es
compatible con su TV.
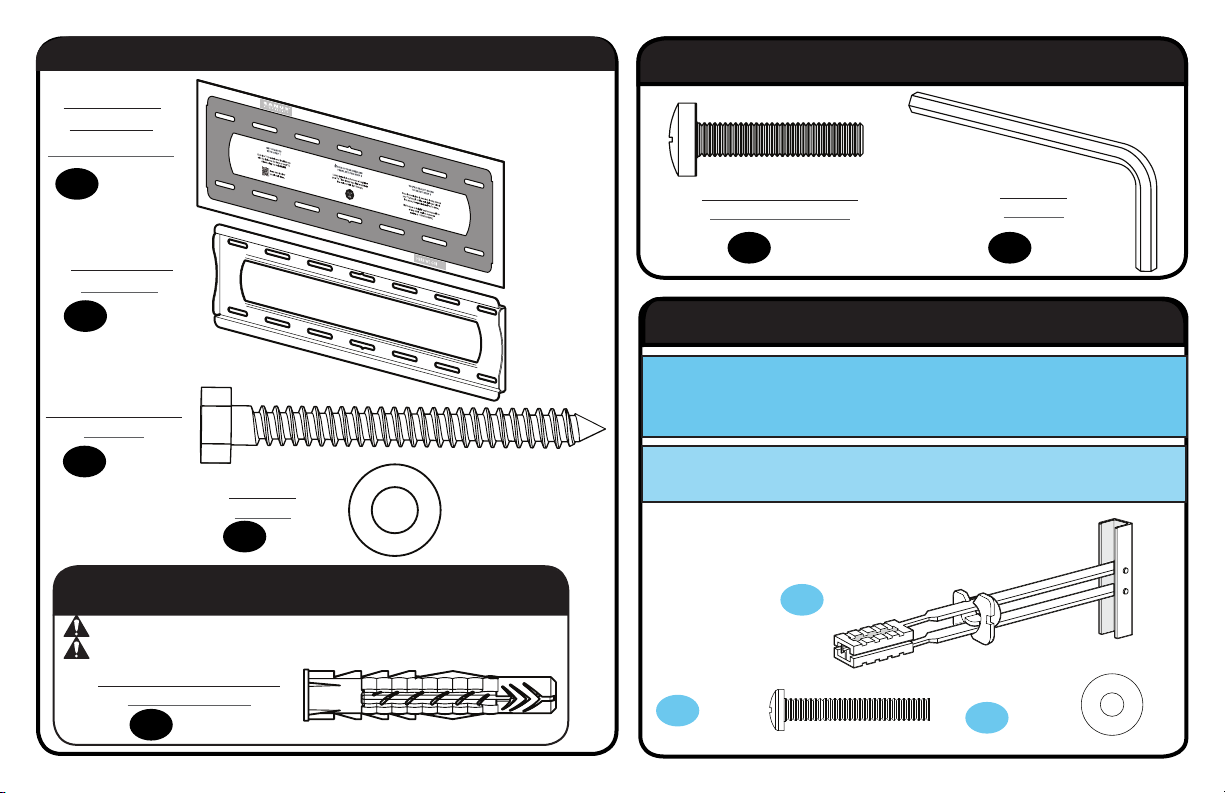
Use los tornillos del televisor largos 01 y los espaciadores 03
para crear espacio adicional entre el televisor y el soporte.
Use long TV screws 01 and spacers 03 to create extra space
between the TV and TV bracket.
• Flat Back TV with extra space needed
[for deep inset holes or cable interference]
• Rounded or Irregular Back TV
[TV brackets NOT resting flat on your TV]
8

IMPORTANT:The tilt tension knob Ton TV brackets 04 /05 should normally be oriented to the outside edges, EXCEPT for TVs with 100 mm (4 in. wide)
mounting hole spacing - these TVs require switching the TV brackets 04 /05 .
Install using the spacer, TV screw and washer combination you selected for your TV.
CAUTION: Avoid potential personal injuries and property damage! DO NOT use power tools for this step. Tighten the screws only enough to secure the TV
bracket to the TV. DO NOT overtighten the screws.
03
02
02 01
01
1
A
B
1,3 Fije los soportes al televisor
1.3 Attach TV Brackets to Your TV
If your TV included inset
spacers or wall mount adapters,
see Troubleshooting (PAGE 22).
Para televisores que incluyen separadores
insertados o aros adaptadores para soportes
murales, see Solución de problemas en página 22.
SIN ESPACIADOR
NO SPACER
CON ESPACIADOR
SPACER NEEDED
T
T
04
05
IMPORTANTE:La perilla de tensión de inclinación Ten los soportes del televisor 04 /05 debe estar orientada hacia los bordes externos, EXCEPTO
para televisores con un espaciado de agujeros de montaje de 100 mm (4 pulgadas) - estos televisores requieren cambiar los soportes de TV 04 /05 .
Realice la instalación utilizando el espaciador y la combinación de tornillo y arandela que haya seleccionado para su televisor.
PRECAUCIÓN: Evite posibles lesiones personales y daños materiales. NO utilice herramientas eléctricas para este paso. Apriete los tornillos solo con la
fuerza suficiente como para asegurar el soporte del televisor al televisor. NO ajuste demasiado los tornillos.
9
TOP OF TV
ONLY for 100mm (4 in.) TV
mounting hole spacing,
switch the TV brackets 04 and
05 on your TV.
Para televisores con un
espaciamiento de agujeros de
montaje de 100 mm (4 pulg.)
Cambie los soportes de TV 04 y
05 el televisor.
T
100mm (4 in.)
04 05

10
Wood Stud InstallationSTEP 2A Attach Wall Plate
para montantes de madera
PASO 2A Fijar la placa mural
12
≤16 mm
(5/8 in.) 406 mm-610 mm
(16-24 in.)
NOTE: TV with brackets can be shifted to the left or right from center. Consider this when selecting the location of your wall mount.
NOTA: Los televisores con soportes se pueden mover hacia la derecha o hacia la izquierda desde el centro. Tenga esto en cuenta cuando
seleccione la ubicación de la montura de pared.
06
CAUTION: Avoid potential personal injury or property damage!
●Drywall covering the wall must not exceed 5/8 in. (16 mm)
●Minimum wood stud size: nominal 2 x 4 in. (51 mm x 102 mm) actual 1½ x 3½ in. (38 mm x 89 mm)
●Stud center must be verified
PRECAUCIÓN: Evite lesiones personales y daños materiales.
●El yeso que recubre la pared no debe exceder los 16 mm (5/8'')
●Tamaño mínimo del montante de madera: nominal 51 mm x 102 mm (2'' x 4'') actual 38 mm x 89 mm (1 ½'' x 3 ½'')
●Se debe verificar el centro del montante

11
3 4
70 mm (2 ¾in.)
5.5 mm
(7/32 in.)
IMPORTANT: Be sure to drill into the center of the stud.
IMPORTANT: Pilot holes must be drilled to a depth of 2 ¾in. (70 mm),
using a 7/32 in. (5.5 mm) diameter drill bit.
IMPORTANTE: Asegúrese de perforar el centro del montante.
IMPORTANTE: Los orificios deben realizarse con una mecha de
5.5 mm (7/32'') de diámetro hasta una profundidad de 70 mm (2 ¾').
Tighten the lag bolts 08 only until the wall plate 07 is held tightly in place.
CAUTION: Improper use could reduce the holding power of the lag bolt.
DO NOT over-tighten the lag bolts.
Ajuste los tornillos tirafondo 08 solamente hasta que queden firmes contra la
placa mural 07 .
PRECAUCIÓN: El uso indebido podría reducir la capacidad de retención
de los tornillos tirafondo. NO ajuste en exceso los tornillos tirafondo.
Vaya al PASO 3 en la PÁGINA 18.
Go to STEP 3 on PAGE 18.
08
09
06
07

Solid Concrete or Concrete Block Installation
para hormigón sólido o bloques de cemento
STEP 2B Attach Wall Plate
1 2
610 mm
(24 in.)
10 mm
(3/8 in.)
75 mm (3 in.)
CAUTION: Avoid potential personal injury or property damage!
●Mount wall plate 07 directly onto concrete surface (no wall covering)
●Minimum solid concrete thickness: 8 in. (203 mm)
●Minimum concrete block size: 8 x 8 x 16 in. (203 mm x 203 mm x 406 mm)
PRECAUCIÓN: Evite lesiones personales y daños materiales.
●Instale la placa mural 07 directamente sobre la superficie de hormigón
●Espesor mínimo del hormigón: 203 mm (8'')
●Tamaño mínimo del bloque de cemento: 203 mm x 203 mm x 406 mm (8'' x 8'' x 16'')
PASO 2B Fijar la placa mural
NOTE: TV with brackets can be shifted to the left or right from center.
Consider this when selecting the location of your wall mount.
NOTA: Los televisores con soportes se pueden mover hacia la
derecha o hacia la izquierda desde el centro. Tenga esto en cuenta
cuando seleccione la ubicación de la montura de pared.
Drill pilot holes into solid concrete. Never drill into the mortar be-
tween blocks.
IMPORTANT: Pilot holes must be drilled to a depth of 3 in. (75 mm),
using a 3/8 in. (10 mm) diameter drill bit.
Realice los orificios guía en el hormigón sólido. Nunca perfore el
cemento que une los bloques.
IMPORTANTE: Los orificios guía deben realizarse con una mecha
de 10 mm (3/8'') de diámetro hasta una profundidad de 75 mm (3'').
06
06
002862.eps
12

3 4
CAUTION: Be sure the anchors 10 are seated flush with the
concrete surface.
PRECAUCIÓN: Cerciórese de que los anclajes 10 queden
nivelados respecto de la superficie de hormigón.
Tighten the lag bolts 08 only until the wall plate 07 is held tightly in place.
CAUTION: Improper use could reduce the holding power of the lag bolt.
DO NOT over-tighten the lag bolts.
Ajuste los tornillos tirafondo 08 solamente hasta que queden firmes contra la
placa mural 07 .
PRECAUCIÓN: El uso indebido podría reducir la capacidad de retención
de los tornillos tirafondo. NO ajuste en exceso los tornillos tirafondo.
Vaya al PASO 3 en la PÁGINA 18.
Go to STEP 3 on PAGE 18.
10
09
08
07
13

CAUTION: Avoid potential personal injuries and property damage!
●Studs must be at least 2x4 in. / 25 ga.
●If back side of wall is unfinished, drywall must be installed to a minimum of one stud left and
right of the stud(s) being used to install the mount
●Drywall must be a minimum of 1/2 in. (13 mm) thick on each side of the studs, and a minimum
clearance of 1 ⅞in. (48 mm) behind the wall is required
●Pilot holes MUST be drilled to a depth of 1 in. (26 mm), using a 1/2 in. (13 mm.) diameter drill bit
●This product must be centered on the studs
●Stud type and structural strength must conform to the North American Specification for the
Design of Cold-Formed Steel Structural Members [362 S 125 18, C-Shape, S - Stud Section]
●Drywall must be secured to studs with screws 12 in. (304.8 mm) on center
Kit de anclaje para paredes con montantes de acero #SSMK1 (no incluido) - Póngase en contacto con el Servicio de Atención al Cliente en el
1-888-333-1376 p
ara que le envíen estas herramientas adicionales directamente a su hogar.
Steel Stud Anchor Kit #SSMK1 (not included) - contact Customer Service at 1-888-333-1376 t
o inquire about the SSMK1 kit.
1/4-20 x 1¾ in.
1/4 in.
1/4-20 SnapToggle BB
PRECAUCIÓN: Evite posibles lesiones personales y daños materiales.
●Los montantes deben tener al menos 51 mm x 102 mm (2 x 4 pulgadas) /
0.6 mm (25 ga.) de grosor
●Si la parte posterior de la pared no está terminada, se debe aplicar mampostería al
menos en uno de los montantes a la izquierda y a la derecha de los montantes que
se empleen para instalar el soporte
●La mampostería debe tener un grosor mínimo de 13 mm (1/2 pulg.) en cada lado de
los montantes y una distancia mínima de 48 mm (1 ⅞ pulg.) por detrás de la pared
●Los orificios guía DEBEN taladrarse hasta una profundidad de 26 mm (1 pulg.),
utilizando una broca de 13 mm (1/2 pulg.) de diámetro
●Este producto debe ubicarse en el centro de los montantes
●El tipo de montante y la resistencia estructural deben ajustarse a la Normativa
norteamericana para el diseño de componentes estructurales de acero forjado en
frío [362 S 125 18, C-Forma, S - Sección de montante]
●La mampostería se debe fijar a los montantes con tornillos de 304,8 mm (12 pulg.) en el centro
(45 mm)
(6 mm)
para montantes de acero
Steel Stud InstallationSTEP 2C Attach Wall Plate
PASO 2C Fijar la placa mural
14
S1 x4
S2 x4 S3 x4

24 in.
(609 mm)
16 in.
(406 mm)
24 in.
(609 mm)
16 in.
(406 mm)
21
24 in.
(609 mm)
16 in.
(406 mm)
24 in.
(609 mm)
16 in.
(406 mm)
406 mm (16 in.)
609 mm (24 in.)
25 mm (1 in.)
13 mm
(1/2 in.)
NOTE: Do not use center 3 slots for steel stud mounting.
NOTE: TV with brackets can be shifted to the left or right from center.
Consider this when selecting the location of your wall mount.
NOTA: Los televisores con soportes se pueden mover hacia la
derecha o hacia la izquierda desde el centro. Tenga esto en cuenta
cuando seleccione la ubicación de la montura de pared.
NOTA: No utilice las tres ranuras del medio para instalar el soporte en
un montante de acero.
06
06
15

3 4
S1
S1
5 6
S1
S1
16

24 in.
(609 mm)
16 in.
(406 mm)
7
Tighten all screws S2 only until they are pulled firmly against the wall plate 07 .
CAUTION: Improper use could reduce the holding power of the screws S2 . DO NOT over-tighten the screws S2 .
Apriete todos los tornillos
S2
solo hasta que queden firmemente sujetos contra la placa de pared
07
.
PRECAUCIÓN: El uso incorrecto podría reducir la capacidad de sujeción de los tornillos S2 . NO apriete excesivamente los tornillos S2 .
07
S1
S3
S2
17

HEAVY! You may need assistance with this step.
¡ELEMENTO PESADO! Es posible que necesite ayuda en este paso.
STEP 3 Hang TV onto Wall Plate
PASO 3 Colgar el televisor en la placa de pared
18
1
Instale el montaje del soporte del televisor; para esto, encaje los enganches superiores de los soportes del montaje 04 /05 sobre el borde superior de la placa de pared 07 .
CONSEJO: Incline los soportes del televisor 04 /05 como se muestra para facilitar la instalación.
Install the TV / Bracket assembly by fitting the top hooks of BOTH TV brackets 04 /05 over the top edge of the wall plate 07 .
TIP: Tilt TV brackets 04 /05 as shown for ease of installation.
07
04
05
04
07
07
05
04
05
04
05
04
05

19
2
Swing the TV/mounting brackets 04 /05 down until they rest against the wall plate 07 .
Install
securement
screws
11
to secure arm to wall plate
07
.
IMPORTANT: BEFORE MOVING YOUR TV, securely tighten down screws 11 to properly install the assembly.
CAUTION: Avoid potential personal injuries or property damage! Screws 11 must be installed to secure arms to wall plate 07 .Periodic tightening may be required.
Pivotar los soportes de montaje
04 /05
hacia abajo hasta que se apoyen en la placa de pared
pared 07 .
Instalar los tornillos de fijación
11
para fijar el brazo de la
placa
07
de la pared.
IMPORTANTE: ANTES DE MOVER SU TV, apriete los tornillos 11 para instalar correctamente el ensamblaje.
PRECAUCIÓN: Evite posibles lesiones personales o daños materiales. Se deben instalar tornillos 11 para sujetar los brazos a la placa de pared
07 . Puede
ser necesario un apriete periódico.
11
07
07
04
05

20
EXTEND / RETRACT
Si el televisor no se extiende o se retira
correctamente, retire el televisor (consulte la
PÁGINA 21) y vuelva a instalar el siguiente PASO 3
en la PÁGINA 18.
IMPORTANTE: ANTES DE MOVER SU TV,
apriete los tornillos 11 mostrados en la PÁGINA
19 para instalar correctamente el ensamblaje.
El televisor debe acomodarse fácilmente al moverlo, y luego
quedar en su lugar. Si el televisor está demasiado suelto o
demasiado ajustado, ajuste las perillas de tensión lateral T.
NOTA: Una vez que el televisor esté en su lugar, ajuste las
perillas de tensión lateral Tpara evitar un movimiento indeseado.
EXTENSIÓN/REPLIEGUE
12
T
Your TV should adjust easily when moved, then stay in place.
If your TV is too loose or too tight, adjust side tension knobs T.
NOTE: Once your TV is in place, tighten the side tension
knobs Tto prevent unwanted movement.
If your TV doesn't extend or retract properly,
remove your TV (See PAGE 21), then reinstall
following STEP 3 on PAGE 18.
IMPORTANT: BEFORE MOVING YOUR
TV, securely tighten down screws 11 shown on
PAGE 19, to properly install the assembly.
INCLINACIÓN
TILT
NIVEL
LEVEL
TV Adjustments
Ajustes del televisor
04
04
05
05
Table of contents
Other Sanus TV Mount manuals

Sanus
Sanus VisionMount MD115 User manual

Sanus
Sanus DLL1 User manual

Sanus
Sanus Decora DST1 User manual

Sanus
Sanus 6901-170131 User manual

Sanus
Sanus VLT7-B2 User manual

Sanus
Sanus New VisionMount VMT15 User manual

Sanus
Sanus Sanus VisionMount LL11-B1 User manual

Sanus
Sanus SAN25BB User manual

Sanus
Sanus SLT4 User manual

Sanus
Sanus OLT15 User manual

Sanus
Sanus VLT7-B3 User manual

Sanus
Sanus MMF12b User manual

Sanus
Sanus VLT16B1 User manual

Sanus
Sanus BXL1 User manual

Sanus
Sanus VLF613 User manual

Sanus
Sanus VisionMount LT25 User manual

Sanus
Sanus VXF730-B2 User manual

Sanus
Sanus SLF5 User manual

Sanus
Sanus NEW VisionMount VLT14 User manual

Sanus
Sanus VisionMount MF215 User manual