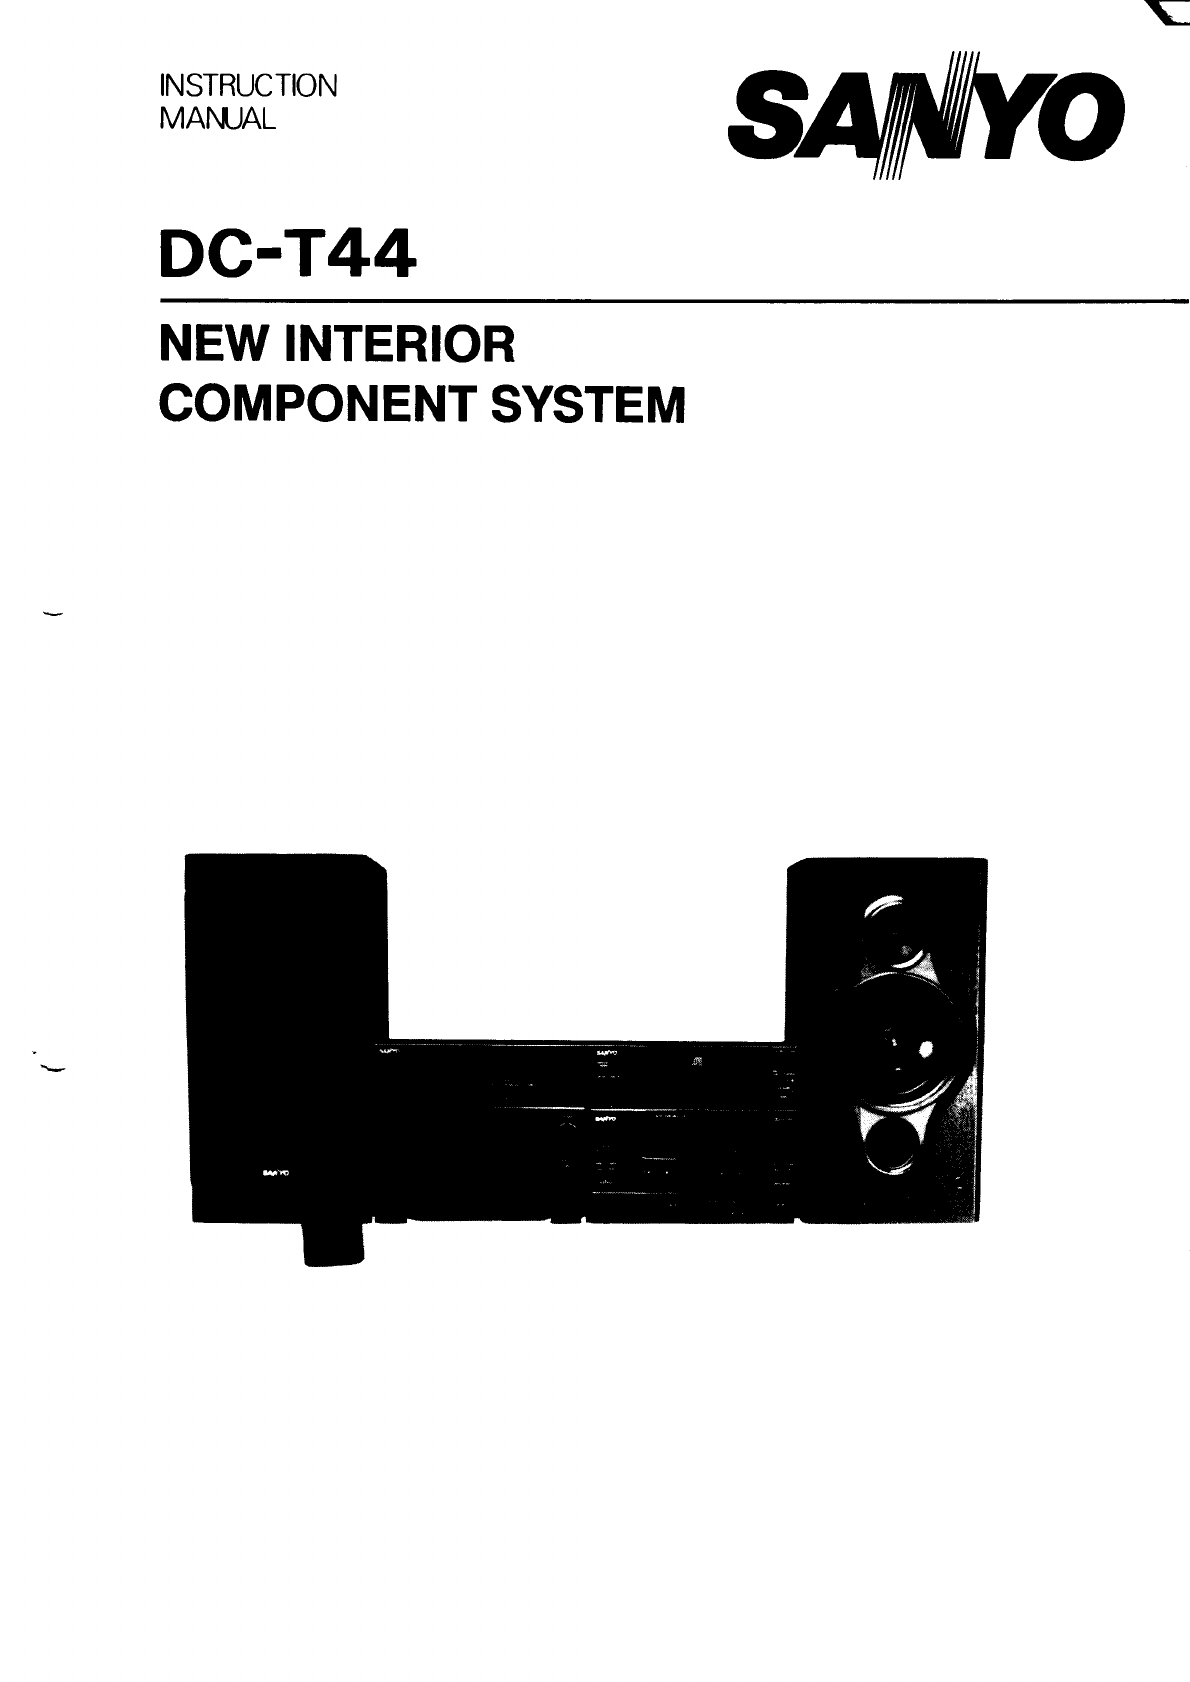
Sanyo DC-T44 User manual

INSTRUCTION
MAIWAL
DC”T44
NEW INTERIOR
COMPONENT SYSTEM

CAUTION
I
CAUTION–INVISIBLELASERRADIATIONWHENOPENAND
INTERLOCKSOEFEATEO.AVOIOEXPOSURETOBEAM.
ADVARSEL-USYNLIGLASERsTflIILINGVEOitBNING,NAR
SIKKERHEOSAFBRYDEREERUOEAFFUNKTION,UNOGAUOSkTTELSE
FORSTRALING.
VARNING-OSYNLIGLASERSTRALNINGNAROENNAOELiifl ~PPNAD
OCHSPARRARURKOPPLAO.STRALENARFARLIG.
VORSICHT–UNSICHTBARELASERSTRAHLUNGTRITT AUS,WENN
OECKELGEtiFFNETUNOWENNSICHERHEITSVERRIEGELUNG
iiBERBRUCKT1ST.NICHT,OEMSTRAHLAUSSETZEN.
VARO–AVATTAESSAJASUOJALUKITUSOHITETTAESSAOLETALTTIIN1
NAKYMATTtiMALLELASERSATEILYLLE.ALAKATSOSATEESEEN.
-USE OF CONTROLS OR ADJUSTMENTS OR PERFORMANCE OF PROCEDURES OTHER THAN
THOSE SPECIFIED INTHE OPERATING INSTRUCTIONS MAYRESULTIN HAZARDOUSRADIATIONEXPOSURE.
THE COMPACT DISC PLAYERSHOULD NOT BE ADJUSTED OR REPAIREDBYANYONE EXCEPT PROPERLY
QUALIFIEDPERSONNEL 1-
-1-

CONTENTS
PRECAUTIONS................................................................... 2
ARRANGEMENT................................................................3
CONNECTIONS .................................................................. 4
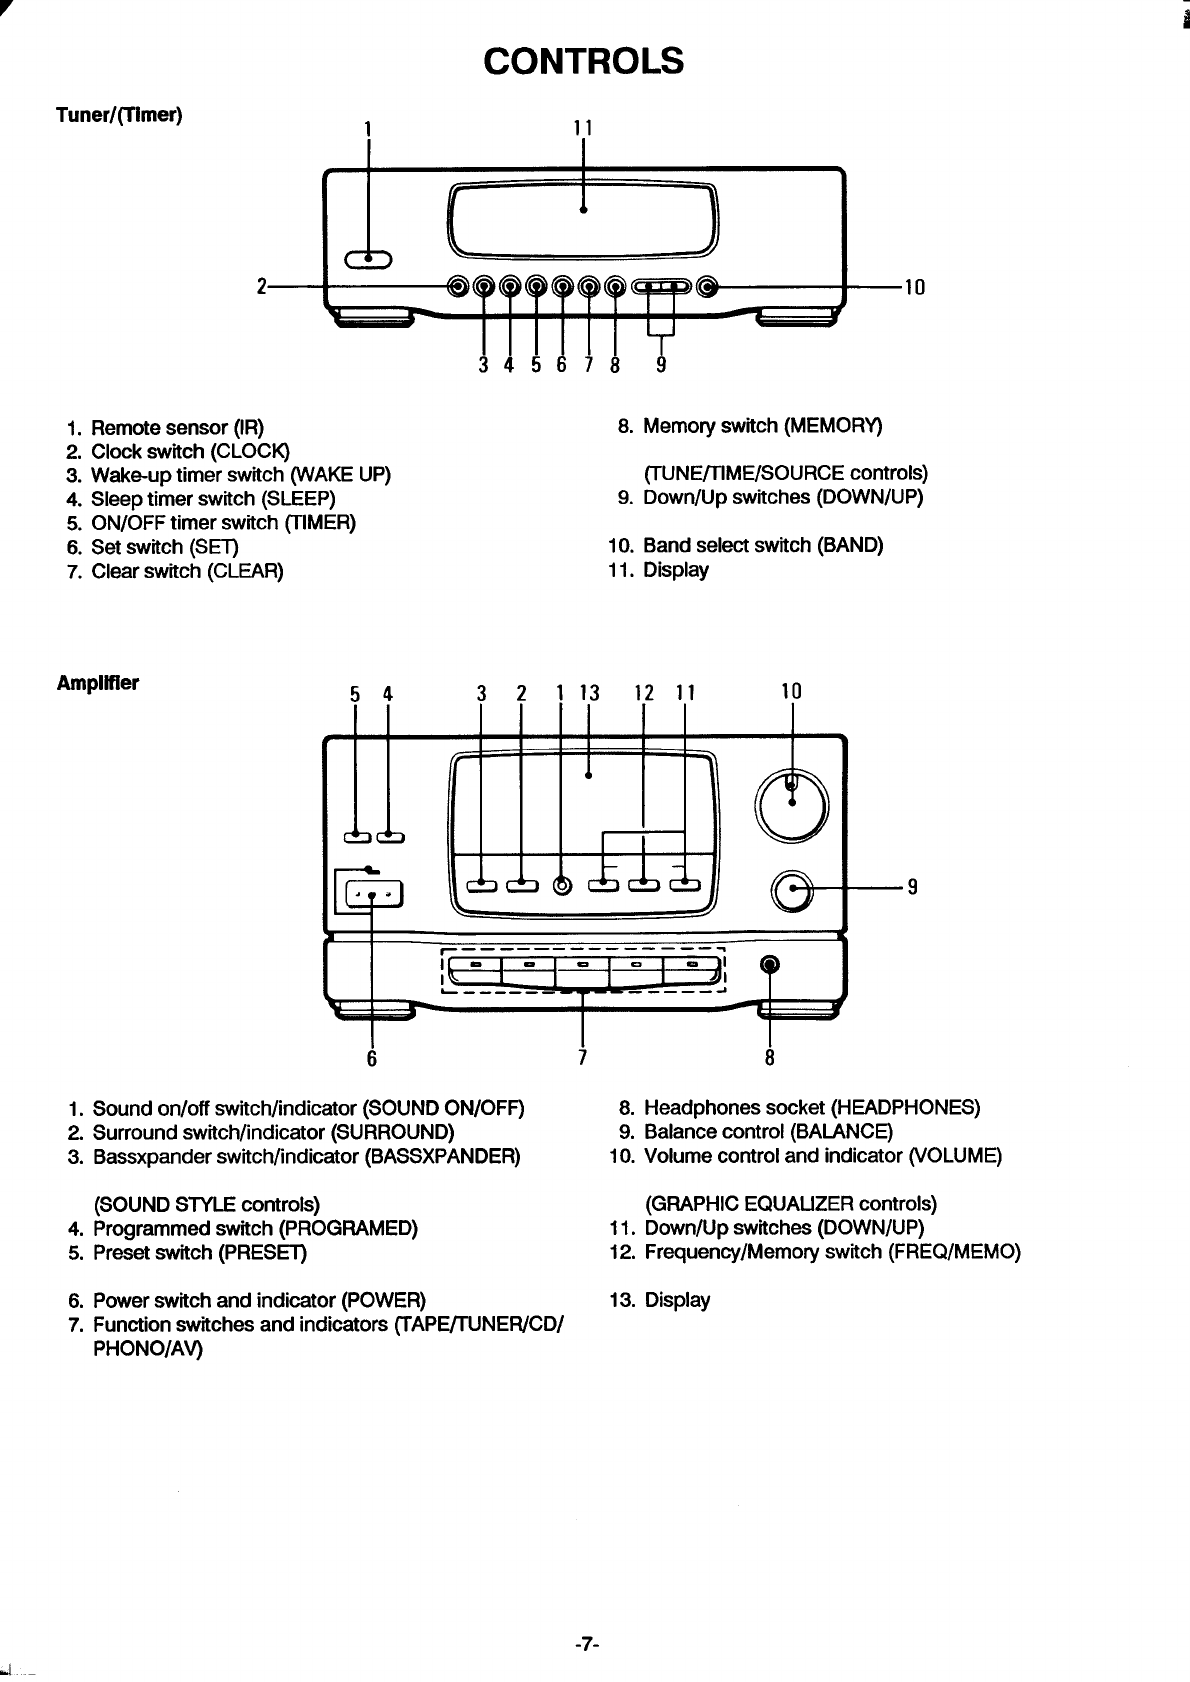
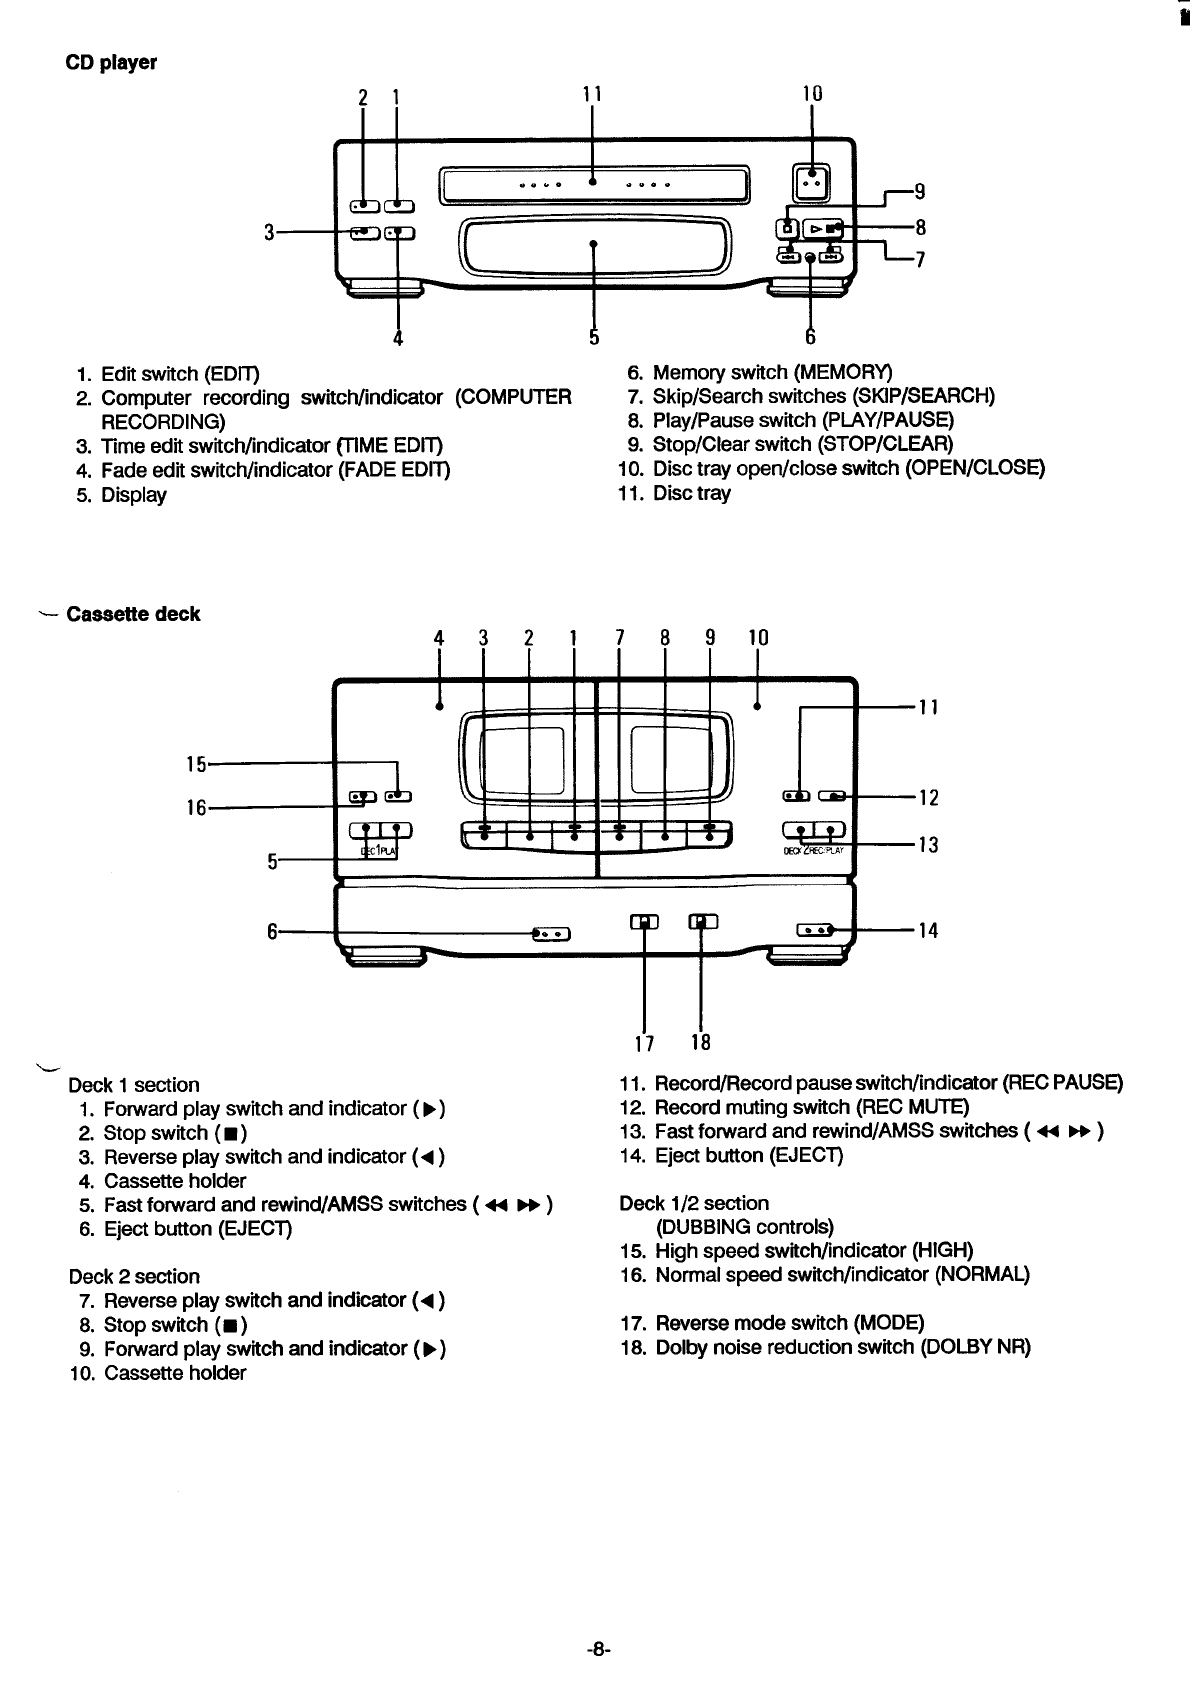
CONTROLS ......................................................................... 7
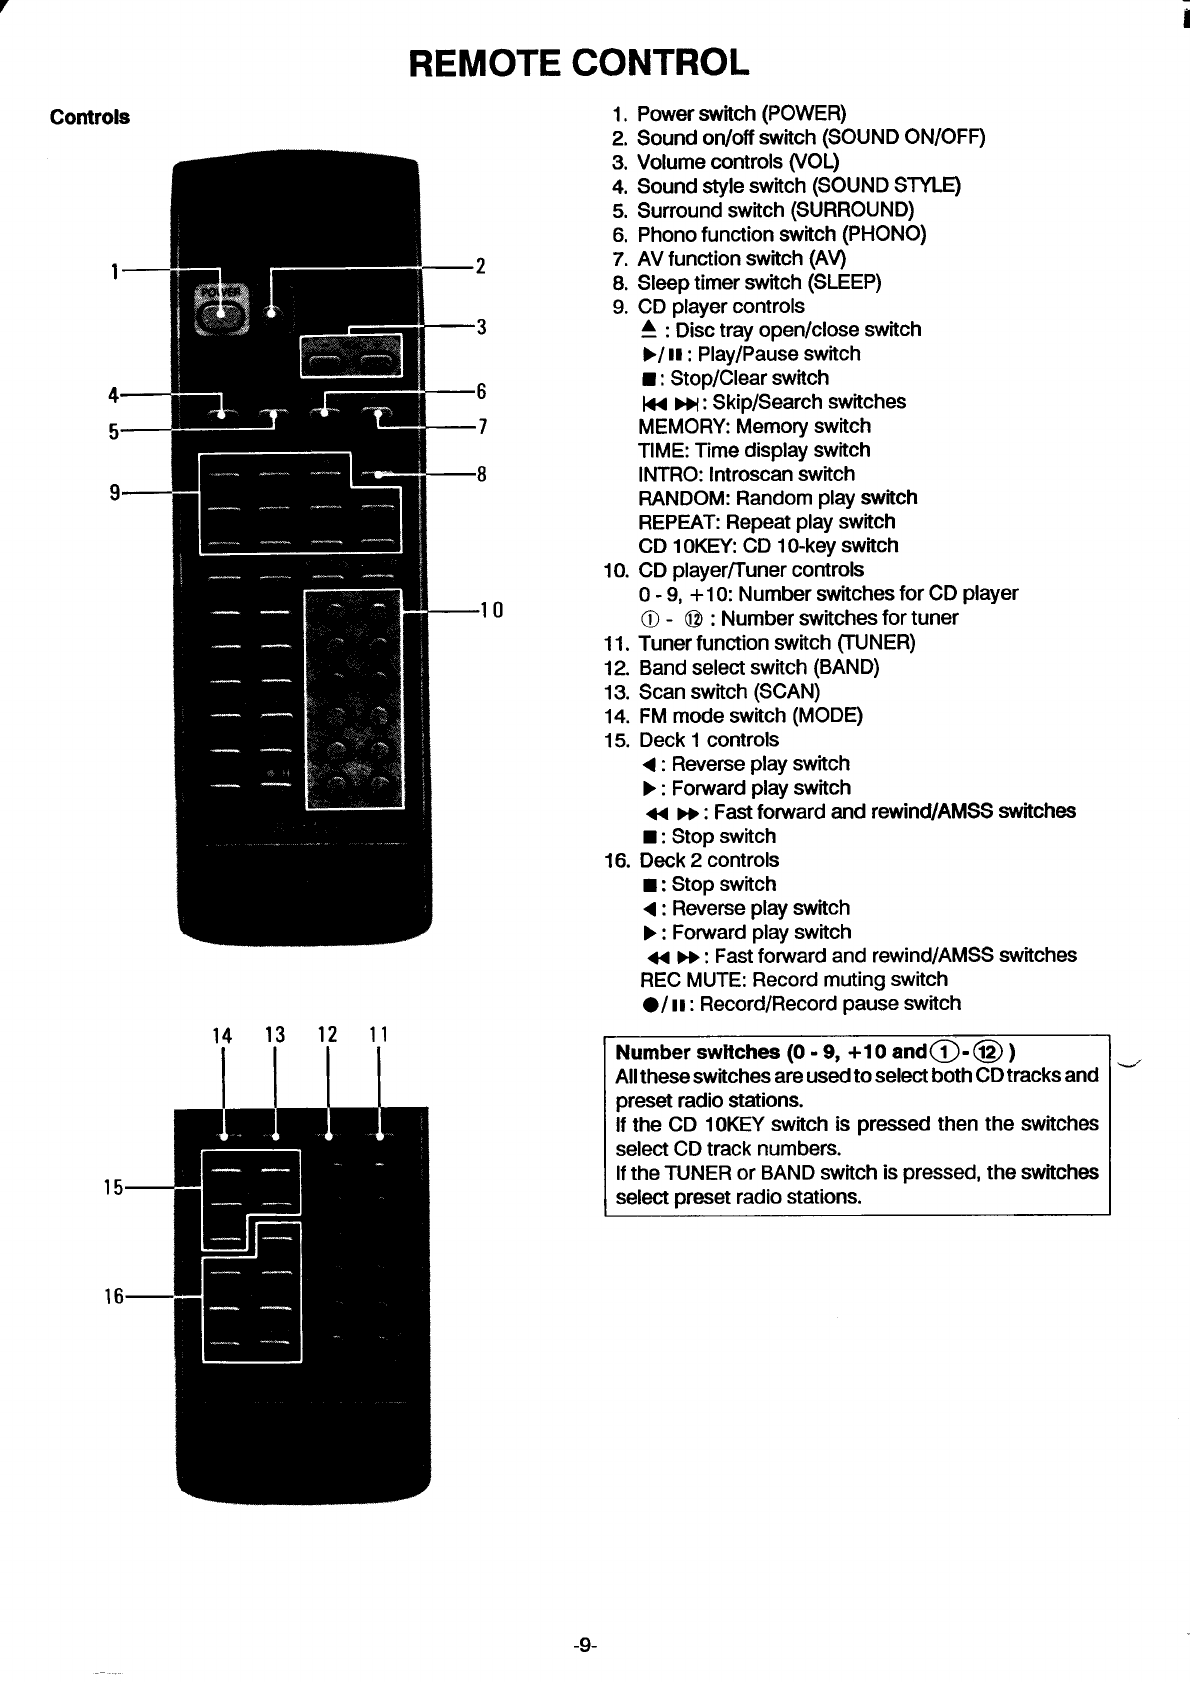
REMOTECONTROL ..........................................................9
ADJUSTINGTHECLOCK ................................................ 10
BEFOREOPERATION....................................................... 11
ADJUSTINGTHE SOUND QUALITY............................... 12
CD PIAY ............................................................................. 13
LISTENINGTOTAPES .....................................................15
LISTENINGTO THE RADIO............................................. 16
LISTENINGTORECORDS ORAVSOURCES ................ 16
BEFORERECORDING AND DUBBING.......................... 17
RECORDINGCOMPACT DISCS..................................... 17
TAPE DUBBING................................................................. 20
RECORDING FROM THE TUNER, PHONO OR AV
INPUT.................................................................................. 21
TIMER OPERATION .......................................................... 21
MAINTENANCE.................................................................. 23
REMOTECONTROLOPERATION ..................................24
SPECIFICATIONS............................................................... 26
PRECAUTIONS
Ifwater should enter the unit, electrical shock or real- -
functionmayresult.Alwaysuse itinaplacewherethere
islow humidityand littledust.
~Do not use where there are extremes of temperature
(below5°C orexceeding 35”C) orwhere directsunlight
may strikeit.
-Because of the CD player’s extremely low noise and
wide dynamic range,there mightbe atendency to turn
the volume on the amplifierunnecessarily high. Doing
so may produce an excessively large output from the
amplifierwhich could damage your speakers.
Sudden changesinthe ambienttemperaturemaycause
condensationtoformonthe opticallensinsidethe unit.
Ifthis happens, takeout the disc, Ieavethe unitwiththe
disctray extended for about 1hour, and then proceed
to operate.
The system’sspeakers use powerful magnets. Do not
placetimepieces, creditcards orothermagneticcards,
cassette tapes, video tapes or other magnetic tapes
near the speakers.
-2-

ARRANGEMENT
Lch speaker
Example 2
Tuner CD player
wm
[[ I
t., .,-,.
1IA●d~~-
=Amplifier Caseeltedeck
_L____.Jl
Detachlngthespeaker panel
-3-

CONNECTIONS
Rch speaker L ch speaker
To conneot To dieoonned
CD player \\ Tuner
—
Cassettedeok ~
Ilmll
I
Power SI.UXMY Speakers
Connect the mains lead to an AC wall outlet. When connecting the speakers, makesurethat (+) and
Note: (-) Polarties are matched properly.Otherwise,the sound
Do not connect the mains lead to an AC outlet until all mayappearto be lackinginthe bass range and instability.
connectionshave been made. Connectthe speakerwirewiththe stripetothe redterminal
(+) and the other wireto the black terminal (-).
The systemisnot disconnectedfromthe mainsunlessitis Atthe speakers At the main unit
unplugged fromthe AC outlet. i\l
‘Flat connection leads
(Black)
I@$Jti
SYSTEM CONNECTOR-1 (Amplifier-- Deck)
SYSTEM CONNECTOR-2 (Amplifier-- Tuner)
(Blue) (Blue)
SYSTEM CONNECTOR-3 (Amplifier-- CD player)
Lever
=@
/:
L
To connect, push the middle ofthe plug and insertituntil
itclicks.
Connect so that the white stripe wire comes to the right
side.
-4-

r
Aerials
15demalaerial
T
/A
Aerialwire
I
i
Aerialholder
‘Ta
(w\AM loopaerial
‘%? L\ ‘
Lw
E:T. A;
p
-..-.--,
--------
-.:=------3
/-------- --
~.;.-” ii:
~~::?s~-’ Q
---
*..-
ln areas close to atransmitterthe simde indoor aerial is Headphones socket (HEADPHONES)
sufficientto receive broadcasts. Extend the aerialwireas Connect stereo headphones (8 ohms to 10 kohms, not
straightas possibleand, while listeningto the sound from supplied)formonitoringorforprivatelistening.The speak-
the system, secure it in aposition which yields minimal ersare automaticallydisconnectedwhen headphones are
distortionand noise. connected to this socket.
Infringe areas orwhere reception isdistortedor noisy,an
externalaerial(notsupplied)shouldbeconnected instead
ofthe simple indoor aerial. Consult your dealer.
AM loop aerial
Mountthe loop aerial inthe aerial holder and place it in a
positionwhich yields the best AM (MW/LW) reception, or
attachthe aerial holder to awall or other surface. Adjust
the angle of the aerialforthe best reception.
Note:
To minimize noise, do not place the aerial close to the
systemor alV.
-5-

Connections for AV (Audio/Video) equipment
This unit comes with connection facilitiesfor audio/video connected. Also,the MONITOR OUT socket can be used
equipment,and they enable aturntable,videodisc player, to connect aTV for monitoring the images of avideo
VCR, BS tuner or digital audio tape (DAT) deck to be device.
DAT 000
-g -fno
------
0I1 1 111 1 ,000
~~
Analogoutputs
I
WIll
Analoginputs
Video disc player/BS tuner/VCR
1= I
—
Analogaudiooutputs Videooutput
Videoinput
1yII
Videocord
-6-

ii
r
Tuner/(Timer)
CONTROLS
2I10
345678
1. Remote sensor (IR)
2. Ciock switch (CLOCK)
3. Wake-up timer switch (WAKEUP)
4. Sleep timer switch (SLEEP)
5. ON/OFF timer switch (TiMER)
6. Set switch (S~
7. Ciear switch (CLEAR)
Ampiifier
1.
2.
3.
4.
5.
6.
7.
8.
9.
10.
11.
Y
9
Memory switch (MEMORY)
(TUNE/TiME/SOURCE controis)
Down/Up switches (DOWN/UP)
Band seiect switch (BAND)
Dispiay
54 32113 12 11 10
—————— —-— ——— ——=
I
A---——— —-—— —4
L’
67
Sound on/off switch/indicator(SOUND ON/OFF) 8.
Surround switch/indicator (SURROUND) 9.
Bassxpanderswitch/indicator (BASSXPANDER) 10.
(SOUND STYLE controis)
Programmedswitch (PROGRAMED) 11,
Presetswitch (PRESET) 12,
Powerswitch and indicator (POWER) 13,
Functionswitches and indicators (TAPE/TUNER/CD/
PHONO/AV)
8
—9
Headphones socket (HEADPHONES)
Balance controi (BALANCE)
Voiumecontroland indicator (VOLUME)
(GRAPHiC EQUALIZERcontrols)
Down/Up switches (DOWN/UP)
Frequency/Memory switch (FREQ/MEMO)
Display
-7-
d

i
CD player
1.
2.
3.
4.
5.
21 11 10
f1 1 I I *
ELL[[ I
. . . . A. . . .
3
Edfi switch (ED~ 6.
Computer recording switch/indicator (COMPUTER 7.
RECORDING) 8.
Time edit switch/indicator(TIME EDll) 9.
Fade edit switchfindicator(FADE EDIT) 10.
Display 11.
=Cassette deck
6
Memory switch (MEMORY)
Skip/Search switches (SKIP/SEARCH)
Play/Pause switch (PIAY/PAUSE)
Stop/Clear switch (STOP/CLEAR)
Disctray open/close switch (OPEN/CLOSE)
Disctray
5IC#clFtAt
LDeck 1section
1. Forwardplay switch and indicator(F)
2. Stop switch(¤)
3. Reverse play switch and indicator(4)
4. Cassette holder
5. Fastforward and rewind/AMSS switches (*w)
6. Eject button (EJECT
Deck2section
7. Reverse play switchand indicator(<)
8. Stop switch(m)
9. Forwardplay switchand indicator(›)
10, Cassette holder
14
11. Record/Record pause switch/indicator(REC PAUSE)
12. Record mutingswitch (REC MUTE)
13. Fast forward and rewind/AMSS switches (44 w)
14. Eject button (EJECT)
Deck 1/2 section
(DUBBING controls)
15. High speed switch/indicator(HIGH)
16. Normal speed switch/indicator(NORMAL)
17. Reverse mode switch (MODE)
18. Dolby noise reductionswitch (DOLBYNR)
-8-

REMOTE CONTROL
Controls
1
4
5
9
14 13 12 11
15
16
2
“3
“6
-7
-8
-10
1.
2.
3.
4.
5.
6.
7.
8.
9.
10.
11.
12.
13.
14.
15.
16.
Powerswitch (POWER)
Sound on/off switch (SOUND ON/OFF)
Volume controls(VOL)
Sound styleswitch (SOUND SME)
Surround switch (SURROUND)
Phono functionswitch (PHONO)
AV functionswitch (AV)
Sleep timer switch (SLEEP)
CD player controls
4: Disctray open/close switch
➤/M: Play/Pause switch
■:Stop/Clear switch
144H: Skip/Search switches
MEMORY Memory switch
TIME: Time display switch
INTRO: Introscanswitch
RANDOM: Random play switch
REPEAT Repeat play switch
CD 10KEY CD 10-key switch
CD player/Tuner controls
0-9, +1 O:Number switchesfor CD player
0- @: Number switchesfor tuner
Tuner function switch (TUNER)
Band select switch (BAND)
Scan switch (SCAN)
FM mode switch (MODE)
Deck 1controls
<: Reverse play switch
}: Forward play switch
-M: Fastforward and rewind/AMSS switches
■:Stop switch
Deck 2controls
■✚Stop switch
<: Reverse play switch
h: Forward play switch
~w: Fastforward and rewind/AMSS switches
REC MUTE: Record mutingswitch
●/II: Record/Record pause switch
Number swltchea (O-9, +1 Oand~- @)
Alltheseswitches areused to select both CDtracks and
preset radio stations.
If the CD 10KEY switch is pressed then the switches
select CD track numbers.
Ifthe TUNER or BANDswitchis pressed, the switches
select preset radio stations.
_.
-9-

Inserting batteries
12Remote control range
u
L-J
L=J
00
——
t
2R03/LR03/AM/UM-4
(not suppfied)
Remote‘ensorl%wI
Note:
Afwaysremove batteries ifthe remote controlis notto be
usedforamonthormore.Batteriesleftinthe unitmayleak
and cause damage.
ADJUSTING THE CLOCK
“0:00’ blinkswhen the mains lead isconnected to the AC
outletfor the firsttime.
Example:To set “7:30”,
1. Pressthe CLOCK switchfor 1or more seconds.
CLOCK
0:00
The “CLOCK’ and hours displays blink.
If nothingfurther is done, the time setting mode will
be released after30 seconds.
2. Pressthe UP and DOWN switchesto set the “hours.”
CLOCK
7:00
3. Pressthe MEMORY switch.
CLOCK
7:00
The minutesdisplay blinks.
4. Pressthe UPand DOWN switchesto setthe “minutes.”
CLOCK
7:30
5. Pressthe MEMORY switch.The clock starts.
The time can be set accurately by pressing the
MEMORY switchwhen atime signal is heard.
These operationscan be done, even ifthe powerisoff.
When apowerfailureoccurs,the memorycontentswill
be retained for one-half day, but the clock willblinkat
that time. Reset the time when the display blinks be-
cause ofapowerfailure.Resetthe timerON/OFF times
as well.
-1o-

ii
BEFORE OPERATION
Turn down the VOLUME control so that the sound will
not suddenly be delivered at ahigh level.
Pressthe POWER switch.
To turn offthe power, press it again. The clock display
and POWER indicator remain lit.
While the SOUND ON/OFF indicator is lighting, no
sound is obtained from the speakers or headphones.
Turn itoff by pressingthe SOUND ON/OFF switch.
When the power is switched ON:
Tunec
“Frequency display” appears on the display.
Amplifiec
The VOLUME indicator, one of the function indicators
and display light.
CD playec
If the function is “CD”, “no dISC” appears on the
display. If adisc has been placed on the disc tray, its
total number of tracks and total play time appear. Wmh
any other function, “Cd OFF” appears.
Adjusting the volume
Turn the VOLUME control or press the “+” or” -” VOL
switchon the remote control.
OR
To mute the sound temporarily
Pressthe SOUND ON/OFF switch,The SOUND ON/OFF
indicatorlights.Pressthe SOUND ON/OFF switchagainto
restorethe previoussound level.
Adjusting the left/right speaker balance
Use the BAIANCE controlto adjust the left/rightspeaker
balance. Normally,it is kept at itscentre position.
Selecting the function
The function is automatically selected when CD play or
tape playback is stafted, or when any of the function
switcheson the tuner have been operated.
-When the function selection is changed, CD play or
tape playback isautomaticallystopped. (exceptduring
tape dubbing.)
-Pressthe PHONO orAV functionswitchforturntableor
compatible audio/video equipment operation.
Surround sound system
Pressthe SURROUND switch.The SURROUND indicator
lightsand a“Wide” effect is created.
-The surround effect cannot be activated whileyou are
listeningto monaural sound.
Base expander system
Press the BASSXPANDERswitch to enhance the bass –
sound. The BASSXPANDERindicatorlights.
Spectrum analyzer
Indicates the input level and peak value of each sound
range.
Generalinputleveland peakvalueare indicatedon LEVEL
WHAT TO DO IF ...
Ifthe operationofthe unitor display isnot normal,turnoff
the POWER switch on the main unit and then turn it on
again.
Ifthe powerisnotturned offeven by pressingthe POWER
switch,disconnectthe mainsleadfromtheAC outlet.Then
connect the lead to the AC outlet and resumethe opera-
tion. Inthis case, resetthe clock and memorycontents.
-11-

ADJUSTING THE SOUND QUALITY (SOUND STYLE)
Adjusting the programmed sound style
The graphic equalizer has been programmed with aflat
response setting, plus setting for fwe dfierent sound
styles,matchingthe followingtypes of music:
POP: Poos. etc.
JAZZ Jazz, etC.
ROCK Rock music,etc.
CiASSIC: Classical music,etc.
+12::::: ::: :24 CEmJm
+0::::: ::: :20
+4._:—: .:$4
:—:—:
o~::—:~: :~12 4A22
-4.::::: :: :8 aocK
-a::::::: ::4 —CLM2ic
-e ~. .
SO”120”400”* 2* 42”19’”IEVEL .0 E%
DISCO: Disco music, etc.
IFm
Selectthe sound style matchingthe musicto be listened
to by pressingthe PROGRAMED switchon the main unit,
orthe SOUND STYLE switch on the remote control.
Each time the switch is pressed, the display changes as
follows:
l-pop -JAZZ~ROCK~C1-AsslC ~DISCO~FiAT 1
Equalizer programming
Up to 6extrasound styiescan be programmedto suitthe
acoustics of the room or your indwidual musical prefer-
ences.
1.
2.
3.
4.
5.
6.
7.
Pressthe PRESETswitchto seiectthe position(A-F)to
be memorized.
When the switch is pressed, the ciispiaychanges
fromthe spectrumanalyzerto the graphic equaiiier.
“PRESET” appears.
Eachtimetheswitch ispressed,thedispiay changes
as foiiows:
A-B~C-D-E+F
Pressthe FREQ/MEMO switch(forie=than o.5se@ to
specifyafrequency. The biinking indicatorshtis each
time the switchis pressed.
Blinking_
E
+12::::: :
H$& ~: ; ;
—.—:— :—;
-4:;~::
-a::::::
-12: 50”1!50” 400” lk”2.4k”
Pressthe UP or DOWN switchto set the desired ievei.
Repeat steps 2-3 to set the other frequency ieveis.
Press the FREQ/MEMO switch continuously untii ~
blinksinthe dispiay. (Memory enabieci.)
Verify each frequency ievei, then press the FREQ/
MEMO switchcontinuouslyuntil❑iights.Theseiected
preset positionis memorized.
Repeat steps 1-6 to memorizethe remaining preset
positions.
if the next step is not taken within approximately 5
seconds during steps 1-6, the dispiay returnsto the
spectrum analyzer.
Press the PRES= switch, to listen to each preset
programme setting.
The memory contents wiii be iost if the mains iead is
disconnected or apower faiiure continues for aiong
period oftime.
Manuai equaiizer settings
Spec-Hyafrequency with the FREQ/MEMO switch,thenset
the desired ieveiwith the UP or DOWN switch.
Thisoperationisalsopossiblewtiiieusingaprqyamrned
sound style.
This setting is not memorized and does not affectthe
programmed ieveis.
Afterapproximately5seconds, the spectrum analyzer
disDlavrear.mesrs.
,., -,,
-12-

ii
CD PLAY
Use compact discs bearing the symbol shown below. In
additionto conventional 12 cm CDs, this system can be
usedto play 8cm CDs without an adapter.
drgYj
DIGITAL AUDIO
1.
2.
3.
Pressthe OPEN/CLOSE switch.
The disc tray slides out and “OPEN” appears on the
display.
“Cd OFF” isdisplayed ifany otherfunctionhas been
selected.
Placethe disc withthe label facing upon the disctray.
For12 cm CD For8cmCD
Pressthe OPEN/CLOSE switch again to closethe disc
tray.
4. Pressthe PLAY/PAUSEswitch.
~
“D” appears, and play starts from the firsttrack. The
track number, elapsed play time for the current track
and whole number oftracks on the disc are dksplayed.
-Ifthe disc contains 16 or moretracks, ”➤”appears
on the rightof the”1 5“ indication.
-Playwillalso begin ifthe disc tray isopen.
5. Pressthe STOP/CLEAR switchto end disc play.
The total number of tracks and total play time on the
disc are displayed.
When the lasttrack has been played, the player auto-
maticallystops.
When the OPEN/CLOSE switchispressed duringplay,
playwillstop and the disc tray willslide out.
Notes on handlina compact discs
Do notexposetfie discto directsunlight,high humidity
or hightemperatures for extended periods of time.
Discs should be returned to their cases after use.
Do not apply paper or write anything on the disc sur-
face.
Handle the disc by its edge. Do not touch the playing
surface (glossy side).
Fingerprintsand dust should be carefullywiped offthe
playingsutface of the disc with asoft cloth.
Wipe inastraight motionfromthe centreto the outside
ofthe disc.
Never use chemicals such as record cleaning sprays,
antistaticsprays or fluids, benzine or thinner to clean
mmpact discs.
Temporarily stopping play
Pressthe PIAY/PAUSE switch.”D” blinksonthe display,
To resume play, pressthe switch again.
Direct track selection
Byusingthe remote control, play can be started immedi-
atelyfromthe desired track.
Whileadiscisplaying,itispossibleto switchimmediately
to aparticulartrack.
Proceedwiththe operationafterthe CD 10KEYswitchhas
been pressed.
Examples
To startfromtrack 3on the disc, pressthe 3switch.
To startfromtrack 10, press +1 O,then O.
To startfromtrack 25, press +10 twice, then 5.
Skip play
To skip to track 6while track 3is playing, press the PM
StQP/SEAFiCHswitchrepeatedlyuntil“6’ appearsinTRACK
on the display.
To skip back to track 3while track 6is playing, pressthe
144SKIP/SEARCH switch repeatedly until“3’ appears. ‘“
Search (forward/reverse)
If the ~or wSKIP/SEARCH switch is pressed during
play,the playerwillsearch at high speed inthe forwardor
reversedirectionwhilethe switch isbeing pressed.When
the switchis released, normal play willcontinue.
Introscsn
Pressthe INTRO switchon the remote controlto play the
first 10 seconds of each track. “INTRO” appears on the
display.
-Pressthe INTRO switchagain to returnto normalplay.
-If the INTRO switch is pressed during normal play,
introscanwillstartwiththe nexttrack on the disc.
Random play
Press the RANDOM switchonthe remotecontrolto begin
randomplay.The playerwillautomaticallyselect and play
tracksonthe disc at random. “RANDOM” appears onthe -
display.
Ifthe RANDOM switch is pressed during random play,
the playerwillselect the next random track.
Random introscan play
Pressthe INTRO switch,then the RANDOM switch,to play
the first10 seconds of each track at random.
Repeat play
Before or during play, press the REPEAT switch on the
remote control.The player will play all the tracks, all the
programmedtracks, allthe introscanplaytracksorallthe
randomplaytracksrepeatedly.“REPEAT”appeam onthe
dsplay.
To cancel repeat play, press the REPEAT switch again.
“REPEAT’ d-ppt?ars.
-13-

Time display selection
Pressthe TIME switch on the remote control repeatedly
during play. The display changes in the following se-
quence:
Remainingtime for the currenttrack
Remainingtimeforthe entiredisc (Duringprogrammed
play, remainingtime for all programmed tracks)
Elapsed time forthe currenttrack
The display returnsto “elapsed time” after 10 seconds.
.
Ifthe track number exceeds 24, the remainingtime for
the currenttrack cannot be displayed.
In the stop mode, the total play time on the disc is
displayed.
PROGRAMMED PLAY (using the remote control)
Upto 24 selectionson adisc can be programmedforplay
inany order.
-To begin the programming procedure, select the CD
functionfirst.
_The tracks are programmed inthe stop mode.
-The same track can be programmed morethan once.
Example:
To prograrnmetracks 5,2,6 and 10
-Proceedwith the operation after the CD 10KEYswitch
has been pressed.
1. Pressthe MEMORY switch. “PROG.” blinks.
1Pr. 1PROG.
TR4CK MIN SEC
12345678910
2. Selecttrack 5by pressingthe 5switch.
~
3. Pressthe MEMORY switch. “PROG.” remainslit.
I5Pr. 1PROG.
LTRACK MIN SEC I
5
4. Selecttrack2 by pressingthe2 switch.“PROG.” blinks.
I2Pr. 2PROG.
TRACK MIN SEC I
II
5. Pressthe MEMORY switch. “PROG.” remains lit.
r
6. The remainingtracksareprogrammed inthe sameway.
7. Pressthe ➤/tI switchto start play.
b50.01 Pm.
TRACK MIN SEC
2 56 10
When the TIME switch is pressed while “PI” is lit,the
total time ofthe programmed tracks isdisplayed.
ifthe total time exceeds 99 minutes 59 seconds, or ifa
track number higher than 24 has been programmed,
“no dlSP” or blank isdisplayed. When the TIME switch
is pressed, “Pr” returns.
The tracks can also be selected usingthe wor w
switch.
When programmingusingthe controlsonthe mainunit,
use the SKIP/SEARCH switchesto assign the tracks.
Anyattemptto programmemorethan 24 selectionswill
resultin“FULL”beingdisplayed and discontinuationof
the programming.
The programme iscleared inthe followingcases:
-Whe;the ■switch is pressed inthe s;op mode
-When the EDIT switch is pressed inthe stop mode
When the 4switch is pressed
-When the mains lead has been disconnected
Checking the programme
Each time the MEMORY switch is pressed in the stop
mode,the programmeddetailssequentiallyappear onthe
display.
Changing aprogramme
To add anew selectionto aprogramme:
1. Inthestop mode, pressthe MEMORYswitchrepeatedly
until”- - ----- “is displayed.
2. Select atrack number as explained above.
To change aselection:
1. Pressthe MEMORY switch repeatedly until the selec-
tion to be replaced is displayed.
2. Select atrack number as explained above.
Note
Programmed details cannot be partially deleted or in-
serted.
Operations during programmed play
-Press the WI ‘or
tracks.
-The O-9 and +10
programmed play.
mswitch-to-skip programmed
switches do not function during
mialpf0g~3t2wths have played, the player
stops automatically. The total programmed time ap-
pears.
-The programme contents are retained in memory.
-Ifthe total programmed time exceeds 99 minutes59
seconds, “no dlSP” appears.
-14-

i
LISTENING TO TAPES
Deck1isforplayback only;deck2 isforboth playbackand
recording.
1. Pressthe EJECT button to open the cassette holder.
2. Loadthe cassette(s).
To load, place the tape with its exposed end at the
bottom. After the tape has been loaded, push the
cassette holder back into position.
3. Set the DOLBY NR switchto ON or OFF according to
whetherthe tape has been recorded withthe DolbyNR
systemor not.
4. Press the bor 4switch on either deck to begin
playback.The ➤or 4indicator lights.
5. Pressthe ■switchto stop playback at any time.
Whenthe end ofthe tape has been reached, automatic
stop or reversewillbe activated.
Typea of usable tapes
The type of tape used is automatically identified by the
system since decks 1and 2both employ an auto tape
selectionsystem.The followingtypes oftape can be used
withthis system.
Normal
cro2
Metal
Note:
Metaland Cr02tapes withoutsensing holescannot be
used sincethey cannot be identifiedby the auto selec-
tor.
-Endlesstapes cannot be used.
Do not use C-120 tapes. They may jam in the mecha-
nism.
Auto reverse
In both decks 1and 2, tapes can be played back in the
following3ways using the MODE switch.
—.
—. For listeningto one side of the tape only.
2: For listeningto both sides of the tape in succession.
If playback has been started from the reverseside,
onlythe reverse side will be played back.
rJ :
For listeningrepeatedly to both sides of the tape.
Automatic Music Select System (AMSS)
Press the ~or 44 switch during playback in either
deck 1or deck 2. The deck willenter the fast forward (or
rewind)modeto skiptothe beginning ofthe nextselection
(or the current selection), then return to the play mode.
(Whilethe tape iswinding, the For< indicator blinks.)
wswitch:
Duringforward playback:
The start ofthe next selection isfound.
During reverseplayback:
The startofthe selection currentlyplaying isfound.
*switch:
Duringforward playback:
The start ofthe selection currentlyplaying isfound.
During reverseplayback:
The start ofthe next selection isfound.
Note
Unrecorded blanks lasting at least 4seconds are re-
quired for proper AMSS operation.
Ifthe systemisbeing used nearalV, theAMSS maynot
function properly due to the effect of the signalsfrorr
the TV. Ifthisisthe case, eitherswitchoffthe TV, oruse-
the system at the distance fromthe TV.
Fast forward and rewind
1. Pressthe ■switchto stop the tape at any time.
2. Press the wor *switch. The For 4indicator j
blinks. 3
When the tape has been wound to the end (or begin-
ning), the fast forward or rewind function willbe auto- .
maticallyreleased. .
Relay playback (continuous playback on decks 1and 2)
1. Load the cassettes into both decks 1and 2.
2. Set the MODE switchto =.
3. Pressthe bor <switch of deck 1or 2.
Relayplayback willcontinue fromdeck 1(or2) to deck
2(or 1)untilthe 9switchofthe deck playing backthe
tape is pressed.
rDeck 1forwardside-D Deck 1reverseside
Deck 2reverseside+ Deck 2forward sideJ-.
Dolby NR system
Dolby Noise Reduction circuitryprovidessuperiorrecord-
ing and playback resultsby suppressing tape hissby up
to 10 dB for virtuallynoise free recordings.
Dolby noise reduction manufactured under licensefrom
Dolby LaboratoriesLicensingCorporation.
“DOLBY”and the double-D symbol Mare trademarks
of Dolby LaboratoriesLicensingCorporation.
-15-

LISTENING TO THE RADIO
Memory operation
Thisunitenables 12 stationsFM1, FM2 and AM (eg: 6MW
and 6LW) bands to be preset inthe memory.
1.
2.
3.
‘L
4.
5.
MW and LW stations will be memorized in the same
memory.
Selectthe band(FM1, FM2, MW orLW) usingthe BAND
switch.
ICLOCK MW
15:00 531 kHz I
Pressthe UP or DOWN switchto tune in astation.
Press the switch and release it when the frequency
starts to change. The unit aut~matically stops at the
next receivable station.
-When receiving astation with weak signals, press
the switch repeatedly untilthe desired frequency is
displayed. Each time the switch is pressed, the fre-
quency changes in9kHz steps for MW, 1kHz steps
for LW and 0.05 MHz steps for FM.
Pressthe MEMORY switch. “MEMORY’ appears.
CLOOK MW MEMORY
15:00 594 kHz
Pressone ofthe@ -@switchesonthe remotecontrol
while “MEMORY’ is lit (approx. 5seconds).
Mw
Pol 594 kHz
After5seconds, the clock display returns.
Note:
When the band is selected by the controls on the
main unit, be sure the @-@switches on the
remote control are functioning as preset function
switches(instead of CD 10KEY).
-If “MEMORY’ has been disappeared before pro-
ceeding with step 4, press the MEMORY switchto
continue.
Repeat steps 1-4, to add more preset stations.
Clearing the memory
-2
3.
Sele~ the band. -
Selectthe presetnumberto be cleared by pressingone
ofthe @-@switches.The preset number appears.
Press the CLEAR switch while the preset number is
displayed. The preset station will be cleared from the
memoryand”- - - -“ willappear on the frequency dis-
play.
Note:
-Ifanew station isprogrammed intoaband and preset
number already containing aprogrammed station,the
previouslyprogrammed stationwillbe cleared.
-Ifthe memorycontentsare lostdue to apowerfailureor
other condition, programme the stations again.
Listening to the radio
1. Select “TUNER”.
2. Select the band.
(Procedure 1)
3. Select the desired preset number by pressing one of
the @-@switcheson the remote control.The clock
isreplaced bythe preset number onthe display.After5
seconds, the clock display returns.
(Procedure2)
3. Pressthe SCAN switch on the remote control.Each of
the preset stationsisselected for approximately5sec-
onds. When all of the preset stations in the selected
band have been tuned in,the originalreception mode
returns.
When the desired station has been tuned in, pressthe
SCAN switchagain to keep the reception lockedatthat
station.
-“STEREO” appears when an FM stereo broadcast is
received.
MODE switch (on the remote control)
If the signals from an FM stereo station are weak and
reception is poor, press the MODE switch to change to
monauralreception. (“STEREO” is replaced by “MONO”
inthe display.)
LISTENING TO RECORDS OR AV SOURCES
1. Pressthe PHONO or AVfunction switch. 2. Follow the instructionssupplied with the turntable or
audio/video equipment.
-16-

BEFORE RECORDING AND DUBBING
Recording copyright material wfthout permission of the
copyright owners is usually an Infringement. If you wish
to re-record copyright material, permission from the
copyright owner is necessary. SANYO does not ap-
prove of, and cannot be held responsible for, any
unlawful use of this machine.
Use deck 2for recording.
1. Press the EJECT button and load the cassette for
recording.
2. Set the DOLBY NR switchto ON or OFF as desired.
3. Set the MODE switch position.
—.
—.For recording one side only.
2: For recording both sides in succession.
-If recording has been started from the reverse
side, only the reverseside willbe recorded.
-Ifatape with one of itstabs already broken out is
used for recording, the tape will not be reversed
automatically,and itwillstop.
rJ :
Recordingatthisswitch positionisthesarneasatthe
~position.
Recording will start in the forward direction under the
following conditions:
-When CD computer recording is used
-When tape dubbing is used
-When recording forthefirsttime after loading acassette
-When using the timer for unattended recording
Automatic record muting
Undesirable parts of aprogramme can be omitted while
recording.
Press the REC MUTE switch once while recording. A
4-second unrecorded blank space is created, then the
cassette deck enters the record pause mode.
To resume recording, pressthe REC PAUSE switch.
Note:
The recordmutingfunctiondoes notoperate duringCD
computer recordingortape dubbing usingthe HIGH or
NORMAL DUBBINGswitch.
To create an unrecorded blank of any length, hold
down the REC MUTE switchforthe requiredtime.The
deck entersthe recordpause mode when the switch is
released.
Accidental erasure prevention tabs (forprotectingvalu-
able recordings)
Accidental erasurecan be prevented by breaking outthe
tabs onthe end ofthe cassette tape (wherethe tape isnot
exposed) using ascrewdriveror similarimplement.
Ifatab isbrokenout inerrorand you wishto re-recordth~
tape, simply block the tab hole using adhesive tape and
the tape can be used for recording again.
-Side AForMetel/Cr02 tape
LJ
Breakouttab Afor side A.
Break out teb Bfor side B.
RECORDING COMPACT DISCS
COMPUTER RECORDING Note
Wtih computer recording, aCD can be’ automatically
recorded on acassette by pressing one switch.
1. Loadthe CD to be recorded.
2. Load ablank cassette intodeck 2
3. Select “CD’.
4. Pressthe COMPUTER RECORDING switch. The sys-
tem automaticallyperformsthe followingfunctions
Deck2
-The tape rewindsto the beginning.
-Recording statts.
CD playec
-The playersearchesforthefirsttrackto be recorded,
then enters the pause mode.
-CD play starts.
The REC PAUSE, Pand COMPUTER RECORDING
indicators light, “D” and “SIDE A“ appear on the -
dsplay as recording begins.
Recording startsautomatically after 8seconds, so the
recordingwill not be interrupted by the leader tape at
the beginning of sides Aand B.
A5-second blank space is automatically recorded at
the end of each track.
The highest track number which can be ediied is 24.
Track numbers25 and above cannot be ediied (except
with backward skip edit).
To stop computer recording at any time, press the
STOP/CLEARswitchofthe CD playerorthe ■switchof
the deck2.The CD playerand deck 2willstop. (Theedit
mode isstilloperational.)
To refease the editing mode, press the STOP/CLEAR
switchofthe CD player.
Setthe MODE switchto ~during computerrecord-
ing.
To recordmaterialfromadfierent positionon the tape,
continue recording manualty.
-17-
—. —

i
Types of edit recording ‘B. Programme edit recording
The following edit recording operations can be performed C. Fade-out edit recording
duringcomputer recording. D. Backward skip edit recording
A. Time edit recording
Time edit recording
When the track 6is not recordable within the specified time, select any
recordable track after track 7. Unrecorded blank
SIDE A25 min. I
JAuto reverse
~+ Omh the track 9. SIDE B25 min.
When the track 11 is not recordable within the specified time, select anv
Irecordable track after track 12.
Unrecorded blank
le tracks that will fn within aselected time period are
‘%tomatically programmedforrecordingon sidesAand B
of the tape. (The tracks are edited so that the remaining
time on the tape is reduced to aminimum). m
Example:
To reoordonto a50-minute tape
1. Press the EDIT switch to select the recording tape
length.
-Eachtimethe EDITswitchispressed,the tape length
display changes inthe followingsequence:
C-46- C-54 -DC-60 -o C-74~ C-90
(Released)—C- ---
-To set the desired tape length upto C-99, usethe
0-9 and +10 switches on the remote controlwhile
“C- --“ isdisplayed.
Toset “C-50”, pressthe+ 10switch5times, then press
the Oswitch. “C-50” appears on the display.
-The +or t44 switches on the remote control orthe
main unit can also be used.
‘-2. Pressthe TIME EDIT switch.
W
The track numbers and play time for side Aare dis-
played. “SIDE A“ blinks.
3.
The track numbers and play time for side Bare dis-
played. “SIDE B“ blinks.
ISIDEA B I
I49.45P%% I
MIN SEC
12345678910 13
The track numbersandtotalplaytime forbothsidesare
displayed.
Pressthe COMPUTER RECORDING switch.
-The track numbers and play time for side Aare
displayed.
-The track numbers and play time for side Bare
displayed.
-Recording startsautomaticallyfrom track 1,
w
The edit mode remains operational when recording
ends.To cancelthe edit mode, pressthe STOP/CLEAR
switch.
-18-

ii
Programme edit recording
SIDE A23 min. Unrecorded blank
523!::!
II ~> Autoreverse
;~j] 7~] 41
Unrecorded blank
The desired selections can be rearranged and recorded
onthe tape within adesignated tape length.
Example:
To recordonto a46-minute tape.
1.
2.
3.
4.
5.
Pressthe EDIT switch until“C46’ appears.
Pressthe MEMORY switch. “PROG.” blinks.
Selectthe track to be recorded by using the 0-9 and
+10 switches on the remote control.
w
The remaining time on side Ais shown on the time
display.
Pressthe MEMORY switch. “PROG.” remains lit.
SIDE A
PROG.
5-13.00 EDIT
TRACK MIN SEC
5
Repeat steps 3-4 to programme the tracks to be
recorded onto side A.
-Ifatrack exceeding the remainingtime on side Ais
selected, itsplay time blinkson the display.
Fade-out edit recording
6.
7,
---- - -- .
When the MEMORY switch is pressed, “SIDEA’
disappears and “SIDE B“ appears.
The remainingtime on side Bappears on the time
display.Thisand subsequenttracksare recordedon
side B.
Repeat steps 3- 4to programme the tracks to be
recorded onto side B.
-If atrack exceeding the remainingtime on side Bis
programmed, “Err” will appear in the display for
about 4seconds.
Pressthe COMPUTER RECORDING switch.
-The track numbem and play time for side Aare
displayed.
The track numbers and play time for side Bw
displayed.
-Recording starts automatically from
grammed track.
E
the first pro-
The track numbers can also be set usingthe mand
Kswitches.
Fade out (10 see.)
SIDE A30 min.
1II 2I.I ,, 3H4II 5[
H1.1 JAuto reverse
19[] 876
IReoordfromthe beginningof atrack. SIDEB30 min.
Fade out (10 sea.)
The sound isautomaticallyfaded out atthe end ofsidesA
and B, according to the selected tape length. When the
tape reversesfrom side Ato B, reoordingcontinuesfrom
the beginning ofthe lasttrack played.
Example
To recordonto a60-minute tape
1. Pressthe EDIT switch until“C-60” appears.
2. Pressthe FADE EDIT switch.
E
Thisshowsthat 5minutes35 seconds oftrack 6willbe
recorded on side A. “SIDE A“ blinks.
-.
SIDE B
11 7.05 EDIT
TRACK MIN SEC
678910
—
This showsthat 7minutes5seconds oftrack 11 willbe
recorded on side B. “SIDE B“ blinks.
~
3. Pressthe COMPUTER RECORDING switch.
-The tracksto be recorded onto side Aare shown.
-The tracksto be recorded onto side Bare shown.
-Recording startsfromthe beginning of track 1.
DSIDE A
10.01 EDIT
TRACK MIN SEC
12345
-19-
Other manuals for DC-T44
1
Table of contents
Other Sanyo Stereo System manuals

Sanyo
Sanyo DC-SLIM3000 User manual

Sanyo
Sanyo DC-MCR300 User manual

Sanyo
Sanyo DC-DA1100 (XE) User manual

Sanyo
Sanyo DC-MV20 User manual

Sanyo
Sanyo DC-DA900 User manual

Sanyo
Sanyo DC-DA280 User manual

Sanyo
Sanyo DTA-200 User manual

Sanyo
Sanyo DC-UB1470 User manual

Sanyo
Sanyo DC-007C User manual

Sanyo
Sanyo DC-MCR80M Assembly instructions

Sanyo
Sanyo DC-X850 User manual

Sanyo
Sanyo DC-UB1475M/XE/UK User manual

Sanyo
Sanyo GCD 1500 User manual

Sanyo
Sanyo DC-DA90 User manual

Sanyo
Sanyo DC-DA370 User manual

Sanyo
Sanyo DTA-300M User manual

Sanyo
Sanyo DC-MCR60 User manual

Sanyo
Sanyo DC-BM300 User manual

Sanyo
Sanyo DC-DA1450M User manual

Sanyo
Sanyo DC-DA100 User manual