SATO SK-810PT User manual

Instruction Manual
Precision Digital Thermometer
Model SK-810PT
O.09

1
Thank you for purchasing the Precision type Digital Thermometer Model SK-810PT
- This product is designed to measure temperature connecting with various optional PT (platinum
resistance temperature detector) probes. Do not use it for other purposes.
- Read this manual thoroughly before using the thermometer. Keep the manual in a safe place for future
references whenever necessary.
Warning
This thermometer is not explosion-proof. Never use it in an atmosphere containing flammable gases.
Beware of explosion!
There is a risk of explosion. Take extreme care.
For any inquiries, contact us or the dealer from which the unit was purchased.
Caution
Be sure to observe the following precautions in order to use SK-810PT correctly.
- Do not use this unit as a clinical thermometer.
- This SK-810PT is a precision instrument. Do not drop this unit or apply impact to it.
- Never disassemble or modify this unit. Doing so may result in failure.
- Do not use this unit in water.
- Do not use this unit in a place exposed to direct sunlight or near heating equipment. Doing so may result
in deformation of the casing or failure.
- Do not use this unit in an environment where electrical noise is generated. Doing so may result in
unstable display or larger errors.
- Do not forcibly pull, bend, or bundle the sensor cord. Placing a heavy object on the sensor cord, heating
or scratching the cord may also damage it.
- If this unit is not to be used for a long time, always remove the batteries from the unit. Otherwise, the
batteries may leak fluid, resulting in failure.
- Do not wash or wipe this unit with alcohol, thinner, or other solvents. Also, do not wash it in water. If the
unit becomes dirty, wipe it with a tightly wrung cloth that has been dipped in warm water with neutral
detergent.
- Be sure to use this unit within the specified measurement range. Using the unit outside the specified
measurement range will result in failure or damage.
- Inside of the connector is not waterproof structure. Do not use the connector in wet condition.
-If this unit is left in a car in the hot summer sun, it will become extremely hot and may malfunction. Do not
leave the unit in such a place.
** For repair or calibration, contact us or the dealer from which the unit was purchased.

2
1. Overview
SK-810PT is a precision digital thermometer that uses a platinum resistance temperature detector as the
sensing element. It displays readings with a high resolution of 0.01°C throughout the measurement range
of -100 to +360°C, and provides highly accurate measurement with a maximum system accuracy of
±0.16°C. The SK-810PTis designed to be used with various optional probes.
2. Features
●Highly accurate measurement
Highly accurate measurement is achieved by using a Pt100 (4-wire) element, storing the
characteristics of each element in the sensing section and processing the compensation in the main
unit.
●Display of various calculation results
The maximum (MAX), minimum (MIN), relative (REL) and moving average (AVG) values are
calculated and displayed.
●Hold function
It is possible to freeze the display of measured values. By using the HOLD function, the measured
values can be easily read even when the readings are unstable.
●Waterproof construction
When the probe is securely connected, the unit is waterproof, conforming to JIS C0920 "IPX7". The
unit is operable even when touched with wet hands or splashed with water, but cannot be used under
water.
●Impact resistance
Damage due to dropping is minimized thanks to the protective rubber around the case.
●Compatible with optional probes
The unit works perfectly with various optional sensor probes; highly accurate measurement is obtained
when any one of them is connected.
3. Cautions before Use
Check that the unit was not damaged during transport. If any damage is found, contact us or the dealer
from where you bought the unit.

3
4. Names of Section (Main housing)
■Front view and Rear view
①Sensor connector : Connect the dedicated optional probes
②Hook for mount on a wall : Pull out the hook for mounting the unit on a wall
■Display section
①MIN : Lights up while the minimum measured value is being displayed
②MAX : Light up while the maximum measured value is being displayed
③AVG : Light up while moving average value is being display or moving average value is being set
④REL : Lights up while relative value is displayed
⑤Low battery mark
: Blinks when battery power is insufficient.
⑥HOLD: Shows while measured value is being held
①Sensor connector
Display section
Key operation
Protective rubber
②Hook for mount
Battery cover
Hole for strap
1
2
3
4
5
6
measured value

4
■Key Operation
①POWER key : Press this key to turn the main unit on or off.
②HOLD/ENTER key : Press this key to hold (freeze) measured value.
In AVG mode, this key confirms the set value.
③MAX/MIN key : Press this key to display the maximum value or minimum value.
④AVG key : Press this key to display moving average value.
⑤CLEAR key : Press this key to clear the maximum value or minimum value.
⑥REL key : Press the REL key to display the relative value (REL).
5. Using the SK-810PT
5-1. Installing the Batteries
Install or replace the batteries before using the unit for the first time or when the low battery indicator is
flashing, by following the procedure below.
(1) Loosen the four screws holding the battery cover by turning them counterclockwise with a Phillips
* If the unit is wet, dry if before removing the battery cover to prevent water from entering the
battery compartment.
* The screws are integrated into the battery cover. Do not forcibly pull them off as this could
damage the cover.
(2) Install the batteries by referring to the polarity markings (+ and −) provided on the battery
compartment.
(3) Make sure that the packing is fitted inside the slot, replace the battery cover, and then secure it with
the screws. Note: To protect against water entering the unit, tighten the screws while applying
uniform force until there is no clearance between the unit and the battery cover. If a torque driver is
available, tighten the screws to approximately 0.5 N·m.
Caution
●Replace the batteries immediately when the low battery indicator starts flashing.
●The replacement batteries must be new and of the same type. Mixed use of different types or new and
old batteries could cause an explosion or leakage.
●Do not dispose of used batteries in a fire. Doing so could cause the batteries to explode, resulting in
injuries or burns.
●For environmental protection, dispose of used batteries in compliance with local rules and regulations.
1
2
3
4
5
6
5
●Keep the batteries out of the reach of children. If a child accidentally swallows a battery, contact a
doctor immediately.
●Since the unit is designed to be sealed, rechargeable batteries must not be used. Gas could be
generated in the battery, resulting in an explosion or fire.
5-2. Installing a Vinyl Cover for the Unit
The SK-810PT comes with a vinyl cover to keep the unit clean and protect it from damage if dropped.
(1) Open the mouth of the cover and place the unit inside so that the sides of the vinyl cover having a slit
is over the back of the unit.
(2) Pass the connector on the top of the unit through the hole on the upper surface of the vinyl cover, and
then insert the strap at the end of the cover into the slit to close the cover.
Note: Static electricity could build up under the vinyl cover, resulting in unstable readings.
In such cases, remove the cover before using the unit.
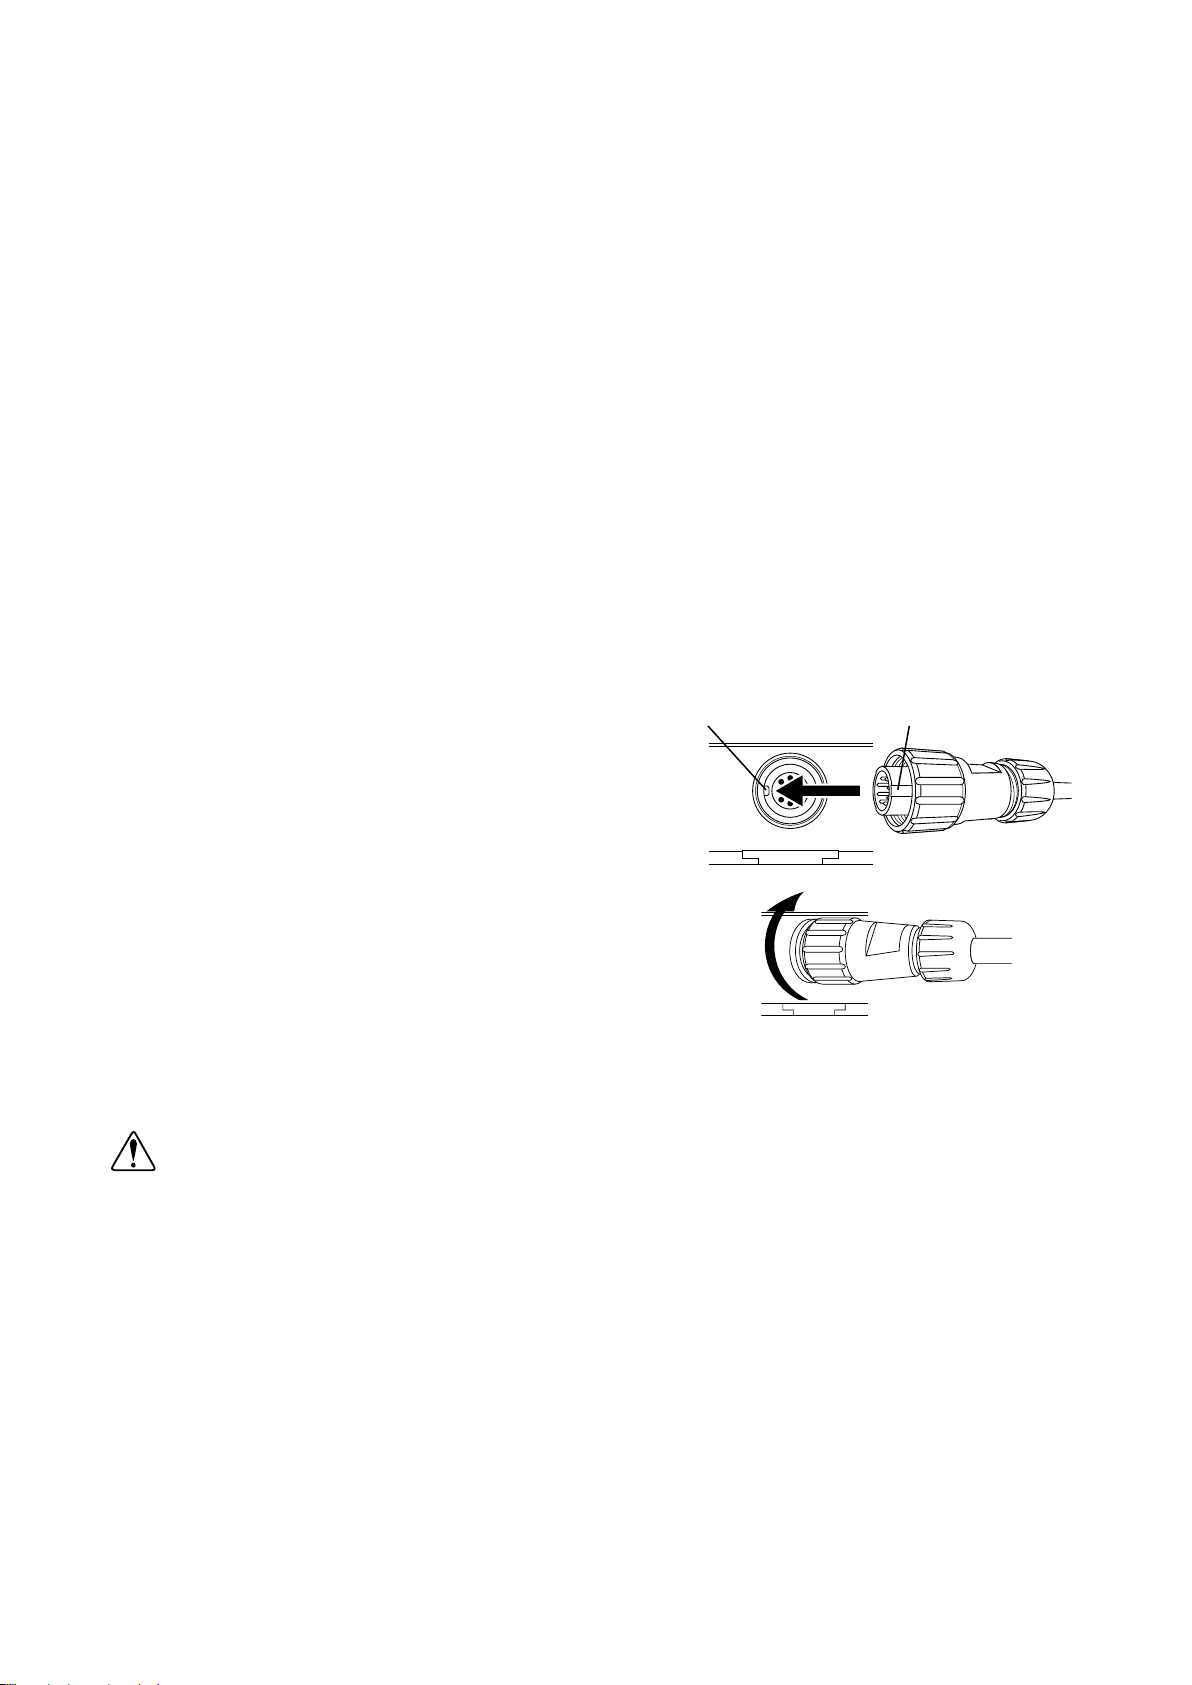
5-3. Connecting the Sensor Probe
(1) While the unit is off, insert the sensor connector into
the unit by aligning the 凸(concave) part of the
sensor connector with the 凹(convex) part of the
connector on the unit.
(2) Turn the nut on the sensor connector clockwise to
secure the connector.
(3) To disconnect the sensor probe, turn the nut
counterclockwise and pull the sensor connector
straight out.
- To protect the sensor, make sure that the unit is off before installing or removing the sensor probe.
Caution
● Do not forcibly pull or turn the sensor connector.
● Do not remove the sensor probe by pulling the sensor cord.
5-4. Measuring Temperature
(1) Connect the sensor probe and turn on the unit.
- The "E_5" code appears if the unit is turned on without the sensor probe connected.
(2) Insert the sensor probe into the object to be measured.
- For a highly accurate temperature measurement, allow enough insertion depth so as not to be
affected by the temperature around the protection tube.
(3) Turn off the unit after use.
凸(concave) part
凹(convex) part

6
Caution
●Take care not to get burned when measuring high temperatures.
●Measuring low temperatures immediately after measuring high temperatures (or vice versa) can
quickly wear out the sensor. Leave the unit in a room-temperature environment for a while before
performing such operation.
●The measurement accuracy could be affected by an abrupt change in the ambient temperature.
Allow the unit to fully adapt to the ambient temperature before starting the measurement.
⚫When using the unit mount on the wall
Pull out the wall-mount hook from the back of the unit and use it to hang the unit on the screw mounted
on the wall or column.
NB: Check that the unit is secured and will not fall by gently swinging it to the right and left. The
wall-mount hook could come off the mounting screw if the unit is forcibly pulled away from the wall.
6. Functions
6-1 Hold Function
When the measured values are continually fluctuating, use the HOLD function to freeze the display for
easier reading.
●Operation procedure
(1) Press the HOLD/ENTER key during measurement.
The HOLD indicator lights up to indicate that the measured values are held.
(2) To cancel, press the HOLD/ENTER key again.
The HOLD indicator goes out and the unit returns to the normal temperature measurement mode.
- The HOLD function is available when the average or relative value is displayed.
6-2. Maximum or Minimum Value Display Function
The unit records the maximum and minimum values measured since power-on.
●Operation procedure
(1) Press the MAX/MIN key during measurement.
The MAX indicator turns on and the maximum value is displayed.
(2) Pressing the MAX/MIN key again lights on the MIN indicator and displays the minimum value.
(3) Pressing the MAX/MIN key again lights off the MIN indicator and returns to the normal
measurement mode.
(4) To clear the maximum or minimum value being displayed, press the CLEAR key.
6-3. Averaging Function
The unit displays the moving average value calculated from the temperatures measured. Use this function
when the temperature of the object being measured varies widely. The calculation provides a simple
moving average with the desired number (2 to 10) set as the measurement count.
- The measurement count is set to "5" at the factory.
- The set value is retained even after power-off or during battery replacement.
- The calculated average value is not retained.

7
● Setting the measurement count
(1) Press and hold the AVG key for at least two seconds. The AVG indicator lights up and the
measurement count starts flashing.
(2) Every time the AVG key is pressed, the measurement count changes.
(3) Press the HOLD/ENTER key when the desired count is displayed. Confirm the set value and return
to the normal temperature measurement mode.
● Operation procedure
(1) Press the AVG key during measurement.
The AVG indicator starts flashing to indicate that the average value calculation is underway. During
calculation, the measured values are displayed as bars. Upon completion of calculation, the AVG
indicator changes from a flashing to solid light and the average value appears.
(2) Pressing the AVG key again turns off the AVG indicator and returns to the normal temperature
measurement mode.
- Pressing the HOLD/ENTER key while the average value is being displayed holds the display.
6-4. REL Function
The REL function displays the relative values (changes in measured values) compared to the current
measured value (set to 0.00°C).
● Operation procedure
(1) Press the REL key during measurement.
The REL indicator lights up and the measured value is displayed as "0.00°C".
(2) Pressing the REL key again turns off the REL indicator and returns to the normal temperature
measurement mode.
- Pressing the HOLD/ENTER key while the relative value is being displayed holds the display.
6-5. Auto Power-Off Function
The auto power-off function turns off the unit if there is no key operation for about 20 minutes. This saves
the battery life, especially if you forget to turn off the unit.
● Releasing the auto power-off function
(1) When the unit is off, press and hold the POWER key for at least two seconds while pressing the
HOLD/ENTER key.
(2) When the "n" indicator appears on the display, release the keys. The "n" indicator goes out to
indicate that the auto power-off has been released.
Note: This function is no longer released once the unit is turned off. Perform the auto power-off release
each time as necessary.

8
6-6. Low Battery Warning Function
The low battery indicator starts flashing when the battery power becomes low. If this occurs, immediately
replace the batteries with new ones. Not doing so can affect the measurement accuracy or cause a
malfunction
7. Error Message
If a problem is detected in the unit, an error code appears on the display.
Error code
Description
Action
E_0
Battery power is low.
Replace with new batteries.
E_4
Internal processing error
- Remove the batteries, leave the unit for a
while, reinstall the batteries, and then turn on
the unit.
- Replace with new batteries.
E_5
The sensor probe is not connected.
Securely connect the sensor probe.
E_8
Sensor signal error
Hi
The measured value is above the upper
display limit.
Use the unit within the measurement range.
Lo
The measured value is below the lower
display limit.
If the displayed error code is not listed above or the problem persists after taking the recommended action,
the unit or the sensor is likely to be faulty. Contact us or the store where you purchased the product.
8. Troubleshooting
Problem
Possible cause
Action
The power cannot
be turned on.
The batteries have run out.
Replace with new batteries.
Readings are
unstable.
The sensor connector is loosely
connected.
Correctly connect the sensor connector.
The unit has not adapted to the
ambient temperature.
Wait until the unit has adapted to the ambient
temperature before starting measurement.
Insufficient quantity of the object to
be measured or insufficient
insertion depth of the sensor probe
Allow a sufficient insertion depth relative to
the object to be measured
The temperature of the object being
measured varies widely.
Use the AVG function
Affected by noise
Do not use the unit in a place where electrical
noise or static electricity is generated.
Display error
The sensor connector is loosely
connected
Correctly connect the sensor connector
Affected by noise
Do not use the unit in a place where electrical
noise or static electricity is generated.
If the displayed error code is not listed above or the problem persists after taking the recommended
action, the unit or the sensor is likely to be faulty. Contact us or the store where you purchased the
product.

9
9. Specifications
Product
No. 8012-00 Precision Digital Thermometer
Model
SK-810PT
Display range
-105.00 to 365.00°C (range is different depending on the probe connected)
Accuracy
±(0.05+1 digit)°C at 23°C ± 5°C
(accuracy is different depending on the probe connected)
Temperature coefficient
±(0.002%rdg+0.008)°C /°C at other than 23°C ± 5°C
Resolution
0.01°C
Sampling time
1 sec.
Operation ambient
0 to 50°C less than 80%rh (no condensing)
Storage ambient
-10 to 50°C (no condensing)
Power requirement
“AAA”size alkali battery x 4 pcs.
Battery life
About 1000 hours continuous (Using alkali batteries)
* It depends on the operating environment or operating condition
Materials
ABS resin
Dimensions
70(W) 169(H) 42(D) mm (excluding connector)
Weight
Approx. 220g (including batteries)
Grade of waterproofness
conform to IP X7 (JIS C 0920) when probe is connected
Accessories
4 “AAA”alkali batteries, vinyl cover, neck strap
The specifications and the appearance subject to change with or without notice
10. Optional Items
Products
Cat. No.
Descriptions
Optional probes
Various probes for SK-810PT are provided. Visit our web-site or contact
us or the shop where you purchased the products
Dedicated carrying case
8012-90
One main unit and three probes can be stored
Accessories: shoulder strap, clip for probe
Clip for S810PT probe
8012-92
Available to hold the stem of probe
11. Warranty
Our products are warranted to be free from defects in materials and workmanship for a period of one year
from date of delivery. If repair or adjustment is necessary and has not been the result of abuse or misuse
within the one-year-period, please return the units on - Freight Prepaid –basis and correction of the defect
will be made without charges. We alone will determine if the product problem is due to deviations or
customer misuse.
Out-of-warranty products will be repaired on charge basis.

10
Warranty during transportation
The warranty during transportation only applies to the products that we arrange the shipment. The case
that the products had been purchased in domestic and were sent to overseas by the purchaser is out of
warranty.
Return of items
Authorization must be obtained from us before returning items for any reason. When applying for
authorization, please include data regarding the reasons the items are to be returned.

3-4, Kanda-kajicho, Chiyoda-ku, Tokyo 101-0045 JAPAN
TEL: +81 (0)3-3254-8117 FAX: +81 (0)3-3254-8123
URL: http://www.sksato.co.jp/english/
Table of contents
Other SATO Thermometer manuals


