sauter HMM User manual

Sauter GmbH
Ziegelei 1
D-72336 Balingen
e-mail: info@kern-sohn.com
Phone : +49-[0]7433- 9933-0
Fax: +49-[0]7433-9933-149
Internet: www.sauter.eu
Instruction manual mobile Leeb
hardness tester
SAUTER HMM
Version 2.0
04/2020
GB
HMM-BA-e-2020
PROFESSIONAL MEASURING

2 HMM-BA-e-2020
GB
SAUTER HMM
V. 2.0 04/2020
Instruction manual mobile Leeb hardness tester
Thank you for purchasing the mobile digital Leeb impact hardness tester from
SAUTER. We hope that you will be very satisfied with the high quality of this device
and its extensive functionality. For any questions, wishes and suggestions we are at
your disposal.
Table of contents:
1Before commissioning.................................................................................. 3
2Introduction.................................................................................................... 3
2.1 Measuring principle.................................................................................................................. 3
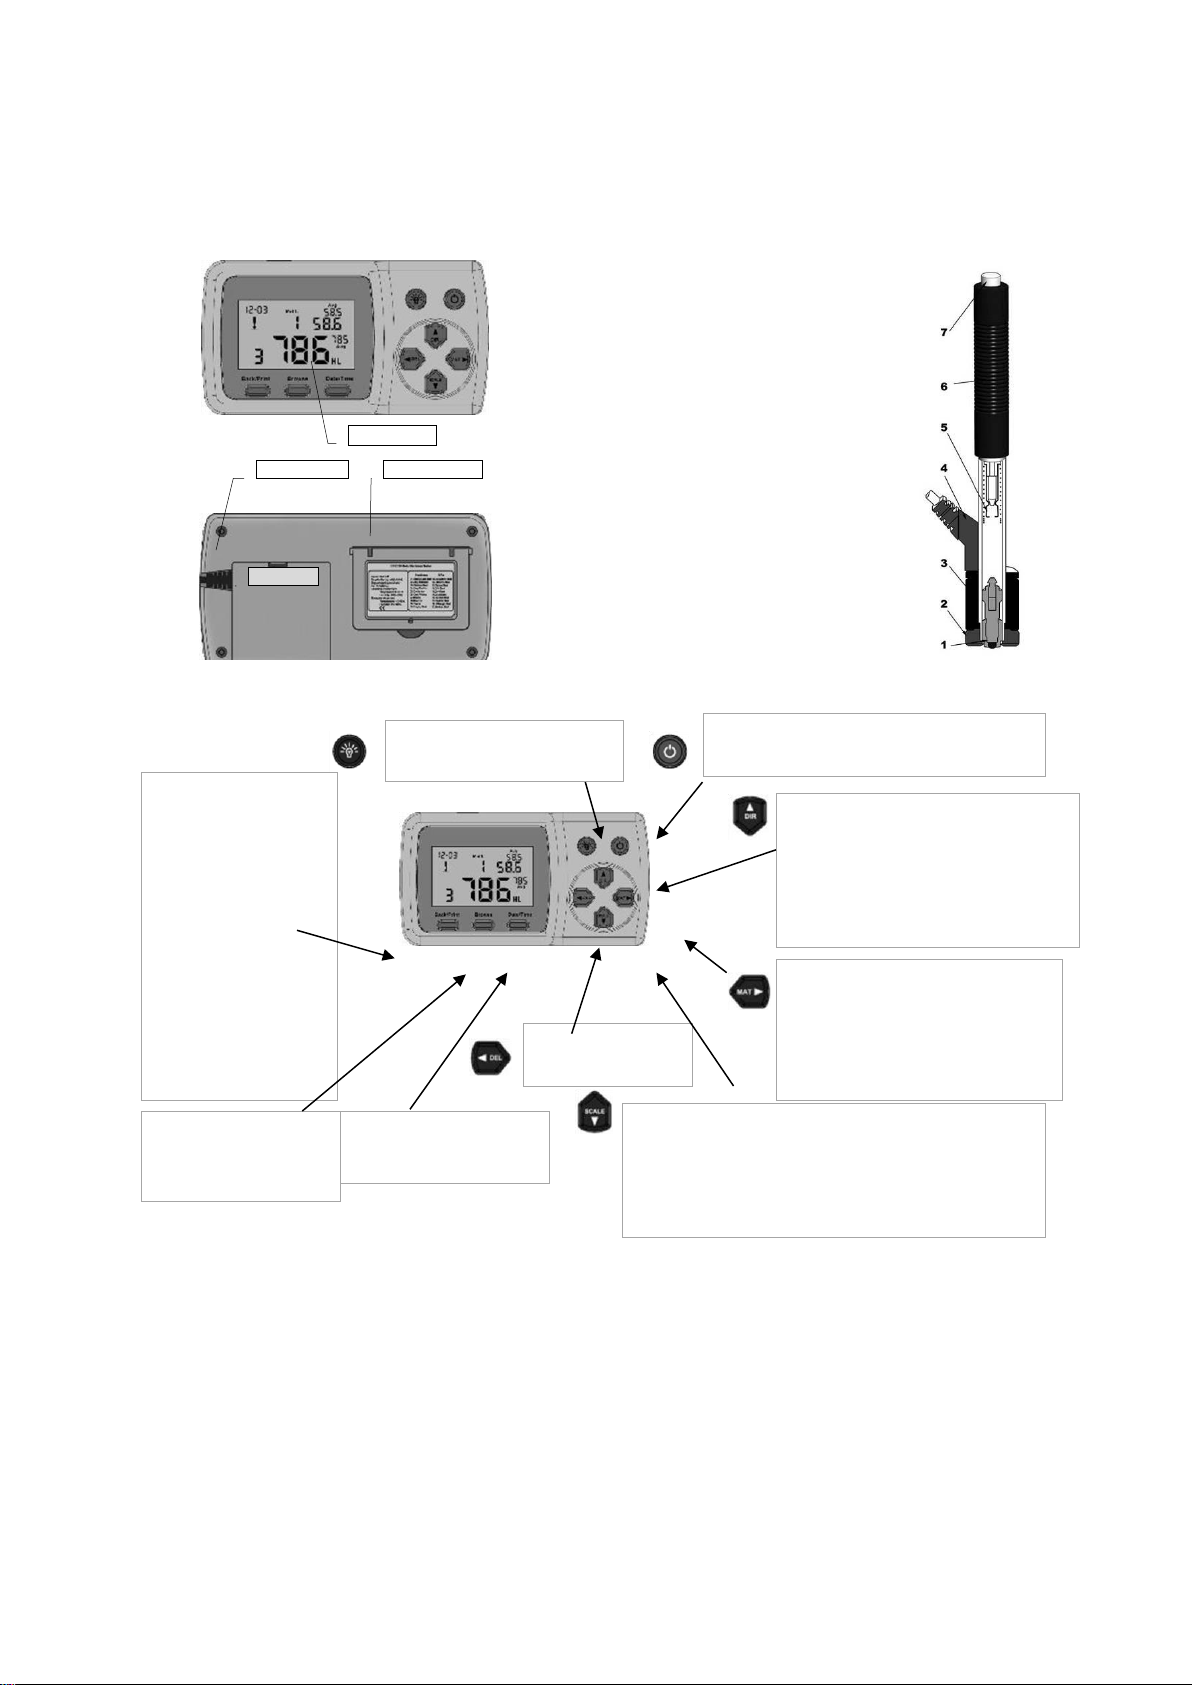
2.2 Structure.................................................................................................................................... 4
2.3 Keys........................................................................................................................................... 4
2.4 Display overview ...................................................................................................................... 5
2.5 Technical data........................................................................................................................... 5
3Test preparation............................................................................................. 6
3.1 Preparation of the test object.................................................................................................. 6
3.2 Sample thickness ..................................................................................................................... 7
3.3 Test procedure.......................................................................................................................... 7
3.3 Test execution .......................................................................................................................... 7
3.4 Browsing ................................................................................................................................... 8
3.5 Print test report......................................................................................................................... 8
4Settings........................................................................................................... 9
4.1 Material code............................................................................................................................. 9
4.2 Impact direction........................................................................................................................ 9
4.3 Scale .......................................................................................................................................... 9
5Service and maintenance............................................................................ 10
5.1 Periodic maintenance ............................................................................................................ 10
6Calibration.................................................................................................... 10
7Annexes........................................................................................................ 12
7.1 A-1 Conversion range ............................................................................................................ 12
7.2 A-2 Material Code ................................................................................................................... 12
7.3 A-3 Scope of Delivery............................................................................................................. 13

HMM-BA-e-2020 3
1 Before commissioning
Before putting the device into operation, check the delivery for any transport damage
to the packaging, the plastic case and the device itself. Should this be the case,
SAUTER must be contacted immediately.
2 Introduction
2.1 Measuring principle
The HMM hardness tester is physically a rather simple dynamic hardness tester: A
rebound sensor with a hard metal tip is driven against the surface of the test object
with spring force. The surface can be damaged if the rebound body hits the surface,
which is ultimately due to a loss of kinetic energy.
This energy loss is calculatedfrom the speed measurements when the rebound sensor
is at a certain distance from the surface for the rebound and trigger phases of the test.
The fixed magnet in the rebound body generates an induced voltage in the simple wire
coil of the rebound body.
The voltage of the signal is proportional to the speed of the rebound sensor. The signal
processing by the electronics ensures that the hardness value can be read on the
display and stored.

4 HMM-BA-e-2020
2.2 Structure
Display Rebound sensor type D
2.3 Keys
1. rebound body
2. stabilising ring
3. bobbin
4. cable
5. pawl clamping device
6. charging tube
7. release button
Key for backlit display: This key is used to
switch the backlighting of the display on
or off.
On/off button: The button is pressed and held down
for a short time to switch the unit on or off.
The "Back/Print" button:
❶ Press this key in the
measuring mode to delete the
measured data. If the mini-
printer is connected to the
instrument at the same time,
these data will be printed
before.
❷In another mode, press
the "Back/Print" key to
complete the setup and save
the preset parameters, then
return to the measuring
mode.
The "Browse" button: Press
this button to view the stored
data.
The "Data/Time" key: This key is
used to set the time and
calendar.
The key is pressed and held to
cancel the current data in the
measuring mode or in the browse
mode.
❶Press this button to set the orientation of
the rebound sensor.
❷In the "Data/Time" mode, press the button
to increase the digit that is lit up by one
numerical value at a time.
❸In Browse mode, press this button to
display the previous data.
❶Press this button to select the material
to be examined.
❷In "Data/ Time" mode and in calibration
mode, this key is used to select the next
binary character to be changed.
❶This button is required to activate the scale for conversion to
other hardness values.
❷In the "Data/Time" mode, press the button to reduce the digit
that is lit up by one numerical value at a time.
❸In the "Browse" mode, press this button to display the next
data, measurement or browse mode.
LCD display
Material code
Signal cable
Battery
compartmen

HMM-BA-e-2020 5
2.4 Display overview
2.5 Technical data
HL Display Indication: 0~999HLD
accuracy: ±6 HL (at 800HLD)
Resolution: 1 (HL, HV, HB, HSD, MPa); 0.1(HRC, HRB)
Rebound power: 11Nmm
Mass of the impactor: 5.5g
Diameter of the test tip: 3mm; Material: tungsten carbide; Hardness of the
Test tip: ≥1600HV
Power source: 3 x1.5V AAA
operating temperature: 32 ~ 122°F, 5% ~ 95% relative humidity;
Storage temperature: 14 ~ 144°F, 5% ~ 95% relative humidity
Dimensions: 150mm x 80mm x 24mm (display)
Rebound length: 147mm (Type D)
Weight: approx. 200 g (display); rebound sensor 75g (type D)
Compliance with the following standards: ASTM A956 & DIN50156
Time
Material
code
Mean conversion value
Conversion scale
Conversion value
Average value
Value HLD
Impact
direction
Impact test

6 HMM-BA-e-2020
3 Test preparation
- Preparing the device
- Inserting the batteries
- Connect rebound sensor
- Switch on the device
- Check measuring accuracy: Insert sample test block to check the sensor for correct
functioning
3.1 Preparation of the test object
Unsuitable material samples can cause measuring errors. Therefore, test preparation
and execution should be carried out according to the sample properties. The
preparation of the test object and its surface should meet these basic requirements:
During the surface preparation of the test object, its surface should not be exposed to
thermal cooling or heating.
The test surface should be flat and have a metallic gloss. There must be no oxide
layers or other contamination.
Roughness of the test surface
The sample should have sufficient mass and stiffness. If not, the impact may cause a
displacement or movement, which may lead to a significant measurement error.
As a general rule, if the weight of the sample is 5 kg or more, testing can be performed
directly.
Clamp
measurement

HMM-BA-e-2020 7
3.2 Sample thickness
The thickness of the sample as well as the thickness of the homogeneous layer (or the
hardening layer of the surface) should have a sufficient material thickness.
If the sample surface is not flat, the radius of the test area should not exceed 30 mm
(50 mm for type G). If it is not specified, an appropriate support ring should be used.
The sample should have no magnetic properties.
3.3 Test procedure
Unsuitable material samples can cause measuring errors. Therefore, test preparation
and execution should be carried out according to the sample properties. The
preparation of the sample and its surface should meet these basic requirements:
•During the surface preparation of the sample, its surface should not be
exposed to thermal cooling or heating.
•The test surface should be flat and have a metallic gloss. There must be no
oxide layers or other contamination.
•The roughness of the test surface shall be Ra ≤ 1,6.
•The sample should have sufficient mass and stiffness to prevent displacement
or movement on impact.
•As a general rule, if the weight of the sample is 5 kg or more, testing can be
performed directly.
•If the weight is 2 to 5 kg, the sample should be clamped with suitable means
so that it remains stationary. If the weight is 0.05 to 2 kg, the sample must be
coupled with another object. If the weight is less than 0,05 kg, the sample is
not suitable for testing with a Leeb hardness tester.
•The minimum thickness of the sample should be 5 mm, and the minimum
thickness of the homogeneous layer (or the hardening layer of the surface)
should be 0.8 mm.
•If the sample surface is not flat, the radius of the test area should not exceed
30 mm. It is also necessary to use an appropriate support ring.
•The sample should have no magnetic properties.
3.3 Test execution
Loading Positioning Impact

8 HMM-BA-e-2020
Shop
Load the rebound sensor by pushing the loading tube
forward.
Positioning
Then position the rebound sensor and hold it on the
surface of the sample at the desired measuring point.
The direction of impact should be vertical.
Impact (measurement)
Perform the measurement by pressing the release
button. Measured hardness value is displayed
immediately.
Reading test results
Read the measurement result of the test from the
display.
Note:
Normally, 5 individual measurements are made at each measuring point of the
sample. The range of values (difference between the maximum and minimum
values) should be less than 15 HL. The distance between two measuring points
should be ≥ 3mm; the distance between the point of impact and the edge of the
sample should be ≥ 3mm.
3.4 Browse
The tester allows to store 9 hardness values which
can be searched after the measurement is finished.
Press the " " key to browse stored data and
display the 1st record from the last 9th test records,
including hardness value HLD, material, conversion
values, impact direction, date and time, etc.
Press the " " or " " button to search a previous or
subsequent record. To return to the measuring mode,
press the " " key again.
3.5 Print test report
The tester can be connected to a wireless printer to
print a test report.
Place the printer near the tester (at a distance of up to 2 m) and switch it on.
Press the " " key and hold it for about 2s: the report is printed.
Hardness value: 786HLD;
3rd measuring point;
Mean value: 785HLD
Conversion to HRC: 58.6HRC
Average HRC: 58.5HRC

HMM-BA-e-2020 9
NOTE:
Original data is automatically deleted from the memory after printing is
completed.
4 Settings
4.1 Material code
In measuring mode, press the " " button to select the code for the material to be
tested. The material code is indicated on the label on the back of the housing (or see
Appendix A-3).
NOTE:
It is necessary to carry out the material classification. If the material type is not
known in advance, the material manual intended for this purpose must be
consulted.
The standard default setting is 01 (steel and cast steel).
4.2 Impact direction
In the measuring mode, press the " " button to select the impact direction. The
alignment sequence changes as follows:
→ → → → →
The tester can automatically correct the direction of impact himself.
4.3 Scale
The tester can automatically convert HLD values into other hardness scales such as
HRC → HRB → HB → HV → HSD or tensile strength (MPa) according to the
corresponding material group (e.g. steel, aluminium).
For this purpose, the " " key is pressed in the measuring mode to perform a
conversion to a known hardness scale or to tensile strength (MPa).
If this key is pressed continuously, the sequence of the scales changes in the following
way:
HRC → HRB → HB → HV → HSD → MPa → HRC

10 HMM-BA-e-2020
NOTE:
If the symbol "---" appears on the display, the conversion is out of range.
If the measured value is converted from a hardness scale to tensile strength or
vice versa, the material selection must be set again.
The conversion value merely provides a general reference value, which may
result in a certain shift. An exact translation requires assigned comparison tests
for this.
The standard setting for the conversion is the "HRC" hardness scale.
5 Service and maintenance
5.1 Periodic maintenance
General Information
Impacts are to be avoided. After use, place the device back into the transport case.
The rebound sensor must be stored in its triggered state. Avoid using the unit in a
strong magnetic field. Protect all components from any contact with grease or oil.
Cleaning the rebound sensor
In principle, the tube and the housing of the rebound sensor must be cleaned every 1
to 2 thousand measurements
Procedure: turn the support ring, loosen and dismantle the rebounding body. Insert the
nylon cleaning brush to clean the tube and tester body.
Replacing the impact ball
Continuous use may cause damage to the impact ball. It must be replaced as soon as
the accuracy of the measurement appears to be impaired.
6 Calibration
The calibration procedure is used to calibrate measured
values (HLD, HRC, HRB, HB, HV and HSD) of the rebound
sensor in order to exclude a measurement error as far as
possible from the outset. The required scale shall be selected
prior to calibration. To perform calibration for the HB range,
the HB scale shall be selected with the key.
Keep the " " button pressed for approx. 2s until the flashing
value of the impact time is "0".
5 Perform measurements on test blocks to obtain an average
value (this will help to exclude incorrect measurements during
the procedure).
Keep the " " button pressed for approx. 2s until the
calibration mode is displayed.

HMM-BA-e-2020 11
Enter the default value for the test block.
Press the " " buttons to change the values and
then the " " or " " button to move to the following
number.
Note:
If the calibration is performed in another scale HRC,
HRB, HB, HV or HSD, the scale required for the
measurement must be set first.
After step 3, keep the " " button pressed and then
press the " " button.
Now the scale in which the calibration is carried out is
displayed.
In another scale (HRC, HRB, HB, HV i HSD) in
calibration mode, the input of standard values is done
in a different way than when calibrating using the
hardness tester LEEB (HL).
25.0HRC must be entered as "250" (HRB remains
unaffected).
85HB must be entered as "085" (HV, HSD remain
unaffected).
If the entered data is outside the range, no calibration
is performed.
Clock setting
The hardness tester is equipped with an integrated
real-time clock.
After changing the battery or always as required, the
clock must be set again.
To do so, press the " " button to select the setting
mode.
Press the " " buttons to change the values and
then the " " or " " button to move to the following
number.
Press the " " button to confirm the setting and return to the measuring mode.
month
Day
Year
Clock
minutes

12 HMM-BA-e-2020
Reset
If the display does not function properly or gets stuck, a system reset must be carried
out. To do this, remove and reinsert the batteries and then switch the unit on again.
7 Annexes
7.1 A-1 Conversion range
7.2 A-2 Material Code
Hardness
Tensile strength
Code
Material
Code
Material
01
Steel & cast steel
11
Low carbon steel
02
Alloyed tool steel
12
High carbon steel
03
Stainless steel
13
Chrome steel
04
Grey cast iron
14
Cr-V Steel
05
Ductile cast iron
15
Cr-Ni steel
06
Aluminium casting alloy
16
Cr-Mo steel
07
Cu-Zn alloy
17
Cr-Ni-Mo Steel l
08
Cu-Sn alloy
18
Cr-Mn-Mo steel
09
Copper
19
Cr-Mn-Si steel
10
Forged steel
20
High strength steel
Material
AGM
HB
HRC
HRB
HSD
Tensile
strength
(MPa)
Steel & cast steel
81-955
81-654
20.0-68.4
38.4-99.5
32.5-99.5
375-2639
Alloyed tool steel
80-898
20.4-67.1
375-2639
Stainless steel
85-802
85-655
19.6-62.4
46.5-101.7
740-1725
Grey cast iron
63-336
Ductile cast iron
140-387
Aluminium casting
alloy
19-164
23.8-84.6
Brass
40-173
13.5-95.3
Bronze
60-290
Copper
45-315
Forged steel
83-976
142-651
19.8-68.5
59.6-99.6
26.4-99.5

HMM-BA-e-2020 13
7.3 A-3 Scope of Delivery
Note:
To view the CE declaration, please click on the following link:
https://www.kern-sohn.com/shop/de/DOWNLOADS/
❶ Display
❷ Rebound sensor D
❸ Test block
❹ Mini Printer
❺ Battery charger
❻Small support ring,
Cleaning brush
❼ Operating instructions
❽ Transport case
❶
❷
❸
❹
❺
❻
❽
❼
Other manuals for HMM
2
Table of contents
Other sauter Test Equipment manuals

sauter
sauter HMM User manual

sauter
sauter SD Series User manual

sauter
sauter TVO 500N300 User manual

sauter
sauter HN-D User manual

sauter
sauter SD Series User manual

sauter
sauter TN-EE User manual

sauter
sauter TVL User manual

sauter
sauter TVP User manual

sauter
sauter JD User manual

sauter
sauter TVL User manual

sauter
sauter TI-A0 User manual

sauter
sauter HMM User manual

sauter
sauter HD Series User manual

sauter
sauter SAUTER HMO User manual

sauter
sauter TVP User manual

sauter
sauter TB-US User manual

sauter
sauter TVP-L Series User manual

sauter
sauter TVL-XL User manual

sauter
sauter HMR User manual

sauter
sauter TVM-N User manual