manuals.online logo
Brands
  1. Home
  2. •
  3. Brands
  4. •
  5. Screen Int
  6. •
  7. Projection Screen
  8. •
  9. Screen Int Canaletto Elastic User manual

Screen Int Canaletto Elastic User manual

RELEASE ER2018_10_24
Il presente documento è di proprietà riservata della Euroscreen S.r.l. E’ vietata la produzione senza autorizzazione
This document is property of Euroscreen Srl. Any distribution, reproduction, copying or publication of this document is prohibited.
MANUALE DI INSTALLAZIONE
INSTALLATION MANUAL
CANALETTO ELASTIC
ISTRUZIONI ORIGINALI IN
ITALIANO
ORIGINAL INSTRUCTIONS IN
ITALIAN LANGUAGE
Translation into English language
RELEASE ER2018_10_24
Il presente documento è di proprietà riservata della Euroscreen S.r.l. E’ vietata la produzione senza autorizzazione
This document is property of Euroscreen Srl. Any distribution, reproduction, copying or publication of this document is prohibited.
CANALETTO ELASTIC
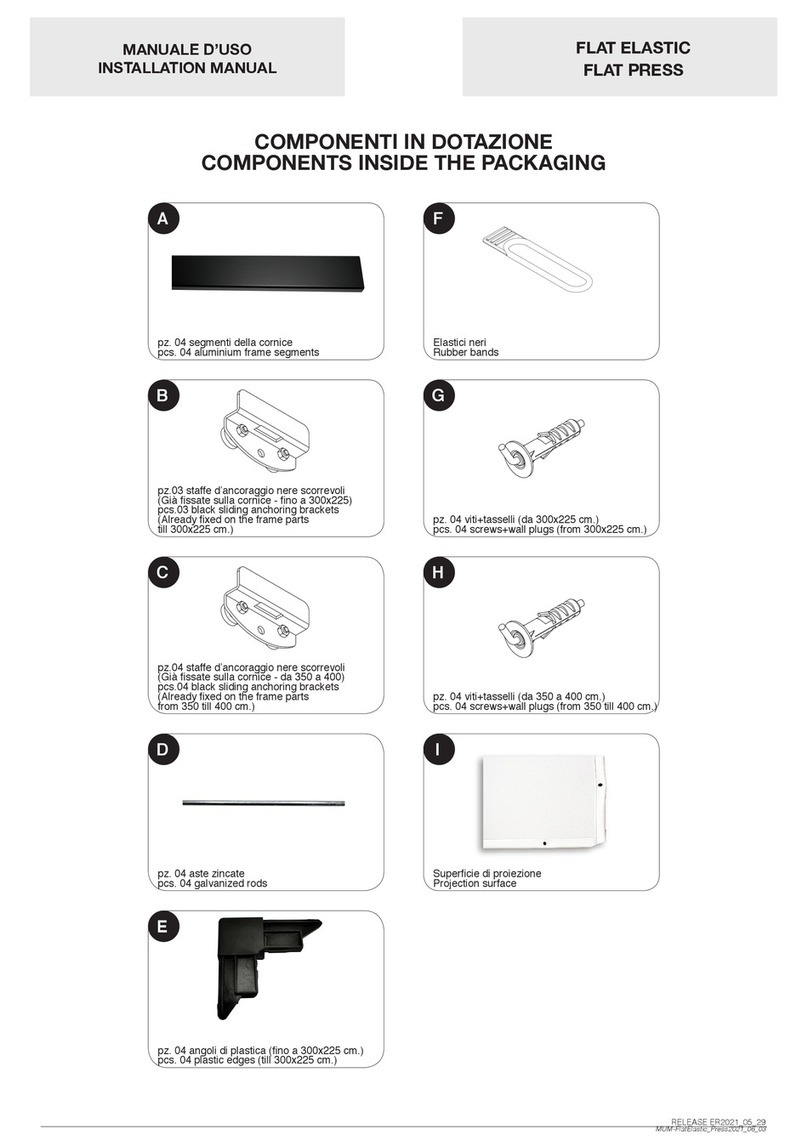
COMPONENTI IN DOTAZIONE
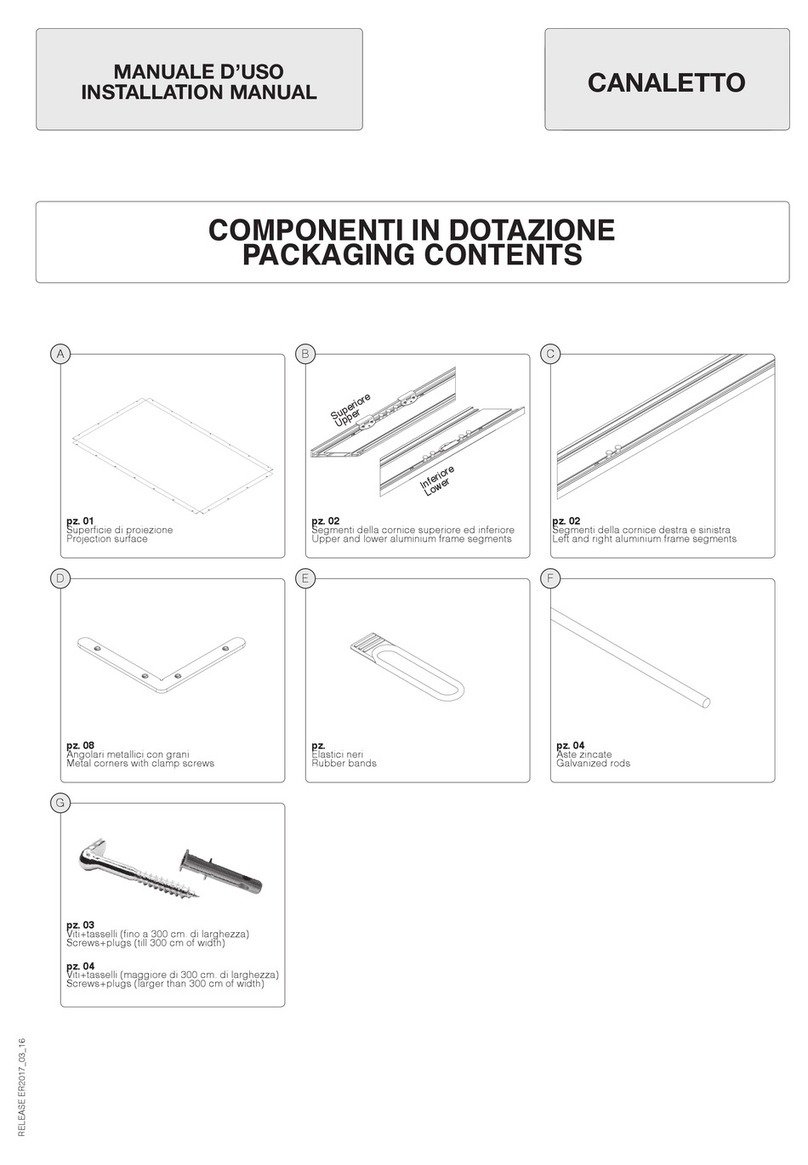
COMPONENTS INSIDE THE PACKAGING
pz. 02
Segmenti della cornice superiore ed inferiore
Upper and lower aluminium frame segments
Superiore
Upper
Inferiore
Lower
pz. 02
Segmenti della cornice destra e sinistra
Left and right aluminium frame segments
pz. 01
Supercie di proiezione
Projection surface
pz. 08
Angolari metallici con grani
Metal corners with clamp screws
pz.
Elastici neri
Rubber bands
pz. 04
Aste zincate
Galvanized rods
*
*
*
A
C
E
B
D
F
RELEASE ER2018_10_24
Il presente documento è di proprietà riservata della Euroscreen S.r.l. E’ vietata la produzione senza autorizzazione
This document is property of Euroscreen Srl. Any distribution, reproduction, copying or publication of this document is prohibited.
CANALETTO ELASTIC
GStaffe di ancoraggio nero scorrevoli
già montate nella cornice
Black sliding anchoring brackets
already mounted in the frames
pz./pcs.03
(pz./pcs. 02 Superiore/Upper, n.01 Inferiore/Lower)
(no a 300 cm. di larghezza)
(till 300 cm of width)
*
pz./pcs. 04
(pz./pcs. 03 Superiore/Upper, n.01 Inferiore/Lower)
(maggiore di 300 cm. di larghezza)
(larger than 300 cm of width)
pz. 03
Viti+tasselli (no a 300 cm. di larghezza)
Screws+plugs (till 300 cm of width)
pz. 04
Viti+tasselli (maggiore di 300 cm. di larghezza)
Screws+plugs (larger than 300 cm of width)
RELEASE ER2018_10_24
Il presente documento è di proprietà riservata della Euroscreen S.r.l. E’ vietata la produzione senza autorizzazione
This document is property of Euroscreen Srl. Any distribution, reproduction, copying or publication of this document is prohibited.
CANALETTO ELASTIC
ITALIANO
INTRODUZIONE
Grazie per avere acquistato uno schermo a cornice della
serie Canaletto Elastic. Questo articolo è interamente
prodotto in Italia con materiali di ottima qualità e tele
per proiezione che garantiscono al vostro sistema
performance qualitativamente eccellenti.
AVVERTENZE
Prima di assemblare ed installare lo schermo a cornice
leggere attentamente le istruzioni di montaggio. Si
prega, inoltre, di conservare sempre le presenti istruzioni
di montaggio in modo tale da poterle consultare
ogniqualvolta ve ne sia la necessità.
In fase di apertura dell’imballo dello schermo, UTILIZZARE
CON MOLTA CAUTELA ATTREZZI TAGLIENTI che
possano danneggiare il contenuto dello stesso. Durante
l’apertura dell’imballo e l’installazione del prodotto, si
raccomanda di indossare guanti da lavoro.
In base al peso del prodotto, esso va maneggiato da
almeno due o tre o più persone secondo il rapporto KG/
PERSONA: MASCHIO 25 kg. – FEMMINA 15 kg.
Dopo aver assemblato lo schermo, potrebbero permanere
delle pieghe sulla supercie di proiezione, causate
dall’imballo e dal trasporto.
Tali pieghe spariranno nell’arco di 48/72 ore, a condizione
che lo schermo sia installato in un ambiente in cui la
temperatura si attesti intorno ai 20°C. Nel caso in cui
la temperatura ambientale sia superiore, le pieghe
spariranno in minor tempo. Nel caso che le pieghe
persistano o qualora vi sia la necessità di rimuoverle
in un breve lasso di tempo, suggeriamo l’utilizzo di un
asciugacapelli.
Attenzione: utilizzare l’asciugacapelli ad almeno 40
cm. di distanza dal telo di proiezione, muovendolo
costantemente e uniformemente lungo la supercie di
PVC. Qualora questo non venga rispettato, si potrebbero
causare danni permanenti alla tela di proiezione.
Nel caso durante il montaggio della tela alla cornice, essa
risultasse apparentemente troppo piccola, lasciarla 24
ore in una stanza ad una temperatura tra 20°-24°C. In tal
modo, la tela risulterà più elastica e più facile da montare
alla cornice.
Il produttore non si assume responsabilità per qualsiasi
danno subito da persone o cose nel caso il prodotto
sia utilizzato per usi impropri al di fuori delle speciche
tecniche o in caso di installazione errata.
Il produttore non si assume responsabilità in caso di
errato montaggio dello schermo.
CERTIFICAZIONI DEL PRODOTTO
Gli schermi a cornice Canaletto Elastic sono conformi alle
direttive CE.
Le tele per proiezione utilizzate non presentano cadmio e
sono certicate ignifughe come segue:
-Classe M1 - WHITE PEARL, FRONTREAR, REAR PLUS
-Classe 1 - CINESOUND
-Classe B - BRIGHT CONTRAST 3D
-Classe M2 - LUMI-GREY, LUMI GREY
MICROPERFORATED, FOLDAWAY
-Classe B1 - WHITE, MICROPERFORATED, FIBRE
MATTE
-Classe NFPA 701 - REAR LUX
GARANZIA DEL PRODOTTO
Lo schermo per videoproiezione è garantito 2 anni
dalla data di acquisto per difetti di fabbricazione. La
responsabilità è limitata alla riparazione o alla sostituzione
dei componenti riconosciuti difettosi, senza altri oneri di
sorta.
Sono da considerarsi esclusi dalla garanzia le componenti
che presentano usura normale o causata da particolari
situazioni ambientali o di installazione.
La garanzia è sospesa d’ucio se:
1) lo schermo viene reso con evidenti segni d’urto e/o
manomissione o con danni risultanti da trasporto;
2) vengono eettuate riparazioni da persone diverse dal
produttore;
3) vengono alterate, cancellate, rimosse o risultano
impossibili da leggere le etichette riguardanti il numero di
serie del prodotto.
NON installare lo schermo vicino o sopra fonti di calore o
di condizionamento dell’aria, poiché il PVC è un materiale
plastico che si dilata e si danneggia irrimediabilmente se
sottoposto a calore e/o aria fredda diretti.
NON esporre lo schermo direttamente ai raggi solari in
quanto la tela in PVC potrebbe rovinarsi per le stesse
motivazioni di cui sopra.
La tela in PVC è molto sensibile alle escursioni termiche.
Eettuare il montaggio del telo ad una temperatura
ambientale di 18°-20°C. Nel caso in cui esso sia passato
da un luogo esterno ad uno interno, subendo in tal modo
uno sbalzo termico, attendere due o tre ore prima di
montare lo schermo.
NON tentare di LAVARE in alcun modo la supercie del
TELO né con detergenti, né con alcool, solventi o prodotti
per la pulizia della casa. Spolverare di tanto in tanto la
supercie con un panno asciutto e pulito.
Usare la massima cautela con lo schermo in quanto le
macchie di qualsiasi tipo sulla tela in PVC sono indelebili.
NON APPENDERSI allo schermo e NON APPENDERVI
OGGETTI. Assicurarsi che bambini non giochino con lo
schermo in quanto potrebbero procurarsi delle lesioni
anche gravi.
NON VERRANNO ACCETTATI resi di schermi senza
previa autorizzazione di rientro data specicatamente dal
produttore (numero RMA) e senza idoneo imballaggio.
ISTRUZIONI DI MONTAGGIO
1. ASSEMBLAGGIO DELLA CORNICE
Il prodotto deve essere installato e utilizzato in conformità
alle normative vigenti nel paese dove esso è ubicato.
Appoggiate i segmenti della cornice (B e C) sul pavimento
con il lato delle scanalature rivolto verso l’alto. Per non
graare la cornice è consigliabile appoggiarla sopra a un
telo morbido e pulito.
Inserire in ogni angolo due angolari metallici con grani (D)
come in Fig. 1.
Dopo aver inserito tutti gli angolari metallici nei 4 segmenti
di cornice, posizionare quest’ultima in modo tale che le
due diagonali abbiamo la stessa misura. A questo punto,
stringere fermamente i grani (Fig. 2).
2. MONTAGGIO DEL TELO SULLA CORNICE
A questo punto, stendete il telo (A) sopra la cornice con
la supercie riettente (vedi etichetta di colore verde
“Projection side”) rivolta verso il basso avendo cura di
non sporcarla.
Nel caso vi sia una saldatura sulla supercie di proiezione,
montare la tela sulla cornice in modo tale che la saldatura
risulti nella parte superiore dello schermo.
Inlare le aste zincate (F) nelle apposite tasche perimetrali
avendo cura di posizionarle verso l’esterno delle tasche
(vedi Fig. 3). Tendere il telo inlando gli elastici (E) nelle
asole che trovate sul perimetro, cingendo anche le aste
zincate e agganciarlo ai cursori sulla cornice (Fig. 4,5 e
6), AVENDO CURA DI PARTIRE DAI QUATTRO ANGOLI
CONTRAPPOSTI.
3. POSIZIONAMENTO A PARETE
II Canaletto Elastic è dotato di apposite stae di
ancoraggio scorrevoli, già montate sulla cornice, che
permettono un facile posizionamento dello stesso alla
parete, utilizzando le viti ed i tasselli forniti a corredo (G)
(Fig. 7).
TUTTI GLI SCHERMI A CORNICE SONO DOTATI DI
STAFFA SUL LATO ORIZZONTALE INFERIORE DELLO
SCHERMO AL FINE DI GARANTIRNE LA FORMA
RETTANGOLARE E LA NON ACCIDENTALE CADUTA IN
CASO DI SOLLEVAMENTO.
Il produttore garantisce che la cornice dello schermo
mantenga, dopo l’installazione, una forma rettangolare,
solo se essa è ancorata direttamente al muro tramite
tutte le stae di ancoraggio montate sulla parte di cornice
superiore ed inferiore.
Nel caso il prodotto venga ssato al sotto tramite catene
o qualsiasi altro modo diverso da quanto specicato
sopra, il produttore non garantisce che lo schermo
mantenga una forma rettangolare.
Al termine del montaggio, vericare che lo schermo sia
perfettamente orizzontale utilizzando una livella.
CONTROLLARE OGNI 6 MESI I FISSAGGI DELLE
VITI, DEI TASSELLI E DELLE STAFFE AL FINE DI
VERIFICARNE LA PERFETTA TENUTA.
NON SOSTARE NEL RAGGIO D’AZIONE DELLO
SCHERMO.
E’ VIETATO L’UTILIZZO DELLO SCHERMO
ALL’APERTO.
RELEASE ER2018_10_24
Il presente documento è di proprietà riservata della Euroscreen S.r.l. E’ vietata la produzione senza autorizzazione
This document is property of Euroscreen Srl. Any distribution, reproduction, copying or publication of this document is prohibited.
CANALETTO ELASTIC
ENGLISH
INTRODUCTION
Thank you for purchasing a frame screen among the
range Canaletto Elastic. This screen is made entirely in
Italy with rst-class materials, including a high quality
projection surface to guarantee excellent performance for
your installation.
WARNINGS
Before installing the screen, please read the following
instructions carefully. We would recommend that these
instructions are stored safely for future reference.
When opening the packaging of the screen, please DO
NOT USE CUTTERS or OTHER SHARP TOOLS that can
damage the screen inside. During opening the packaging
and during installation, it is reccomended to use work
gloves.
Depending on the screen weight, it has to be handled by
at least two or three persons taking care to the following
ratio KG/PERSON: MALE 25 kg. – FEMALE 15 kg.
After assembling the screen, there could result some
wrinkles on the projection surface, due to packaging and
transport.
These wrinkles will disappear within 48/72 hours, under
the condition that the screen is installed inside a room with
at least 20°C temperature. In case the room temperature
is higher than 20°C, the wrinkles will disappear quicker.
In case of persistant wrinkles or if you need to remove
the wrinkles in a very short time, we suggest to use an
hairdryer.
Warning: use the hairdryer at least 40 cm. from the
projection surface and move it constantly and evenly
across the projection cloth.
If this warning is not respected, the surface could be
damaged permanently.
In case during assembling of the projection cloth on the
frame, the surface results apparently too small, please
leave it 24 hrs in a room with 20-24°C temperature. After
this, the cloth will be more elastic and it will be easier to
mount it onto the frame.
The manufacturer does not take responsibility for any
damage to property or personal injury if the screen is
used outside of recommended specications or in case
of incorrect/poor quality installation.
CERTIFICATIONS
Canaletto Elastic is certied CE.
The surfaces for projection used on the products are
cadmium-free and are re-proof certied as follows:
-Class M1 - WHITE PEARL, FRONTREAR, REAR PLUS
-Class 1 - CINESOUND
-Class B - BRIGHT CONTRAST 3D
-Class M2 - LUMI-GREY, LUMI GREY
MICROPERFORATED, FOLDAWAY
-Class B1 - WHITE, MICROPERFORATED, FIBRE
MATTE
-Class NFPA 701- REAR LUX
This projection screen is guaranteed 2 years from the
purchase date for manufacturing defects.
Responsibility is limited to repairing or substitution of the
defected components and without any other charge at
our expense.
Warranty is ocially voided if:
1) the screen has been dismantled or it is returned with
collision damage or defective due to incorrect installation;
2) the screen results damaged due to repairing or
modications made by non-authorized people;
3) the sticker regarding the serial number of the product
has been altered, deleted, removed or is illegible.
DO NOT install this screen nearby or over heating or air
conditioning systems, because PVC is a plastic material
which dilates and remains damaged if it is subjected to
heat and/or cool air.
DO NOT install this screen either facing direct sun light
or blocking a window as PVC could be damaged for the
explanations given above.
The PVC cloth is very sensitive to temperature range.
We advise you to wait 2 hours for the screen to acclimatise
before using the screen after delivery, especially if the
screen is brought into a warm environment from cold.
DO NOT WASH the projection surface with alcohol or
solvent nor with commercial cleaners. Every now and
then dust the surface with a dry and clean duster.
Please, be very careful because any kind of stain on the
PVC cloth is inerasable.
DO NOT HANG TO THE SCREEN and DO NOT HANG
ANY OBJECT to it. Please take care that children DO NOT
PLAY with the screen as they can get severely injured.
The manufacturer will not accept returns of screens for
repair without manufacturer’s authorization (RMA number)
and without a suitable packaging.
INSTALLATION INSTRUCTIONS
1. FRAME ASSEMBLY
The product has to be installed and used conform to the
laws in force within the country where the product is used.
Lay the frame segments (B and C) on the oor with the
grooves facing upwards. In order to avoid scratches to
the frame we advise you to lay the frame on a soft and
clean cloth.
Insert in each corner the two metal corners with clamp
screws (D), see Fig. 1
After the four corners are assembled, align the frame
taking care that the two diagonals have the same lenght.
Now screw tightly all the clamp screws (Fig. 2).
2. PROJECTION SURFACE ASSEMBLY
On the mounted frame, please lay the projection surface
(A) with the reecting side facing downwards (see green
sticker quoting “Projection Side”), taking care not to get
it dirty.
In case there is a seam in the viewing area of the projection
cloth, please take care to mount the projection cloth onto
the frame so that the seam will result on the upper (higher)
part of the screen.
Insert the galvanized rods (F) into the perimeter pockets,
taking care to position them towards the external
side of the pockets (Fig. 3). In order to tight the screen
surface, put the rubber bands (E) into the holes around
the galvanized rods and hook them to the cursors (Fig.
4, 5 and 6), STARTING FROM THE OPPOSITE FOUR
ANGLES.
3. WALL MOUNTING
Canaletto Elastic is provided with sliding anchoring
brackets which allow an easy wall positioning (Fig. 7),
using the supplied screws and wall plugs (G).
ALL FRAME SCREENS ARE SUPPLIED WITH AN
ANCHORING BRACKET ON THE HORIZONTAL BOTTOM
PART OF THE FRAME IN ORDER TO GUARANTEE THE
SQUARENESS OF THE FRAME AND TO AVOID FALLING
DOWN IN CASE OF LIFTING.
The manufacturer guarantees the squareness of the frame
after the installation, only if the frame is hanged to the wall
with all the anchoring brackets mounted on the upper and
lower part of the frame.
Squareness of the frame is not guaranteed in case the
screen is mounted in dierent ways (e.g. metal chains
from the ceiling) from what is above written.
At the end of the installation, please check that the frame
is perfectly levelled.
CAUTION: CHECK EVERY 6 MONTHS THAT SCREWS,
WALL PLUGS AND BRACKETS ARE IN GOOD
CONDITIONS AND WELL TIGHTENED.
IT IS FORBIDDEN TO STAY UNDER THE PROJECTION
SCREEN.
IT IS FORBIDDEN TO USE THE PROJECTION SCREEN
OUTDOOR.
RELEASE ER2018_10_24
Il presente documento è di proprietà riservata della Euroscreen S.r.l. E’ vietata la produzione senza autorizzazione
This document is property of Euroscreen Srl. Any distribution, reproduction, copying or publication of this document is prohibited.
CANALETTO ELASTIC
DEUTSCH
EINFÜHRUNG
Danke für den Kauf einer Rahmenleinwand Canaletto
Elastic. Diese Artikel wurden in Italien mit hervorragender
Qualität und hochwertigen Projektionstüchern für eine
sehr gute Performance produziert.
AUFMERKSAMKEIT
Bevor Sie die Rahmenleinwand zusammenbauen, lesen
Sie bitte die Montage Bedienungsanleitungen. Bitte
bewahren Sie diese Montage Bedienungsanleitungen
auf.
Zum Önen der Verpackung keine Teppichmesser
oder spitzen Gegenstände verwenden. Beim Önen
der Verpackung, sowie bei Installation und Handling
des Produktes immer Schutzhandschuhe tragen. Das
Produkt muss je nach Gewicht von mindestens zwei,
drei oder vier Personen befördert werden (Richtwerte für
die Last pro Person: 25 kg Männer - 15 kg Frauen).
Nach der Montage der Leinwand besteht die Möglichkeit,
dass dieselbe noch durch Verpackung hervorgerufene
Falten aufweist. Diese Falten glätten sich im Laufe von
48/72 Stunden, sofern die Leinwand in einem Raum
mit Temperaturen von mindestens 20°C installiert wird.
Je höher die Raumtemperatur, desto schneller glätten
sich die Falten bis sie dann endgültig verschwinden. Bei
besonders hartnäckigen Fällen bzw. sofern der Bedarf
besteht, die Falten binnen kurzer Zeit zu glätten, ist die
Verwendung eines Föhns empfehlenswert.
Achtung: Bei Missachtung folgender Hinweise kann
die Leinwand durch die Verwendung eines Föhns
unwiderruich beschädigt werden. Der Abstand
zwischen Fön und Leinwand darf NICHT unter 40/50
cm liegen. Der Föhn muss ständig über die gesamte
Faltenäche bewegt werden.
Das Projektionstuch muss in den Rahmen gespannt
werden. Je nach Temperatur kann das Tuch den
Anschein machen zu klein zu sein. Ggf. das Tuch 24
Stunden in einem temperierten Raum liegen lassen (~
20-24°C).
Der Produzent ist nicht verantwortlich für
Personenschaden oder Sachschaden, wenn das
Produkt für unpassende Aktionen eingesetzt oder falsch
installiert wurde. Der Produzent ist nicht verantwortlich,
wenn die Leinwand falsch installiert wurde.
ZERTIFIZIERUNGEN
Die Leinwände Canaletto Elastic entsprechen den CE
Normen.
Die Projektionstücher sind kadmiumfrei und feuerfest:
-Gruppe M1-WHITE PEARL, FRONTREAR, REAR PLUS
-Gruppe 1 - CINESOUND
-Gruppe B -BRIGHT CONTRAST 3D
-Gruppe M2 - LUMI-GREY, LUMI GREY
MICROPERFORATED,FOLDAWAY
-Gruppe B1- WHITE, MICROPERFORATED, FIBRE
MATTE
-Gruppe NFPA 701 - REAR LUX
GARANTIEBEDINGUNGEN
Gegen Herstellungsfehler dieser Leinwand wird ab
Kaufdatum für 2 Jahre Garantie gegeben.
Der Hersteller garantiert nur die Reparatur oder den
Austausch der Teile, ohne die Verpichtung weitere
Kosten zu tragen.
Dieser Garantie erstreckt sich nicht auf:
1) Schäden aufgrund von Reparaturen oder
Anpassungen durch zur Reparatur nicht befugte Firmen
oder Personen;
2) Jegliche Schäden aufgrund von Änderungen oder
Anpassungen, mit denen das Produkt ohne vorherige
schriftliche Genehmigung durch der Hersteller;
3) Veränderungen, Unleserlichkeit oder Entfernung der
Modell- oder Seriennummer auf dem Produkt.
Die Leinwand darf nicht oberhalb oder in der Nähe
einer Hitzequelle oder Kühlung installiert werden, da
in diesem Fall Wellen in dem PVC Tuch entstehen und
dass Tuch bleibend beschädigt wird. Auf oder hinter das
Leinwandtuch darf nicht direktes Sonnenlicht scheinen,
da in diesem Fall Wellen in dem PVC Tuch entstehen und
dass Tuch bleibend beschädigt wird.
Das PVC Tuch ist sehr empndlich auf Temperatur-
Schwankungen. Im Fall, dass die Leinwand aus einer
kalten Umgebung kommt, warten Sie bitte einige
Stunden bevor Sie mit der Montage beginnen. Es ist
wichtig, dass das Leinwandtuch auf Zimmertemperatur
ist.
Das PVC TUCH oder der RAHMEN (aus Aluminium oder
Samt) darf NICHT mit Waschmitteln, Lösungsmitteln
oder Alkohol gereinigt werden. Man darf das Tuch nur mit
einem trocken Baumwoll-Tuch abstauben. Vermeiden
Sie das Beecken der Projektions- Leinwand, da es
fast nicht möglich ist, Flecken aus dem PVC Tuch zu
entfernen.
Hängen Sie sich nicht an die Leinwand, und hängen Sie
keine Objekte an die Leinwand. Stellen Sie sicher, dass
kleine Kinder nicht mit der Leinwand spielen.
Wir akzeptieren nur Rücksendungen von Waren, die
gut verpackt sind und auf der Verpackung unsere RMA
Nummer geschrieben ist. Die RMA Nummer muss vorab
bei uns angefragt werden.
ANLEITUNG
1. MONTAGE DES RAHMENS
Das Produkt muss so installiert und verwendet
werden, um den geltenden Gesetzen in dem Land zu
entsprechen, in dem das Produkt verwendet wird.
Legen Sie die Rahmenteile (B und C) auf den Boden,
wobei die Rillen nach oben zeigen müssen. Um Kratzer
am Rahmen zu vermeiden, empfehlen wir Ihnen, den
Rahmen auf einen weichen und sauberen Untergrund
(z.B. Tuch / Decke) zu legen.
In jede Ecke des Rahmens die beiden Metall-Ecken mit
Klemmschrauben (D) einsetzen, siehe Abb. 1.
Nachdem die vier Ecken montiert sind, richten Sie den
Rahmen so aus, dass die beiden Diagonalen die gleiche
Länge haben.
Schrauben Sie nun alle Klemmschrauben fest (Abb. 2).
2. AUFBRINGEN DES TUCHS AUF DEN
RAHMEN
Legen Sie den Rahmen mit den beweglichen
Befestigungen nach oben. Legen Sie das Tuch (A) auf
den Rahmen mit der Projektionsoberäche nach unten,
ohne diese zu verschmutzen.
Stecken Sie die Zinkstangen (F) in die dafür gedachten
Taschen am Rand des Tuchs (siehe Abb. 3). Hängen Sie
die Gummibänder (E) an die Schieber des Rahmens um
die Zinkstangen (siehe Abb. 4,5 und 6). FANGEN SIE
hierbei MIT DEN VIER ECKEN AN.
3 DECKEN- ODER WANDBEFESTIGUNG
Die Leinwand Canaletto Elastic verfügt über
Aufhängungen, die eine bewegliche einfache
Wandbefestigung ermöglichen (siehe Abb. 7). Mit den
im Lieferumfang enthaltenen Schrauben (G), befestigen
Sie die beweglichen Aufhängungen an der Wand.
ALLE RAHMEN LEINWÄNDE SOLLTEN AUCH
MIT EINEM MONTAGEBÜGEL AM UNTEREN
HORIZONTALEN RAHMENTEIL BEFESTIGT WERDEN.
Auch diese Montagebügel müssen mit einer „L“ förmigen
Schraube an der Wand befestigt werden. Damit soll
vermieden werden, dass der Rahmen von der Wand
gezogen werden kann und dies soll die rechteckige
Form garantieren.
Der Hersteller garantiert dass nach Installation der
Leinwandrahmen rechteckig ist nur im Falle, wenn
die Leinwand mittels aller Montagebügel, die sich am
oberen und unteren Rahmenteil benden, direkt an der
Wand montiert wird.
Falls die Rahmenleinwand durch Ketten an der Decke
montiert wird oder auf andere Weisen montiert wird,
garantiert der Hersteller keine rechteckige Form des
Leinwandrahmens.
KONTROLLIEREN SIE JEDES 6 MONATEN
DIE SCHRAUBEN, DUEBEL UND DECKEN
BEFESTIGUNGEN AN DER LEINWAND UND ZIEHEN
SIE DIE SCHRAUBEN GEGEBENENFALLS AN.
NICHT IN REICHWEITE DER LEINWAND BLEIBEN.
ES IST VERBOTEN DIE LEINWAND IM FREIEN ZU
VERWENDEN.
RELEASE ER2018_10_24
Il presente documento è di proprietà riservata della Euroscreen S.r.l. E’ vietata la produzione senza autorizzazione
This document is property of Euroscreen Srl. Any distribution, reproduction, copying or publication of this document is prohibited.
CANALETTO ELASTIC
PORTUGUESE
INTRODUÇÃO
Agradecemos a sua preferência pela compra de uma
estrutura de ecrã das gamas Canaletto Elastic. Este ecrã
é totalmente feito em Itália, com materiais de primeira
classe e inclui uma tela de projecção de alta qualidade,
de forma a garantir um desempenho excelente para a sua
instalação.
AVISOS
Antes de instalar o ecrã, por favor leia atentamente as
seguintes instruções. Recomendamos que guarde estas
instruções num lugar seguro, para futura consulta.
Para abrir a embalagem do ecrã nao use objetos cortantes
ou outras ferramentas a adas que podem danifcar o seu
equipamento. Recomeda-se o uso de luvas de trabalho
durante a abertura da embalagem e a instalaçao do
ecran.
Dependendo do peso do ecrã, o mesmo deve ser
manuseado por duas ou tres pessoas tendo em conta a
seguinte relação de peso/pessoa: homem
Kg e mulher 15 kg.
After assembling the screen, there could result some
wrinkles on the projection surface, due to packaging and
transport.
These wrinkles will disappear within 48/72 hours, under
the condition that the screen is installed inside a room with
at least 20°C temperature. In case the room temperature
is higher than 20°C, the wrinkles will disappear quicker.
In case of persistant wrinkles or if you need to remove
the wrinkles in a very short time, we suggest to use an
hairdryer.
Warning: use the hairdryer at least 40 cm. from the
projection surface and move it constantly and evenly
across the projection cloth.
If this warning is not respected, the surface could be
damaged permanently.
In case during assembling of the projection cloth on the
frame, the surface results apparently too small, please
leave it 24 hrs in a room with 20-24°C temperature. After
this, the cloth will be more elastic and it will be easier to
mount it onto the frame.
No caso de instalação incorrecta e no caso de se vericar
não terem sido cumpridas as instruções recomendadas,
o fabricante não se responsabiliza por danos a pessoas
ou bens.
CERTIFICAÇÕES
Canaletto Elastic estão CE certicados.
As telas de projecção utilizadas nestes artigos não
contêm cádmio e são à prova de fogo e estão certicados
da seguinte forma:
-Classe M1- WHITE PEARL, FRONTREAR, REAR PLUS
-Classe 1 - CINESOUND
-Classe B - BRIGHT CONTRAST 3D
-Classe M2- LUMI-GREY, LUMI GREY
MICROPERFORATED, FOLDAWAY
-Classe B1 - WHITE, MICROPERFORATED, FIBRE
MATTE
-Classe NFPA 701- REAR LUX
GARANTIA
Este ecrã de projecção tem garantia de 2 anos, a partir
da data de compra e cobre qualquer defeito de fabrico.
A responsabilidade limita-se à reparação ou substituição
das peças com defeito, sem quaisquer outros encargos
incluídos.
Garantia considera-se legalmente caducada, nos
seguintes casos:
1) se o ecrã tiver sido desmontado ou for devolvido
com estragos provocados por colisão ou com defeito
originado por instalação incorrecta;
2) the screen results damaged due to repairing or
modications made by non-authorized people;
3) se o auto colante referente ao número de série deste
artigo tiver sido alterado, apagado, retirado ou ainda se o
mesmo estiver ilegível.
NÃO instale este ecrã perto ou sobre sistemas de
aquecimento ou de ar condicionado, porque o PVC é um
material plástico, que dilata e se danica, se for sujeito a
calor e/ou ar fresco
NÃO instale este ecrã directamente virado para a luz do
sol, nem a tapar uma janela, uma vez que o PVC poderá
danicar-se, conforme as explicações acima referidas.
O material do PVC é muito sensível a variações de
temperatura
Após a entrega, deverá esperar 2 horas, antes de utilizar
o ecrã, para o deixar aclimatizar, especialmente se tiver
vindo de um ambiente frio para um ambiente quente.
NÃO LAVE a tela de projecção com álcool nem solvente
ou com qualquer produto de limpeza comercial. De vez
em quando, limpe o pó com um pano do pó seco e limpo.
Por favor, tenha muito cuidado, porque qualquer tipo de
mancha no material PVC, não poderá ser eliminada.
Não se pendure na tela ou pendure quaisquer objetos
na mesma. Por favor tenha atenção a que as crianças
não briquem com o ecrã sob pena de puderem car
gravemente feridas.
O fabricante não aceitará a devolução de ecrãs para
reparação, sem a autorização do fabricante (número
RMA) e que não esteja acondicionado numa embalagem
adequada.
O fabricante apenas garante o formato quadrangular
da estrutura, após a instalação, se a mesma estiver
pendurada na parede com todos os suportes de xação
montados na parte superior e inferior da estrutura.
Ñão se garante formato quadrangular da estrutura se
o ecrã for montado de formas diferentes (ex. correntes
metálicas do tecto), daquelas acima mencionadas.
No m da instalação, verique se a estrutura está
devidamente nivelada.
INSTRUÇÕES PARA INSTALAÇÃO
1. MONTAGEM DA MOLDURA
O produto deve ser instalado e utilizado de acordo com
as leis em vigor no país onde o produto é utilizado.
Coloque os segmentos da moldura (B e C) no chão com
as ranhuras voltadas para cima. A m de evitar arranhões
na armação, aconselhamos colocar a moldura sob um
pano macio e limpo.
Inserir em cada canto os dois cantos metálicos com
parafusos de aperto (D), ver Fig. 1.
Depois de os quatro cantos estarem montados, alinhar a
moldura tendo em atenção de que as duas diagonais têm
o mesmo comprimento.
Aperte rmemente todos os parafusos de xação (Fig. 2).
2. MONTAGEM DA TELA DE PROJECÇÃO
Estenda a estrutura com os cursores de xação virados
para cima. Coloque a tela de projecção (A) sobre a
estrutura, com o lado re ector virado para baixo, com
cuidado para que não a suje.Introduza as hastes
galvanizadas (F) nas bolsas em todo o perímetro (Fig. 3).
De forma a apertar a tela do ecrã, coloque as borrachas
(E) nos orifícios e prenda-as aos cursores (Fig. 4,5,6).
COMECE PELOS QUATRO ÂNGULOS OPOSTOS.
3. MONTAGEM NA PAREDE
Os modelo Canaletto Elastic estão munido de
braçadeiras de montagem deslizantes, que
permitem um posicionamento fácil na parede (Fig
7), utilizando os parafusos e as buchas fornecidas
(G).TODAS AS ESTRUTURAS DOS ECRÃS ESTÃO
MUNIDAS DEUM SUPORTE DE FIXAÇÃO, NA PARTE
INFERIORHORIZONTAL DA ESTRUTURA, DE FORMA A
GARANTIR QUE MANTENHA O FORMATO QUADRADO,
EVITANDO QUE CAIA, QUANDO FOR LEVANTADO.
O fabricante garante a perpendicularidade da moldura
após a instalação, somente se a estrutura for pendurada
na parede com todos os suportes de ancoragem
montados na parte superior e inferior da armação.
A esquadria da armação não é garantida no caso de
a tela ser montada de diferentes formas (por exemplo,
correntes de metal a partir do teto) do que está escrito
acima.
No nal da instalação, verique se a estrutura está
perfeitamente nivelada.
CUIDADOS: VERIFIQUE DE 6 EM 6 MESES QUE OS
PARAFUSOS, BUCHAS E SUPORTES ESTÃO EM BOM
ESTADO DE CONSERVAÇÃO E BEM APERTADOS.
É PROIBIDO PERMANECER DEBAIXO DO ECRÃ DE
PROJEÇÃO.
É PROIBIDO UTILIZAR O ECRÃ DE PROJEÇÃO AO AR
LIVRE.
RELEASE ER2018_10_24
Il presente documento è di proprietà riservata della Euroscreen S.r.l. E’ vietata la produzione senza autorizzazione
This document is property of Euroscreen Srl. Any distribution, reproduction, copying or publication of this document is prohibited.
CANALETTO ELASTIC
Fig.1
Fig.2
Fig.3
RELEASE ER2018_10_24
Il presente documento è di proprietà riservata della Euroscreen S.r.l. E’ vietata la produzione senza autorizzazione
This document is property of Euroscreen Srl. Any distribution, reproduction, copying or publication of this document is prohibited.
CANALETTO ELASTIC
Fig.4
Fig.5
Fig.6
RELEASE ER2018_10_24
Il presente documento è di proprietà riservata della Euroscreen S.r.l. E’ vietata la produzione senza autorizzazione
This document is property of Euroscreen Srl. Any distribution, reproduction, copying or publication of this document is prohibited.
CANALETTO ELASTIC
Fig.7

Other Screen Int Projection Screen manuals

Screen Int CANALETTO Series User manual

Screen Int

Screen Int CANALETTO Series User manual

Screen Int FLAT ELASTIC VELVET CURVED User manual

Screen Int

Screen Int FLAT ELASTIC VELVET CURVED User manual

Screen Int FLAT ELASTIC User manual

Screen Int

Screen Int FLAT ELASTIC User manual

Screen Int Cine Pro User manual

Screen Int

Screen Int Cine Pro User manual

Screen Int OPEN ROLL User manual

Screen Int

Screen Int OPEN ROLL User manual

Screen Int Compact User manual

Screen Int

Screen Int Compact User manual

Screen Int MAJOR PRO-C User manual

Screen Int

Screen Int MAJOR PRO-C User manual

Screen Int Cine Pro User manual

Screen Int

Screen Int Cine Pro User manual

Screen Int COMPACT User manual

Screen Int

Screen Int COMPACT User manual

Screen Int CINE PRO User manual

Screen Int

Screen Int CINE PRO User manual

Screen Int LEONARDO User manual

Screen Int

Screen Int LEONARDO User manual

Screen Int MODIGLIANI Oyster User manual

Screen Int

Screen Int MODIGLIANI Oyster User manual

Screen Int CANALETTO WRAP AROUND User manual

Screen Int

Screen Int CANALETTO WRAP AROUND User manual

Screen Int MAJOR PRO-C User manual

Screen Int

Screen Int MAJOR PRO-C User manual

Screen Int CANALETTO ELASTIC User manual

Screen Int

Screen Int CANALETTO ELASTIC User manual

Popular Projection Screen manuals by other brands

SI Dynamic 2TB installation manual

SI

SI Dynamic 2TB installation manual

Severtson Cinema Series instruction manual

Severtson

Severtson Cinema Series instruction manual

Simonton Inovo installation instructions

Simonton

Simonton Inovo installation instructions

Da-Lite Wireline Advantage instruction manual

Da-Lite

Da-Lite Wireline Advantage instruction manual

Avers Screens Akustratus 2 Tension user manual

Avers Screens

Avers Screens Akustratus 2 Tension user manual

Elite Screens C user guide

Elite Screens

Elite Screens C user guide

Elite Screens CineTension 2 Series user guide

Elite Screens

Elite Screens CineTension 2 Series user guide

Celexon Manual Economy operating instructions

Celexon

Celexon Manual Economy operating instructions

Draper Access Fit Series Instruction

Draper

Draper Access Fit Series Instruction

Draper Silhouette V series Installation and operating instructions

Draper

Draper Silhouette V series Installation and operating instructions

Elite Screens StarFrame Series user guide

Elite Screens

Elite Screens StarFrame Series user guide

Elite Screens GolfSim Bay Series user guide

Elite Screens

Elite Screens GolfSim Bay Series user guide

Elite Screens Kestrel Tab-Tension Series user guide

Elite Screens

Elite Screens Kestrel Tab-Tension Series user guide

Kodak RODPJSFFSG120 user guide

Kodak

Kodak RODPJSFFSG120 user guide

INSTAAL INSMOT user manual

INSTAAL

INSTAAL INSMOT user manual

NB ROLLER FLY SCREEN Installation & operating guide

NB

NB ROLLER FLY SCREEN Installation & operating guide

Elite Screens TE100HC2 user guide

Elite Screens

Elite Screens TE100HC2 user guide

Monoprice 7930 instruction manual

Monoprice

Monoprice 7930 instruction manual

manuals.online logo
manuals.online logoBrands
  • About & Mission
  • Contact us
  • Privacy Policy
  • Terms and Conditions

Copyright 2025 Manuals.Online. All Rights Reserved.