Sealey VS8198 User manual

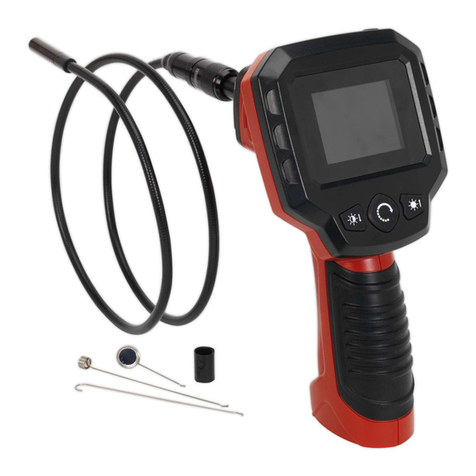
Versatile video borescope with Ø8.5mm x 1000mm semi-rigid probe.
Detachable, wireless colour LCD display with crystal clear 90mm high
resolution screen. Features on-screen horizontal/vertical ip features for
use with side-view mirrors. CMOS camera with adjustable LED for ne
control of light output and clear pictures. Suitable for internal inspection of
cylinder head bores and vehicle compartments/components. Quickest and
most cost effective solution, ideal for the inspection of engines, machinery,
buildings and infrastructure. Supplied with AV cable for external viewing of
image. Uses 4 x AA batteries supplied.
1.1 GENERAL SAFETY
7DO NOT use the borescope if dropped and/or damaged
7DO NOT operate near live electrical wires.
7DO NOT operate near moving parts such as pulleys, motors, gears or fans etc.
7 DO NOT bend the borescope shaft tighter than 13cm diameter.
7 DO NOT expose the borescope housing to water or other liquids.
7 DO NOT insert the borescope shaft into locations whose temperature is greater than 55°C.
Maintain the borescope in good and clean condition for best and safest performance.
A full range of personal safety equipment is available from your Sealey dealer.
Wear suitable clothing to avoid snagging. Do not wear jewellery and tie back long hair.
Account for all tools and parts being used and do not leave any in, or near, the engine.
Be alert to your surrounding environment while using the borescope.
Note the location of the object to be inspected and determine a route to it. Bend the borescope shaft to follow the route.
1.2. ELECTRICAL SAFETY FOR USE OF CHARGERS.
USE ONLY THE SUPPLIED CHARGER PLUG FOR CONNECTING THE LCD SCREEN TO THE POWER SUPPLY.
WARNING! It is the user’s responsibility to read, understand and comply with the following electrical instructions:
You must ensure the risk of electric shock is minimised by the installation of appropriate safety devices.
An RCCB (Residual Current Circuit Breaker) should be incorporated in the main distribution board. We also recommend that an RCD
(Residual Current Device) is used with all electrical products, particularly portable equipment which is plugged into an electrical supply not
protected by an RCCB.
You must also read and understand the following instructions concerning electrical safety.
1.2.1. The Electricity At Work Act 1989 requires all portable electrical appliances, if used on business premises, to be tested by a qualified
electrician, using a Portable Appliance Tester (PAT), at least once a year.
1.2.2. The Health & Safety at Work Act 1974 makes owners of electrical appliances responsible for the safe condition of the appliance and the
safety of the appliance operator. If in any doubt about electrical safety, contact a qualified electrician.
1.2.3. You must ensure that you:
Inspect the charger plug, cables and connectors for wear and damage to ensure items are safe before connecting to the mains power
supply or 12V accessory socket. If worn or damaged DO NOT use.
Uncoil the cable between charger and the LCD screen.
DO NOT pull the charger plugs from the mains socket or 12V accessory socket by the lead.
WARNING! DO NOT use any other type of charger with this product, other than the supplied mains or car charger. Failure to
observe this warning could result in injury and or fire and will invalidate the warranty.
DO NOT try to take the charger apart.
DO NOT use the charger plug to charge or power any other electrical item.
DO NOT get the charger wet, or use in wet, damp conditions (for indoor use only).
1.3 BATTERY SAFETY
WARNING! To reduce the risk of burns or fire:
DO NOT attempt to open, disassemble, modify or service the battery pack.
DO NOT crush, puncture, short external contacts or dispose of in fire or water.
DO NOT expose to temperatures above 60°C (140°F).
Replace only with the battery pack designated for this product.
Recycle or dispose of used battery as stipulated by local regulation.
If the electrolyte in the cells gets on your skin, thoroughly wash with soap and water. If it gets in your eyes, rinse thoroughly with cool water
and seek immediate medical attention.
Thank you for purchasing a Sealey Product. Manufactured to a high standard this product will, if used according to these instructions
and properly maintained, give you years of trouble free performance.
IMPORTANT: PLEASE READ THESE INSTRUCTIONS CAREFULLY. NOTE THE SAFE OPERATIONAL REQUIREMENTS,
WARNINGS AND CAUTIONS. USE THIS PRODUCT CORRECTLY AND WITH CARE FOR THE PURPOSE FOR WHICH IT IS
INTENDED. FAILURE TO DO SO MAY CAUSE DAMAGE AND/OR PERSONAL INJURY AND WILL INVALIDATE THE
WARRANTY. PLEASE KEEP INSTRUCTIONS SAFE FOR FUTURE USE.
1. SAFETY INSTRUCTIONS
INSTRUCTIONS FOR:
VIDEO BORESCOPE 8.5mm
MODEL No: VS8198
2. INTRODUCTION & SPECIFICATION
Minimum Bend Diameter .........................13cm
Probe Size .............................8.5 x 1000mm
Screen Size ...................................90mm
Resolution.............................640 x 480 pixels
Batteries ......................................4 x AA
Accessories ..............................Mirrors - 45°
. . . . . . . . . . . . . . . . . . . . . . . . . .Magnetic Pick Up
. . . . . . . . . . . . . . . . . . . . . . . . . . . . . . . . . . . Hook
. . . . . . . . . . . . . . . . . . . . . . . . . . .Video-out Cable
. . . . . . . . . . . . . . . . . . . . . . . . . .Charging Adapter
Original Language Version VS8198 Issue: 1 - 28/04/11
3. PREPARATION
3.1 Batteries
3.1.1 Remove the screw on the bottom of the borescope handle. (Fig.2).
Slide across and remove the battery compartment cap then
remove the AA battery holder.
3.1.2 Insert AA batteries ensuring correct polarity.
3.1.3 Reinsert the holder and replace the battery compartment cap.
Secure with screw. (Fig.2).
3.2 Probe
3.2.1 Insert the probe (Fig.1.2) into the borescope body, ensure the tab
on the probe aligns with the slot in the borescope.
The probe will only connect one way.
3.2.2 With the probe pushed rmly in, screw the sleeve (Fig.1.3) on the
main body, onto the probe to secure it in place.
3.3 Probe Attachments
3.3.1 There are three attachment for this borescope, a hook, a magnet
and a 45° mirror (Fig.1.9/10/11).
3.3.2 Each attachment is connected the same way - by pushing onto the
end of the probe untill it ‘clicks’.
3.4 LCD Screen
3.4.1 To charge, plug the AC adapter into the mains and then into the
charging port. Fig.3.7.
3.4.2 When charging, the indicator LED (Fig.3.5) will illuminate RED.
When fully charged the indicator LED (Fig.3.5) will illuminate
GREEN.
When the battery is low the LED indicator light will ash GREEN.
3.4.3 The LCD screen can be used wireless (up to 10 metres) or can be
attached to the rear of the borescope. Align the screen and
borescope contacts (Fig.3.4) and slide downwards to secure. See
Fig.4.
NOTE! When the LCD Screen is attached to the rear of the borescope only
the power from the rechargeable lithium-ion battery in the screen
is used, therefore prolonging the life of the AA batteries in the
borescope.
7 DO NOT use excessive force to insert or retrieve probe from the
equipment or areas under inspection.
7DO NOT use the probe to push against objects or to clear a path.
This instrument is for remote viewing only.
7DO NOT bend any part of the shaft tighter than a 13cm diameter.
7DO NOT insert the probe and tip into locations where the
temperature is greater than 55°C.
7DO NOT vibrate, bang, or drop your borescope. It is not shock
resistant.
4.1 Turning On/Off
4.1.1 Borescope - Hold the unit by the handle and roll the scroll switch to
the ‘On’ position (Fig.1.6). The indicator light (Fig.1.4) will
illuminate to show the borescope is ‘On’.
4.1.2 LCD screen - Press and hold the On/Off button on the LCD
screen (Fig.3.2). If the indicator light illuminates GREEN when
the ‘On’ button is released the internal battery is in a low state of
charge. See 3.4.
4.2 Light Adjustment
4.2.1 The light on the end of the probe can be adjusted. The On/Off
switch (Fig.1.6) also controls the brightness of the LED light on
the end of the probe, scroll the switch to nd the desired level of
brightness.
4.3 Image Rotate Function
4.3.1 Press the ‘Rotate’ button (Fig.3.3) on the LCD screen to rotate the
image, this is particularly useful when using the mirror attachment
4.4 Video Out Port
4.4.1 The borescope provides an external video signal via an RCA
phono jack (Fig.3.6). This signal can be utilized by a compatible
monitor or recording device. (AV Lead Included).
WARNING! The handheld monitor unit is not water resistant. The
shaft and tip are water resistant.
4. OPERATION
Fig.1
Fig.2
Fig.3
Original Language Version VS8198 Issue: 1 - 28/04/11
Parts support is available for this product. To obtain a parts listing and/or diagram, please log on to
www.sealey.co.uk, email sales@sealey.co.uk or phone 01284 757500.
NOTE: It is our policy to continually improve products and as such we reserve the right to alter data, specifications and component parts without prior notice.
IMPORTANT: No liability is accepted for incorrect use of this product.
WARRANTY: Guarantee is 12 months from purchase date, proof of which will be required for any claim.
INFORMATION: For a copy of our latest catalogue and promotions call us on 01284 757525 and leave your full name and address, including postcode.
Sole UK Distributor, Sealey Group,
Kempson Way, Suffolk Business Park,
Bury St. Edmunds, Suffolk,
IP32 7AR
Original Language Version VS8198 Issue: 1 - 28/04/11
01284 757500
01284 703534
sales@sealey.co.uk
www.sealey.co.uk
Web
email
Environmental Protection.
Recycle unwanted materials instead of disposing of them as waste.
All tools, accessories and packaging should be sorted, taken to a recycle centre and disposed of in a manner which is compatible with
the environment.
When the product is no longer required, it must be disposed of in an environmentally protective way. Contact your local solid waste
authority for recycling information.
Battery Removal.
•Refer to Section 5.1 for AA battery removal.
• LCD Lithium-ion battery - Remove the four screws on the back of the screen, separate the two half of the monitor. Unplug the battery
connector and lever the battery off the foam mountings.
Dispose of batteries according to local authority guidelines.
Under the Waste Batteries and Accumulators Regulations 2009, Jack Sealey Ltd are required to inform potential purchasers of products
containing batteries (as defined within these regulations), that they are registered with Valpak’s registered compliance scheme.
Jack Sealey Ltd’s Batteries Producer Registration Number (BPRN) is BPRN00705
5.1 Batteries
5.1.1 Remove the screw on the bottom of the borescope handle. (Fig.2).
Slide across and remove the battery compartment cap then
remove the AA battery holder.
5.1.2 Remove and replace AA batteries ensuring correct polarity.
5.1.3 Reinsert the holder and replace the battery compartment cap. Secure with
screw. (Fig.2).
5.2 Cleaning and Storage
5.2.1 Wipe the probe tip, shaft and housing with a clean, soft cloth to remove
residue and moisture.
5.2.2 Wash the probe tip and shaft with a cleaning liquid and rinse with water,
then dry.
5.2.3 Gently clean the probe lens with a lens cleaner (such as isopropyl alcohol)
and a cotton bud.
7 DO NOT submerge the borescope in water - the borescope monitor
is not water resistant.
NOTE: The borescope MUST be completely dry prior to returning it to the
storage case.
5. MAINTENANCE
Fig.4
Table of contents
Other Sealey Diagnostic Equipment manuals

Sealey
Sealey VS2076 User manual

Sealey
Sealey VS921 User manual

Sealey
Sealey BT2012 User manual

Sealey
Sealey LED038 User manual

Sealey
Sealey VS4021.V2 User manual

Sealey
Sealey Auto Service VS8197.V2 User manual

Sealey
Sealey VS8700 User manual

Sealey
Sealey VSCAN User manual

Sealey
Sealey VS2071 User manual

Sealey
Sealey VS2073 User manual

Sealey
Sealey VS2071.V2 User manual

Sealey
Sealey VS868 User manual

Sealey
Sealey VS8196.V3 User manual

Sealey
Sealey VS2073 User manual

Sealey
Sealey VS8623 User manual

Sealey
Sealey TL93.V2 User manual

Sealey
Sealey AUTO SERVICE VS819 User manual

Sealey
Sealey BT2020 User manual

Sealey
Sealey TA130 User manual

Sealey
Sealey VS2072.V2 User manual