manuals.online logo
Brands
  1. Home
  2. •
  3. Brands
  4. •
  5. Sealey
  6. •
  7. Tools
  8. •
  9. Sealey AB930 User manual

Sealey AB930 User manual

IMPORTANT: PLEASE READ THESE INSTRUCTIONS CAREFULLY. NOTE THE SAFE
OPERATIONAL REQUIREMENTS, WARNINGS AND CAUTIONS. USE THIS PRODUCT
CORRECTLY AND WITH CARE FOR THE PURPOSE FOR WHICH IT IS INTENDED. FAILURE TO
DO SO MAY CAUSE DAMAGE AND/OR PERSONAL INJURY AND WILL INVALIDATE THE
WARRANTY. PLEASE KEEP INSTRUCTIONS SAFE FOR FUTURE USE.
Thank you for purchasing a Sealey Product. Manufactured to a high standard this product will, if used according
to these instructions and properly maintained, give you years of trouble free performance.
 WARNING! Ensure that Health and Safety, local authority and general workshop practice regulations
are adhered to when using tools.
Ensure that the air brush and accessories are in a clean, sound condition and good working order. Take
action for immediate repair or replacement of damaged parts. Use recommended parts only. The use of
unauthorised parts may be dangerous and will invalidate the warranty.
 Ensure the air brush supply hose is not tangled, twisted or pinched.
 DO NOT use air brush or accessories if damaged.
 DO NOT operate air brush under the influence of drugs, alcohol, intoxicating medication, or if fatigued.
✘DO NOT direct spray against yourself, other persons or animals, electrical equipment or the machine itself.
✗ DO NOT use the air brush for a task it is not designed to perform.
Wear approved eye protection and a suitable respirator when painting. A full range of personal safety
equipment is available from your Sealey Dealer.
✗ DO NOT allow smoking or open flame in the work area.
INSTRUCTIONS FOR :
AIR BRUSH KITS
MODELS: AB930 & AB9301
Note:Numbers in brackets refer to item numbers in the parts diagram.
2.1. Fit the jar adaptor with lid (13) into the fluid needle assembly (24) as shown in fig.1.
2.2. Screw one end of the hose assembly (19) onto the air hose fitting (10).
2.3. Screw the other end of the hose (19) to the air supply.
2.4. When using a compressor (Sealey Model No. AB900), connect the air hose (19) to the air hose adaptor
(supplied with the compressor) before connecting to the compressor, fig.2.
2.5. When using a propellant can (Sealey Model No. AB/P), connect the air hose (19) to the regulator valve/
cap (11).
2.6. Ensure the valve is turned fully anti-clockwise before screwing to the top of the propellant can, fig.1.
Fig.1. Fig.2.
3.1. Mask the area which is NOT to be painted.
3.2. Ensure the object to be painted is free from dust, grease and the surface has been prepared
3.3. After mixing and thinning the paint, as instructed by the paint manufacturer, fill the paint jar just over
half full and screw onto the lid of the jar adaptor lid.
Note:Mix thoroughly, making sure that the paint is free from lumps. It may be necessary to strain the paint first.
3. OPERATING INSTRUCTIONS
2. ASSEMBLY
1. SAFETY INSTRUCTIONS
AB930 & AB9301 Issue No: 2 - 11/04/08
CAUTION: ENSURE ADEQUATE VENTILATION. DO NOT SPRAY NEAR NAKED FLAMES.
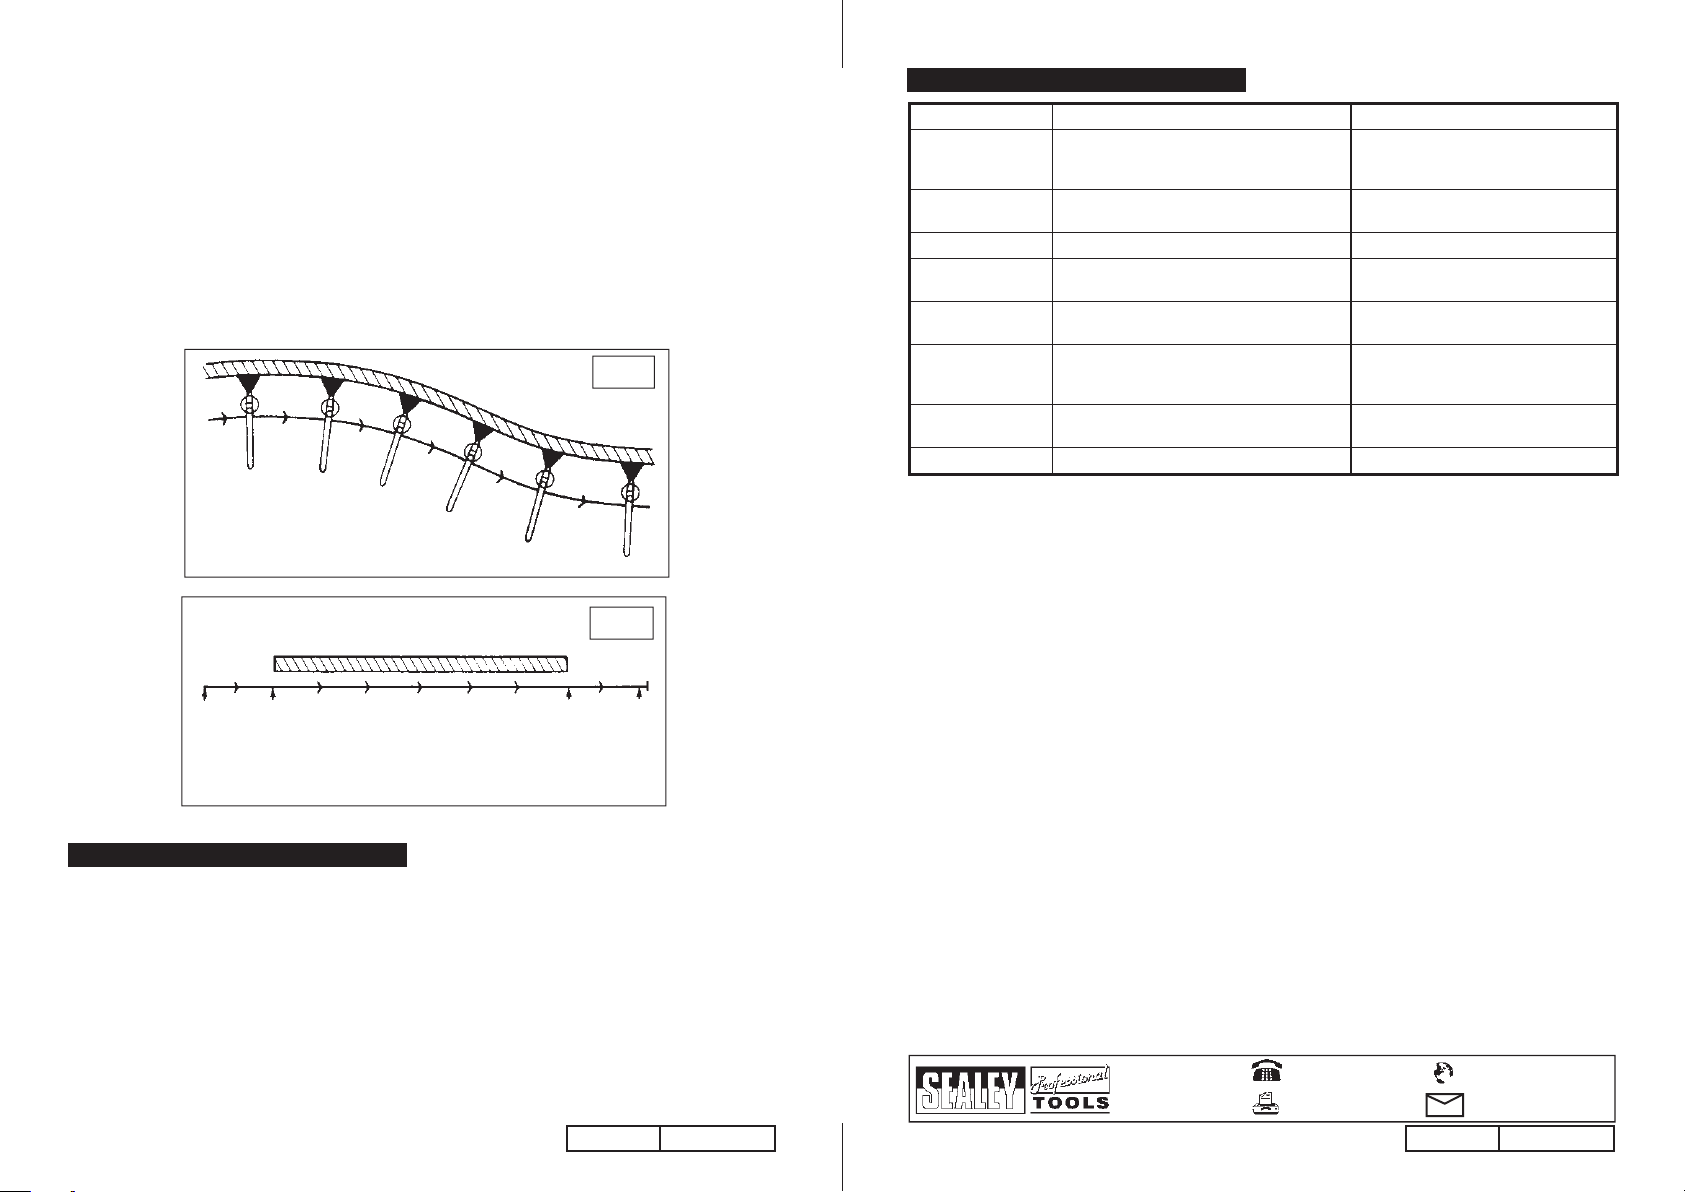
KEEP AIR BRUSH
PARALLEL TO SURFACE
Fig. 3
Fig. 4
SURFACE
START
MOTION
HERE
PRESS
TRIGGER
HERE
RELEASE
TRIGGER
HERE
FOLLOW
THROUGH
MOTION
KEEP MOTION
STEADY AND SPRAY
Note: Numbers in brackets refer to item numbers in the parts diagram.
Note: To achieve the best results when spraying it is always best to start with the air brush clean and totally free
from old paint deposits, dirt etc. Therefore the air brush should be thoroughly cleaned immediately after
each operation.
4.1. Remove the empty paint jar, and wipe the inside thoroughly, including the lid.
4.2. Fill the jar half full of thinners and re-attach to the lid.
4.3. Spray into a suitable container, this will clean the needle, paint seal and air tip. Hold a soft cloth over the
air cap and spray again, this will force air and thinners through the air brush and clean the internal
moving parts. Should the air brush become clogged with paint, remove the fluid needle assembly as
follows:
4.3.1. Undo the lock nut (24B).
4.3.2. Prevent the paint seal (24A) from rotating and, using the spanner provided, unscrew the fluid needle.
4.4. Clean the fluid needle (24C), paint seal (24A) and air tip (1) with a small piece of cotton wool dipped in
thinners.
4.5. Re-assemble the air brush by reversing the paragraphs 4.3.1 and 4.3.2. above.
5. TROUBLESHOOTING
4. CLEANING & MAINTENANCE
NOTE: It is our policy to continually improve products and as such we reserve the right to alter data, specifications and component
parts without prior notice.
IMPORTANT: No liability is accepted for incorrect use of this equipment.
WARRANTY: Guarantee is 12 months from purchase date, proof of which will be required for any claim.
INFORMATION: For a copy of our latest catalogue and promotions, call us on 01284 757525 and leave your full name and address
including your postcode.
3.4. Turn the air ON and test your spray on a suitable test panel to get the “feel” of your air brush.
3.5. Make any necessary spray adjustments. The paint flow and spray pattern are adjusted by turning the
paint seal (24A). The seal is completely closed when it has been turned clockwise to the stop point. To
obtain various degrees of paint flow, turn the seal anti-clockwise. The maximum flow will be attained by
turning the seal approximately 4 turns anti-clockwise.
3.6. Holding the air brush about 6 inches from the surface press the trigger. Using short strokes, move the air
brush at a steady rate, parallel to the surface, fig.3. Best results are achieved with a good constant
motion. Start the motion before pressing the trigger, and follow a through motion after releasing the
trigger, fig.4.
3.7. Apply a light coat of paint, let it dry, then apply another coat. Continue with this method until the desired
coverage is reached. DO NOT spray too heavily.
Note: When using quick drying paints, it is advisable to clean or immerse the fluid end of the air brush in a
compatible solvent between sprays.
THE PROBLEM THE CAUSE THE SOLUTION
Paint Runs. Too much paint applied.
Air brush too close to object.
Moving air brush too slowly along workpiece.
Press trigger lightly.
Hold further away from object.
Move at a faster speed.
Grainy Spray. Paint too thick.
Dried paint deposits on tip, needle or regulator. Thin paint.
Clean air brush thoroughly.
Paint Splattering. Needle snapping back into tip. Release needle gently.
Curved Stroke. Air brush arcing too close to object. Keep air brush parallel to the object,
unless curved stroke is desired.
Paint Spitting. Needle snapping back into tip.
Paint too thick. Release needle gently.
Thin paint.
Restricted Spray. Air adjusting valve screwed in too tight.
Paint tube in pot clogged.
Loosen the air adjusting valve
to obtain the correct spray.
Clean as described above.
Bubbles in Paint Cup. Air adjusting valve out too far
Paint tube in pot clogged. Adjust air valve to eliminate bubbles.
Clean as described above.
Erratic Spray. Fluid needle bent or paint deposits on needle. Replace needle or clean as required.
01284 757500
01284 703534 sales@sealey.co.uk
Sole UK Distributor
Sealey Group,
Bury St. Edmunds, Suffolk.
www.sealey.co.uk
Web
email
AB930 & AB9301 Issue No: 2 - 11/04/08AB930 & AB9301 Issue No: 2 - 11/04/08

This manual suits for next models

1

Other Sealey Tools manuals

Sealey AK96SET User manual

Sealey

Sealey AK96SET User manual

Sealey AB932.V4 User manual

Sealey

Sealey AB932.V4 User manual

Sealey RE2281 User manual

Sealey

Sealey RE2281 User manual

Sealey GSA6004.V2 User manual

Sealey

Sealey GSA6004.V2 User manual

Sealey AK458DX.V4 User manual

Sealey

Sealey AK458DX.V4 User manual

Sealey RE105 User manual

Sealey

Sealey RE105 User manual

Sealey AK3988 User manual

Sealey

Sealey AK3988 User manual

Sealey VS311.V2 User manual

Sealey

Sealey VS311.V2 User manual

Sealey VSE4781 User manual

Sealey

Sealey VSE4781 User manual

Sealey Ds01 User manual

Sealey

Sealey Ds01 User manual

Sealey CPG12V.V4 User manual

Sealey

Sealey CPG12V.V4 User manual

Sealey VS7004 User manual

Sealey

Sealey VS7004 User manual

Sealey SA6002.V2 User manual

Sealey

Sealey SA6002.V2 User manual

Sealey MS087 User manual

Sealey

Sealey MS087 User manual

Sealey VS919 User manual

Sealey

Sealey VS919 User manual

Sealey VS2049 User manual

Sealey

Sealey VS2049 User manual

Sealey RWH20 User manual

Sealey

Sealey RWH20 User manual

Sealey SA401.V2 User manual

Sealey

Sealey SA401.V2 User manual

Sealey SA37/95 User manual

Sealey

Sealey SA37/95 User manual

Sealey 1020LE User manual

Sealey

Sealey 1020LE User manual

Sealey AB9321 User manual

Sealey

Sealey AB9321 User manual

Sealey Auto Service PFT12 User manual

Sealey

Sealey Auto Service PFT12 User manual

Sealey SA6005 User manual

Sealey

Sealey SA6005 User manual

Sealey VS7233 User manual

Sealey

Sealey VS7233 User manual

Popular Tools manuals by other brands

BGS technic 6667 instruction manual

BGS technic

BGS technic 6667 instruction manual

SAF 3 434 3317 00 Service bulletin

SAF

SAF 3 434 3317 00 Service bulletin

RED ROOSTER RRI-BA30IOA H19 manual

RED ROOSTER

RED ROOSTER RRI-BA30IOA H19 manual

EINHELL Bavaria BHP 1500-2 operating instructions

EINHELL Bavaria

EINHELL Bavaria BHP 1500-2 operating instructions

RAMSET T4 Operators safety manual

RAMSET

RAMSET T4 Operators safety manual

RAMSET R150 Operator's safety & operating instruction manual

RAMSET

RAMSET R150 Operator's safety & operating instruction manual

Artos 45-064 owner's manual

Artos

Artos 45-064 owner's manual

Bostitch BTMT72391 Operation and maintenance manual

Bostitch

Bostitch BTMT72391 Operation and maintenance manual

Fresmak Arnold SC Service manual

Fresmak

Fresmak Arnold SC Service manual

IKA S50KD-G45G manual

IKA

IKA S50KD-G45G manual

TPI SP323 instruction manual

TPI

TPI SP323 instruction manual

Parkside PDMH 4500 A2 Operation and safety notes

Parkside

Parkside PDMH 4500 A2 Operation and safety notes

Shop fox D4648 instruction sheet

Shop fox

Shop fox D4648 instruction sheet

RODCRAFT RC 8132 manual

RODCRAFT

RODCRAFT RC 8132 manual

Triton TWSMPJ Operating/safety instructions

Triton

Triton TWSMPJ Operating/safety instructions

BGS technic 62636 quick start guide

BGS technic

BGS technic 62636 quick start guide

MATLOCK CRP130 INSTRUCTIONS & GENERAL INFORMATION

MATLOCK

MATLOCK CRP130 INSTRUCTIONS & GENERAL INFORMATION

Textron GREENLINE 910FS CLEANING

Textron

Textron GREENLINE 910FS CLEANING

manuals.online logo
manuals.online logoBrands
  • About & Mission
  • Contact us
  • Privacy Policy
  • Terms and Conditions

Copyright 2025 Manuals.Online. All Rights Reserved.