Seat Media System E User manual

SEAT MEDIA SYSTEM E OWNER’S MANUAL
Inglés 3R0012006AJ (07.09) (GT9)
3R0012006AJ
Portada Media System E_Maquetación 1 20/04/11 18:04 Página 3

Contents 1
Contents
Notes about this Owner's Manual
Operating . . . . . . . . . . . . . . . . . . . . . . . . . . . . .
Overview . . . . . . . . . . . . . . . . . . . . . . . . . . . . . . . . .
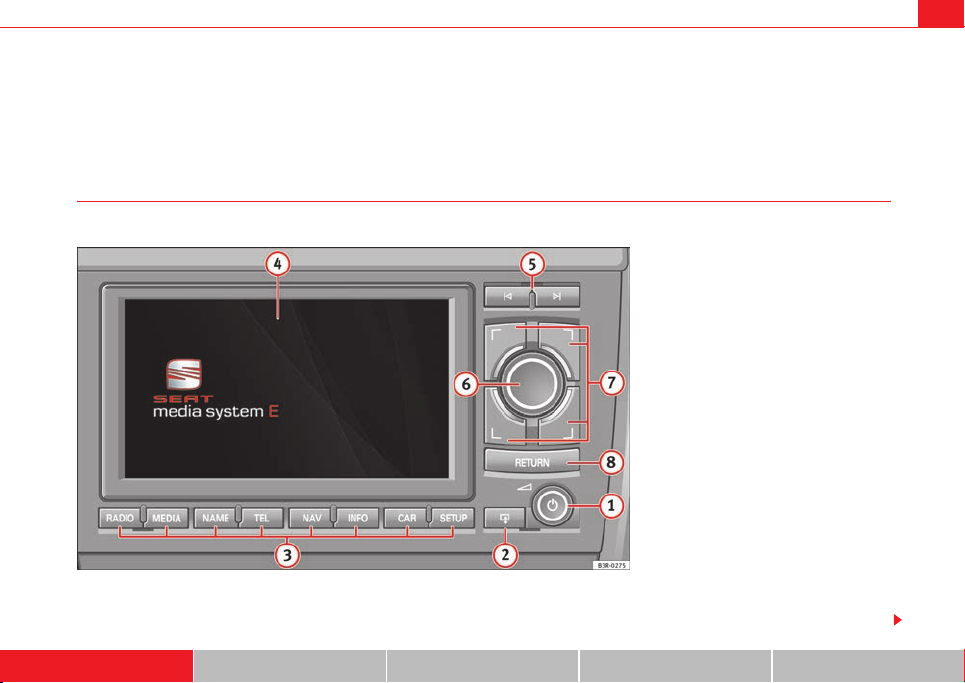
Control panel with screen . . . . . . . . . . . . . . . . . .
Switching on and off . . . . . . . . . . . . . . . . . . . . . .
Opening and closing the display . . . . . . . . . . . .
Notes on road safety . . . . . . . . . . . . . . . . . . . . . .
Cleaning and care . . . . . . . . . . . . . . . . . . . . . . . .
Handling: General information . . . . . . . . . . . .
Control switches . . . . . . . . . . . . . . . . . . . . . . . . .
Multi-function steering wheel* . . . . . . . . . . . . . .
Display . . . . . . . . . . . . . . . . . . . . . . . . . . . . . . . . . . .
Display orientation . . . . . . . . . . . . . . . . . . . . . . .
Working with the alphanumeric keyboard . . . . .
Control wheel . . . . . . . . . . . . . . . . . . . . . . . . . . . .
Drives . . . . . . . . . . . . . . . . . . . . . . . . . . . . . . . . . . . .
System drives . . . . . . . . . . . . . . . . . . . . . . . . . . .
General instructions on CD mode . . . . . . . . . . . .
Instructions relating to memory cards . . . . . . . .
iPod interface* . . . . . . . . . . . . . . . . . . . . . . . . . . .
USB interface* . . . . . . . . . . . . . . . . . . . . . . . . . . .
Aux-in connection* . . . . . . . . . . . . . . . . . . . . . . .
RADIO, MEDIA (audiovisual
systems) . . . . . . . . . . . . . . . . . . . . . . . . . . . . . .
RADIO . . . . . . . . . . . . . . . . . . . . . . . . . . . . . . . . . . . .
Introduction . . . . . . . . . . . . . . . . . . . . . . . . . . . . .
Band function . . . . . . . . . . . . . . . . . . . . . . . . . . .
Main radio menu . . . . . . . . . . . . . . . . . . . . . . . . .
"Memory" Menu . . . . . . . . . . . . . . . . . . . . . . . . . .
Tuning Menu . . . . . . . . . . . . . . . . . . . . . . . . . . . .
Radio setups . . . . . . . . . . . . . . . . . . . . . . . . . . . .
MEDIA . . . . . . . . . . . . . . . . . . . . . . . . . . . . . . . . . . .
Introduction . . . . . . . . . . . . . . . . . . . . . . . . . . . . .
Source control button . . . . . . . . . . . . . . . . . . . . .
Main audio CD / MP3 CD menu . . . . . . . . . . . . .
Audio CD: Control menu . . . . . . . . . . . . . . . . . . .
Main MP3 menu . . . . . . . . . . . . . . . . . . . . . . . . .
MP3: Control menu . . . . . . . . . . . . . . . . . . . . . . .
MP3 settings . . . . . . . . . . . . . . . . . . . . . . . . . . . .
Adjusting sound settings . . . . . . . . . . . . . . . . .
Setting the sound . . . . . . . . . . . . . . . . . . . . . . . .
DSP ("Digital Signal Processing") . . . . . . . . . . . .
Dynamic noise compensation* . . . . . . . . . . . . . .
Volume settings of other functions . . . . . . . . . .
NAME, TEL . . . . . . . . . . . . . . . . . . . . . . . . . . . .
NAME (Directory) . . . . . . . . . . . . . . . . . . . . . . . . .
Introduction . . . . . . . . . . . . . . . . . . . . . . . . . . . . .
Main directory menu . . . . . . . . . . . . . . . . . . . . . .
Mobile phone system* . . . . . . . . . . . . . . . . . . . .
Introduction . . . . . . . . . . . . . . . . . . . . . . . . . . . . .
Installation . . . . . . . . . . . . . . . . . . . . . . . . . . . . . .
Using the telephone . . . . . . . . . . . . . . . . . . . . . .
Main telephone menu . . . . . . . . . . . . . . . . . . . . .
"Memory" Menu . . . . . . . . . . . . . . . . . . . . . . . . . .
Phone settings . . . . . . . . . . . . . . . . . . . . . . . . . . .
Telephone speech control system . . . . . . . . . . .
Speech recognition for some countries . . . . . . .
NAV, INFO . . . . . . . . . . . . . . . . . . . . . . . . . . . . .
Navigation (NAV)* . . . . . . . . . . . . . . . . . . . . . . . .
General safety precautions . . . . . . . . . . . . . . . . .
Introduction . . . . . . . . . . . . . . . . . . . . . . . . . . . . .
Main navigation menu . . . . . . . . . . . . . . . . . . . .
"Memory" Menu . . . . . . . . . . . . . . . . . . . . . . . . . .
Route control button . . . . . . . . . . . . . . . . . . . . . .
Map control button . . . . . . . . . . . . . . . . . . . . . . .
Nav-Info control button . . . . . . . . . . . . . . . . . . . .
Navigation settings . . . . . . . . . . . . . . . . . . . . . . .
INFO (Traffic information) . . . . . . . . . . . . . . . . . .
Introduction . . . . . . . . . . . . . . . . . . . . . . . . . . . . .
Main traffic information menu . . . . . . . . . . . . . .
Memo TP control button . . . . . . . . . . . . . . . . . . .
Source function button . . . . . . . . . . . . . . . . . . . .
Traffic information setup . . . . . . . . . . . . . . . . . . .
CAR, SETUP . . . . . . . . . . . . . . . . . . . . . . . . . .
CAR (vehicle settings) . . . . . . . . . . . . . . . . . . . . .
Introduction . . . . . . . . . . . . . . . . . . . . . . . . . . . . .
SETUP . . . . . . . . . . . . . . . . . . . . . . . . . . . . . . . . . . . .
Introduction . . . . . . . . . . . . . . . . . . . . . . . . . . . . .
Settings control button . . . . . . . . . . . . . . . . . . . .
Display control button . . . . . . . . . . . . . . . . . . . . .
Frequently Asked Questions (FAQ) . . . . . . . . .
Emergencies . . . . . . . . . . . . . . . . . . . . . . . . . . . .
Index . . . . . . . . . . . . . . . . . . . . . . . . . . . . . . . . . .
2
3
3
3
4
5
6
6
8
8
12
15
15
18
21
22
22
26
28
28
31
33
35
35
35
36
36
38
39
41
48
48
50
51
51
54
54
57
59
59
60
60
61
63
63
63
63
68
68
69
72
74
77
83
86
95
97
97
97
97
104
116
120
123
130
131
141
141
143
146
147
148
151
151
151
153
153
154
156
158
158
161
media_systemE_EN.book Seite 1 Montag, 21. September 2009 1:48 13

Notes about this Owner's Manual2
Notes about this Owner's Manual
This Owner's Manual contains important information, tips, suggestions and
warnings regarding your vehicle handling.
Please ensure that this Owner's Manual is always kept in the vehicle. It
should always be available to anyone else driving the vehicle, i.e. anyone
renting, borrowing or buying the vehicle from you.
This manual describes the equipment available for the vehicle at the time of
going to print. Some of the equipment described here will not be available
until a later date, or may only be available in certain markets.
Some sections of this Owner's Manual do not apply to all vehicles. When this
is the case, the section will be identified, for example: “Applies to vehicles:
with mobile phone adapter”. This optional equipment is also marked with an
asterisk “*”.
Illustrations are intended as a general guide, and may vary from the equip-
ment fitted in your vehicle in some details.
At the beginning of this Owner's Manual, you will find a table of contents
showing all the items described in this manual in the order in which they
appear. An alphabetical index is included at the end of the Owner's Manual.
All references to positions such as “left”, “right”, “front” or “rear” are given
as seen facing in the direction of travel.
* Optional equipment
The section is continued on the following page.
This shows the end of the section.
®Registered trademarks are marked with ®. The absence of this symbol
does not warrant unrestricted use of a term.
⇒Refers to a “WARNING” within the same section. If the WARNING
symbol is followed by a page number the warning text referred to is included
in a different section.
WARNING
Texts with this symbol contain safety information. They warn you of serious
dangers, possibly involving accident or injury.
Caution
Texts with this symbol draw your attention to a possible risk of damage to
your vehicle.
For the sake of the environment
Texts with this symbol refer to points relevant to the protection of the environ-
ment.
Note
Texts with this symbol contain additional information of a more general
nature.
media_systemE_EN.book Seite 2 Montag, 21. September 2009 1:48 13

Overview 3
Operating RADIO, MEDIA (audiovisual
systems) NAME, TEL NAV, INFO CAR, SETUP
Operating
Overview
Control panel with screen
This overview will help you to quickly familiarise yourself with the controls and displays.
ON/OFF button
−Switching on and off . . . . . . . . . . . . . . . . . . . . . . . . . . . . . . . .
−Adjusting volume . . . . . . . . . . . . . . . . . . . . . . . . . . . . . . . . . .
−Mute function . . . . . . . . . . . . . . . . . . . . . . . . . . . . . . . . . . . . .
Fig. 1 SEAT Media System navigation system control
panel
A
1
4
9
10
media_systemE_EN.book Seite 3 Montag, 21. September 2009 1:48 13

Overview4
Button () for opening out and closing the display. . . . . . . . .
Function buttons . . . . . . . . . . . . . . . . . . . . . . . . . . . . . . . . . . . . .
Display . . . . . . . . . . . . . . . . . . . . . . . . . . . . . . . . . . . . . . . . . . . . .
Forward/reverse buttons . . . . . . . . . . . . . . . . . . . . . . . . . . . . . .
Control knob . . . . . . . . . . . . . . . . . . . . . . . . . . . . . . . . . . . . . . . .
Control buttons . . . . . . . . . . . . . . . . . . . . . . . . . . . . . . . . . . . . . .
button . . . . . . . . . . . . . . . . . . . . . . . . . . . . . . . . . . . . . .
Note
•Please note that this Owner's Manual describes only the SEAT Media
System navigation system and its components. For more information about
the features and equipment fitted on your vehicle, please refer to its owner's
manual.
•Some of the equipment shown is found only in certain model versions or
its option equipment.
Switching on and off
Automatic switching on and off
The navigation system switches on automatically after you turn the ignition
on. When you remove your key from the ignition lock, the navigation system
will automatically switch off.
What happens when it is switched on?
When the system is switched on, the start screen appears. Then the last
selected main function is switched on automatically. The last selected
audio/video source is automatically switched on.
What happens when it is switched off?
When the equipment is switched off, the display darkens and the audio
source is silenced. Settings made are stored.
Note
The display can be switched off in the SETUP menu ⇒page 156; the oper-
ating mode selected remains on.
Switching on and off manually
The navigation system can also be turned on and off manu-
ally if necessary.
– Briefly press the ON/OFF button ⇒fig. 2 to activate the naviga-
tion system.
A
25
A
39
A
415
A
58
A
69
A
79
A
8RETURN 9
Fig. 2 Navigation system:
ON/OFF button
media_systemE_EN.book Seite 4 Montag, 21. September 2009 1:48 13

Overview 5
Operating RADIO, MEDIA (audiovisual
systems) NAME, TEL NAV, INFO CAR, SETUP
– Press and hold the ON/OFF button to switch the navigation
system off.
The navigation system can also be turned on and off manually if necessary. If
the navigation system was switched on in this way with the ignition key
removed, it will remain available for about thirty minutes.
If the system was switched off manually, it will not be switched on again auto-
matically the next time the ignition is turned on.
Note
To avoid discharging the battery, the navigation system should not be left
switched on for unnecessary long periods with the engine off.
Opening and closing the display
The display must be opened to access the drives located
behind it.
Fig. 3 Navigation system:
Button for opening and
closing the display
Fig. 4 Display open:
Access to the DVD drive
and memory card readers
media_systemE_EN.book Seite 5 Montag, 21. September 2009 1:48 13

Overview6
– Press the button ⇒page 5, fig. 3 to open or close the display
⇒page 5, fig. 4.
Opening the display provides access to the DVD drives and the two card
readers for MP3 (SD and MMC) memory cards ⇒page 5, fig. 4.
The display can also be closed using the control knob, the control buttons,
the button or the forward/reverse buttons ⇒page 8.
The open display is automatically closed after approximately one minute.
Caution
•If the display cannot be closed, it may be obstructed by some object (e.g.
an MP3 memory card may not have been correctly inserted in the reader). Do
not attempt to close the display by force.
•To prevent damage to the navigation system, no foreign bodies should be
inserted into the DVD drive or into the memory card readers.
Note
For more information regarding the various media drives, please refer to
⇒page 22.
Notes on road safety
Only use the system when the traffic conditions allow you to
do so safely.
As well as offering full navigation functions, the SEAT navigation system with
its numerous extra features also provides a wealth of in-car entertainment
and a great deal of information about traffic and road conditions.
Carry out your settings in the navigation system only when the vehicle
⇒page 153 is stationary. If you operate the navigation system while driving,
you should always be aware of the current traffic situation and, if necessary,
give your full concentration to road safety. When driving, make use of the
multi-function steering wheel* whenever possible ⇒page 12.
WARNING
•Today's driving conditions require your full attention. As the driver, you
bear the responsibility for road safety. Therefore, only use the SEAT naviga-
tion system when traffic conditions allow as such, remaining in control of
the vehicle. If not, an accident may occur.
•The volume of the sound system should be set at a level that enables
you to hear acoustic signals from outside, such as police and fire brigade
sirens. Failure to do so may cause an accident.
•Always obey the laws controlling the use of telephones in vehicles!
Cleaning and care
The controls and display of the navigation system require
care and cleaning from time to time.
Cleaning the display
– Use a soft, clean cloth and an LCD cleaner to clean the navigation
system display.
Cleaning the control panel
– First clean the control panel with a brush to remove dust.
– Then wipe the controls with a clean, soft and slightly damp cloth.
RETURN
media_systemE_EN.book Seite 6 Montag, 21. September 2009 1:48 13

Overview 7
Operating RADIO, MEDIA (audiovisual
systems) NAME, TEL NAV, INFO CAR, SETUP
Display
The display can be cleaned with professionally available “LCD cleaner”. The
cloth should be slightly dampened with a cleaning fluid to clean the display.
Control switches
The controls should be cleaned with a brush first so that no dirt is trapped in
the equipment or between the buttons and the panel. Then you can wipe over
the controls with a damp cloth. The cloth can be moistened with washing-up
liquid and water.
Caution
Treat the display with care. Pushing on it with your fingers or touching it with
sharp objects can cause dents or scratches.
media_systemE_EN.book Seite 7 Montag, 21. September 2009 1:48 13

Handling: General information8
Handling: General information
Control switches
Concept for handling
You can operate all the functions of the navigation system by
pressing and rotating the control knob.
Fig. 5 Navigation system: Control switches
Forward/reverse buttons
Press the or button to select the previous or next radio station on the
corresponding list.
When the radio memory list ⇒page 38 is shown in the display, you can also
use these buttons to select a station from the list.
Press the button to call up the next CD or MP3 track. You can jump back to
the previous track by pressing the button within the first ten seconds of
play time for the track. After 10 seconds it jumps to the start of the track.
If the or button is held down in CD/MP3 mode, fast forward or reverse
is activated, respectively.
If you would like to scroll in a list of radio stations or a CD or MP3 track list
using the forward/reverse buttons, it is not necessary to show the list of
stations or track list on the navigation system display.
Fig. 6 Navigation system:
Correspondence between
the control buttons and
the menus in the corners
of the display
A
1
media_systemE_EN.book Seite 8 Montag, 21. September 2009 1:48 13

Handling: General information 9
Operating RADIO, MEDIA (audiovisual
systems) NAME, TEL NAV, INFO CAR, SETUP
Main control
To select a menu option in the display, turn the rotary pushbutton in the
required direction and then press it.
Control buttons
To activate a function indicated in one of the four corners of the display, press
the corresponding control button for that corner of the display. For instance,
the top right control button corresponds with the top right corner of the
display ⇒page 8, fig. 6.
RETURN button
Press the button to cancel an entry that has not yet been confirmed
or to return to the previous menu level. You can also use this button when you
have activated the side menu for the navigation map depiction.
Function selector buttons
Press one of the function selector buttons to activate the function shown on
the button. For example, the Radio function is started by pressing the
function button.
The button only works when you have pressed one of the other func-
tion buttons. You can use it to make new settings for the function that you
have selected.
Adjusting volume
Volume can be adjusted by turning the ON/OFF knob ⇒fig. 7. The volume
setting will be stored automatically.
If the volume set is very high, when switching on the system it will be auto-
matically reduced to a maximum level preset at the factory. If the volume is
too low when the radio is turned on, it will be increased automatically to a
level set by the factory.
Note
Volume can also be adjusted using the buttons on the multi-function steering
wheel* ⇒page 12.
A
2
A
3
A
4
RETURN
A
5
RADIO
SETUP
Fig. 7 Navigation system:
ON/OFF knob (adjusting
volume)
media_systemE_EN.book Seite 9 Montag, 21. September 2009 1:48 13

Handling: General information10
Mute
Switching on the mute function
– Briefly press the ON/OFF knob. The volume for the enabled audio
source will then be switched off.
Switching off the mute function
– Briefly press the MMI knob or:
–TurntheON/OFFknob.
By briefly pressing the MMI knob, the sound of the currently enabled audio
source will be muted. When the mute function is enabled, the symbol
⇒fig. 9 will appear in the bottom of the display. The sound is switched back
on when the MMI knob is pressed briefly or turned.
When the navigation system is switched on, the volume is automatically set
to the factory default.
Note
If you enable the mute function during a traffic announcement or a navigation
cue, the current announcement will be cancelled. If you enable the mute func-
tion once again, the audio source will be muted.
Home function
Press the corresponding function button within a main function, the system
will automatically jump to the main menu of that main function.
In navigation*, “Home function” depends on the route guidance selected: if
you have activated route guidance with stopovers, you go to the menu for
route planning by pressing the function button again ⇒page 120, fig. 143.
If you have activated route guidance without stopovers ⇒page 120, you go
to the main navigation menu* (single destination mode) by pressing the
function button again.
Fig. 8 Navigation system:
Mute
Fig. 9 Navigation system:
Mute function symbol
A
1
media_systemE_EN.book Seite 10 Montag, 21. September 2009 1:48 13

Handling: General information 11
Operating RADIO, MEDIA (audiovisual
systems) NAME, TEL NAV, INFO CAR, SETUP
History function
The system recalls the previous settings.
When a function button is pressed, the system will switch to the most recently
accessed menu level for the specific main function. This includes any
sublevels that were opened. This excludes the Setup menus.
The history memory is erased when the system moves into standby mode.
An example: You are currently in radio mode and have selected the Control
menu. You switch to the navigation menu by pressing the button. If you
then press the button, you will return to the menu selected before
leaving radio mode. In this case, the Control menu of the radio is shown in the
display.
Resetting the navigation system
The procedure described below will restart your navigation system
and restore full normal operation.
– Press the ON/OFF knob to switch the navigation system off
⇒fig. 10.
– Press and hold the ON/OFF knob until the display reappears and
turns black.
– Release the ON/OFF knob as soon as the display has turned
black. After a few seconds, the navigation system will restart, or
you can switch it on manually ⇒page 4.
NAV
RADIO
Fig. 10 Navigation
system: ON/OFF button
media_systemE_EN.book Seite 11 Montag, 21. September 2009 1:48 13

Handling: General information12
Multi-function steering wheel*
Introduction
The multi-function steering wheel enables quick and easy
operation of selected functions of the navigation system.
To minimise driver distraction when operating the navigation system and its
components, buttons for controlling basic audio and video* functions are
placed on the multi-function steering wheel. However, this applies only if
your vehicle equipment was factory-fitted.
The functions are operated by pressing and scrolling the controls to on
the multi-function steering wheel ⇒fig. 11:
•Press the button repeatedly to switch the display between the
various modes and the phone book* ⇒fig. 11.
•Scroll and press the left thumbwheel to select a function from one of
the menus.
•The telephone speech control system* ⇒page 86 is enabled by pressing
the talk button . Press the talk button again to disable the telephone
speech control system*.
•Scroll the right thumbwheel up/down to raise/lower the volume as
desired. When you adjust the volume for one audio mode, this will automati-
cally change the volume settings of the other audio systems as well. You can
set the volume for the telephone* or speech control system* independently
of the audio systems.
Fig. 11 Controls on the
multi-function steering
wheel
Fig. 12 Instrument panel
display: Phone book entry
of on-board phone
memory (telephone
mode)
A
AA
D
MODE
A
B
A
1
A
A
A
C
A
D
media_systemE_EN.book Seite 12 Montag, 21. September 2009 1:48 13

Handling: General information 13
Operating RADIO, MEDIA (audiovisual
systems) NAME, TEL NAV, INFO CAR, SETUP
•Press the right thumbwheel while the route guidance is enabled to
repeat the last navigation voice cue*.
Note
•During an active call, the speech commands of the telephone* cannot be
enabled.
•If certain equipment has not been installed in the vehicle, the multi-func-
tion steering wheel assigned to that equipment will be inoperative.
Radio mode
Selecting the radio
– Press the button ⇒page 12, fig. 11 until a
station/station name from the radio station list appears in the
instrument panel display.
Changing between stations in the radio station list
–Usetheleftthumbwheel ⇒page 12, fig. 11 to scroll
up/down1).
Tuning
– Press the left thumbwheel once to start the station search
⇒page 12, fig. 11.
– Press the left thumbwheel again to stop the station search.
If you hear only a hissing noise when you change stations, the current station
number has not been assigned or the selected station is currently not within
the reception range.
CD/MP3 Mode
Selecting CD/MP3 mode
–Pressthe button ⇒page 12, fig. 11 until a CD or MP3
track appears in the instrument panel display.
Next/previous track
– Use the left thumbwheel ⇒page 12, fig. 11 to scroll
up/down.
Fast forward
– Press and hold the left thumbwheel to start the fast forward
⇒page 12, fig. 11.
– Release the left thumbwheel again to continue listening to the
CD.
Scroll the left thumbwheel up or down several click stops to skip up or down
through the tracks.
Telephone mode*
Selecting a phone number
–Pressthe button ⇒page 12, fig. 11 until a telephone
number appears in the instrument panel display.
1) When the navigation system display shows the radio memory list you can also use the
left thumbwheel to select a station from the list.
A
D
MODE A
B
A
A
A
A
A
A
MODE
A
B
A
A
A
A
MODE
A
B
media_systemE_EN.book Seite 13 Montag, 21. September 2009 1:48 13

Handling: General information14
Making a call
–Usetheleftthumbwheel ⇒page 12, fig. 11 to scroll up and
down through the phone book.
– Press the left thumbwheel . The number is dialled and the
audio system is muted automatically.
Answering or ending calls
– Press the left thumbwheel ⇒page 12, fig. 11.
Rejecting a call
– Press and hold the left thumbwheel ⇒page 12, fig. 11.
Replacing a call
– If a second call is received (call waiting), briefly press the left
thumbwheel ⇒page 12, fig. 11. The current call will be
ended and you will be connected with the second caller.
The following telephone status messages appear on the display in the instru-
ment panel:
Phone numbers can be stored in different categories in the mobile phone
directory. These categories are displayed as follows:
P Private phone number
W Work phone number
M Mobile phone number
Scroll the left thumbwheel downwards to scroll down the list of stored names
from A to Z. Scroll the left thumbwheel upwards to scroll up the list of stored
names from Z to A. If you "flick" the left thumbwheel you can jump to the next
letter of the alphabet.
Note
The information shown on the instrument panel display depends on the type
of mobile phone used.
Please wait... The SIM card memory is being scanned.
SIM CARD There is no SIM card in the mobile phone.
PIN CODE The PIN code has not yet been entered.
NO SERVICE No network connection
CALL A call is active or incoming. If the caller's telephone
number is available, the display will alternately
give the caller's number and the message CALL.
LINE ENGAGED Number dialled is engaged.
A
A
A
A
A
A
A
A
A
A
TELEPHONE OFF The telephone is switched off.
CALLING The connection is being established.
NO ENTRIES The phone book has no entries.
media_systemE_EN.book Seite 14 Montag, 21. September 2009 1:48 13

Display 15
Operating RADIO, MEDIA (audiovisual
systems) NAME, TEL NAV, INFO CAR, SETUP
Display
Display orientation
Description
The main menu or the submenus appear on the display when
a function button is pressed.
When you press one of the function selector buttons ⇒page 9 the display
will show the main menu for that function, or one of its submenus
⇒page 11, “History function”. The centre of the display contains the options
you can select for the function.
The following describes the different sections of the display shown in the
illustrations ⇒fig. 13 and ⇒fig. 14.
Track
The title line shows the main function that you are currently in (e.g. navigation
system*) ⇒fig. 13. If Setup is displayed on the title line as well, you are in a
Setup menu ⇒fig. 14.
Use the function selector buttons to switch between main functions
⇒page 9.
Corners of the display
These functions depend on the menu you are currently in and are operated
using the control buttons. The control buttons are logically assigned to the
menus in the corners of the display. The top right corner of the screen corre-
sponds to the top right control button (⇒page 9).
Display centre
Radio station or track lists are displayed in the centre of the display in radio,
CD and MP3 mode. In the NAV* function, the individual destination mode is
displayed. In the main Setup menus, a list of available functions is displayed.
Orientation symbols
The different symbols in the display are use to select various additional func-
tions ⇒page 17.
Fig. 13 Display: Main
navigation menu
Fig. 14 Display: A tele-
phone menu
A
1
A
2
A
3
A
4
media_systemE_EN.book Seite 15 Montag, 21. September 2009 1:48 13

Display16
Roaming symbol*
If your vehicle is equipped with a mobile phone installation* and is not using
your home network, the roaming symbol will also appear in the title line.
Mobile network service provider*
If your vehicle is equipped with a mobile phone installation*, the name of the
mobile network service provider your phone is using will appear in the title
line.
The name of the mobile network service provider as it appears in the display
may be different from the name that appears in the phone display.
Subtitle
The subtitle shows detailed information about the selected menu option,
such as Numbers dialled ⇒page 15, fig. 14.
Submenu display centre
In the centre of the display, the available options in the particular menu are
listed or notes are displayed.
Status line
In the status line ⇒page 16 you can find the current status of the traffic
programme reception ⇒page 42, traffic messaging channel (TMC) recep-
tion* ⇒page 145, mute status of current audio source, the time and tele-
phone* information ⇒page 68.
Status line
The symbols in the status line are displayed regardless of the menu selected.
For example, you can easily see in every menu if the mute function is acti-
vated ⇒page 10.
The status line includes the following symbols (as shown in the illustrations
⇒fig. 15 and ⇒fig. 16).
TP Symbol
The TP symbol indicates the status of the traffic programme function
⇒page 42.
A
5
A
6
A
7
A
8
A
9
Fig. 15 Display: Symbols
in the status line
Fig. 16 Display: Symbols
in the status line
A
1
media_systemE_EN.book Seite 16 Montag, 21. September 2009 1:48 13

Display 17
Operating RADIO, MEDIA (audiovisual
systems) NAME, TEL NAV, INFO CAR, SETUP
TMC symbol*
The TMC symbol indicates the reception status of traffic messages for specific
routes or road types ⇒page 145.
Time
Displays the set or received time ⇒page 155.
Mute symbol
The mute symbol will appear if the volume for the current audio source has
been switched off ⇒page 10.
Signal strength
The telephone* reception signal is indicated by vertical bars. The more
shaded bars displayed, the greater the signal.
Under certain circumstances, the symbols SIM, PIN or PUK can appear in
place of the signal strength bars.
If SIM is displayed, you must insert your SIM card into the slot to be able to
use the phone.
If PIN is displayed, you must enter the PIN code ⇒page 73 for the SIM card
being used.
If PUK is displayed, you must enter the PUK code into the mobile phone.
Bluetooth Symbol*
The Bluetooth symbol appears on the display when a mobile phone is
connected to the navigation system through the Bluetooth* connection
⇒page 71.
Cursor and arrows
The cursor and arrows provide orientation when navigating
through the different menus.
This cursor designates a chosen line in a menu ⇒fig. 17.
The arrows pointing up and down indicate other menu points (equivalent
to scrolling up/down) ⇒fig. 17.
After selection is made, this arrow points to other available selections or
possible settings ⇒fig. 17.
A
2
A
3
A
4
A
5
A
6
Fig. 17 Detail of display:
Orientation symbols
A
1
A
2
A
3
media_systemE_EN.book Seite 17 Montag, 21. September 2009 1:48 13

Display18
Selected option
Your choice will be highlighted in white text ⇒fig. 18.
Working with the alphanumeric keyboard
Summary
The alphanumeric keyboard automatically appears in the display of the navi-
gation system when it is possible or necessary to enter numbers or letters.
Depending on the system mode, the option for entering numbers (⇒fig. 19)
or letters (⇒fig. 20) appears in the display. If necessary, you can also switch
Fig. 18 Detail of display:
Selected option Fig. 19 Display: Number
keyboard
Fig. 20 Display:
Keyboa rd i n letter mode to
enter a navigation desti-
nation, for example
media_systemE_EN.book Seite 18 Montag, 21. September 2009 1:48 13

Display 19
Operating RADIO, MEDIA (audiovisual
systems) NAME, TEL NAV, INFO CAR, SETUP
manually from numbers to letters using button or from letters to numbers
using .
The table below lists the symbols appearing in the illustrations ⇒page 18,
fig. 19 and ⇒page 18, fig. 20, together with their corresponding functions.
Legend Symbol /
Name Action
Pointer
The selected element has a white back-
ground and is shown larger in the entry
ring.
DEL The symbol to the left of the cursor with
the white fill is deleted.
Cursor movement in entry field back-
wards and forwards
Switch between caps/no caps.
OK Confirms an entry.
A...Z Switches from number to letter key-
board.
Cursor
Entry field
Large image of the selected charac-
ter/function.
LIST Selects a suggestion from the list.
0..9 Switches from letter keyboard to number
keyboard.
A
6
A
11
A
1
A
2
A
3
A
4
A
5
A
6
A
7
A
8
A
9
A
10
A
11
Space
Reference to list elements that match the
current entries in the entry field, show-
ing the number of list elements
List of entries ordered alphabetically.
Legend Symbol /
Name Action
A
12
A
13
A
14
media_systemE_EN.book Seite 19 Montag, 21. September 2009 1:48 13
Table of contents
Other Seat Car Video System manuals

Seat
Seat SOUND SYSTEM 1.0 User manual

Seat
Seat Media System Plus User manual

Seat
Seat Media System Colour 2018 User manual

Seat
Seat Media System Plus User manual

Seat
Seat MEDIA SYSTEM 2.2 User manual

Seat
Seat Media System Touch User manual

Seat
Seat Media System Plus User manual

Seat
Seat Media System Touch User manual