SEFRAM M9885A00 User manual
SEFRAM 9885
¯¯¯¯¯¯¯¯¯¯¯¯¯¯¯¯¯¯¯¯¯¯¯¯¯¯¯¯¯¯¯¯¯¯¯¯¯¯¯¯¯¯¯¯¯
Operating manual
M9885A00

SEFRAM 9885
1
SEFRAM
32, rue E MARTEL
BP55
F42009 SAINT-ETIENNE
France
Important information and notes
Icons for easy finding of chapters
CE-Conformity
The product complies with the following standards:
EMC: EN 61326-1
Safety Regulations: EN 61010-1:1993/ A2:1995
The product accomplishes the requirements of the EMC Directive 89/336/EEC
and of the low-voltage directive 73/23 /EEC.
Scope of supply
SEFRAM 9885 unit
t/c insertion probe
USB interface cable
software
pouch
hard case
operators manual
You will find the serial number on the unit. Always use this number when you contact the customer service
concerning maintenance, additional order of components, spare parts or repairs.
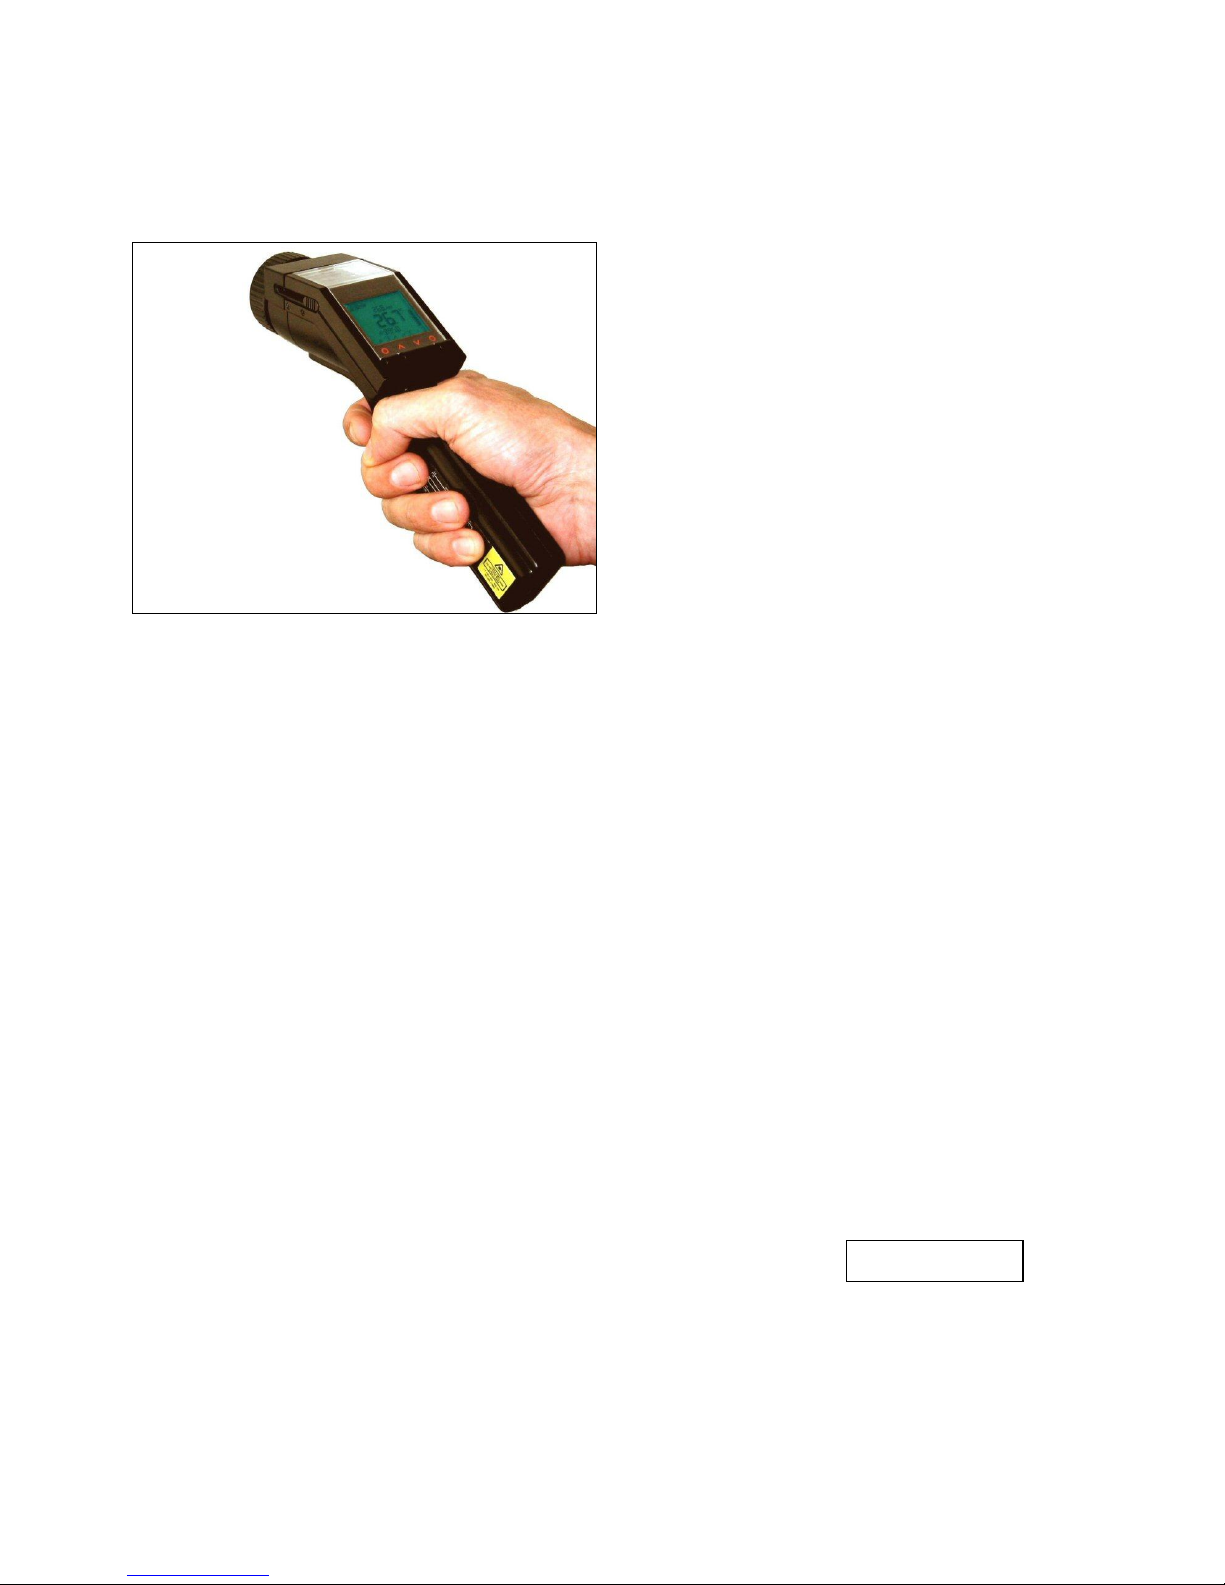
Thank you for choosing the SEFRAM 9885 infrared thermometer.
Comments to this manual
Read the manual carefully before the initial start -up. The producer reserves the right to change the herein
described specifications in case of technical advance of the product.
Orientation
Operating elements on the SEFRAM 9885 unit │Buttons in the software [►Reference to other chapters]
ADJUSTABLE VALUES [Menu: Hint to menu items in the software]
Readings on the unit display │Readings in software screens
Warranty
Each single product passes through a quality process. Nevertheless, if failures occur please contact the customer
service at once. The warranty period covers 24 months starting on the delivery date. After the warranty is expired the
manufacturer guarantees additional 6 months warranty for all repaired or substituted product components. Warranty
does not apply to electrical circuit breakers, primary batteries and damages, which result from misuse or neglect. The

SEFRAM 9885
2
warranty of SEFRAM 9885 expires if you open the product. The manufacturer offers a 3 month warranty for
rechargeable batteries. The manufacturer is not liable for consequential damage. If a failure occurs during the
warranty period the product will be replaced, calibrated or repaired without further charges. The freight costs will be
paid by the sender. The manufacturer reserves the right to exchange components of the product instead of repairing
it. If the failure results from misuse or neglect the user has to pay for the repair. In that case you may ask for a cost
estimate beforehand.

SEFRAM 9885
3
Content
Page Page
Basic Operation 4 Material- and Position-Names 19
Batteries 4 Data Logger Recall 20
User interface 4 Thermocouple Probe 21
Display 5 Software OptrisConnect 22
Measurement 6 Installation and Start 22
Handling 6 Connection to the Computer 22
Measurement Functions 7 Data Logger Functions 24
Display Backlight 8 Time Stamp 25
Laser Sighting 8 Material- and Position-Names 25
Optics 9 Digital Displays 26
Setup Menu 1 11 Diagram Functions 27
Emissivity Setting 11 Device Setup 31
High Alarm 12 Device Information 32
Low Alarm 12 Specification 33
Long-Term Measurement (Lock Mode) 13 Technical Data 33
Setup Menu 2 14 Factory Default Setting 35
Temperature Unit 14 Troubleshooting 35
Buzzer 15 Maintenance 36
Flip-Display 15 Principle of Operation 37
Ambient Temperature Compensation 16 Emissivity 38
Reset 17 Appendix A –Emissivity Table MetaSEFRAM 9885 40
Data Logger 18 Appendix B –Emissivity Table Non MetaSEFRAM 9885 41
Storing Data 18

SEFRAM 9885
4
Please do not use old and new batteries together. Please
use only alkaline or rechargeable batteries
[Type: Mignon AA, R6, UM3].
Basic Operation
Batteries
To open the battery compartment, press gently the cover lid on the left
side of the handle in direction of the arrow (see picture). Insert the
batteries (orientation as shown inside the compartment) and close the
cover lid.
If the batteries are low the battery
symbol will appear in the display. Please
exchange the batteries immediately if the
symbol is flashing.
User interface
1 Precision glass optics
2 Optics toggle switch SF/ CF
3 Tripod mount
4 Trigger
5 Display
6 Up and Down buttons
7 Mode (I and II) buttons
8 Handle and Battery compartment
9 USB interface
10 t/c input
Display
Readings in the display Status information
Alarm activation
High/ Low alarm
Battery symbol
Data logger mode
Lock symbol
Buzzer on
LCD backlight
Laser on
1 Status information
2 Upper display: Measurement functions (MIN-, MAX-, DIF-, AVG-indication), Data logger position
3 Main display: IR-temperature and unit (°C/ °F)
4 Lower display: HOLD, emissivity, probe temperature, data location and comment
5 Assignment of buttons: Mode I I, Mode II II , Up Λand Down Ve
6 Bar graph display
7 Up- and Down button
8 Mode buttons
SEFRAM 9885
5
Please note, that at vertical use (Flip mode) in context with a switched
display aSEFRAM 9885o the assignment of the Mode buttons (I and
II) will change.
Measurement
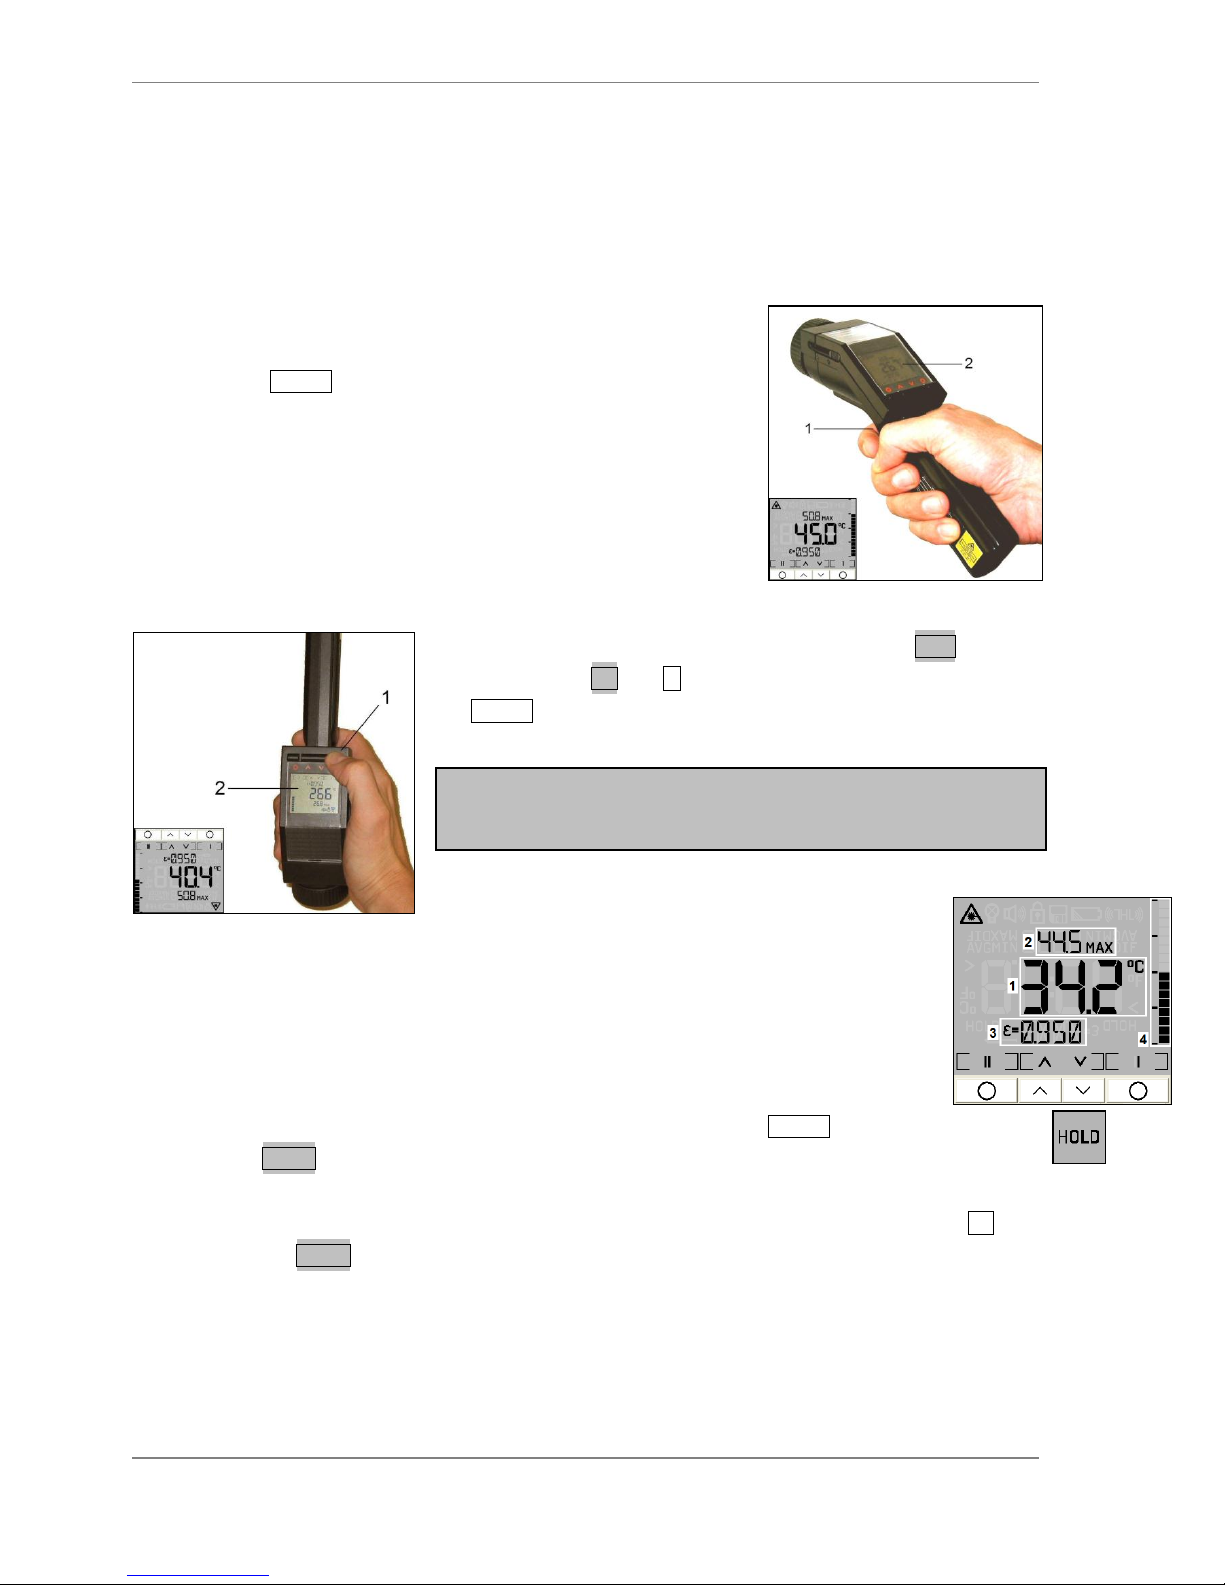
Handling
Please hold the unit as shown in the right figure and aim at the
target. Pull the Trigger [1] and keep it pressed –if the laser is
activated the true size and location of the measurement spot will be
shown on the object surface. The temperature of the object is
shown in the display [2].
The SEFRAM 9885 can aSEFRAM 9885o be used in vertical position
(measurement downwards). With this handling small objects like
electronic SMD components can easily be aimed and measured. For this purpose please hold the unit as
shown in the left figure. If the display switch is set to Auto (default
setting) or set to On, the I-button gets automatically the function of
the Trigger [1] and the readings in the display [2] are turned by 180°
[►Flip-Display].
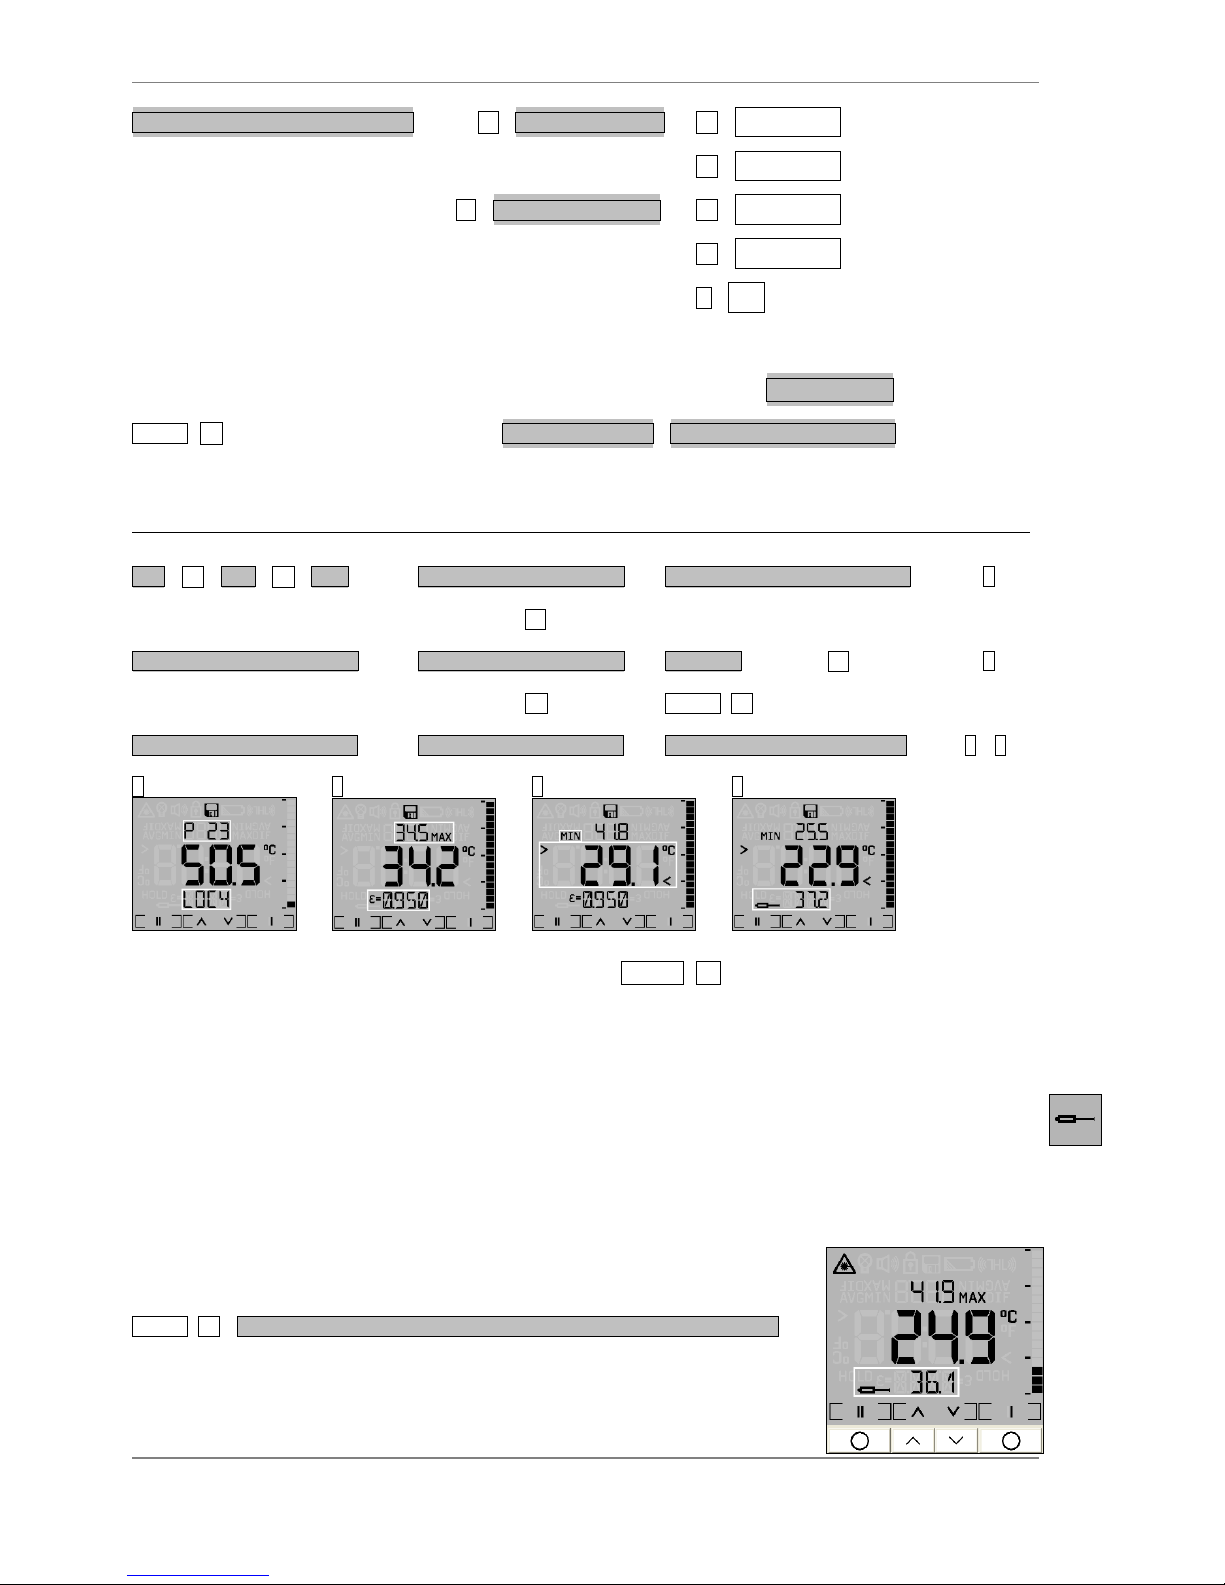
Measurement Functions
The measured temperature will be shown in the main display [1]. In the upper display the
according maximum temperature [2] and in the lower display the set emissivity [3] will be
displayed. The bar graph in the right part of the display [4] shows temperature trends.
The scaling will be done automatically between minimum reading (no segment) and
maximum reading (all segments).
Hold function: The temperature will be displayed for 7 seconds after the Trigger is released. The
display shows HOLD. The unit automatically switches off after this time if no button is pressed.
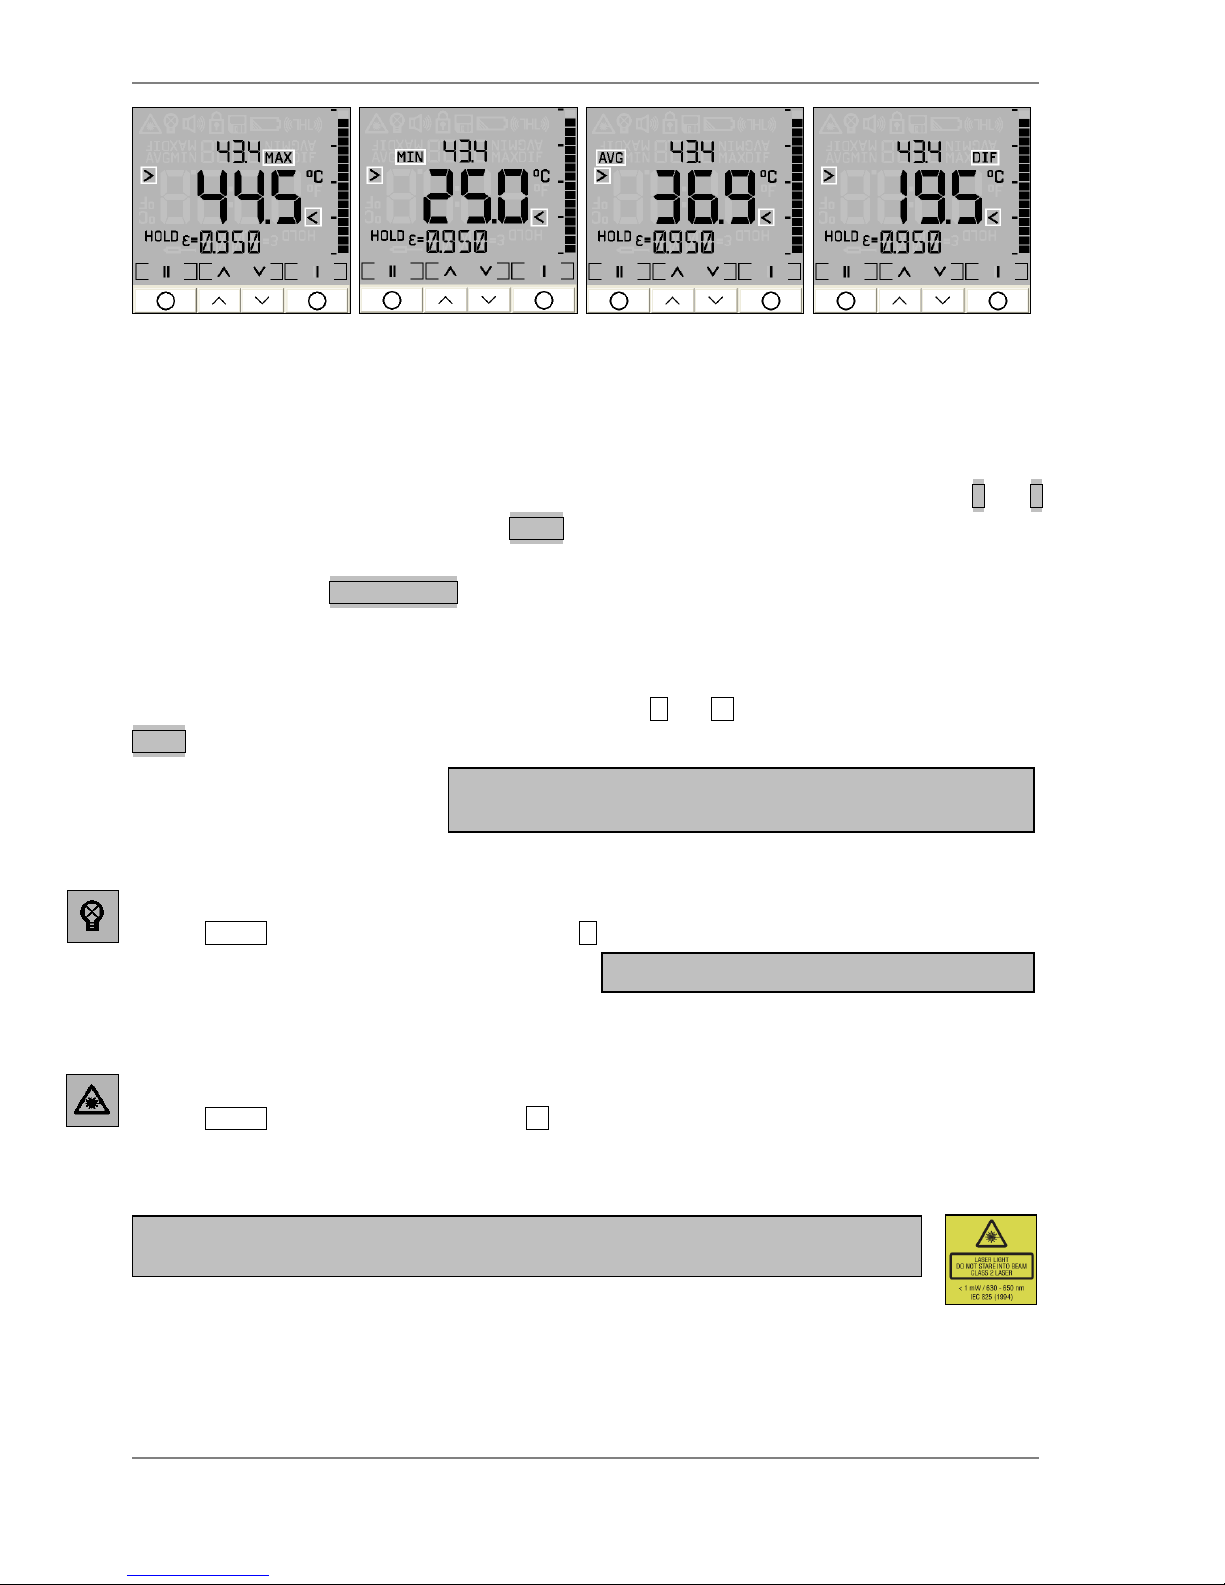
After taking a measurement the following functions can be displayed in turn by pressing the Λ-button
(starting from the HOLD mode):
SEFRAM 9885
6
In the emissivity menu the last measured temperature value can
be corrected afterwards by changing the emissivity.
Maximum reading [MAX] Minimum reading [MIN] Average reading [AVG] Difference reading [DIF]
MAX: maximum value determined during measurement AVG: average value (related to duration of
measurement)
MIN: minimum value determined during measurementDIF: the difference between MIN and MAX
These values will be shown in the main display, which is marked with the symboSEFRAM 9885 >and <in
this case. The current temperature (in the HOLD mode: the last measured temperature) will be shown in
the upper display.
After turning into the measure mode or after switch off of the unit the selected measurement function will
be kept.
Recall (Last Value) The last measured value remains stored in the SEFRAM 9885 after switch off. To recall
this value please press (in the switched off condition) the I- or II -button. The unit will be set into the
HOLD mode.
Display Backlight
Pull the Trigger (keep pressed) and
then press the I-button to activate/ deactivate the display backlight.
The symbol in the display flashes to confirm.
Default setting: Off
Laser Sighting
Pull the Trigger (keep pressed) and then the II -button to activate/ deactivate the laser. The laser symbol
in the display (only if the trigger is pulled) indicates the active laser.
Default setting: On
WARNING: Do not point the laser directly at the eyes of persons or animaSEFRAM 9885!
Do not stare into the laser beam. Avoid indirect exposure via reflective surfaces!
This function is not available in the Flip mode.
SEFRAM 9885
7
The measured area of the object (spot size)
depends on the distance. For a correct
measurement the spot size should at all times
have at least the same size like the object or
should be smaller than that.
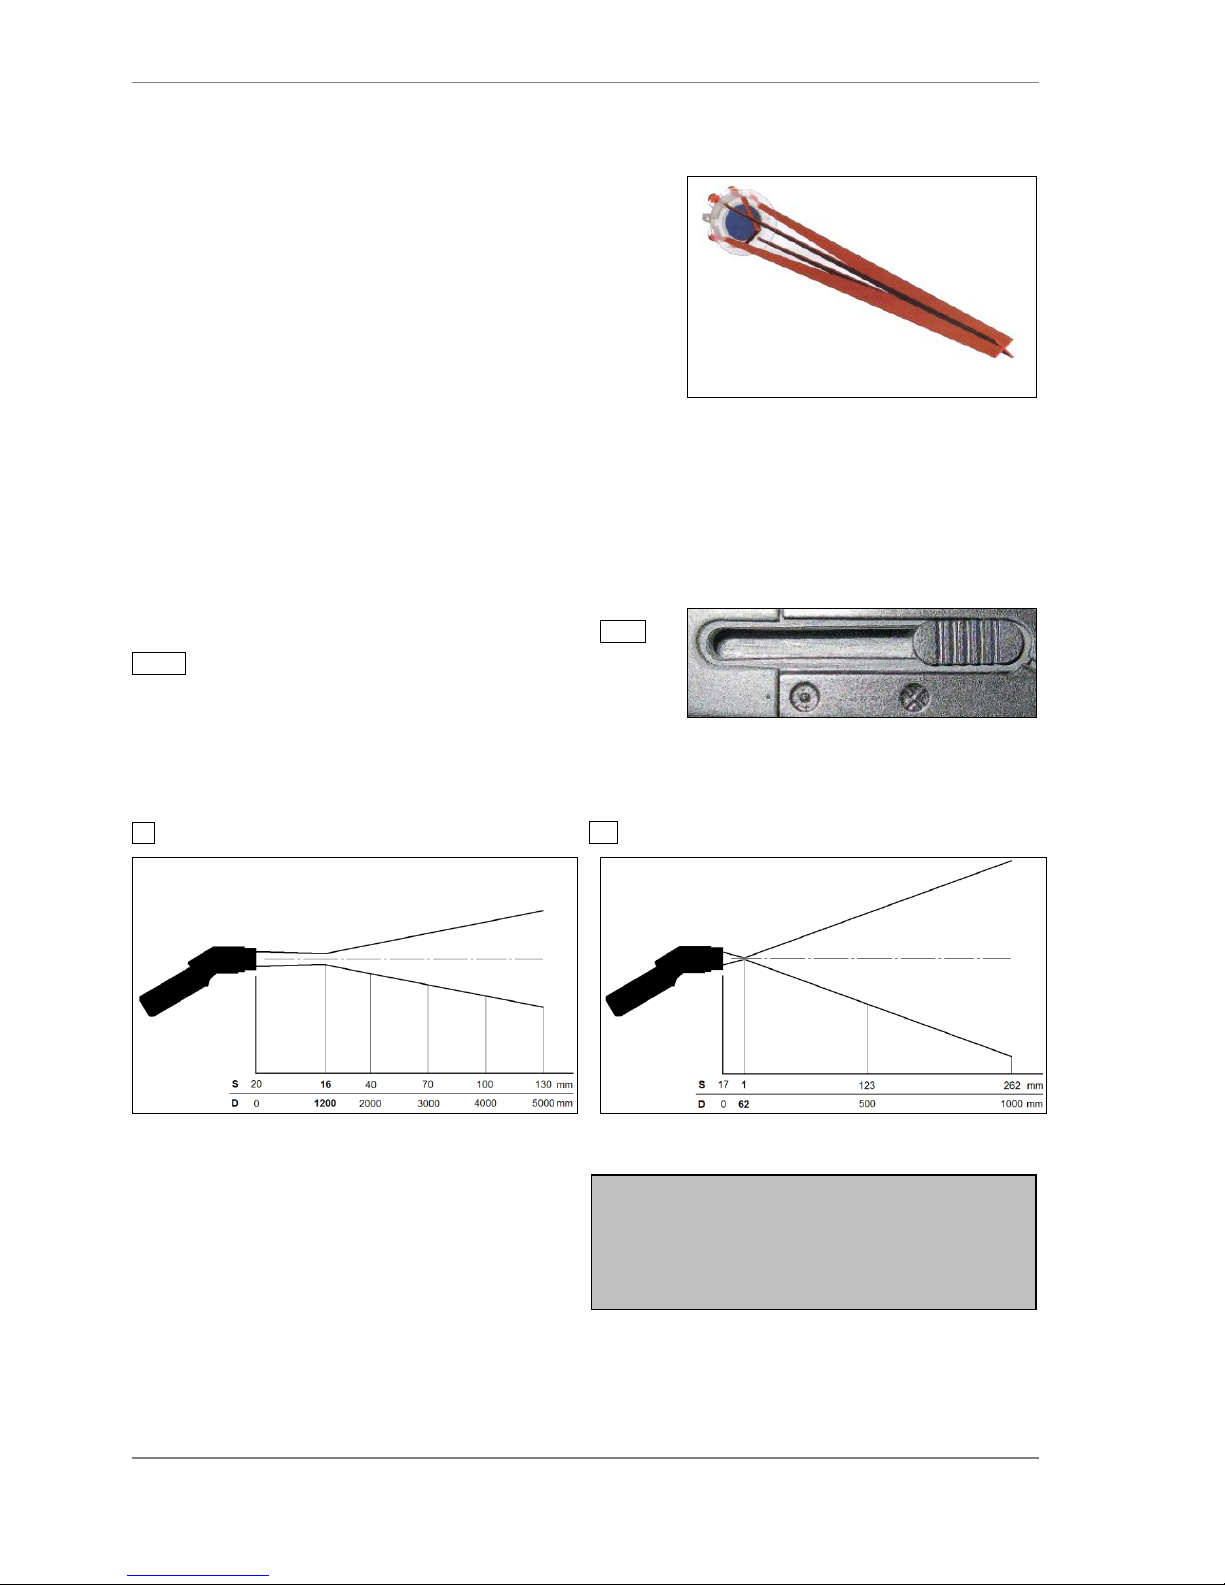
Optics
The SEFRAM 9885 has a switchable optics. The both
possible operating modes are indicated as SF mode
(Standard Focus) and CF mode (Close Focus).
In the SF mode (standard operating mode) objects ≥ 16mm can
be measured. The measurement spot will be exactly
marked with the patented crosshair laser, i.e. the real size and
location of the spot is shown on the object –independently from the distance and with no optical offset
(see right figure).
In the CF mode objects ≥1mm (e.g. electronic components) can be measured. In this operating mode a
two point laser shows the spot on the target. Both laser beams are crossing at the focus distance (62m m
from front of housing) and indicating at this distance the minimum spot size (Diameter: 1mm).
To switch between SF and CF mode please shift the Optic
switch which is located besides the display, to the
according position (see right figure).
The symboSEFRAM 9885 on the housing have the following meaning:
X SF/ Crosshair laser CF/ Two point laser
D:S (focus point) = 75:1/ 16 mm@ 1200 mm D:S (focus point) = 62:1/ 1 mm@ 62 mm
D:S (far field) = 36:1 D:S (far field) = 4:1
D = Distance from front of the unit to the object
S = Spotsize

SEFRAM 9885
8
To activate the setup menu the unit must be in
the HOLD mode.
Setup Menu 1
In this menu Emissivity, Alarm values and the Lock mode can be set up.
Each setting or change of values and parameters will be saved by pressing the
Trigger or the I-button.
TriggerSAVEMeasure mode
ISAVEnext menu item
If none of these buttons is pressed the made settings or changes will not be saved and the unit switches
off after approx. 30 s.
Emissivity Setting
The emissivity (- Epsilon) is a material constant which describes the ability of the body to emit infrared
energy. It can range between 0 and 1 (0 and 100 %) [►Emissivity].
Setting range: 0,100...1,100 (values > 1,000 = amplification)
Default setting: 0,950
HOLDII flashesΛINCREASE
VDECREASE
High Alarm
Setting of a temperature value (alarm setpoint). If the temperature reading is above this setpoint a visual
display colour = red + alarm symbol in info line and an acoustic signal (buzzer) will be generated:
Setting range: -35...900°C
Default setting: 900°C
HOLDII IH flashes ΛINCREASE VALUE
VDECREASE VALUE
II ACTIVATION/DEACTIVATIONalarm symbol [beside H] on/ off
Low-Alarm
Setting of a temperature value (alarm setpoint). If the temperature reading is
below this setpoint a visual display colour = blue + alarm symbol in info line and
an acoustic signal (buzzer) will be generated:
Setting range: -35...900°C
Default setting: -35°C

SEFRAM 9885
9
HOLDII 2x IL flashes ΛINCREASE VALUE
VDECREASE VALUE
II ACTIVATION/DEACTIVATION alarm symbol [beside L] on/ off
Long-Term Measurement (Lock Mode)
This function allows a continuous measurement without pulling the
trigger for that time. The laser is only working if the trigger is pulled.
Setting range: On/ Off
Default setting: Off
HOLDII 3x ILock symbol flashes ΛON/OFF
VON/OFF
after setting to On:
2x IHOLD+LockTriggerstarting Measurement mode+Lock
Triggerstarting Measurement mode+Lock
You can deactivate the Lock function in the same order, but starting from
Measurement mode+Lock.
The data logger functions are aSEFRAM 9885o available in the Lock mode [►
Data Logger].
For a long-term temperature measurement of an object it is
recommended to mount the unit on a tripod.
Setup Menu 2
In this menu Temperature unit, Buzzer, Flip display and Factory default
settings can be set up.
HOLDII 4x I2. Menu
The procedure is the same as described in the setup menu 1:
TriggerSAVEMeasurement mode
ISAVEnext menu item
Temperature Unit
With this function you can switch the temperature unit in the display
between °C und °F.

SEFRAM 9885
10
If ONis activated the display will switch immediately (see the right
picture). Please note, that in this context SEFRAM 9885 the
assignment of the Mode buttons (I und II) changes.
Setting range: °C/ °F
Default setting: °C
2. MenuII Temperature unit flashes Λ°C/ °F
V°C/ °F
Buzzer
With this function the buzzer (acoustic alarm signal) can be switched on
and off.
Independent from this the key tone (confirmation by pressing Mode, Up and
Down button) will remain On.
Setting range: On/ Off
Default setting: On
2. MenuII IBuzzer symbol flashes ΛON/OFF
VON/OFF
Flip-Display
The SEFRAM 9885 has a so called Flip display (turn around display). As the
unit can be used in horizontal and in vertical position (preferably in
combination with the CF mode), the ability to switch allows a comfortable
operation in both positions.
Setting range: Auto/ Off/ On
Default setting: Auto
2. MenuII 2x Icurrent setting ΛAUTO/OFF/ON
VAUTO/OFF/ON
AUTO:automatic position detection (by internal position sensor) and
display switch according to the handling of the unit
OFF:no switch (for reading at horizontal measurements)
ON:permanent switch for reading at vertical measurements)

SEFRAM 9885
11
Ambient Temperature Compensation
In dependence on the emissivity value a certain amount of ambient radiation will be reflected from the
object surface. To compensate this impact you can use this function to enter a temperature value for the
ambient radiation [Tamb]:
Setting range: -35...900°C
Default setting: deactivated
2. MenuII 3x ITamb ΛINCREASE VALUE
VDECREASE VALUE
II ACTIVATE/DEACTIVATE
If the Tamb-function is activated, the current set Tamb-value can be easily
displayed as follows:
Trigger+ ΛToggle between Emissivity and Tamb in lower display
If, in addition, a thermocouple probe is connected, the lower display will
toggle between Emissivity, t/c probe temperature and Tamb value.
[►Thermocouple Probe]
Reset
With this function the unit can be set back to the factory default values
[►Factory Default Setting].
2. MenuII 3 or 41)x IRESII RES flashes II RESET
IHOLD
TriggerMeasure mode
1) depends on the status of Tamb function
The stored values in the data logger will not be deleted with the reset function.
An activation of this function on the SEFRAM 9885 for the first time is
only possible with the supplied software [►Device Setup].

SEFRAM 9885
12
Data Logger
The SEFRAM 9885 has an internal data logger with a maximum capacity of 100 measurement
protocoSEFRAM 9885.
Every protocol contains the following values:
Position number (P 00...P 99) MAX-, MIN-, AVG- and DIF-value
Comment Emissivity
IR temperature Probe temperature (if connected)
Storing Data
To store any data the unit must be in the HOLD mode. At first please take
your measurement and after this release the Trigger:
HOLDVDisc symbol + next free Pos. [Pxx] ΛINCREASE POS.-NO.
VDECREASE POS.-NO.
ISTOREHOLD
If you pull the Trigger no storage will be made and the unit changes to the Measurement mode.
If no button will be pressed, also no storage will be made and the unit switches off after approx. 30 s.
Material- and Position-Names
You can assign a 4-digit alpha numeric description to any data logger
position. This description will be shown in the bottom display and has the
following presetting:
P000 (for position 1) –P099 (for position 100)
In the editing mode you can choose between 20 pre-defined descriptions (SURF, ENG, ..., GLAS, ..., PVC, etc.).
To do this please start the data logger mode and choose a desired position:
Disc symbol + choosen position [Pxx]II description flashes ΛSURF, ..., GLAS, ..., PVC, ...
VPVC, ..., GLAS, ..., SURF, ...
ISAVE
You can also define own descriptions. The following character set can be used:
[A...Z] [0...9] [-/<>] [empty]
If the storage mode is started the next free position automatically will be shown.
If you select an occupied position, the P flashes in the upper display.
The storage function can aSEFRAM 9885o be executed after recall of the last value [► Recall (Last
Value)].
SEFRAM 9885
13
Disc symbol + choosen position [Pxx] 2x II 1. character flashes ΛCHANGE VALUE
VCHANGE VALUE
II next character flashes ΛCHANGE VALUE
VCHANGE VALUE
after input of all characters: ISAVE
Data Logger Recall
To recall a stored measurement protocol the unit must be set into the Measure mode:
Trigger+V[while keeping pressed the trigger]Disc symbol flashesP xx [starting with position 00]
To switch between the data logger positions and different displays please proceed as follows:
Upper display Main display Lower display Examples
P -1VP xxΛP +1 TObj eaMaterial-/ Position name e 1
II e
aMAX eTObj eEmissivity II e 2
ΛTrigger+ Λe
aMAX/ TObj eTObj/ MAX/ MIN/ AVG/ DIF TExt [probe temperature] 3 + 4
1 2 3 4
To leave the data logger mode please press again the Trigger+Vsimultaneously.
If no button is pressed, the unit switches off after approx. 30 s.
Thermocouple Probe
The SEFRAM 9885 has an input for thermocouple probes. You will find the connection at the end of
the handle
[►User Interface]. You can connect the supplied insertion probe as well as any other t/c probe type K.
To show the t/c temperature in the display, proceed as follows:
Trigger+ ΛToggle between T/C probe temperature and Emissivity [lower display]
If, in addition, the Tamb-function is activated, the lower display will toggle
between Emissivity, t/c probe temperature and Tamb value.

SEFRAM 9885
14
[►Ambient Temperature Compensation]
Software OptrisConnect
Installation and Start
Insert the installation CD into the according drive on your computer. If the auto run option on your
computer is activated the installation wizard will start automatically. Otherwise please start setup.exe on
the CD-ROM. Follow the instructions of the wizard until the installation is finished.
The installation wizard will place a launch icon on the desktop and in the start menu:
[Start]\Programs\Optris Gmbh\OptrisConnect.
If you want to uninstall the software from your system please use the uninstall icon in the start menu.
Connection to the Computer
Please connect the SEFRAM 9885 with your computer by
using the special USB adapter cable. After you have
started the software and the communication has been
established the status line (below the time axis) will show the following information:
COMxx: Opened active COM port if a USB adapter cable is connected
SEFRAM 9885: Connected successful communication with the connected SEFRAM 9885
SF/ CF selected optics mode on the SEFRAM 9885
As long as the SEFRAM 9885 is connected to your computer it will be powered via the USB interface. In
this case operation is aSEFRAM 9885o possible if no batteries are inside the unit. At digital communication
the unit display shows the HOLD –mode but the unit is measuring continuously and is sending
temperature data via the interface to the computer
[►Digital displays].
Please use for a connection between the SEFRAM 9885 and a computer only the supplied USB adapter
cable, as otherwise there will be no function.
The supplied connection cable is not a standard USB cable!
System requirements:
Windows XP, 2000
USB interface
Hard disc with at least 30 MByte free space
At least 128 MByte RAM
CD-ROM drive
Main functions:
Download of logger data
Display and record of temperature trends
Setup of parameters
The t/c probe in combination with the SEFRAM 9885 can be used to
determine an unknown emissivity value [►Emissivity].
SEFRAM 9885
15
Language
You can select the desired
language under Menu: Setup\
Language.
If you cannot establish a communication in spite of correct connection between SEFRAM 9885 and
computer please choose the correct COM port under Menu: Setup\ Interface. If the USB adapter cable is
connected this port is marked [Infrared Thermometer Adapter]:
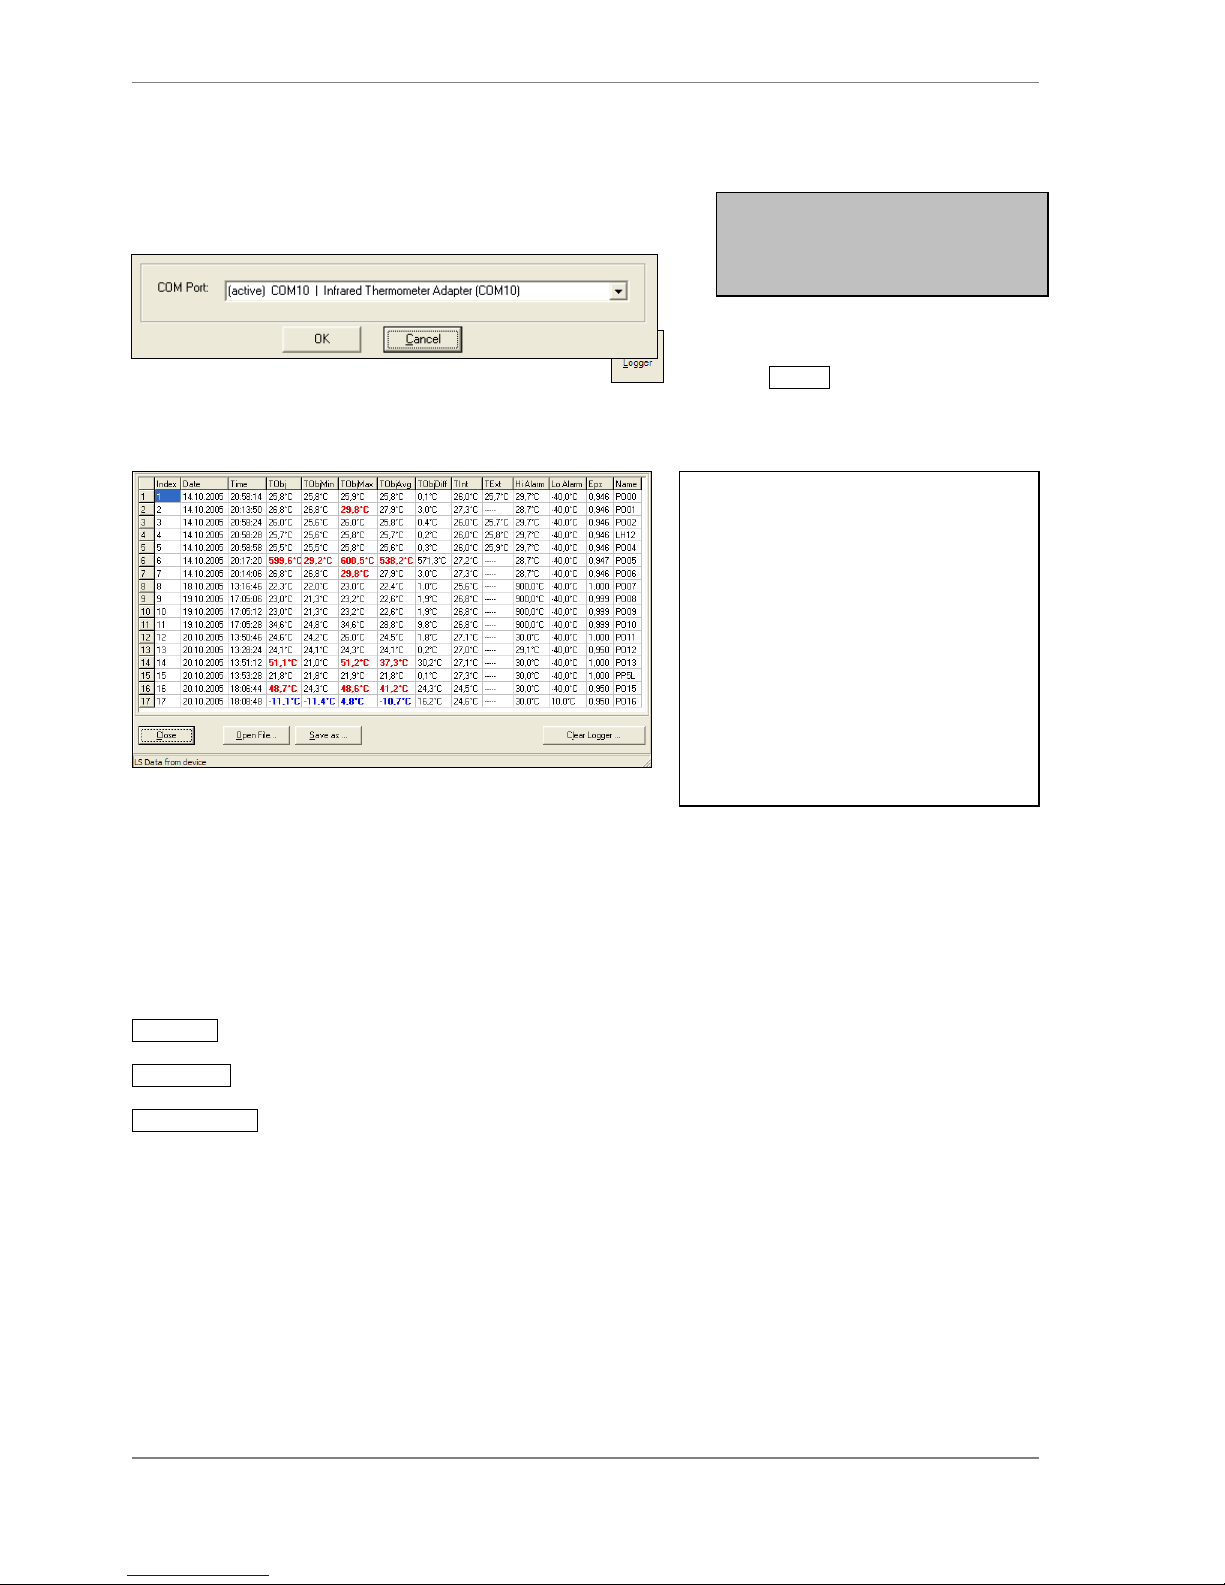
Data Logger Functions
To download the logger data from the unit please press the Logger -button [Menu:
Measurement\ Download logger data].
All data from the logger will be displayed in an extra window as a table:
Logger temperatures, on which the set High-Alarm value has been exceeded, will be shown in the table red
and bold.
Logger temperatures, on which the set Low-Alarm value has been fallen below, will be shown in the table
blue and bold.
Save as... opens an explorer window to save the logger data on your computer [*.lgg]
Open File... opens an explorer window to open existing logger files
Clear Logger... After confirmation of the security query all logger data inside the SEFRAM 9885 will
be deleted
[unit display shows: CLR].
The status line inside the data logger window (beneath the table) shows the location and file name of the
current data.
Columns in the logger table
Index serial number
Date date of measurement
Time time of measurement
TObj object temperature
TObj Min min. object temperature
TObj Max max. object temperature
TObj Avg average object temperature
TObj Diff. difference between
TObj Min and TObj Max
TInt internal unit temperature
TExt t/c temperature
(if connected)
Hi-Alarm High-Alarm value
Lo-Alarm Low-Alarm value
Eps emissivity
Name material or position name
SEFRAM 9885
16
Please store the logger data on your computer before you
change the batteries. Otherwise an exactly assignment
of the time of measurement is not possible (Restart of the
timer).
s
Time Stamp
If you store data inside your SEFRAM 9885 for the first time (after insertion of the batteries), an internal
timer will be started automatically. After connection to a computer the timer will be synchronized with the
computer time. After this every logger
entry gets the date and time of taking the
measurement.
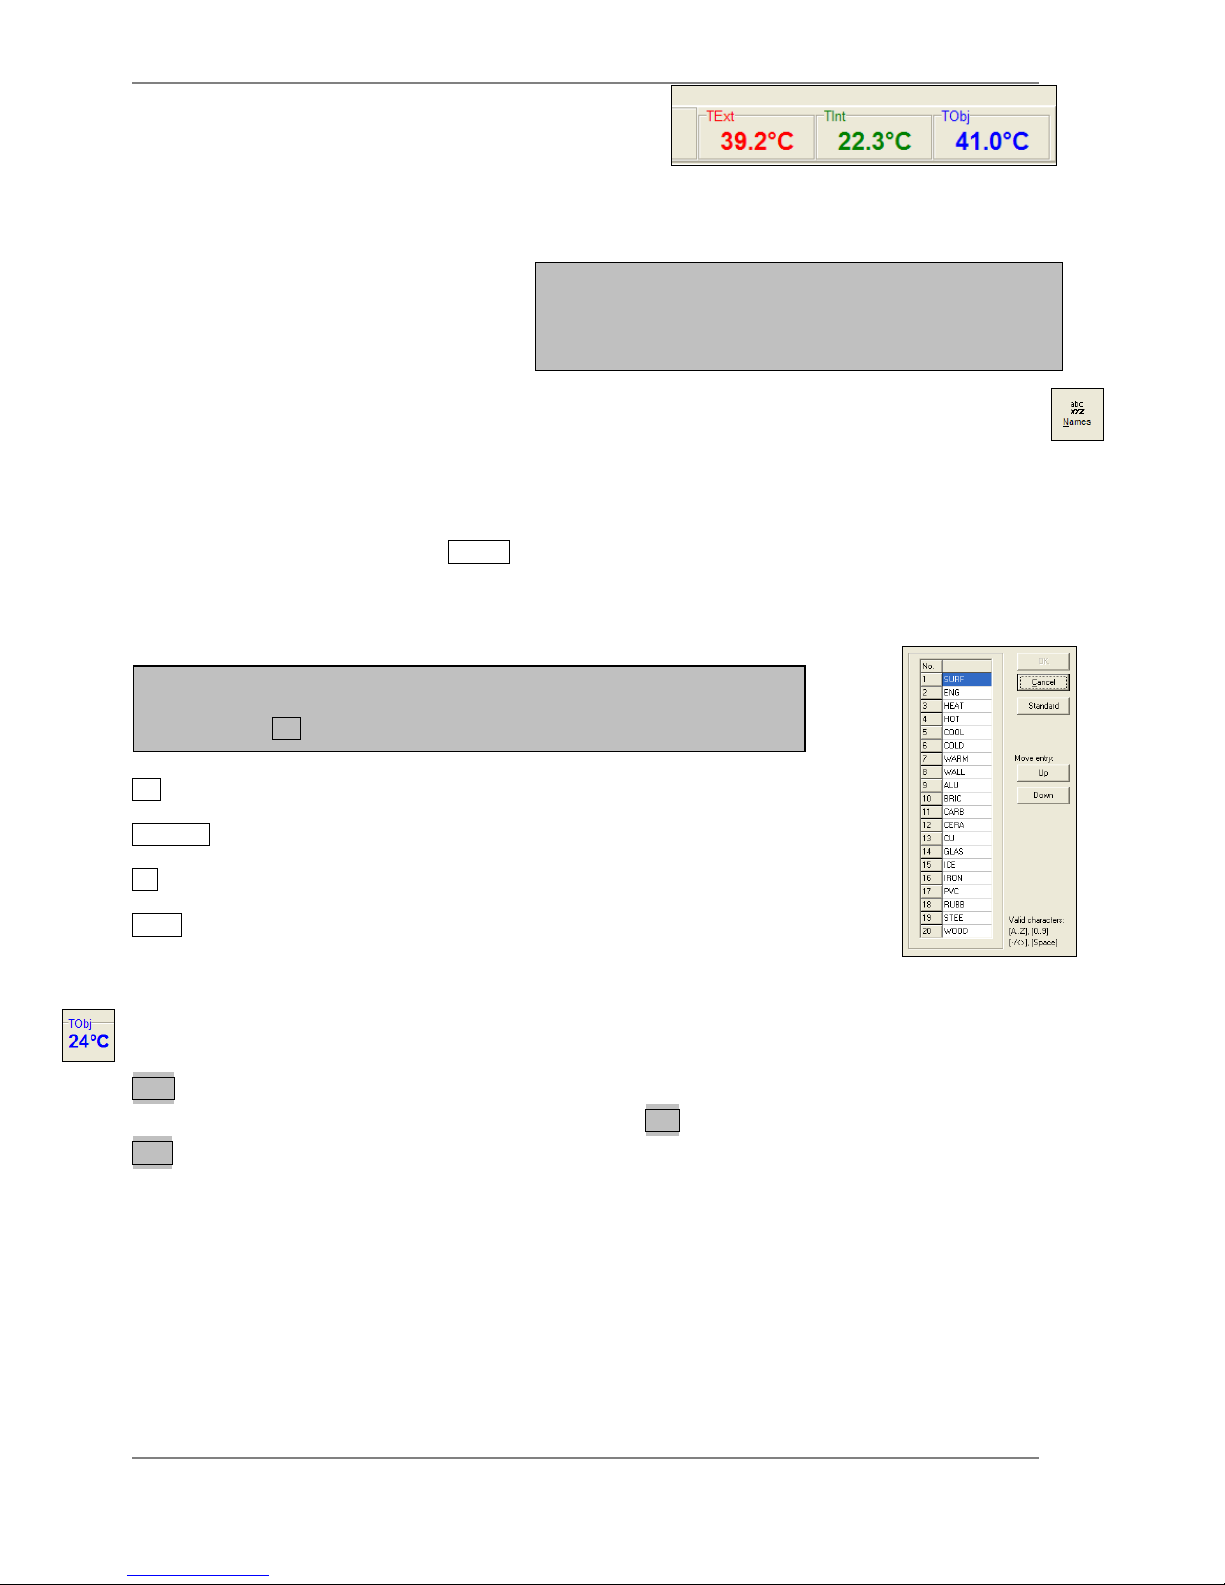
Material- and Position-Names
You can assign descriptions to each logger position whereat you can choose between 20
predefined descriptions or define own descriptions. The table of the predefined descriptions can be edited
with the software.
To open the table please press the Names button [Menu: Device\ Material and location names]. Then mark
the entry which you would like to edit with the cursor and enter the desired name. The maximum length is
four digits. The following character set can be used: [A...Z] [0...9] [-/<>] [Space].
OK saves the changed table inside the SEFRAM 9885
Standard loads the standard table (factory default) in the connected unit
Up moves the selected entry up
Down moves the selected entry down
Digital Displays
If the SEFRAM 9885 is connected to your computer and you start the software, the current temperature
TObj will be shown as digital display (top right).
You can add additional displays for internal temperature TInt and temperature of a connected t/c probe
TExt [Menu: View\ Digital displays].
The once selected displays will aSEFRAM 9885o appear after a restart of the software. The size can be
changed if you put the mouse cursor on the line beneath the displays and pull this down. The buttons of
the tool bar will be moved or faded out (depending on the display size).
If a wrong input is made (no character/ more than 4 characters/ invalid
character) the position number in the table appears red and the table cannot
be closed with OK .

SEFRAM 9885
17
Control elements of the temperature axis:
1 Global auto scaling
2 Local auto scaling
3 Scroll bar
4 Zoom in (increase)
5 Zoom out (decrease)
6 Whole range
Activation of the desired option:
Control elements (temperature axis) or [Menu: Diagram].
Diagram Functions
Starting the Measurement
To start a measurement, please press the
Start button in the tool bar
[Menu: Measurement\ Start].
Any activation of a control element of the time axis will stop the further actualization of the measurement
graph. The measurement itself continues in the background. To return to the current measurement graph
please press the Pause button [Menu: Measurement\ Pause] or C.
During the stopped status any parts of the diagram can be selected with the Time scroll bar. With the
zoom in-button + these parts can be stretched (enlarged) and with the zoom out-button –clinched
(minimized).
Scaling of the temperature axis
With global scaling the temperature range of the
diagram will be adapted automatically to t he
respective peak values. The range will stay in this
setting during the whole measurement.
With local scaling the temperature range of the
diagram will be adapted dynamically to the respective peak values. After the
respective peak has left the diagram in the further process of the measurement, the
range will be readapted. This option enables an optimum display of the temperature
graph.
A manual scaling can be done at any time using the control elements of the temperature axis.
Control elements of the time axis:
1 Scroll bar
2 Zoom in (increase)
3 Zoom out (decrease)
4 Whole range
5 H: Hold/ C: Continue

SEFRAM 9885
18
Stop Measurement
To stop the current measurement please press the Stop
button [Menu: Measurement\ Stop].
The Save button [Menu: File\ Save as] opens an
explorer window to select destination and file
name
[file type: *.dat].
Saving of Data
The menu item options [Menu: Setup\ Options] enables the
following settings for data protection:
Ask for saving if activated, each Stop and new
Start will be followed by the query:
There is unsaved Data. Save now?
[Default setting: activated]
Force data saving after „stop“ if activated, after each Stop an
explorer window for saving of data will be
opened automatically.
Opening of Files
To open of a saved file please press the button Open [Menu: File\ Open]. You can select the desired file in
the opening explorer window [file type: *.dat].
Diagram Settings
The menu item Settings [Menu: Diagram\ Settings] enables the selection of the following diagram options:
Diagram Selection which signaSEFRAM 9885 should be displayed as graph [TObj, TInt, TExt]
Pen Width Pen width of the temperature graphs [1...5]
Color Color of the temperature graph and digital displays
Digital Selection which signaSEFRAM 9885 should be displayed as digital display
Initial time Time frame on the x-axis, which should be displayed at beginning of a measurement
If non of both options is activated, a new measurement will be started after
termination of one measurement and pressing of the Start button.
In this case the former data are deleted!
Table of contents
Other SEFRAM Measuring Instrument manuals

SEFRAM
SEFRAM MW 3015 User manual

SEFRAM
SEFRAM MW 3352 User manual

SEFRAM
SEFRAM MW 3950B User manual

SEFRAM
SEFRAM 7805B User manual

SEFRAM
SEFRAM MW 3950 User manual

SEFRAM
SEFRAM MW 3360 User manual

SEFRAM
SEFRAM SPX50 User manual

SEFRAM
SEFRAM 7859 User manual

SEFRAM
SEFRAM 9836 User manual

SEFRAM
SEFRAM DAS240 User manual

SEFRAM
SEFRAM CDM User manual

SEFRAM
SEFRAM DAS240BAT User manual

SEFRAM
SEFRAM MW 3031 User manual

SEFRAM
SEFRAM 9862 User manual

SEFRAM
SEFRAM 9835 User manual

SEFRAM
SEFRAM 7803B User manual

SEFRAM
SEFRAM 7940 Series User manual

SEFRAM
SEFRAM 7880 User manual

SEFRAM
SEFRAM 3515F User manual

SEFRAM
SEFRAM 9893 User manual


