Senju Sprinkler CN-RES User manual

Page
:
1 of 7
Document No.U025417
Date
:
Jan/11/2019
Residential Flat Concealed Sprinkler, Pendent,
Model: CN-RES, K-Factor: 4.9, SIN: SS8421
GENERAL DESCRIPTION
The Model CN-RES Residential Flat Concealed Sprinklers are automatic sprinklers of the compressed fusible solder type. These
are decorative and fast response. The frame of the sprinkler hides the deflector, gasket, etc., which is in turn concealed above
the ceiling by the cover plate assembly. The cover plate has a flat profile, and its diameter is extremely small. The
push-on/thread-on, thread-off design of the concealed cover plate assembly allows easy installation of the cover plate. Therefore,
the Model CN-RES should be your first choice when aesthetics is the major consideration for ultimate appeal and unbeatable
performance is desired. The Model CN-RES is designed for the residential occupancies and it is perfect for use in homes, hotels
and other living quarters.
The Model CN-RES is to be used in wet pipe residential sprinkler systems for One- and Two- Family Dwellings and
Manufactured Homes per NFPA 13D; wet pipe residential sprinkler systems for Residential Occupancies up to and Including
Four Stories in Height per NFPA13R; or, wet pipe sprinkler systems for the residential portions of any occupancies per NFPA 13.
The Model CN-RES has a 4.9 (70.6 LPM/bar1/2) K-factor that meets the required residential flow rates with minimal residual
pressure, which allows for smaller pipe sizes and water supply requirements.
For extended installation flexibility, the Model CN-RES provides 3/8 inch (9.0mm) vertical adjustment. This adjustment in
installation decreases the need for precise cutting of the pipe that drops to the sprinkler and allows for a perfect fit with a range of
pipe lengths.
The heat sensitivity and water distribution design of Model CN-RES allows for an increased chance of residents’ escape or
evacuation in case of fire. However, residential fire sprinkler systems are not a substitute for fire safety awareness or fire safety
construction required by building codes.
WA R N I N G S
The Model CN-RES must be installed and maintained in accordance with the rules stated herein as well as in
compliance with the applicable standards of the National Fire Protection Association regulations and the standards of
any other authorities having jurisdiction.
In the event of this condition, consult the authorities having jurisdiction for guidance and approval.
Failure to do so may impair the integrity of these devices.
It is the responsibility of the installing contractor to provide a copy of this document to the owner or his representative,
and in turn, it is the obligation of the owner to provide a copy of this document to a succeeding owner. The owner is
responsible for maintaining their fire protection system and devices in proper operating condition. The installing
contractor or sprinkler manufacturer should be contacted with any related questions.

Page
:
2 of 7
Document No.U025417
Date
:
Jan/11/2019
TECHNICAL DATA
Approvals: cULus Listed
Sprinkler Identification Number (SIN): SS8421
Maximum Working Pressure: 175psi (12.1bar)
Discharge Coefficient (Nominal K-Factor):
K=4.9 GPM/psi1/2 (70.6 LPM/bar1/2)
Temperature Rating: 162℉/72℃Sprinkler
140℉/60℃Cover Plate
Vertical Adjustment: 3/8 inch (9.0 mm)
Cover Plate Finishes:
Standard Finishes-
White, Ivory, Beige, Brown, Black, Nickel,
Wood Grain
Custom Finishes-
Custom Color and custom pattern cover
plates are available on special order. Contact
a Senju Sprinkler representative with any
custom orders.
Please see chart on Page 7 for more detail.
Physical Characteristics: Ref. Figure 1
OPERATION
In case of fire, the solder component that holds together the Cover Plate and the Retainer melts and as a result the Cover Plate
is released. The two Heat Collectors are exposed and when sufficient heat from the fire is recorded, internal components of the
sprinkler to fall apart. This leads to the dropping of the Deflector into its operating position, allowing the water flow to be
distributed on the affected by fire area. (Ref. Figure 2)
FIGURE 2. OPERATION PROCESS
DESIGN CRITERIA
The herein stated rules for use and installation of Model CN-RES are provided by the manufacturer and must be strictly
implemented for safe and full results.
FIGURE 1. Model CN-RES K=4.9
Sprinkler OperationNormal Condition Cover Plate Operation Water Discharge
NPT 12
Year of Manufacture
Country Origin
Temperature Rating
Listing Mark
Marking
ID Number (SIN)
6 Wrench Slots
2- 38" (60mm)
7
6
5
2
3
1
4
1- 38" (35mm)
COMPONENTS (MATERIALS) :
3- Deflector (Phosphorus Bronze)
2- Frame (Bronze)
1- Body (Copper Alloy)
5- Fusible Metal (Solder)
6- Heat Collector (Copper)
7- Cover Plate Assembly
4- Gasket (PTFE)

Page
:
3 of 7
Document No.U025417
Date
:
Jan/11/2019
NOTES
Residential Fire Sprinkler Systems should only be designed and installed by individuals who are completely familiar
with automatic sprinkler system design, installation procedures, and techniques.
Several criteria may apply to the installation and usage of each sprinkler. Consequently, it is recommended that the
sprinkler system designer review and develop a working understanding of the complete list of criteria prior to initiating
the design of the sprinkler system.
Questions concerning sprinkler installation and usage criteria, which are not coverage by the following instructions,
should be submitted to Contact Company. Include sketches and technical details as appropriate.
In some instances, the requirements of this document may concern specifications which are more stringent and which
take precedence over those specified in NFPA 13, 13D, 13R, or by the authority having jurisdiction.
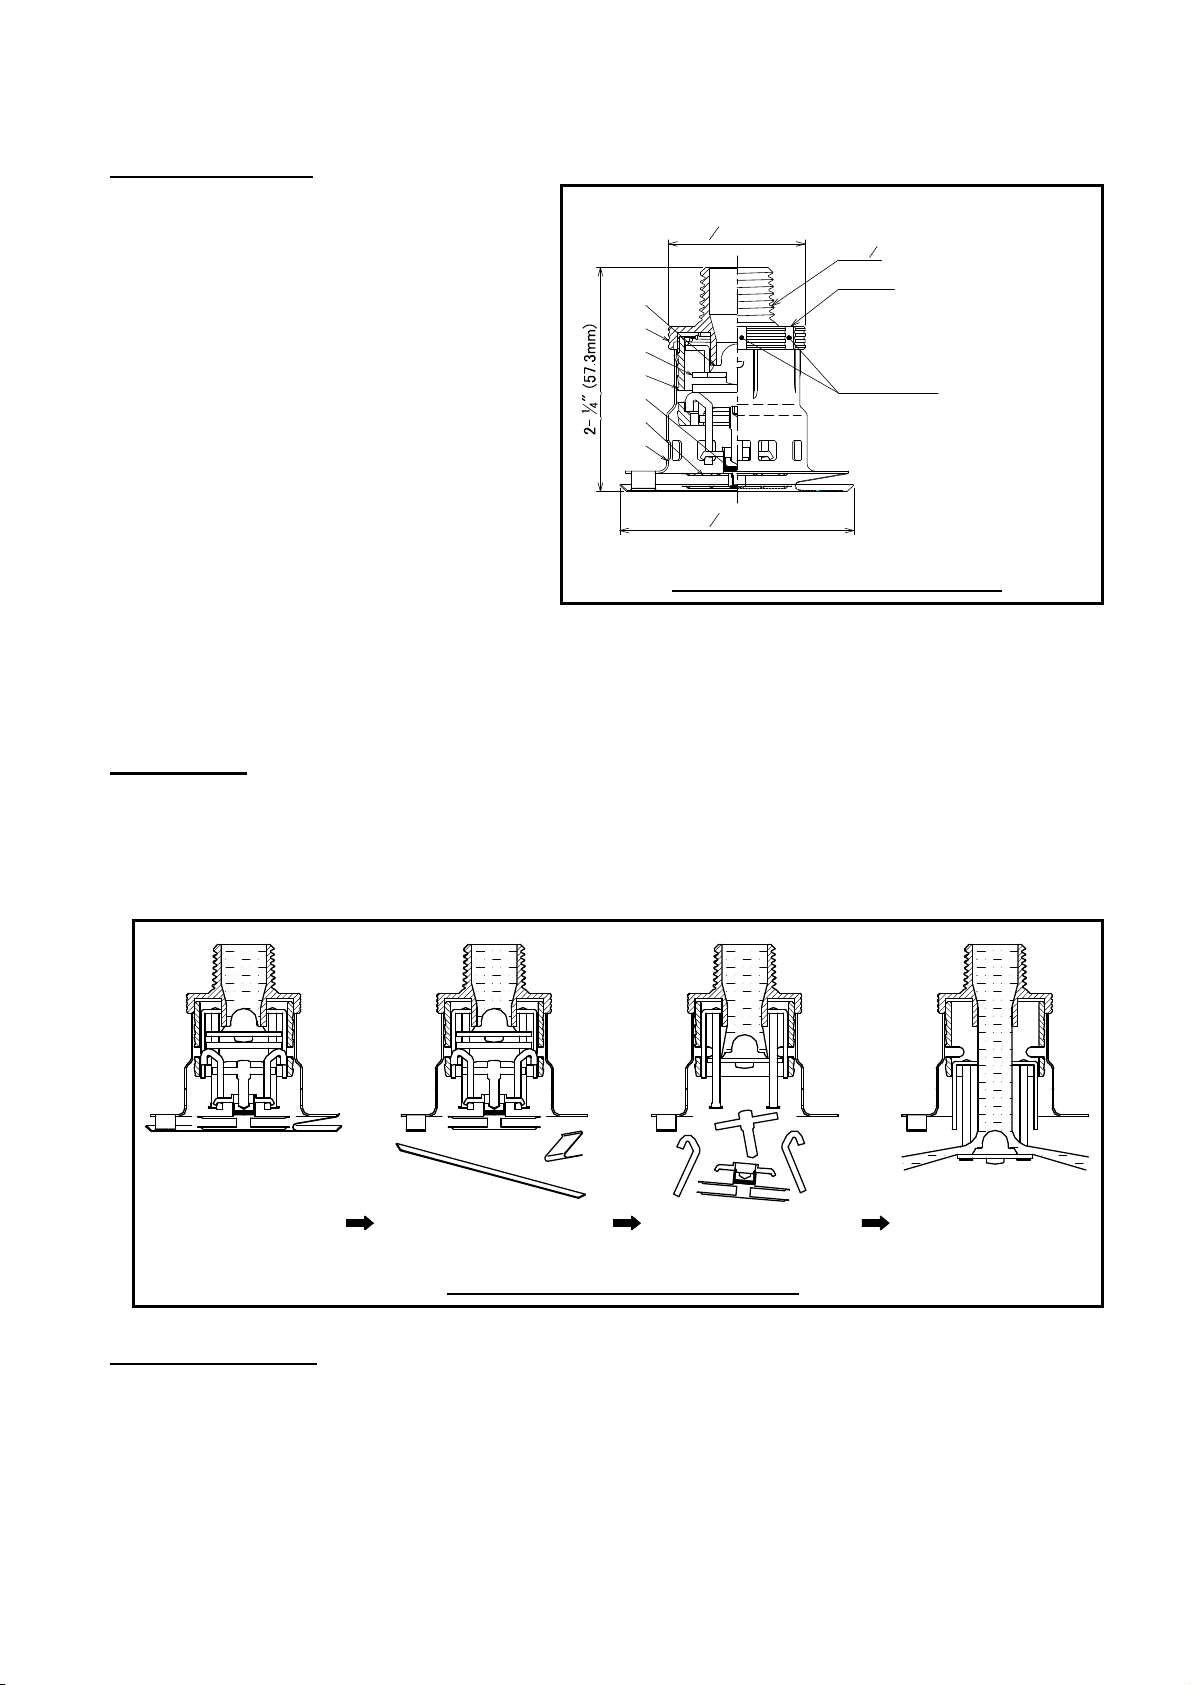
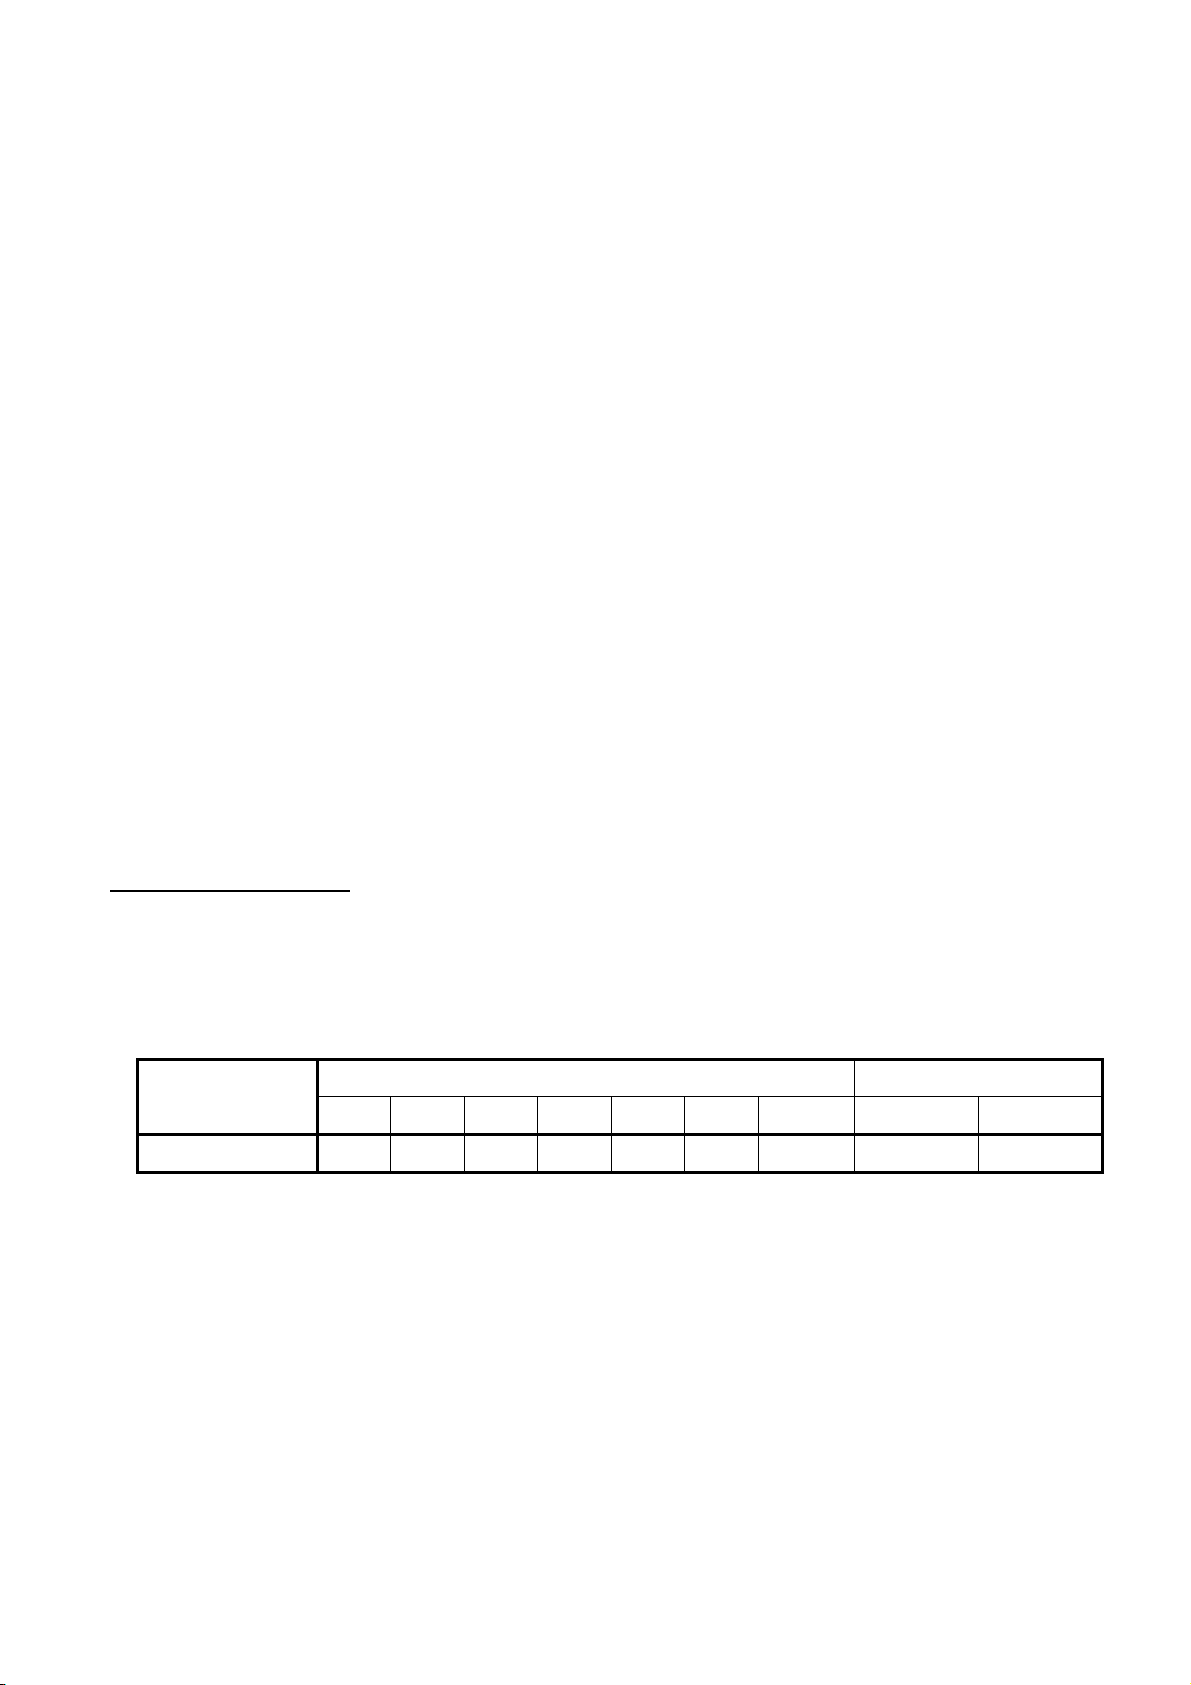
The Model CN-RES must not be used in applications where the air pressure above the ceiling is greater than that below.
Inspect all sprinklers after installation to ensure that both the gap between the cover plate, ceiling and some air vents
on the side of the cover plate assembly are open and free from any air flow impediment.
The spray from the sprinkler is distributed radically outward and downward from the sprinkler deflector. Consequently,
the sprinklers must be located such that there will be no blind spaces shielded from spray by partitions, room dividers,
overhangs or other parts of the dwelling structure.
The number of sprinklers within each compartment (as defined by NFPA 13, 13D, or 13R) must be kept as small as
possible. Do NOT use more sprinklers than necessary to cover a particular space.
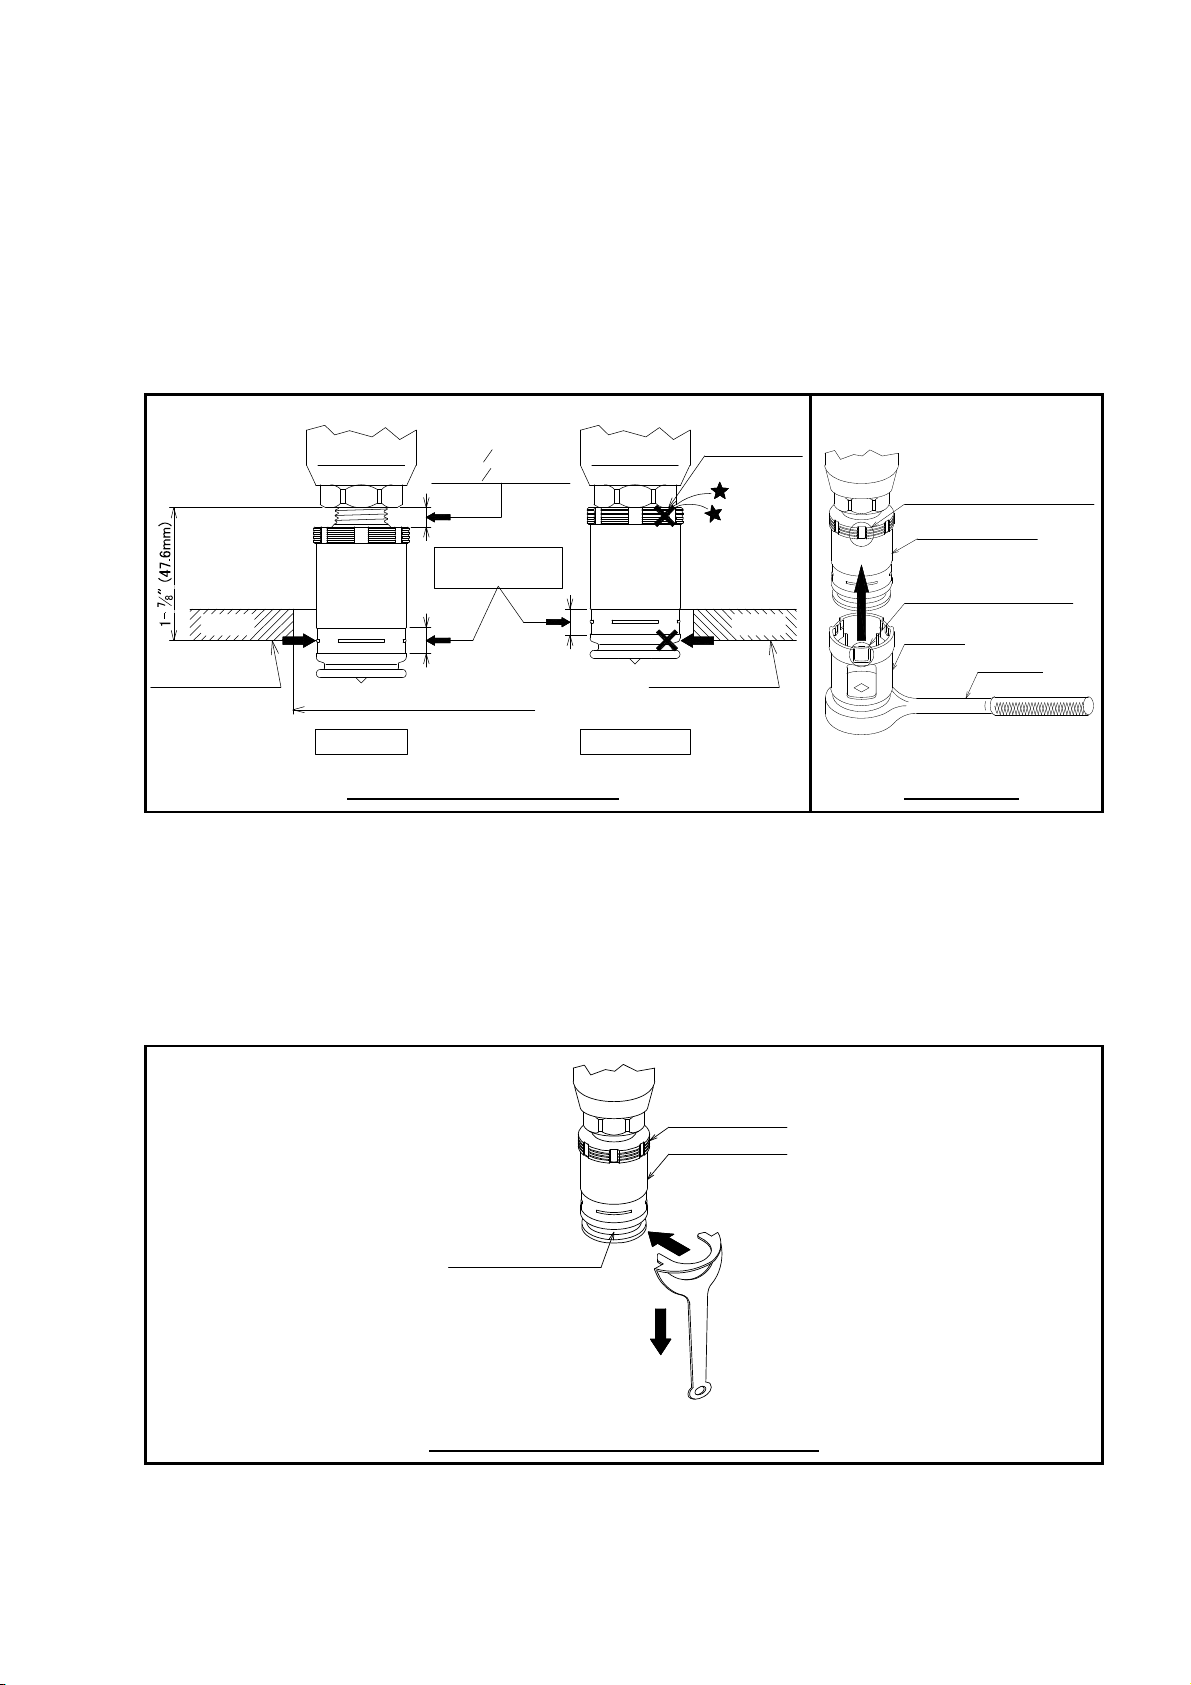
Use only the Cover Plate provided with the Model CN-RES. The sprinkler must be secured in place by firmly fastening
the sprinkler system piping to the structure. If the sprinkler is not properly secured in position, reaction forces
resulting from sprinkler operation could alter its orientation and its water distribution pattern.
Obstruction to Water Distribution
Locations of sprinklers must follow the obstruction rules of NFPA 13 for Residential Sprinklers.
General Service Conditions
The Model CN-RES must only be utilized in WET PIPE sprinkler systems.
Heat Source Criteria
Refer to NFPA 13D or 13R for the requirements relating to the prevention of possible activation of the Heat Responsive
Element of Model CN-RES, due to exposure to a heat sources other than an actual fire.
Precautionary Warnings for Corrosive Environments
The Model CN-RES should not be installed where they may be subjected to a corrosive environment including the following:
(1) Chlorine ion and Chloride environment.
Stress corrosion cracking may be caused by exposure to environments with Chlorine ion and Chloride. Exposure to this
environment may result in sprinklers operating under Non-Fire conditions or Not Operating when exposed to an actual fire.
(2) Sprinkler system piping with Copper.
Sprinkler systems should be constructed in compliance with the applicable standards and the requirements for the copper
piping when copper piping is used in the sprinkler system. (Reference standards NFPA 13, ASTM B813, B828, and CDA
(Copper Development Association) – Solder Joint)
All residual flux must be removed from the interior and exterior of copper piping by thoroughly flushing before installation of
the Sprinkler Heads. Otherwise, residues of flux may cause corrosion and leakage in the sprinkler system.
Sprinkler Spacing Criteria
The minimum spacing between sprinklers is 8 feet (2.4m). The maximum spacing between sprinklers cannot go beyond the
coverage area calculated by using the specific hydraulic factors. (Ref. Table A)
Hydraulic Design Criteria
The minimum required sprinkler flow rates for system designed to NFPA 13D or 13R are given in Table A as a function of
temperature rating and the maximum allowable coverage areas. The sprinkler flow rate is the minimum required discharge
from the most hydraulically demanding sprinkler from each of the total number of “design sprinklers” as specified in NFPA 13D
or 13R.
For systems designed to NFPA 13, the number of designed sprinklers is to be the four most hydraulically demanding
sprinklers. The minimum required discharge from each of the four sprinklers is to be the greater of the followings;
・ The flow rates given in Table A for NFPA 13D and 13R as a function of temperature rating and maximum allowable
coverage area.

Page
:
4 of 7
Document No.U025417
Date
:
Jan/11/2019
・ A minimum discharge 0.1GPM/sq.ft. [4.07(L/min)/ sq.m] over the “design area” comprised of the four most hydraulically
demanding sprinklers for the actual coverage areas being protected by the four sprinklers.
TABLE A. NFPA 13D & 13R WET PIPE HYDRAULIC DESIGN CRITERIA for Model SS8421
Ordinary Temperature Rating
162℉(72℃)
Maximum
Coverage Area(a)
Ft.×Ft.
(m)
Maximum
Spacing
Ft.
(m)
Flow(b)
GPM
(L/min)
Pressure(b)
PSI
(bar)
Heat Collector
to
Ceiling
Installation
Type
Minimum
Spacing
Ft.
(m)
12×12
(3.7×3.7) 12
(3.7) 13
(49.2) 7
(0.48)
14×14
(4.3×4.3) 14
(4.3) 14
(53.0) 8.2
(0.56)
16×16
(4.9×4.9) 16
(4.9) 15
(56.8) 9.4
(0.65)
18×18
(5.5×5.5) 18
(5.5) 19
(71.9) 15.0
(1.03)
Smooth Ceilings
±3/16 inches from
the bottom surface
of the ceiling
Beamed Ceilings per
NFPA 13D or 13R
±3/16 inches from
the bottom surface
of the ceiling
Concealed 8
(2.4)
(a) For coverage area dimensions less than the above mentioned, it needs to use the minimum required flow for the
Next Higher Coverage Area listed.
(b) Requirement is based on minimum flow in GPM/LPM from each sprinkler. The associated residual pressures are
calculated using the nominal K-Factor. Refer to Hydraulic Design Criteria Section for details.
(c) For systems with ceiling types smooth flat horizontal, or beamed, or sloped, in accordance with the 2013 Edition of
NFPA 13D, 13R or 13 as applicable.
INSTALLATION
The Model CN-RES must be installed in accordance with the following instructions.
NOTES
Do not use any sprinklers which have been subjected to potential mechanical damage. Do not use any sprinklers which
show deformation or cracking in either the Sprinkler or the Protective Cap.
Prior to installation, sprinklers should be maintained in the original cartons and packaging until used to minimize the
potential for damage to sprinklers that would cause improper operation or non-operation.
The Protective Cap must remain on the sprinkler during installation and until the ceiling installation is completed. The
Protective Cap must be removed to place the sprinkler in service.
Use a torque of 7 to 14 ft.lbs (9.5 to 19.0Nm) to achieve a 1/2 inch NPT sprinkler joint. If you exceed the recommended
maximum torque, this could result in damage to the sprinkler inlet, which may lead to leakage from the sprinkler.
In case of insufficient adjustment in Cover Plate installation, do not try to overly tighten, screw the sprinkler too loosely
or make any modification to the cover plate assembly. Readjust the sprinkler fitting for a better fit.
Installing Procedure
Step 1
The installation requirements for the sprinkler are as follows: to be installed only in the pendent position with the waterway
perpendicular to the ceiling. Install the sprinkler fitting so that the distance from the face of the fitting to the mounting surface
will be nominally 1- 7/8 inch (47.6 mm) as shown in Figure 3.

Page
:
5 of 7
Document No.U025417
Date
:
Jan/11/2019
Step 2
With pipe thread sealant applied to the threads, hand tighten the sprinkler into the sprinkler fitting. Then tighten it with the
Sprinkler Socket or Wrench & Socket Combination (Ref. Figure 4). The grooves of the Socket must fit perfectly with the
grooves on the Sprinkler for proper installation (Ref. Figure 4).
Step 3
If desired the Protective Cap may also be used to locate the center of the clearance hole by gently pushing the ceiling material
against the center point of the Protective Cap. Before the installation of the ceiling, the sprinkler installation can be started with
the 2 inch (50 mm) diameter clearance hole (Ref. Figure 3). Use the “Tolerance Limit of Ceiling Level” indicator on the
Protective Cap to check for proper installation height (Ref. Figure 3).
FIGURE 3. INSTALLATION
FIGURE 4
Step 4
Use the Protective Cap Removal Tool to remove the Protective Cap (Ref. Figure 5) and then push/screw a Cover Plate
Assembly on the Frame of the Sprinkler by hand until its flange just comes in contact with the ceiling (Ref. Figure 6 and Figure
7). Stop tightening the Cover Plate Assembly once the flange has come in contact with the ceiling. If the ceiling has been lifted
from its normal position in the process of tightening of the Cover Plate Assembly, readjust the cover plate assembly as
necessary. If the flange of the Cover Plate Assembly cannot come in contact with the ceiling sufficiently, readjust the
sprinkler fitting as necessary. When properly installed, there is a nominal 1/8 inch (3.2mm) air gap between the lip of the
Cover Plate and the ceiling, as shown in Figure 6
FIGURE 5. PROTECTIVE CAP REMOVAL
Wrench
Groove on the Sprinkler
Socket
Groove of the Socket
Protective Cap
Make a Space Here
Mounting Surface
Ceiling Ceiling
Do NOT
Over-Tighten
2" (50mm) Ceiling Hole Diameter
of Ceiling Level
Tolerance Limit
Mounting Surface
CORRECT INCORRECT
Avg. 14" (6.4mm)
Min. 18" (3.2mm)
Protective Cap
Step1
Step 2
Pull down
Groove of the Cap
Sprinkler Head

Page
:
6 of 7
Document No.U025417
Date
:
Jan/11/2019
FIGURE 6
FIGURE 7. INSTALLATION (CORRECT OR INCORRECT)
CARE AND MAINTENANCE
The following instructions must be implemented for the maintenance and service of the Model CN-RES.
NOTES
Wet pipe sprinkler systems must be maintained at a minimum temperature of 40
℉
/
4
℃
to prevent freezing and bursting
of the pipe and/or sprinklers.
Automatic sprinklers are not to be tested with a heat source. Operation of the heat responsive element can result.
Absence of a Cover Plate Assembly may delay the response time of the sprinkler in case of fire.
Install the cover plate assembly properly, as shown in Figure 6. Improper installation of the cover plate assembly may
cause improper operation or non-operation.
If the ceiling is to be repainted after the installation of the Sprinkler, care must be exercised to ensure that the new paint
does not seal off any of the air gap.
Factory painted Cover Plates must not be repainted. They should be replaced, if necessary, by factory painted cover
plates. Non-factory applied paint may adversely delay or prevent sprinkler operation in case of a fire.
Do not pull the Cover Plate. Separation may result.
In preparation for maintenance of the fire protection system, permission to close the main control valve must be
obtained from the proper authorities and all affected by this action parties must be informed before the maintenance
session can commence.
INCORRECT CORRECT INCORRECT
CeilingCeiling
Screw
Mounting Surface
Cover Plate Assembly
2- 38"( 60mm)
CeilingCeiling
Heat Collector

Page
:
7 of 7
Document No.U025417
Date
:
Jan/11/2019
Do NOT enclose any sprinklers within drapes, curtains, or valances.
Do NOT hang anything from the sprinklers.
Do NOT clean the sprinklers with soap and water, detergents, ammonia, cleaning fluids, or other chemicals. Remove
dust, lint, cobwebs, cocoons, insects, and larvae by gently brushing with a feather duster or gently vacuuming with a
soft bristle (i.e., dusting) brush attachment.
Exercise suitable safety precautions in the use and storage of highly flammable materials. The rapid rate of fire
development and spread of these materials can reduce the ability of the sprinkler systems to aid in the control of a fire
involving such hazards.
Leaking or corroded sprinklers must be replaced.
Automatic Sprinklers must be kept in a cool and dry place.
Automatic sprinkler must never be physically altered, such as painted, plated, or coated, once shipped from the factory. If the
sprinklers have been in any way modified, they must be replaced.
Great caution must be applied to prevent damage to the sprinklers at all stages - before, during, and after installation. Damaged
units, as a result of dropping, hitting, over-tightening, or wrench slippage, must be replaced.
The Model CN-RES must only be replaced with pendent sprinklers which are listed for residential fire protection service and
which have the same nominal K-Factor, the same coverage area, and the same or lower flow ratings (as indicated under Table A
“Hydraulic Design Criteria”).
When remodeling, such as by adding false beams or light fixtures or changing the location of compartment walls, first verity that
the new construction will not violate the installation requirements of the applicable standards of NFPA. Alter the new construction
and/or the sprinkler system to suit the requirements of this document and the applicable NFPA regulations.
The owner is responsible for the maintenance of the sprinkler system, including inspection and testing, its compliance with this
documents, as well as the standards of the National Fire Protection Association (e.g., NFPA 25), and the regulations of any other
authorities having jurisdiction. The owner should direct any questions regarding the above rules and regulations to the installing
contractors or the sprinkler manufacturer. It is recommended that automatic sprinkler systems be inspected, tested, and
maintained by a qualified Inspection Service in accordance with NFPA 25.
ORDER PROCEDURE
When placing an order, please contact a local distributor with the following information (Model Name, Specify, and Item Number).
Sprinkler
Model: CN-RES (SIN:SS8421, Residential Flat Concealed Sprinkler, Pendent, K4.9, Temp.: 162℉ / 72℃)
Cover Plate Assembly
2-3/8inch (60mm), Temp.: 140℉/ 60℃, Order Separately from Sprinkler
Please refer to the chart below for available finishes.
Standard Finishes Custom Finishes
White Ivory Nickel Beige Brown Black Wood grain Custom Color Custom Pattern
2-3/8" Round, 140ºF ○ ○ ○ ○ ○ ○ ○ ○ ○
Tools for Installation of Model: CN-RES
Socket for Model CN-RES
Ratchet Wrench & Socket for Model CN-RES
Protective Cap Removal Tool for Model CN-RES
This manual suits for next models
1
Table of contents
Other Senju Sprinkler Irrigation System manuals

Senju Sprinkler
Senju Sprinkler RC-RES User manual

Senju Sprinkler
Senju Sprinkler FR-RES User manual

Senju Sprinkler
Senju Sprinkler RC-RES User manual

Senju Sprinkler
Senju Sprinkler FR-QR User manual

Senju Sprinkler
Senju Sprinkler RC-QR User manual

Senju Sprinkler
Senju Sprinkler RC-QR-EC User manual

Senju Sprinkler
Senju Sprinkler ZN-RES User manual

Senju Sprinkler
Senju Sprinkler CN-QR User manual

Senju Sprinkler
Senju Sprinkler SS8464 User manual

Senju Sprinkler
Senju Sprinkler RC-RES User manual