SERVIT 423SDI1A User manual
USER MANUAL
DROP-IN ICE COOLED WELLS
TM
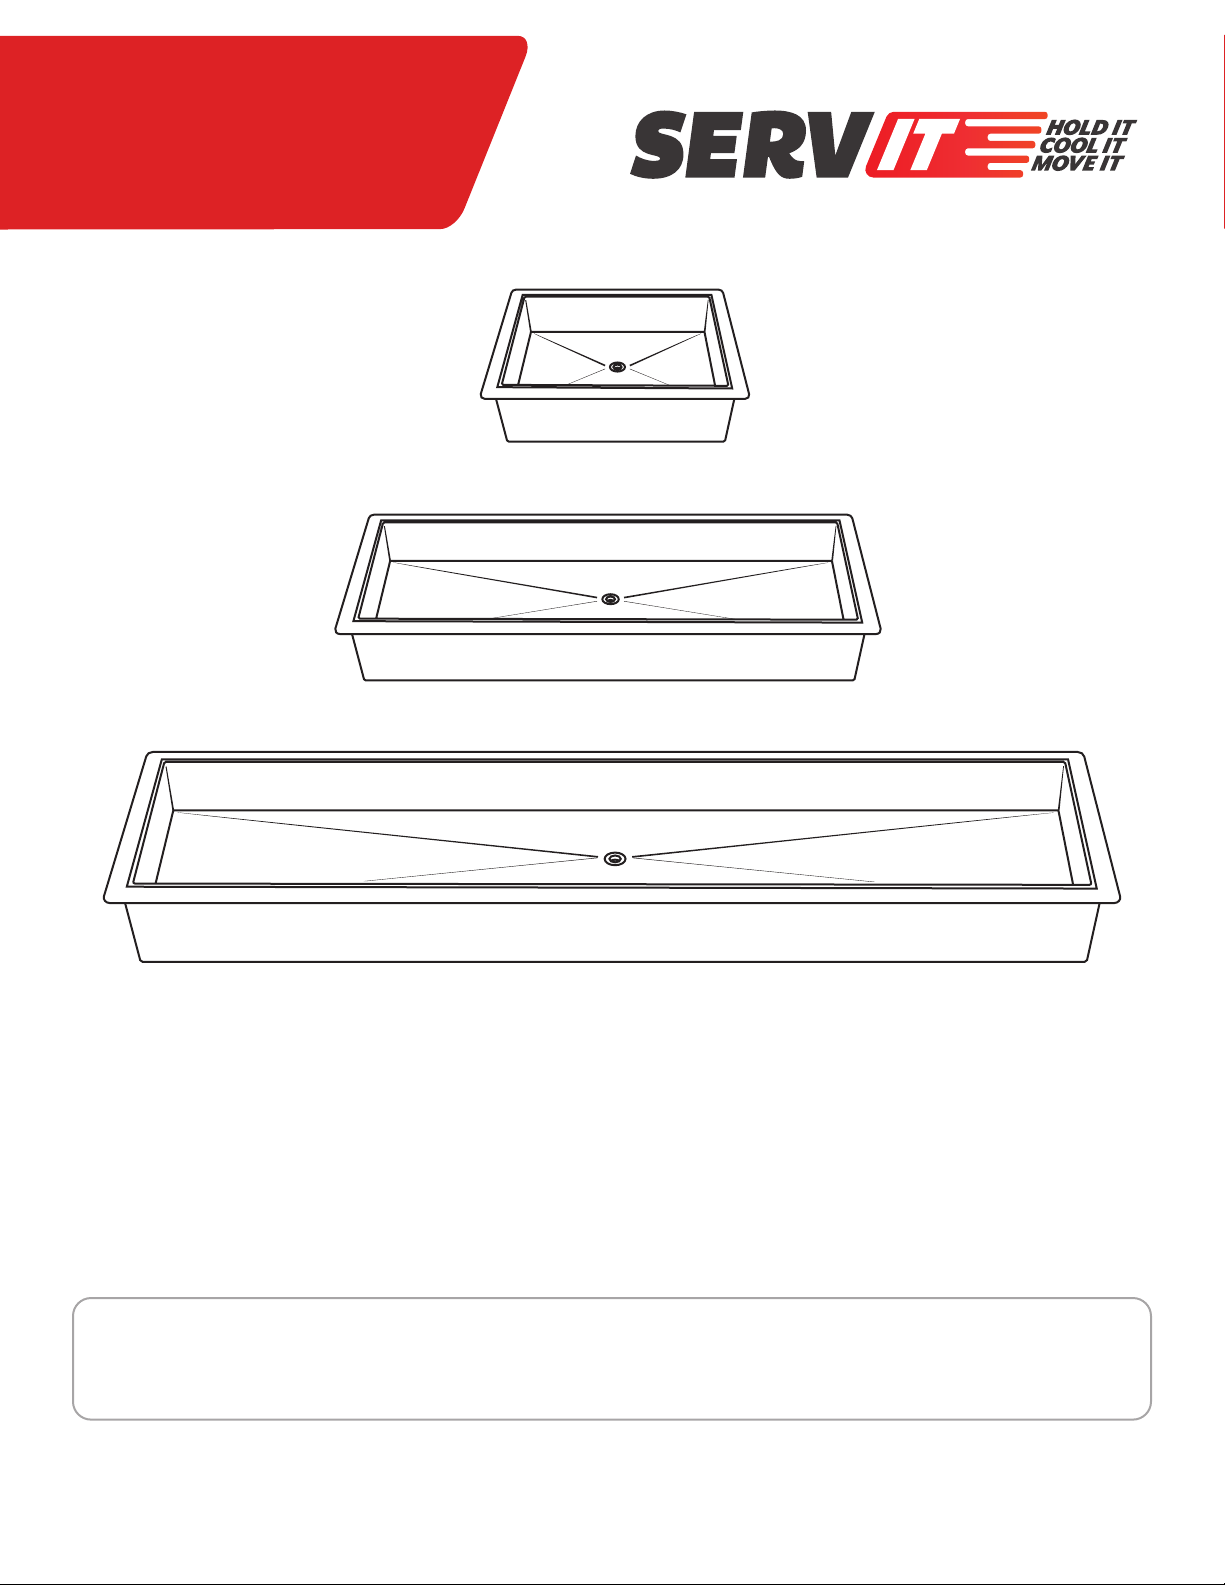
423SDI1A
423SDI3A
423SDI6A
DROP-IN ICE COOLED WELLS
(NON-REFRIGERATED)
Models:
423SDI1A, 423SDI2A, 423SDWI3A, 423SDI4A, 423SDI5A, 423SDI6A
RETAIN THIS MANUAL FOR FUTURE REFERENCE.
REVISED 10/2023

2
TM
USER MANUAL
DROP-IN ICE COOLED WELLS
TABLE OF CONTENTS
Owner's Information ........................................2
Safety Warnings.............................................3
Operating Instructions...................................... 4
Installation Dimensions......................................5
Installation Instructions......................................5
Installation Diagrams ....................................... 6
Cleaning Instructions ........................................7
OWNER'S INFORMATION
Please complete this information and retain this manual for the life of the equipment. For warranty purposes, please fill out and
retain this information. An example of the serial plate(s) for these units are included below for reference.
Model No.: ______________________________________________________
Serial No.:_______________________________________________________
Date of Purchase: _________________________________________________
Serial Plate Example:
ITEM #: 423SDI4A
SERIAL #:
DESCRIPTION: ICE COOLED • FULL SIZE
FOOD WELL DROP IN • 4 PAN • 12" x 20"
Conforms to
NSF/ANSI-2
MADE IN CHINA
WARNING! Minimum clearance from side and back of unit to combustible construction:
1" from sides and 1" from back.
For use in noncombustible locations only.
WARNING!
WARNING!
Commercial use only, not intended for household use.
Improper Installation, adjustment, alteration, service or maintenance can cause property damage,
injury or death. Read the installation, operating and maintenance instructions thoroughly before installing
or serving this equipment.
CONFORMS TO
NSF/ANSI STD. 2

3
TM
DROP-IN ICE COOLED WELLS
USER MANUAL
INTRODUCTION
ServIt Drop-In Ice Cooled Wells (Non-Refrigerated) are designed to keep foods at optimum serving temperatures without affecting
quality. Perfect for commercial environments such as buffets, serving lines, and corporate cafeterias, these ice-cooled wells hold
anything from soda, beer, sushi, salads, and more!
All models include standard features such as sliding lids and drains with screens to prevent food waste from entering your plumbing
waste line. The drains are large 1” sized, allowing for quick draining during end of day cleaning or when replenishing ice. They are
built for tough front and back of house use with rugged stainless steel construction and heavy-duty hardware. ServIt Ice-cooled
wells come equipped with robust 304 grade stainless steel with 16-gauge tops and 18-gauge wells, perfect for resistance to corrosion
while being easy to clean. These ice-cooled wells were designed with the fabricator and installer in mind, providing simplified
installation over competitors.
This manual provides the installation, safety, and operating instructions for Drop-In Ice-Cooled Wells. ServIt recommends all
installation, operating, and safety instructions appearing in this manual be read prior to installation or operation of the unit.
SAFETY WARNINGS
ServIt Ice-Cooled Drop-In Food Wells are designed, built, and sold for commercial use and should be operated by trained personnel
only. Clearly post all CAUTIONS, WARNINGS, and OPERATING INSTRUCTIONS near each unit to ensure proper operation and to
reduce the chance of personal injury and/or equipment damage.
WARNING: Do not store or use gasoline or other flammable vapors and liquids in the vicinity of this or any other appliance.
Keep the area free and clear of combustible materials.
WARNING: Improper installation, adjustment, alteration, service, or maintenance can cause property damage, injury, or death.
Read the Installation, Operating, and Maintenance Instructions thoroughly before installing or servicing this equipment.
CAUTION: These models are designed, built, and sold for commercial use only. If these models are positioned so the public can use
the equipment, make sure all cautions, warnings, and operating instructions are clearly posted near each unit so that
anyone using the equipment can use it correctly and not injure themselves or the equipment.
CAUTION: Make sure food product has been cooled to the proper food-safe temperature before placing in unit. Failure to cool food
product properly may result in serious health risks. This unit is for holding prechilled food product only. Unit is not meant
to chill or freeze food from warm or hot temperatures.
CAUTION: Locate unit in an area that is convenient for use. The location should be level and strong enough to support the weight of
the unit and contents.
4
TM
USER MANUAL
DROP-IN ICE COOLED WELLS
OPERATING INSTRUCTIONS
FAILURE TO FOLLOW THE INSTRUCTIONS IN THIS MANUAL COULD RESULT IN SERIOUS INJURY OR DEATH.
General Information:
• Always clean equipment thoroughly before first use (see general cleaning instructions).
• Check rating label for your model designation.
• For best results, use stainless steel countertops.
General Operating Instructions:
• All foodservice equipment should be operated by trained personnel.
• Never hold perishable food above 41 degrees Fahrenheit (5 degrees Celsius).
Unboxing Instructions:
1. Remove unit from carton and all packaging materials from the unit.
2. Remove the manual/information packet from the unit.
3. Position the unit in desired location (refer to Installation Instructions).
NOTE: Place unit where the ambient air temperature is constant and a minimum of 70 degrees Fahrenheit and maximum
85 degrees Fahrenheit. Avoid areas that are subject to active air movements or currents. Make sure the unit is located on a
solid, level area at a proper height for convenient use and following health standards.
Setup & Operating Instructions:
1. Ensure unit is properly connected to a drain line, and a 1” IPS Ball Valve (not included) is in the “closed” position.
2. Fill the unit with ice, approximately ½ - ¾ of the total interior well.
3. Allow the unit 30 minutes to pre-chill.
NOTE: Covering the well will speed up the pre-chill time.
4. Place pre-chilled food or drinks in well.
5. Check well ice levels every 3 hours and refill as needed, drain excess water.
TOP
25 ⅞"
Ø1"
16 ½"
FRONT
11 /₁₆"
16 ½"
12 ⅞"
15 ¼"
1 /"
/"
SIDE
24 ⅝"
22 ¼"
25 ⅞"
10"
11 /"
1 /"
/"
TOP ICED FRONT SIDE
H H
A
C
B
DE
HH
E
B
D
C
Ball Valve
(Not Included)
6” Clearance
Recommended Ball Valve
(Not Included)
FRONT SIDE
H H
A
A
C
B
DE
HH
ICE FILL
Ball Valve (Not Included)
in Closed Position
¾ Fill
½ Fill
TOP REFRIG
E
B
D
C
A
Recommended Fill Lines - Figure 1:
5
TM
DROP-IN ICE COOLED WELLS
USER MANUAL
INSTALLATION DIMENSIONS
DIMENSIONS BELOW ARE NOMINAL AND MAY VARY BASED ON MANUFACTURING TOLERANCES. IT IS RECOMMENDED TO
ALWAYS MEASURE THE ACTUAL UNIT RECEIVED PRIOR TO PROCEEDING WITH CUTOUT AND INSTALLATION.
Item #
Total Height
(Including
Drains)
Overall Outer Dimensions
(Flange)
Overall Outer Dimensions
(No Flange) Suggested Cutout Size Flange
Overhang
(Per Edge)
Width Depth Width Depth Width Depth
Diagram
Reference AB C D E F G H
423SDI1A
11 1/16"
(281mm)
16 ½"
(419mm)
25 ⅞"
(657mm)
15 ¼"
(387mm)
24 ⅝"
(625mm)
15 ½"
(394mm)
24 ⅞"
(632mm)
⅝"
(16mm)
423SDI2A 29 ⅝"
(752mm)
28 ⅜"
(721mm)
28 ⅝"
(727mm)
423SDI3A 42 13/16"
(1087mm)
41 9/16"
(1056mm)
41 13/16"
(1062mm)
423SDI4A 56 ¼"
(1429mm)
55"
(1397mm)
55 ¼"
(1403mm)
423SDI5A 69 ⅞"
(1775mm)
68 ⅝"
(1743mm)
68 ⅞"
(1749mm)
423SDI6A 83 7
/16"
(2119mm)
82 3/16"
(2088mm)
82 7
/16"
(2094mm)
INSTALLATION INSTRUCTIONS
Before getting started, please refer to the Installation Diagrams on page 6.
NOTE: Consult a qualified plumber for proper trap and drain installation that confirms to local plumbing codes.
1. Cut out countertop as specified.
NOTE: Unit is designed for installation in stainless steel countertops. If installed in stone or wood countertop, additional
clearances between the well and the counter are necessary.
2. Apply putty or butyl tape to the underside perimeter of the well rim outer edge.
3. Apply a ¼” bead of food-grade silicone adjacent to the putty/butyl tape on the well flange.
4. Drop well into the pre-cut opening from the top and push down until the perimeter of the well flange is flush with the
counter service.
5. Allow silicone to set and fully cure before making electric and water connections
6. Connect 1” IPS Ball Valve (not included) to drain line and connect drain line to waste line.
NOTE: Copper drain lines are recommended.

6
TM
USER MANUAL
DROP-IN ICE COOLED WELLS
INSTALLATION DIAGRAMS
(Please refer to the Installation Dimensions chart on page 5 for specific model specs and information.)
Drop-In Cut Out Diagram - Figure 2:
COUNTERTOP
G
F
Top View - Figure 3:
TOP
25 ⅞"
Ø1"
16 ½"
FRONT
11 /₁₆"
16 ½"
12 ⅞"
15 ¼"
1 /"
/"
SIDE
24 ⅝"
22 ¼"
25 ⅞"
10"
11 /"
1 /"
/"
TOP ICED FRONT SIDE
H H
A
C
B
DE
HH
E
B
D
C
Ball Valve
(Not Included)
6” Clearance
Recommended Ball Valve
(Not Included)
FRONT SIDE
H H
A
A
C
B
DE
HH
ICE FILL
Ball Valve (Not Included)
in Closed Position
¾ Fill
½ Fill
TOP REFRIG
E
B
D
C
A
Front View - Figure 4:
TOP
25 ⅞"
Ø1"
16 ½"
FRONT
11 /₁₆"
16 ½"
12 ⅞"
15 ¼"
1 /"
/"
SIDE
24 ⅝"
22 ¼"
25 ⅞"
10"
11 /"
1 /"
/"
TOP ICED FRONT SIDE
H H
A
C
B
D
E
HH
E
B
D
C
Ball Valve
(Not Included)
6” Clearance
Recommended
Ball Valve
(Not Included)
FRONT SIDE
H H
A
A
C
B
DE
HH
ICE FILL
Ball Valve (Not Included)
in Closed Position
¾ Fill
½ Fill
TOP REFRIG
E
B
D
C
A
Side View - Figure 5:
TOP
25 ⅞"
Ø1"
16 ½"
FRONT
11 /₁₆"
16 ½"
12 ⅞"
15 ¼"
1 /"
/"
SIDE
24 ⅝"
22 ¼"
25 ⅞"
10"
11 /"
1 /"
/"
TOP ICED FRONT SIDE
H H
A
C
B
D
E
HH
E
B
D
C
Ball Valve
(Not Included)
6” Clearance
Recommended
Ball Valve
(Not Included)
FRONT SIDE
H H
A
A
C
B
DE
HH
ICE FILL
Ball Valve (Not Included)
in Closed Position
¾ Fill
½ Fill
TOP REFRIG
E
B
D
C
A

7
TM
DROP-IN ICE COOLED WELLS
USER MANUAL
CLEANING INSTRUCTIONS
General Cleaning Information:
• Always clean equipment thoroughly before first use. Clean unit daily. Except where noted on charts: Use warm, soapy
water. Mild cleansers and PLASTIC scouring pads may be used to remove food particles and water scale.
• Cleaning solution or Delimer may be run through the well.
Cleaning Instructions:
1. Remove all food product from well and open covers.
2. Drain unit by opening drain valve.
3. Wipe down entire unit using clean cloth or sponge with mild detergent.
4. Use a PLASTIC scouring pad to remove any hardened food particles or light mineral deposits.
NOTE: DO NOT use steel wool or stainless steel pads for cleaning.
5. Rinse well with vinegar and water solution to neutralize all detergent residue.
6. Close drain valve and refill with proper amount of ice.
This manual suits for next models
5
Table of contents
Other SERVIT Commercial Food Equipment manuals


Popular Commercial Food Equipment manuals by other brands

Electrolux Professional
Electrolux Professional E7FTGDCS00 Service manual

Crathco
Crathco 5311 Operator's manual

Eagle
Eagle DHT Series operating manual

Oliver
Oliver MODEL 619-16 User's operating and instruction manual

Studio 54
Studio 54 DAIQUIRI 60 Instructions for use

Univex
Univex SFG 500 Operator's manual


Prince Castle
Prince Castle DCFT-BKNA Operation manual
 NAM operating instructions")
Daikin
Daikin AHT MONTREAL XL 175 (U) NAM operating instructions

Diamond
Diamond EFTA477 L operating instructions

Follett
Follett KFC Series Operation and maintenance manual

KRATOS
KRATOS 29Y-056 user manual

MKN
MKN FlexiCombi MagicPilot installation instructions